Save to My DOJO
In part 1, I covered the basics of vSphere VM templates and outlined the differences between templates and clones. I also described a standard process on how to create a generic template. Finally, I introduced guest OS customization (GOSC) specifically targeting Linux but stopped short from showing how GOSC can be used to automate virtual machine configuration when deploying from a template.
Today, I’ll start off by creating a Linux VM template and a GOSC. I’ll then deploy a VM based on the Linux template just created using GOSC to automate its configuration.
Preparing the Centos Linux template
I prepared a VM running Centos 7 Linux 64-bit as the guest OS. Before converting this to a template, I ran yum update to update the OS to the latest patch level. I also used yum to install Open VM Tools which is one method used to deploy VMware Tools on Linux VMs.
Unintentionally, I forgot to mention the Guest OS Version setting in part 1 of this series. When creating a VM, make sure that its value matches that of guest OS’ name and version you’re actually installing. As per Fig.1, I’ve set mine to Centos 7 (64-bit) to match the VM’s guest OS being installed. It’s important that there are no mismatches as customization will generally fail if there are.
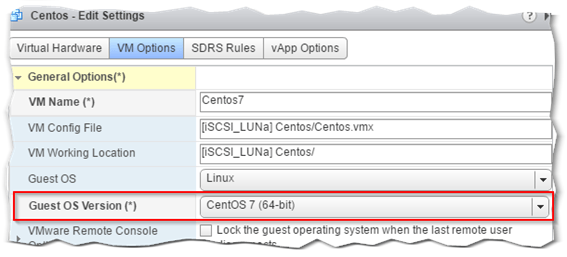
Figure 1 – Setting the correct Guest OS Version for a VM
The next things to do is to change the hostname to something like Centos7-template and remove any references to any IP network settings. The latter is achieved by editing the ifcfg-xxx file for the primary nic. The ifcfg file is generally found under /etc/sysconfig/network-scripts. Both path and filename may vary depending on the Linux flavor. As it were, both of these steps are optional since these settings are overwritten when GOSC settings are applied. I put them in to show that GOSC settings are indeed being applied during provisioning.
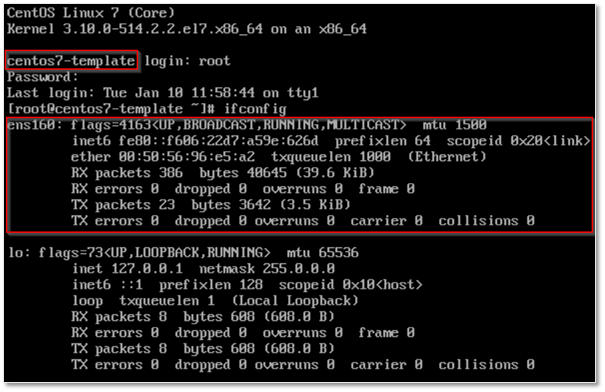
Figure 2 – Displaying the hostname and IP settings in Centos
Here’s another reminder to read through this post as it goes into some detail on how to prepare Linux templates.
Once you’re satisfied with the final configuration, run shutdown immediately followed by Convert to Template using the vSphere Web Client.
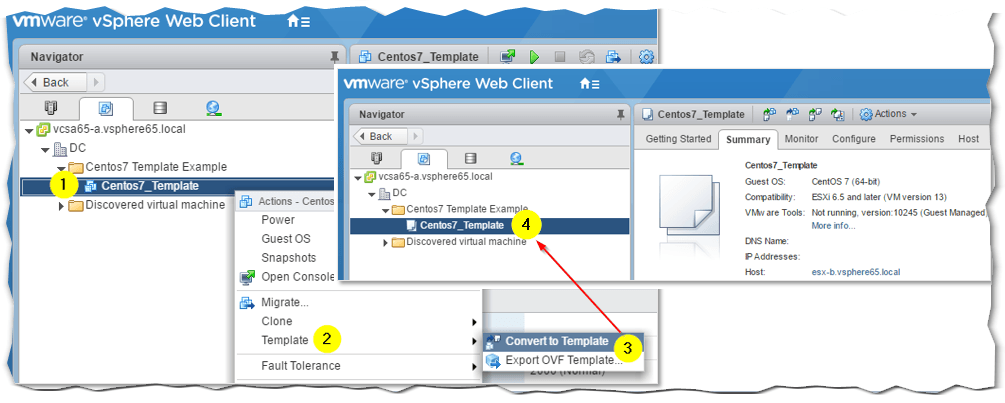
Figure 3 – Converting a VM to a template using the vSphere Web client
Provisioning a Centos VM from template
I’ve already covered how to create a GOSC for Linux in part 1, so I’ll limit myself to pasting screenshots of the settings used in the GOSC. I named the GOSC specification Centos7-Blog-Post, which in hindsight is somewhat of a daft name as it doesn’t really tell you anything! Anyways.
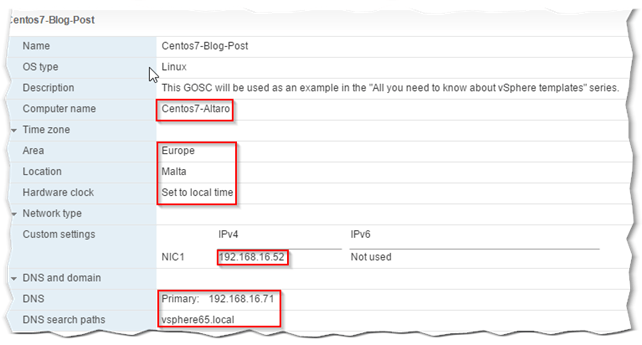
Figure 4 – Displaying the settings defined by the GOSC
To deploy a new Centos VM from template, right-click on Centos7_Template (Fig. 5) and select New VM from This Template.
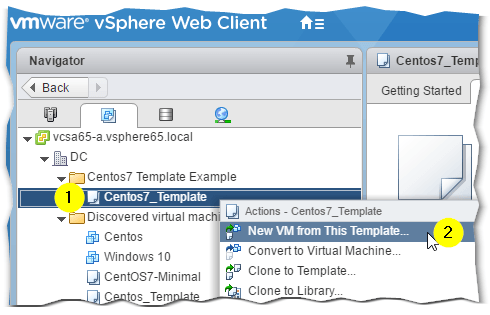
Figure 5 – Deploying a VM from template
This launches the Deploy From Template wizard which takes you through a number of steps:
- Set the VM name and location or folder.
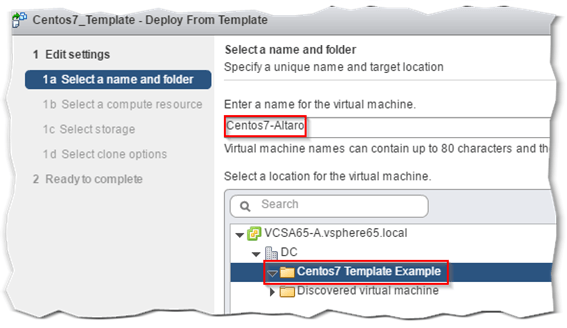
- Select a cluster and/or ESXi host where the VM will reside.
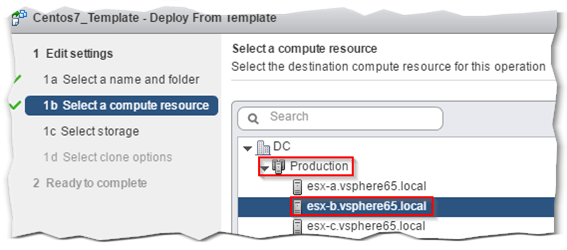
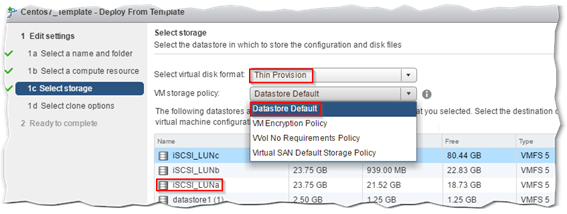
- Choose the VM’s disk format, the VM storage policy and the datastore where the VM is created.
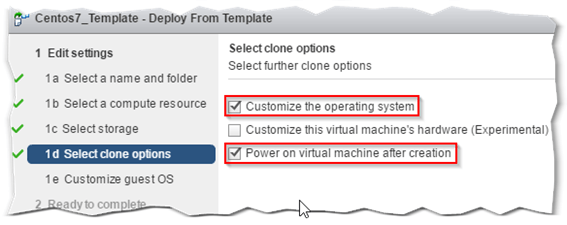
- Ticking on the Customize the operating system option tells the wizard that a GOSC will be used. You must also tick the Power on virtual machine after creation option to fully automate the configuration process.
- Next, select the GOSC that is applied to the VM being provisioned.

- Finally, review the settings and hit Finish to kick off the provisioning process.
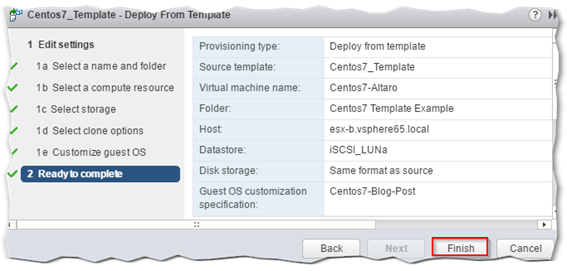
After provisioning completes, the VM will power up and is configured before finally rebooting. The reboot is required so that the GOSC settings applied take root. Under my nested environment, the whole process took roughly 3 minutes from start to finish. Not too shabby!
To verify that the settings have been applied, I logged in the freshly deployed VM and ran some basic commands followed by a ping test to ensure proper network connectivity. This is shown in Fig. 6.
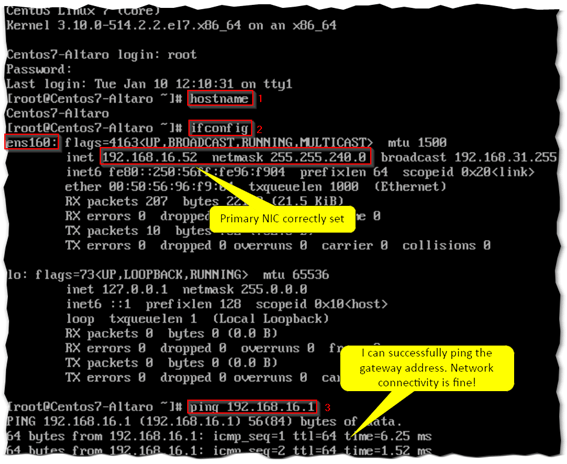
Figure 6 – Verifying if the GOSC settings have been applied
Now, if I wanted to deploy a second, third or any other number of Centos VMs using different hostnames and IP addresses, I would simply go in and edit the existing GOSC from the Customization Specification Manage and repeat the deployment procedure just described. I could also employ PowerCLI to spice up things.
Using PowerCLI to modify an existing GOSC
These are a few PowerCLI commands, related to GOSC, you must know about.
- Get-OSCustomizationSpec – Retrieve the settings defined in a GOSC.
- Set-OSCustomizationSpec – Changes one or more settings defined in the GOSC.
- Get-OSCustomizationNicMapping – Retrieves the network settings defined in a GOSC.
- Set-OSCustomizationNicMapping – Changes parameters set for a network card.
This is all we need to update a GOSC using PowerCLI. In the examples that follow, I’m updating the Centos7-Blog-Post GOSC created earlier for this post (see Fig. 4).
The changes affected include the hostname and IP address to ensure we don’t end up with duplicate addresses and hostnames on the network. Here’s one way of doing it:
Connect-VIServer 192.168.16.50
Get-OSCustomizationSpec Centos7-blog-post | Set-OSCustomizationSpec -NamingPrefix "Centos7-Apache" -NamingScheme fixed

Get-OSCustomizationNicMapping -OSCustomizationSpec Centos7-Blog-Post | Set-OSCustomizationNicMapping -IpMode UseStaticIP -IpAddress 192.168.16.53 -SubnetMask 255.255.240.0 -DefaultGateway 192.168.16.1

To verify that the GOSC has picked up the new settings, you could simply have a look at it in Customization Specification Manager (Fig. 7) or issue the following PowerCLI command:
(Get-OSCustomizationSpec centos7-blog-post).NamingPrefix; (Get-OSCustomizationNicMapping -OSCustomizationSpec centos7-blog-post).IPAddress

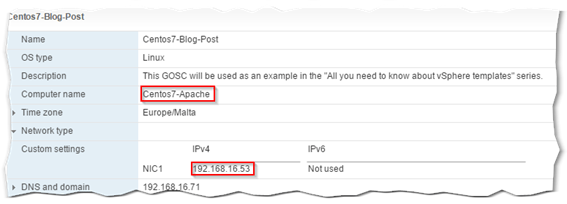
Figure 7 – Displaying the settings defined by a GOSC
Using PowerCLI to deploy a VM from template and GOSC configure it
At this point, we have sufficient PowerCLI knowledge to allow us to deploy a VM from template and configure it with GOSC. The New-VM cmdlet is one more command you need to know about. The cmdlet, as implied by the name, will create a VM from scratch but can also be used to clone or deploy a VM from template. New-VM takes a number of mandatory parameters as seen in the script below. I’ve commented every script line to make it easier to follow.
The (Get-VMHost)[0] line, simply picks the first ESXi from a list of retrieved hosts since I’m not targeting a DRS enabled cluster.
#Set the VM name.
 $VMName="Centos 7 Apache Server"

#The datastore on which the VM is created.
 $DS=Get-Datastore -Name "iSCSI_LUNb"

#The location where the VM will be created. Here I'm targeting a VM folder I created.
 $Location = Get-Folder "Centos7 Template Example"

#Retrieve a list of ESXi hosts and select the first one. No need for this when DRS is enabled.
 $VMHost=(Get-VMHost)[0]

#Specify the VM template to use.
 $CentosTemp = Get-Template -Name Centos7_Template

#Specify which GOSC is applied.
 $CentosSpec = Get-OSCustomizationSpec -name Centos7-Blog-Post

#Create a new VM based on the set template and GOSC.
 New-VM -Name $VMName -Template $CentosTemp -OSCustomizationSpec $CentosSpec -Location $Location -VMHost $VMHost -Datastore $DS

#Power up the VM to have GOSC settings applied.
 Start-VM -VM $VMName
If you do have a DRS enabled cluster, amend as follows:
#Replace "cluster name" with the name of the cluster you're deploying to
 $ResourcePool = Get-cluster -Name "cluster name"

 New-VM -Name $VMName -Template $CentosTemp -OSCustomizationSpec $CentosSpec -Datastore $DS -ResourcePool $ResourcePool -Location $Location
As per Figure 8, the above can be run as individual commands. Alternatively, save the whole lot and execute it as a PowerCLI (.ps1) file. The progress bar at the top of the PowerCLI window shows the New-VM cloning task at work.
The Start-VM cmdlet powers up the VM allowing GOSC customization to complete. As mentioned, the VM will reboot one more time after which it is ready for use. I carried out the same tests as before to verify that all went according to plan.
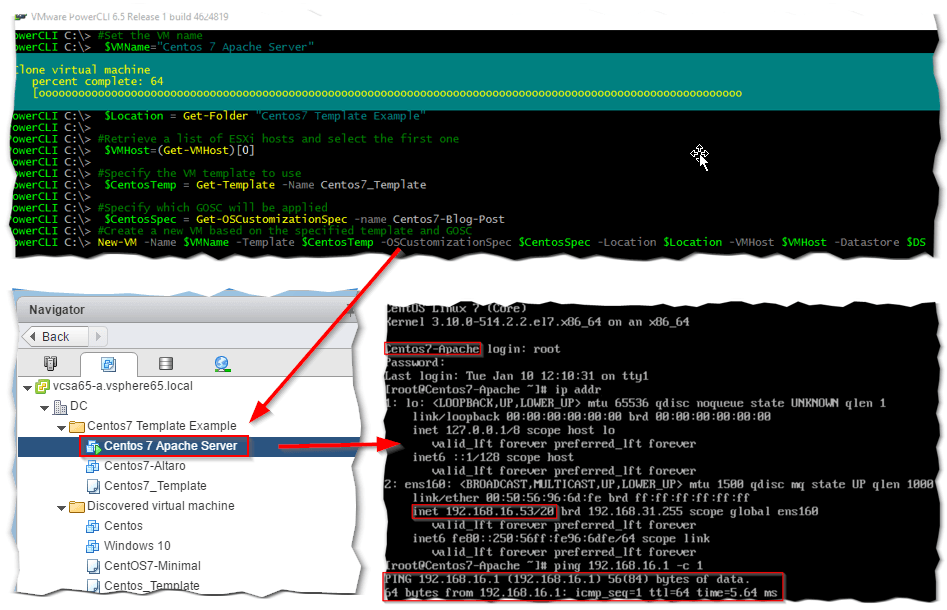
Figure 8 – A collated view of the PowerCLI commands executing, the provisioned VM as listed in Navigator and a quick look at the VM settings applied from console
Conclusion
In today’s post, we’ve seen how to deploy a VM running a Linux guest OS from template and configure it automatically using GOSC. I only touched on Centos but the same applies pretty much to other Linux distributions with some minor difference related to the commands and syntax used, file names and paths and so on.
In the part 3, I’ll tackle Windows templates pretty much in the same vein.
[the_ad id=”4738″][the_ad id=”4796″]


Not a DOJO Member yet?
Join thousands of other IT pros and receive a weekly roundup email with the latest content & updates!


