Save to My DOJO
In part 2 of this series, I tackle the vSphere Distributed Switch (vDS), a vCenter Server component or object that is used to centralize the network configuration of managed ESXi hosts. Unless standard switches are required for a specific reason, a vDS voids the need to create a standard switch on every ESXi host. This boils down to the fact that a vDS’ configuration is pushed to any ESXi host that is hooked up to it. Let’s have a quick look at the architecture first.
The architecture of a vDS
The next diagram, kindly reproduced from the VMware site, shows the vDS’ architecture and how the management plane is kept separate from the data plane as opposed to what happens on a standard switch. This partitioning scheme makes it possible to roll out one distributed switch across a number of hosts as opposed to creating a standard switch on every host. The management plane, in case of vDS, resides on the vCenter Server while the data plane, also referred to as a host proxy switch, is local to the ESXi host. This is the primary reason why vCenter Server needs to be installed if distributed switching is in your bucket list.
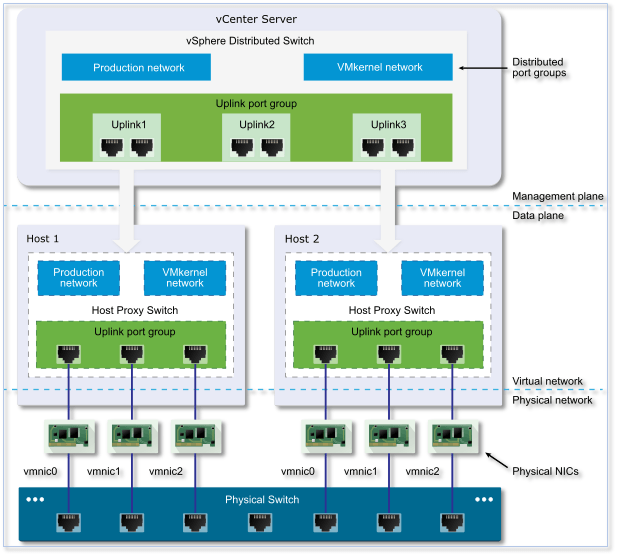
Figure 1 – vDS Architecture
The vDS also introduces a couple of new abstractions namely the Uplink Port Group and the Distributed Port Group. Below is an explanation for each, taken from here;
Uplink port group: An uplink port group or dvuplink port group is defined during the creation of the distributed switch and can have one or more uplinks. An uplink is a template that you use to configure physical connections of hosts as well as failover and load balancing policies. You map physical NICs of hosts to uplinks on the distributed switch. At the host level, each physical NIC is connected to an uplink port with a particular ID. You set failover and load balancing policies over uplinks and the policies are automatically propagated to the host proxy switches, or the data plane. In this way you can apply consistent failover and load balancing configuration for the physical NICs of all hosts that are associated with the distributed switch.
Distributed port group: Distributed port groups provide network connectivity to virtual machines and accommodate VMkernel traffic. You identify each distributed port group by using a network label, which must be unique to the current data center. You configure NIC teaming, failover, load balancing, VLAN, security, traffic shaping, and other policies on distributed port groups. The virtual ports that are connected to a distributed port group share the same properties that are configured to the distributed port group. As with uplink port groups, the configuration that you set on distributed port groups on vCenter Server (the management plane) is automatically propagated to all hosts on the distributed switch through their host proxy switches (the data plane). In this way you can configure a group of virtual machines to share the same networking configuration by associating the virtual machines to the same distributed port group.
Creating a vDS
For the remaining how-tos in this post, I’ll be using the vSphere Web Client. The vSphere setup I am using here consists of a virtualized vCenter Server 6.0 U1 managing two nested (virtualized) ESXi 6.0U1a hosts.
To create a new distributed switch, follow these steps;
Once you’ve logged in vCenter Server using the vSphere Web client, select Networking from Navigator. With the Datacenter name highlighted, in this case DC, right-click on it selecting New Distributed Switch from the Distributed Switch sub-menu (Figure 2).

Figure 2 – Creating a new vDS
Proceed by completing the information asked for by the wizard, in this order;
- Specify a name for the switch
- Select the switch version. Distributed switches created in earlier versions can be upgraded to the latest to leverage new features.
- Edit the settings of the vDS
- Specify the number of uplink ports (see Part 1)
- Enable Network I/O control, if supported, to monitor I/O load and assign free resources accordingly
- Optionally, create a corresponding distributed port group and set a name for it
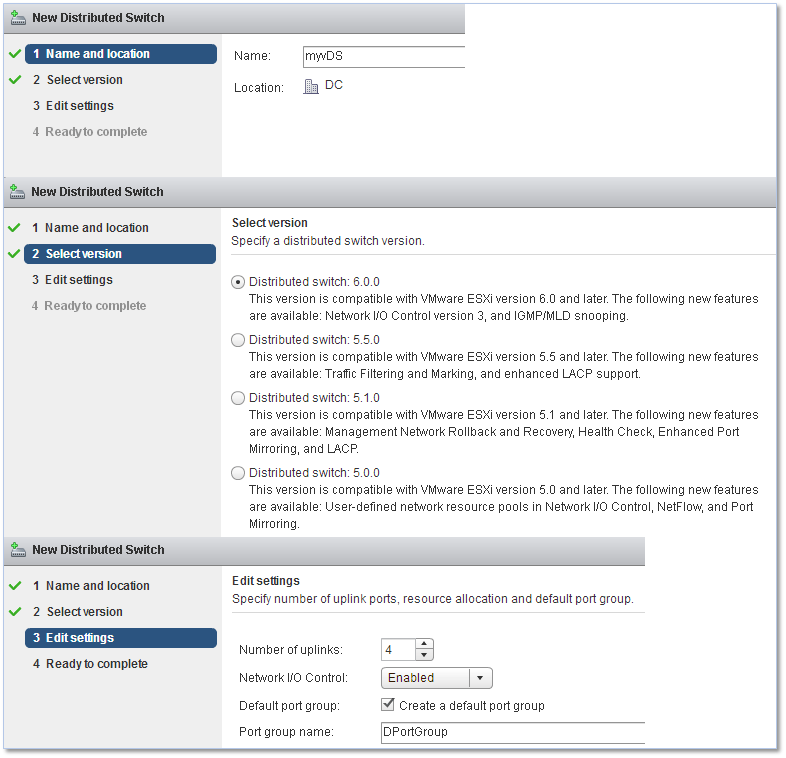
Figure 3 – Completing the configuration of a vDS
Similar to what I covered in the first article of this series, you can use PowerCLI to create a distributed switch on vCenter using the following example. Note that the location parameter is mandatory. I’m already connected to the vCenter Server on which I want the switch created via the Connect-VIServer cmdlet.
New-VDSwitch -location (get-Datacenter -Name DC) -Name myVDS -
-NumUplinkPorts 2

Figure 4 – Creating a vDS using PowerCLI
So far we have simply created an empty switch. The next step is to add hosts to it.
Adding hosts to a vDS
Having created the distributed switch, we can now add the ESXi hosts we’d like connected to it. Before proceeding, however, make sure that;
- There are enough uplinks available on the distributed switch to assign to the physical NICs you want to be connected to the switch.
- There is at least one distributed port group on the distributed switch.
- The distributed port group has active uplinks configured in its teaming and failover policy.
To add hosts to the vDS, simply right-click on the name of the vDS just created and select Add and Manage Hosts.
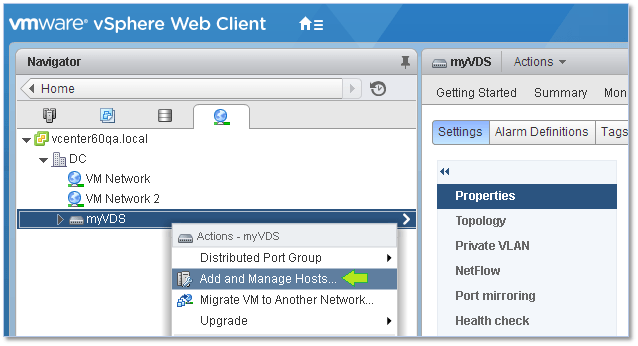
Figure 5 – Adding hosts to a vDS
The first screen of the wizard presents a number of options but this being the first time we’re adding hosts to the vDS, the only options that really interest us are Add hosts and Add host and Manage host networking. I’m going by the first.
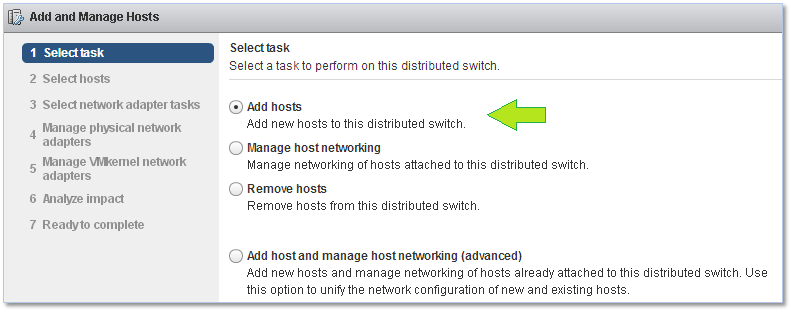
Figure 6 – Selecting a task from the “Add and Manage hosts” wizard
Click on New hosts and, on the secondary window, tick the check-box next to whichever host you want to be connected to the vDS. Click Next when done.
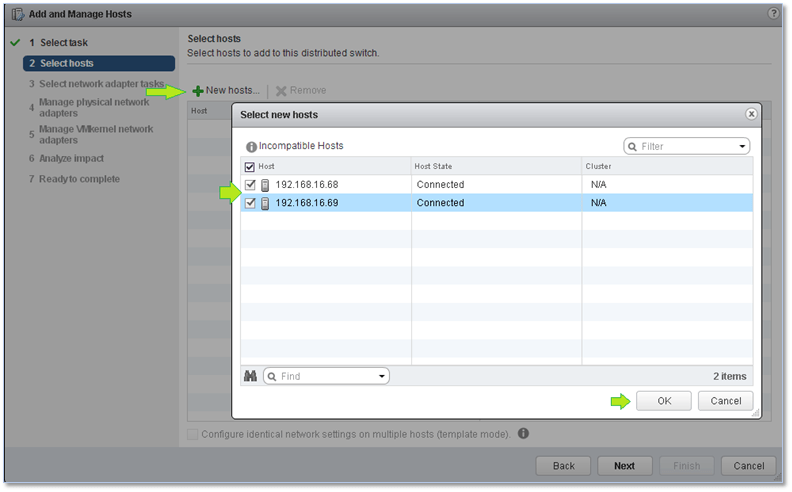
Figure 7 – Selecting the hosts to connect to the vDS
Yet again, you are presented with a number of options. In the figure below, I’ve chosen to add uplinks to the switch as well as migrate any VMkernels, set up on the hosts (set up on standard switches), to the vDS by selecting the first two options.
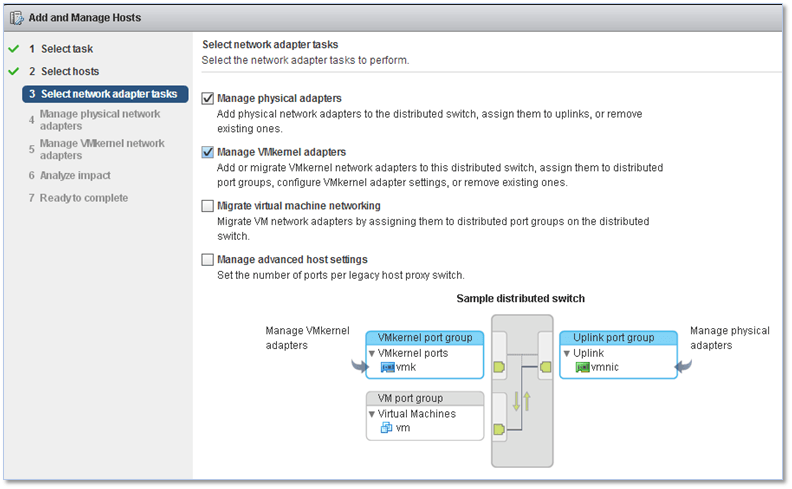
Figure 8 – Selecting the network adapter tasks to carry out when creating a vDS
The next screen gives you a summary of what’s available on the host in terms of physical NICs. A warning pops up if any of the NICs are found to be already bound.
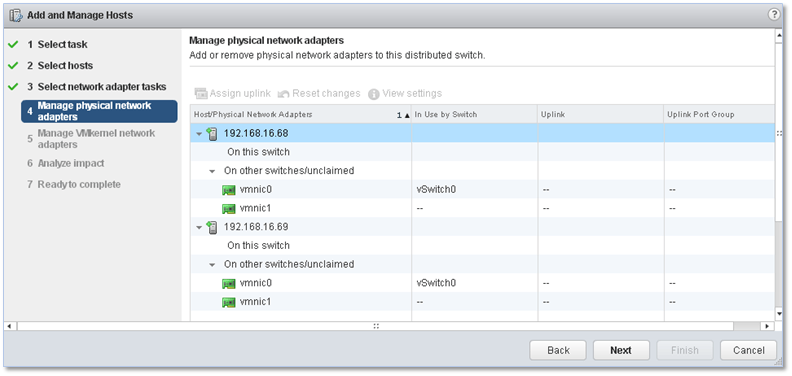
Figure 9 – Selecting the physical NICs to bind to the vDS
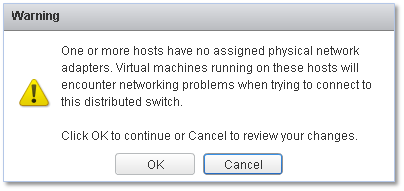
Figure 10 – Warning about one or more hosts not having any uplinks
The next step helps you to migrate any existing VMkernels to the vDS’ port group. To do so, highlight the VMkernel you wish to migrate and click on Assign port group. Select the required port group from the secondary window.
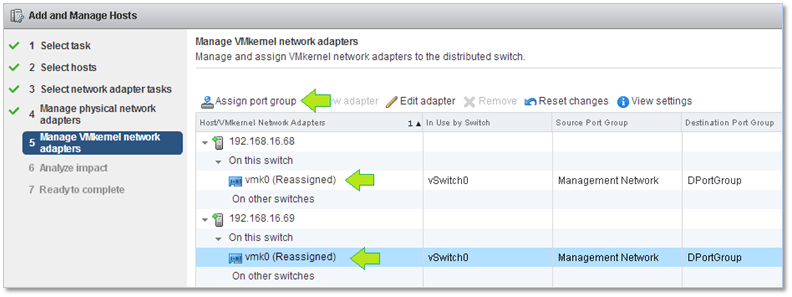
Figure 11 – Migrating VMkernels to the vDS
Next, an impact analysis is carried out where checks are made to ensure that running services are not impacted by the network changes being done.
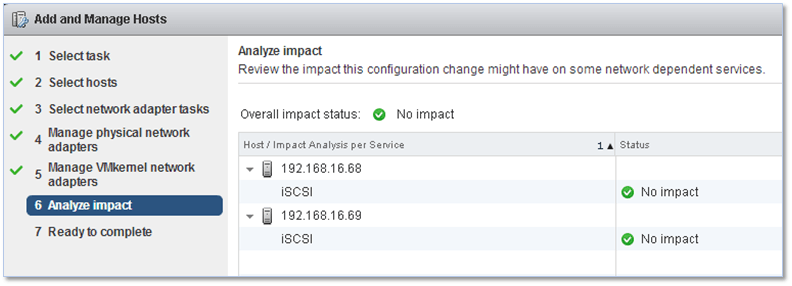
Figure 12 – Impact analysis when creating a vDS
Click Finish to finalize the Add and Manage Hosts process.
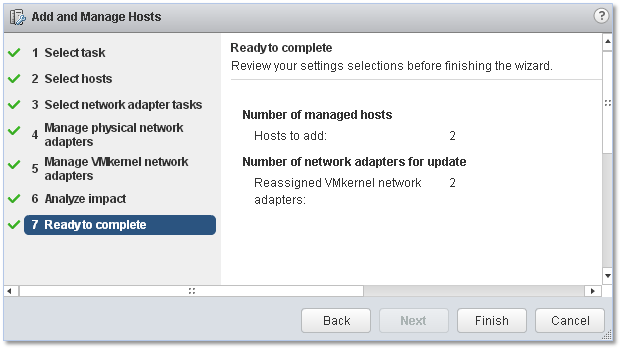
Figure 13 – Finalizing the vDS creation process
In order to verify that all the VMkernels marked for migration have been correctly moved, select the vDS’ port group from Navigator and switch to the Manage tab. On the Ports screen, you should be able to see the migrated VMkernels each assigned to a respective port on the vDS. The link-state for each should also be up.

Figure 14 – Ensuring that the VMkernels are port connected and running
Likewise, you should make sure that all hosts report as active on the vDS. To do so, select the distributed port group object from Navigator and verify that the uplinks are up.

Figure 15 – Making sure all uplinks are active
Migrating virtual machines to the vDS
Once you’ve switched over – excuse the pun – to using distributed switches instead of standard ones, you’ll find that any virtual machines set to use port groups created on a standard switch will be left in a networking limbo unless you happened to select Migrate virtual machine networking during the vDS’ host assignment process as shown in Figure 16.

Figure 16 – Enabling the “Migrate virtual machine networking” option when creating a vDS
Alternatively, this can easily be rectified by changing the port group assignment from the VM’s properties. However, if there are a significant number of VMs to migrate, the migration wizard is definitely the way forward. To initiate the migration process, right-click on the vDS’ name under Navigator and select Migrate VM to Another Network.
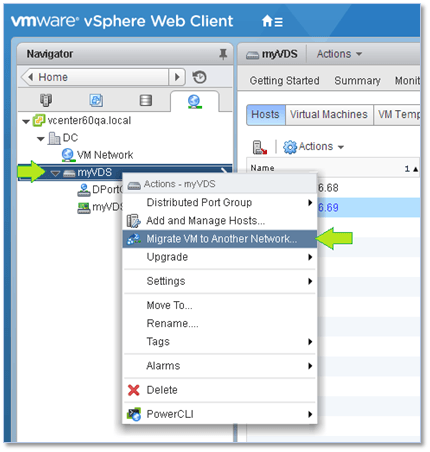
Figure 17 – Running the “Migrate VM to another network” wizard to move VMs to the vDS
At the first screen, select the source and destination port group. As the Source network, I’ve chosen a port group called VM Network previously set up on every standard switch created. DPortGroup is the destination network on the vDS to which the VM will be migrated.
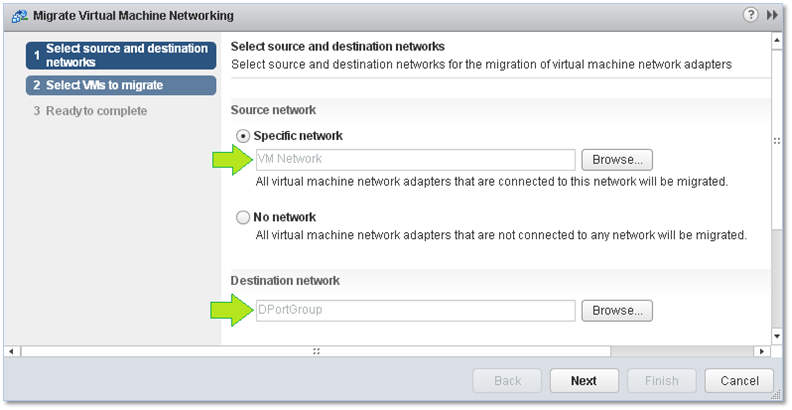
Figure 18 – Setting the source and destination networks when migrating VMs
On the next screen, select the VMs you want to be migrated to the new port group. Tick the box next to whichever VM’s networking you want to be migrated or simply tick the box next to All virtual machines to move the whole lot. Click Next and Finish (the last screen not shown) to finalize the migration process.

Figure 19- Selecting the VMs to migrate
Alternatively, and as mentioned, any VM can be reassigned to any port group by changing the same from the network settings.
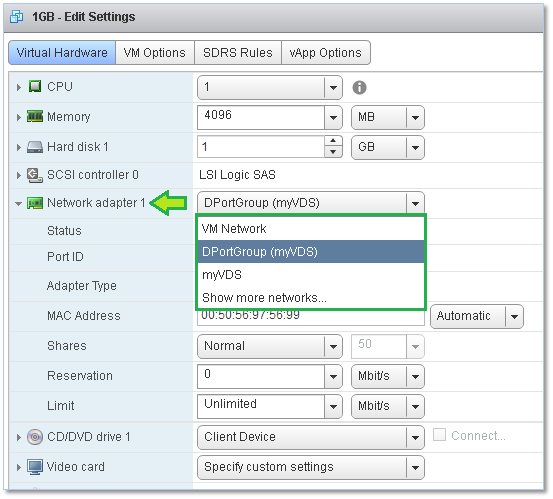
Figure 20 – Changing the port group assignment from the properties of a VM
vDS Settings
There are a number of settings extra to those found on standard switches. Similarly, you’ll find a bunch of configuration settings applicable to the switch itself as well as the distributed port and uplink groups created.
The switch settings are accessible by clicking on the Edit button shown in Figure 21. In addition, you can configure advanced features such as port mirroring, allowing you to mirror traffic from one port to another for analytical and diagnostic purposes and private VLANs which are used to overcome the limitations of VLAN IDs by further segmenting broadcast domains into smaller sub-domains. You can also enable and configure Cisco’s NetFlow protocol to monitor IP traffic and aggregate links for greater bandwidth using LACP.
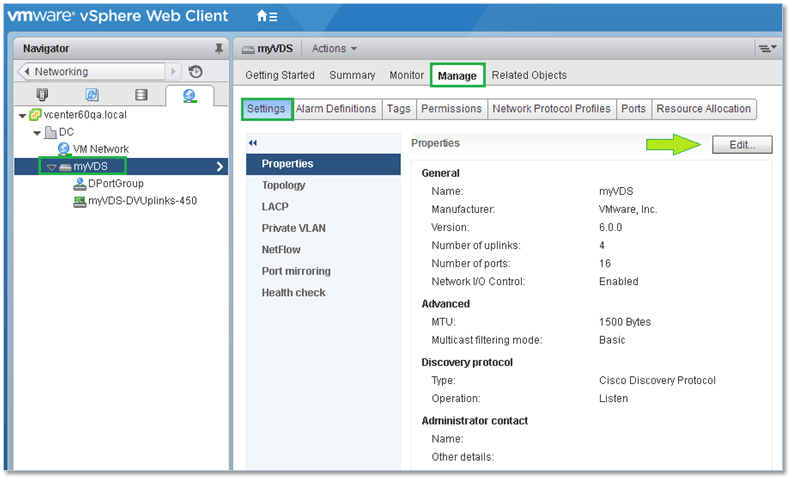
Figure 21 – Accessing the distributed switch properties
Similarly, the distributed port and uplink group settings are accessible by clicking on the Edit button shown in Figures 22 and 23.
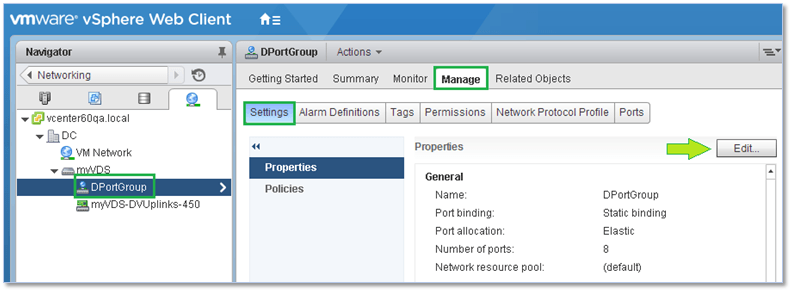
Figure 22 – Accessing the distributed port group properties
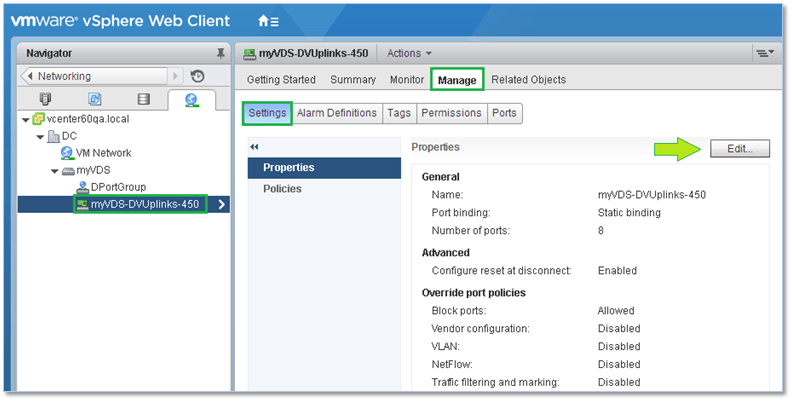
Figure 23 – Accessing the distributed uplink group properties
Something important you should keep in mind is that you still have to set up and configure VMkernel adapters on a per-host basis similar to what you have been doing with standard switches.
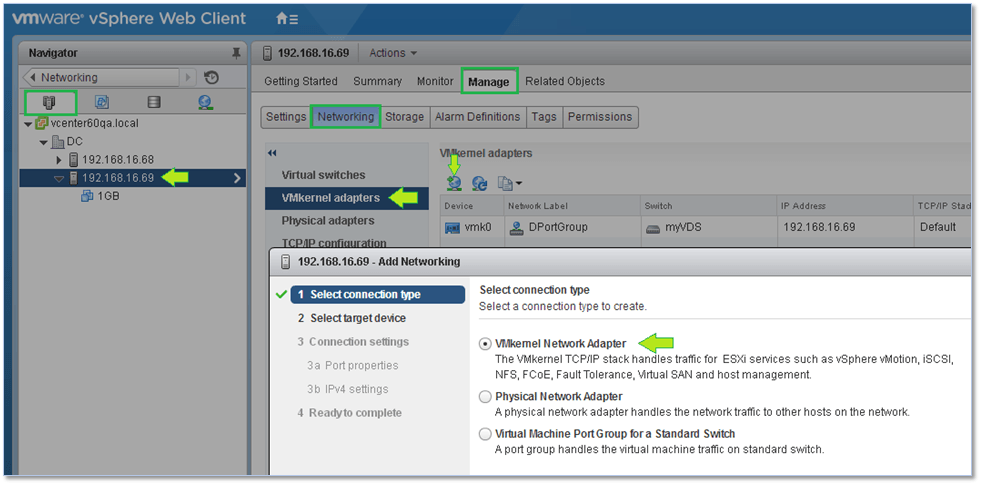
Figure 24 – Setting up a VMkernel on an ESXi host
There are more options you will need to explore many of which are documented in great detail on the VMware documentation site. I cannot possibly go into each and every option as I would end up replicating what’s already available out there making this post a never-ending one.
TCP/IP Stacks
One last feature I’d like to talk about is TCP/IP stacks, in particular how they can be used to segregate the network traffic associated with a particular service ultimately improving performance and security.
By default, vSphere provides three TCP/IP stacks with these being the default, vMotion and provisioning stacks which can all be configured from the TCP/IP configuration screen of an ESXi host as shown below.

Figure 25 – Managing TCP/IP stacks on an ESXi host
Each stack can have its own default gateway and DNS configuration meaning any service bound to a particular stack will effectively be running on its own network if configured as such. In addition, you can also choose the type of congestion control algorithm and the maximum number of allowed connections.
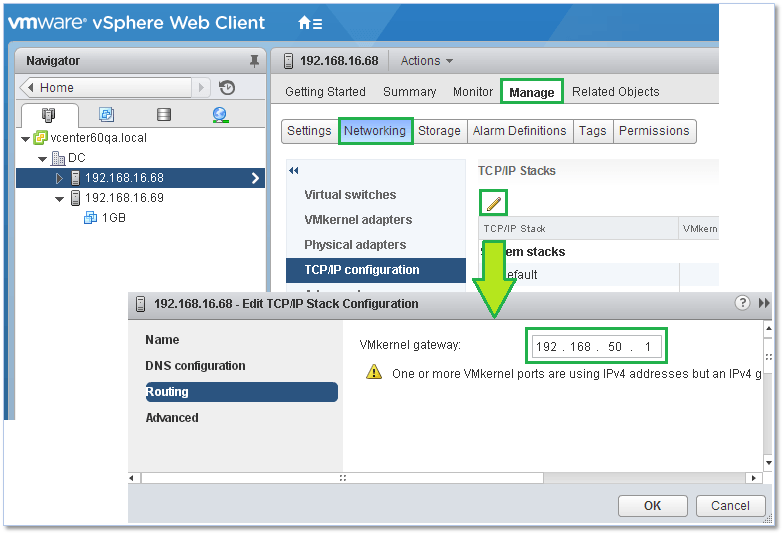
Figure 26 – Configuring the default gateway on a TCP/IP stack
Stack Types
Default – This stack is generally used for management traffic, vMotion, storage protocols such as iSCSI and NFS, vSAN, HA, etc.
vMotion – This stack is used when wanting to isolate vMotion traffic. To achieve this, create a VMkernel on every host configured for vMotion and set the kernel to use the configured vMotion stack. The steps are as follows;
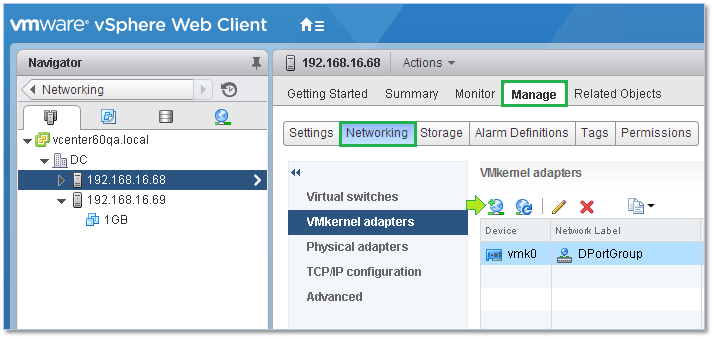
Figure 27 – Creating a VMkernel on an ESXi host
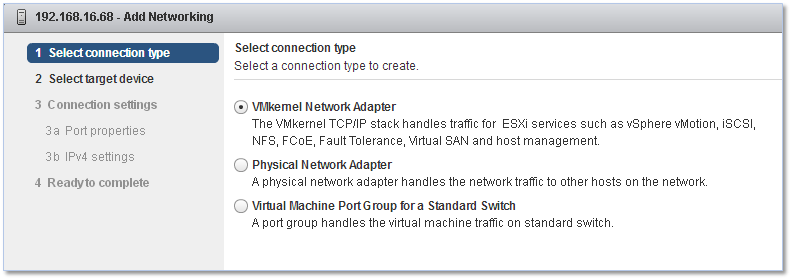
Figure 28 – Choosing the “VMkernel Network Adpater” option when creating a VMkernel
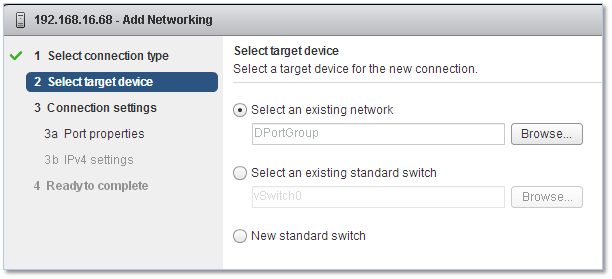
Figure 29 – Selecting the target network
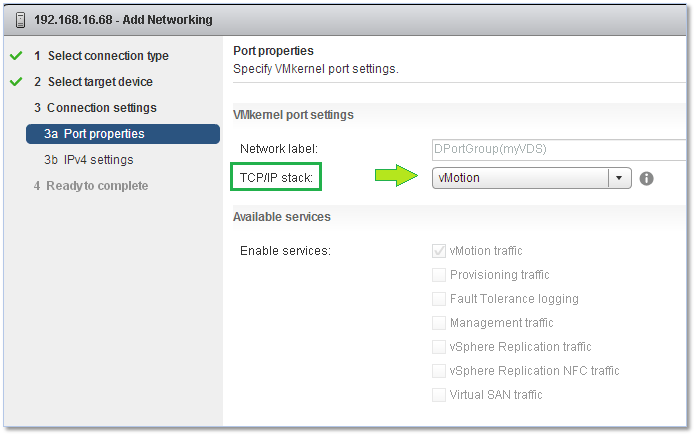
Figure 30 – Choosing the appropriate TCP/IP stack
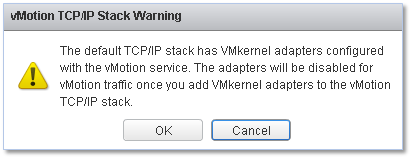
Figure 31 – vMotion stack warning
Provisioning – This stack is generally used to isolate traffic related to cold migrations, cloning and snapshots.
If required, you can use ESXCLI to create custom stacks. The command is as follows;
esxcli network ip netstack add -N="stack_name"
Conclusion
In this series, we learned the differences between standard and distributed switching together with a brief explanation on port groups, VMkernels, VLANs and a few other topics. The information presented is by no means exhaustive but it should suffice to get you started with the networking side of vSphere. As always, the best way to learn is to experiment and try things out for yourself.


Not a DOJO Member yet?
Join thousands of other IT pros and receive a weekly roundup email with the latest content & updates!


19 thoughts on "vSphere Networking Basics – Part 2"
Best document on networking I have ever seen….thanks
Hi Alex,
Thanks for the comment. Highly appreciated.
Regards
Jason
Hi Jason excellent document! Today I become insane configuring vmotion tcp stack using distributed switch wizard in my lab meaning that only default stack was available and vmotion stack was greyed out. After a Google search I found this post and I read:
vMotion – This stack is used when wanting to isolate vMotion traffic. To achieve this, create a VMkernel on every host configured for vMotion and set the kernel to use the configured vMotion stack
So… I realized that I must manually create the vmkernel on each host and configure vmotion stack while I thought it was possible using vds wizard template mode.
The question is:
Why this kind of limitation? Is there any technical reason or is it just a limitation within the wizard and vmware could fix that? It would be so useful…
Best
Marco
Italy
Hi Marco,
Thank you for your comment first of all.
Vmkernels must be created manually or via api
on eachonly on the template ESXi host. Once the template host is configured, the network configuration is copied over to every other host added to the vDS when using template mode. That said, I have to try this out as the online documentation is a bit sparse on the subject. In fact you just gave me an idea for a new post! Thanks.Hope this helps
Jason
PS: I don’t work for VMware – I wish – so I don’t know if the issue will be addressed in future releases of vSphere.
EDIT: I just finished trying this out (and writing about it). Vmkernels created on the template host will be AUTOMATICALLY created on the target host if they do not exist. So, no, you do not have to manually create vmkernels on all hosts but only on the template host. The stack type however IS NOT carried forward. I tried this on vSphere 6.5 U1.
I replied past week but for some strange reason you didn’t receive it (maybe my browser…)
Anyway…thanks again for the confirmation that stack is not created, very useful information.
I have another question always related to DVS. I created a nested lab based on Vsphere 6.5U1 with:
-VCSA
-external PSC
-4 hosts with DVS
Everything is working perfectly, I tested vmotion, DRS etc.. but I did notice a strange thing:
when you edit the vm network settings (or you create a new vm and define network within the wizard), both Distributed switches and PortGroup are shown.
Because a picture is worth a thousand word, please have a look to the following pictures:
vm_network.jpg – https://imgur.com/a/JaZeW
what_happen_if_DVS_selected.jpg – https://imgur.com/a/M7Hg0
DVS_config.jpg – https://imgur.com/a/oOP4o
If you select the portgroup it does work properly instead if you select the DVS, the PORT ID is highlighted in red and display the following message:
please enter a free valid port id
I tried to recreate from scratch all DVS but the behavior is always the same and I already asked to other collegues (maybe more expert than me) but none of them have been able to give an explanation apart that, because in production never happened, it could be related to the virtual nested lab.
What do you think? Did you have ever seen somethink like that in you lab?
Hi Marco,
So I tested this out quickly and what’s happening is that you’re selecting the vDS itself rather than the actual distributed port group. This happens to me as well and here’s a pic showing it as reproduced just now.
I’m not entirely sure why this happens. Perhaps it’s just a UI bug. If I come across an answer I’ll let you know but this is normal behavior even on production environments.
Hope this helps.
Jason
Oh…so this doesn’t happen just to me!
Thanks Jason, I just thought I did something wrong and I was going crazy trying to understand this strange behavior but now that I have a confirmation by an expert like you, I’m relieved.
Anyway I just installed two different vsphere environment based on 6.5U1 and I hadn’t this problem thus I’m quite sure you are right about the GUI bug even the strange thing is that it hapens only within nested lab.
Jason I really appreciated your help and, apart your expertise, what is really impressive is the clearness of this article. Again, my best compliment, this is really the best post I have ever seen about that topic, I’ll suggest to other people.
I can’t wait to see other posts by you, I just added you in my top blog list
Hi Marco,
Nope, I came across this issue in the past and even with 6.5 U1.
Thank you for the kind comments and despite the vExpert status I have to admit that I’m always learning something new and re-learning things I thought I knew or forgot 🙂 There are over 105 posts to choose from on our blog atm, so take your pick and let me know if you find anything useful.
Best regards
Jason
Jason
just another clarification: do you see this issue in a real environment or in a nested lab?
The pic I included before was from my nested environment. At the moment we do not have distributed switches – no enterprise licenses – set up on our prod env so I cannot test it out. However, I’m 99% sure that I came across this behavior on physical setups running vSphere 5.5 and 6.0 at my old workplace. I don’t think it’s nested related so it would be interesting to test this on a prod / physical setup.
What I can say is that I just installed a real environment with 6.5U1 enterprise and I didn’t have this problem; this is the reason for whitch I thought something related to the nested. Anyway….very interesting, if I’ll find something I’ll let you know and please do the same
Interesting. Will do.
Thanks