Save to My DOJO
Software-defined networking is revolutionizing the world of networking as we know it. It is doing for the networking world what server virtualization has accomplished for the datacenter. Software-defined networking is allowing organizations to overcome and even eliminate obstacles in the networking arena for the enterprise. It has also opened up a whole new world of possibilities.
VMware’s NSX is arguably one of the most popular software-defined networking (SDN) solutions in use today. VMware NSX-V uses an overlay encapsulation protocol called Virtual Extensible LAN (VXLAN) to create the overlay network used to create the virtual networks. What is VXLAN? Why is it required? What role does it play in virtual networking? What is the difference between VXLAN and traditional VLANs? How are VXLANs configured using VMware NSX-V?
Importance of network virtualization
Organizations are increasingly adopting cloud technologies and infrastructure. It includes increasingly virtualized constructs as part of this move toward cloud environments. New, very complex modern applications may require connectivity to components located in many different geographic regions. Network virtualization is allowing multiple virtual servers to connect to the same logical network despite different locations.
Network virtualization has made possible more robust east-west data center traffic than the more traditional north-south traffic flow between client-server architectures. Also, businesses today are moving at a rapid pace. One of the appealing facets of the cloud is the agility provided to provision infrastructure, including networks. Traditional network infrastructure has long been a roadblock to efficient and quick infrastructure provisioning. Making changes to typical physical network environments could take weeks with the various change control and technical configuration involved.
What is VXLAN?
VXLAN is an encapsulation protocol initially documented by the IETF in RFC 7348. It allows software solutions to tunnel Layer 2 communication over Layer 3 networks as described in the process above. VXLAN allows encapsulating Layer 2 network frames within UDP datagrams and transmitting them across Layer 3 boundaries. So, simply put, it encapsulates Layer 2 frames inside Layer 3 packets. Compared to the relatively limited number of Layer 2 VLANs possible, VXLAN offers the ability to create up to 16 million logical networks providing Layer 2 adjacency across Layer 3 IP networks. This increased scalability is made possible by a 24-bit header attached to the frame. This specialized header is known as the Virtual Network Identifier (VNI).
The increased scalability is an excellent feature for service providers and others who may have many different tenants. The 16 million VNIs means a unique ID can be assigned to potentially millions of customers, and this ID can remain unique across the entire network. Like a VLAN ID, the VNI establishes a boundary that allows isolation from one tenant to another. Since the VXLAN protocol is based on the IETF standard, it is an open standard not reliant on any particular vendor solution. The VXLAN encapsulation protocol is what provides the underlying technology upon which solutions can construct network virtualization solutions.
Another point to consider with VXLAN is that it is not merely a technology that can only be taken advantage of by virtualized solutions. VXLAN is an encapsulation protocol that can also be used by hardware devices that have the feature built-in. An example of a VXLAN-aware device is the Cisco Nexus 9000-EX platform.
VXLAN VTEPs
There is another unique construct of VXLAN that is important to understand. The VXLAN Tunnel Endpoint (VTEP) is responsible for encapsulating and decapsulating the Layer 2 frame traffic. The VTEP can be a virtualized solution like VMware NSX-V or a hardware gateway. Creating the VXLAN VTEPs is part of configuring a VXLAN implementation. We will see how this is configured in VMware NSX-V.
Overlay vs. Underlay
The VXLAN encapsulation protocol encapsulation of Layer 2 frames inside of Layer 3 packets creates what is known as an overlay. In contrast, the physical IP network that transmits the packets constitutes the underlay. The network overlay creates a layer of abstraction that allows the virtualized network to overlay “on top of” the physical network.
The network overlay is created when a packet or frame is encapsulated at its source and transmitted to the destination edge device. The encapsulation adds an outer header that allows the intermediary network devices to transmit the packet and forward it based on the outer header. They remain unaware of the original packet payload with the Layer 2 frame underneath. Once the packet arrives at the destination, the packet is decapsulated, and the receiving device strips off the outer header. The encapsulation process described is handled with an encapsulation protocol such as VXLAN.
This overlay created through the encapsulation protocol allows Layer 2 boundaries to stretch across the Layer 3 network underlay. In traditional networking constructs within a physical network with physical devices outside of network virtualization, Layer 2 segments are not “routed” or carried across Layer 3 boundaries. Certain technologies in the physical world, such as EoMPLS, VPLS, and OTV, allow stretching Layer 2 segments across routed boundaries. However, their implementation and flexibility aren’t nearly as seamless as using VXLAN.
One of the tremendous advantages of the overlay and underlay network design is it decouples the network configuration of the overlay and underly from one another. You can make changes in the overlay network without affecting the underlay and vice versa. However, it is essential to note that the underlay network’s stability and reachability affect the overlay networks created on top of them.
- Underlay – The underlay network includes the physical Layer 3 IP network used to transmit packets. The physical IP network includes all the physical hardware, cabling, and routing protocols used to transmit and receive these packets. OSPF, IS-IS, and BGP are examples of standard routing protocols for this purpose.
- Overlay – The overlay network is formed “on top of” the underlay physical network architecture. Configuration of the overlay network is decoupled from the configuration of the underlay network. Multiple virtual networks can overlay on top of a single physical network. Standard routing protocols are used to transmit VXLAN encapsulated packets.
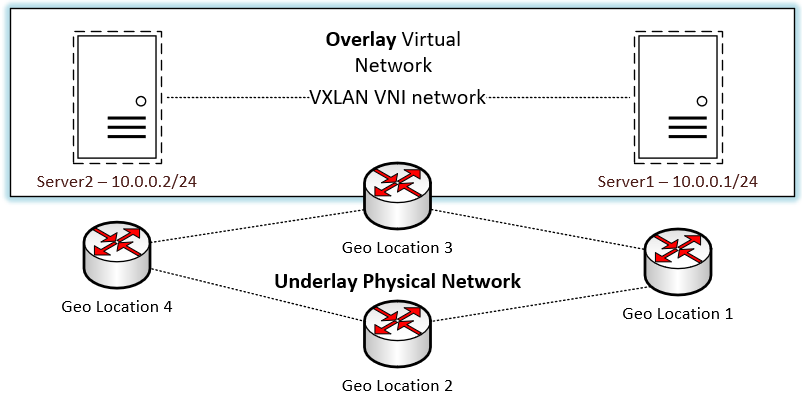
Logical Overview of the VXLAN overlay network
VXLAN vs. VLAN
Those familiar with traditional networking constructs like VLANs will note similarities between the functionality of VXLAN and VLANs. VLANs provide a Layer 2 boundary in conventional networking that provides the “home” for a particular IP subnet. However, when comparing VLAN and VXLAN, the capabilities of VXLAN exceed those found in traditional VLANs in several areas. Let’s look at a quick comparison:
- VLANs allow some 4000+ different network segments
- VXLANs allows 16 million different network segments
- VLAN IDs are 12-bits in length, while VXLAN is 24-bit
- VLANs require trunking, whereas VXLAN does not
- VXLAN does not require spanning tree
- VLANs require physical network configuration
- VXLAN does not require physical network configuration to segment traffic
VMware NSX-V VXLAN Implementation
VMware NSX-V uses VXLAN for the network overlay encapsulation technology. It allows creating isolated multi-tenant broadcast domains and enables customers to have the ability to create logical networks that span between physical networks and underlying network locations. VMware NSX-V networking makes use of VXLAN to create logical networks and abstract networking resources.
It does this in much the same way as compute resources are virtualized and combined in virtual pools of resources consumed in the vSphere environment. VMware NSX-V allows doing this using VXLAN across clusters, pods, and even geographically separated data centers. As described above, VXLAN creates Layer 2 logical networks encapsulated in standard Layer 3 IP packets. A unique identifier called the Segment ID exists in each frame that designates VXLAN logical networks. It is different than VLAN tags, and we will see a bit later. The segment IDs allow creating isolated Layer 2 VXLAN networks that can coexist on the same Layer 3 network.
You may wonder where the encapsulation happens in VMware vSphere with NSX-V. The encapsulation is carried out between the virtual NIC of the guest workload VM and the logical port on the vSphere virtual switch. This encapsulation process benefits the VXLAN encapsulation by being transparent to the guest VM and underlying Layer 3 network infrastructure. How does a receiving server or device outside of the VXLAN construct communicate with nodes found on the VXLAN segment? It is made possible by the NSX Edge services gateway appliance. It translates VXLAN segment IDs to the VLAN IDs needed to communicate between the VMs on the VXLAN and these physical devices. What infrastructure is required to create the VXLAN VMware configuration?
NSX-V Manager
VMware NSX-V is the NSX Data Center solution for vSphere environments. The NSX Manager is a special-purpose service VM (SVM) that provides the GUI and REST APIs needed to create, configuring, and monitor NSX components. These components include the NSX Controllers, logical switches, and edge services gateways. Also, it provides the centralized network management component of NSX Data for vSphere. VMware packages the VMware NSX Manager appliance for NSX-V as an OVA appliance deployed into a VMware vSphere environment. It is the first component of the NSX-V infrastructure provisioned to begin configuring NSX-V.
Installing VMware VXLAN using NSX-V Manager
Let’s take a look at installing VMware VXLAN using the NSX-V Manager appliance in VMware vSphere. Deploying the VMware NSX-V Manager appliance is the first step to deploy VXLAN in your vSphere environment. After deploying the NSX-V Manager, you will integrate it with vCenter Server, which makes installing the special VMware NSX-V VIBs possible in your vSphere clusters. Once the VMware NSX-V Manager appliance is integrated with vCenter Server, you can configure VXLAN and the other logical constructs that make up your vSphere virtualized network.
After you download the VMware NSX-V Manager OVA appliance file, you deploy this using the standard means in the vSphere Client. Choose the OVA file on the Deploy OVF Template wizard.
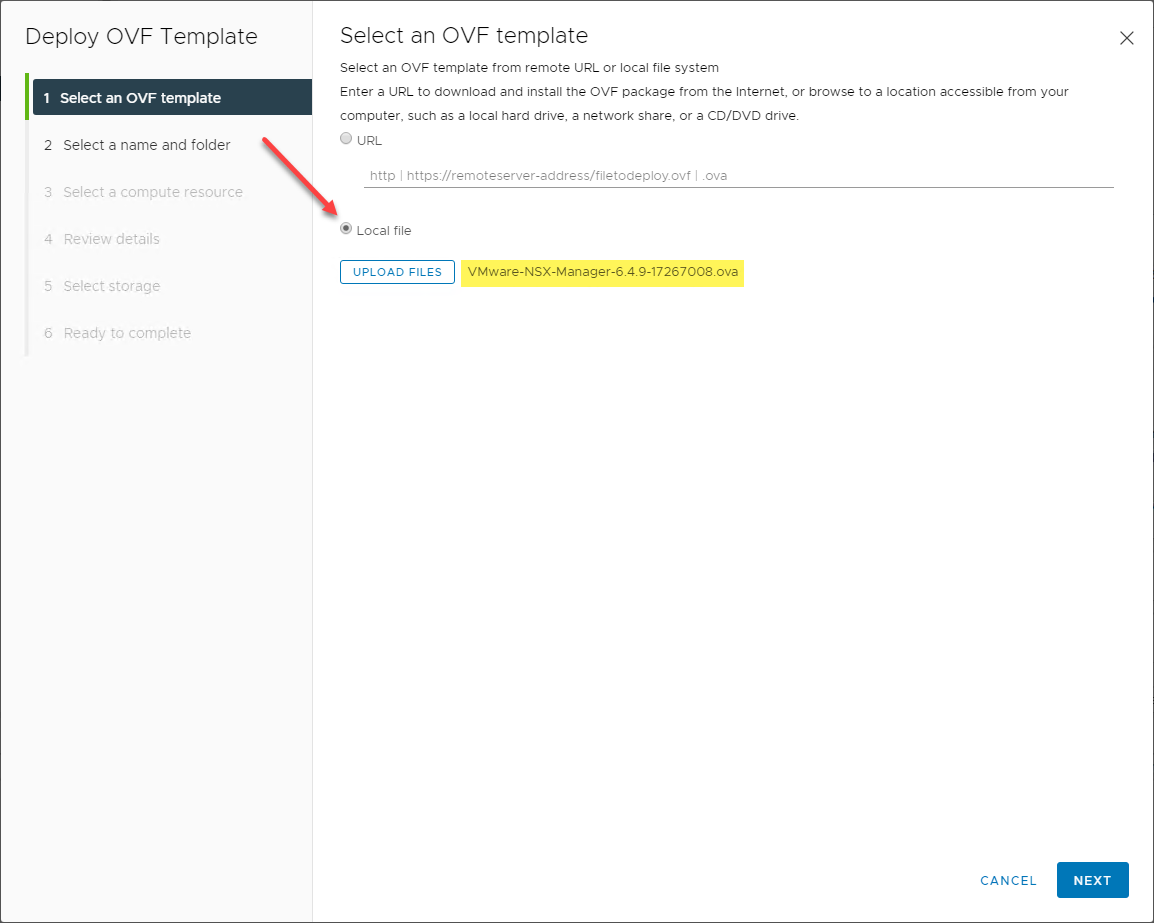
Choosing the NSX-V Manager OVA
Select the name of the NSX-V Manager appliance and the folder location in your vSphere datacenter.
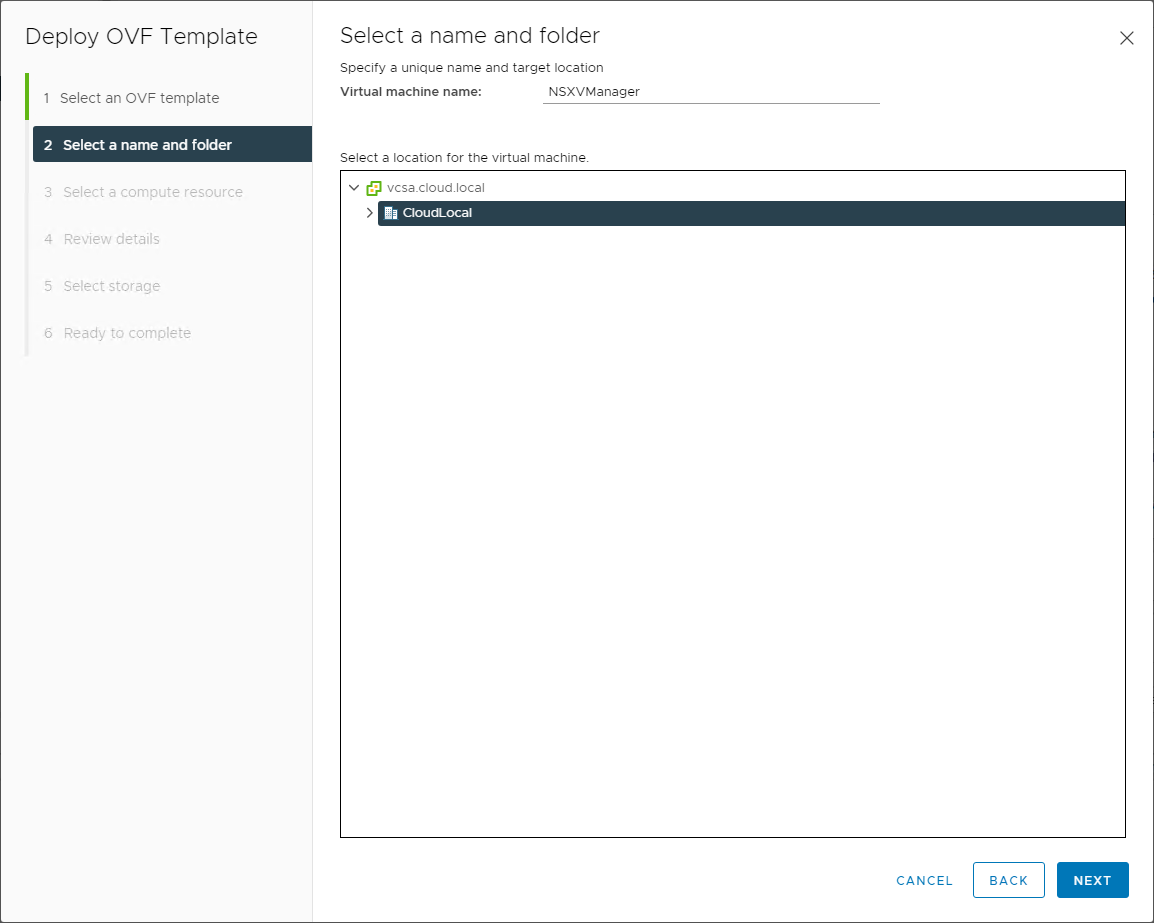
Choose the virtual machine name and folder
Select the compute resource in which you will run the NSX-V Manager appliance. It is standard best practice to run service VMs such as the VMware NSX-V Manager in a management cluster that houses other infrastructure VMs such as vCenter, vROPs, and others.
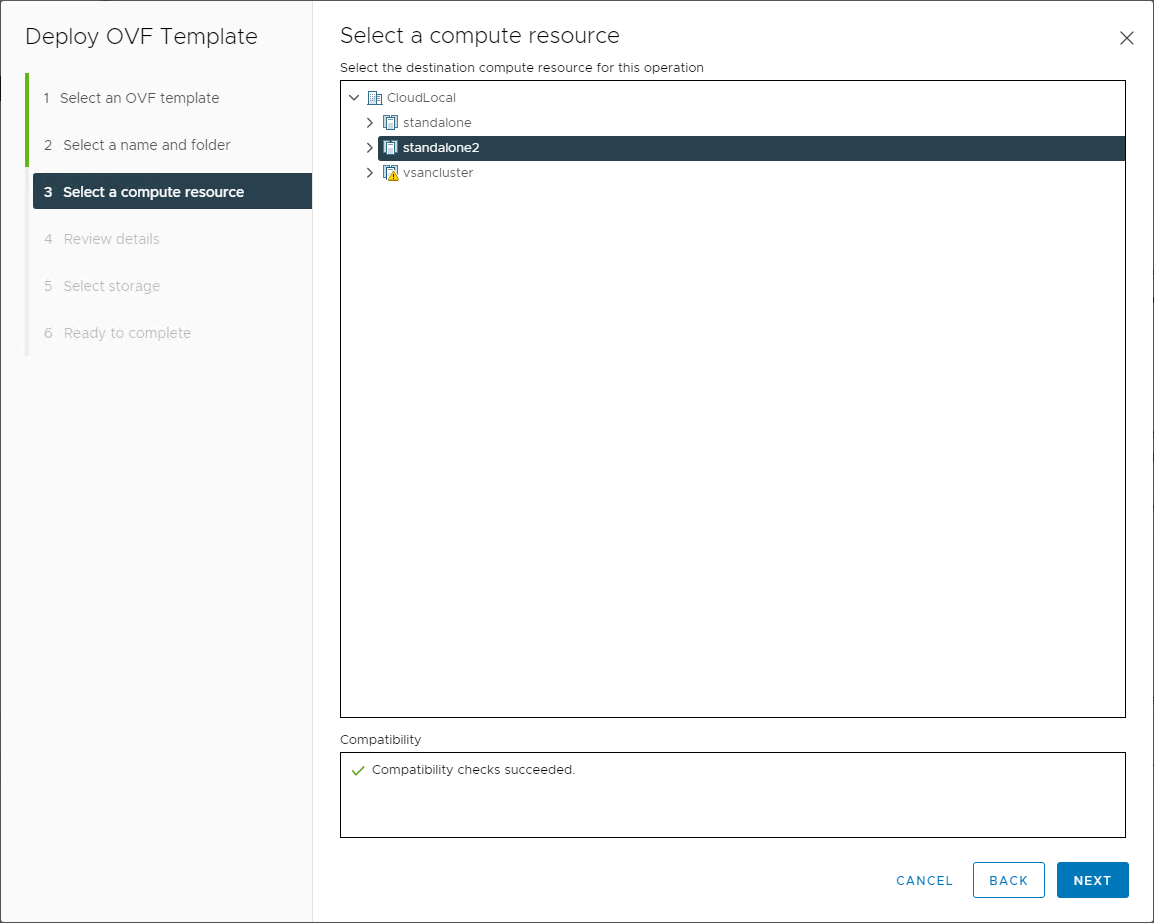
Choose the compute resource from your VMware vSphere datacenter
The wizard will display the initial deployment details for review.
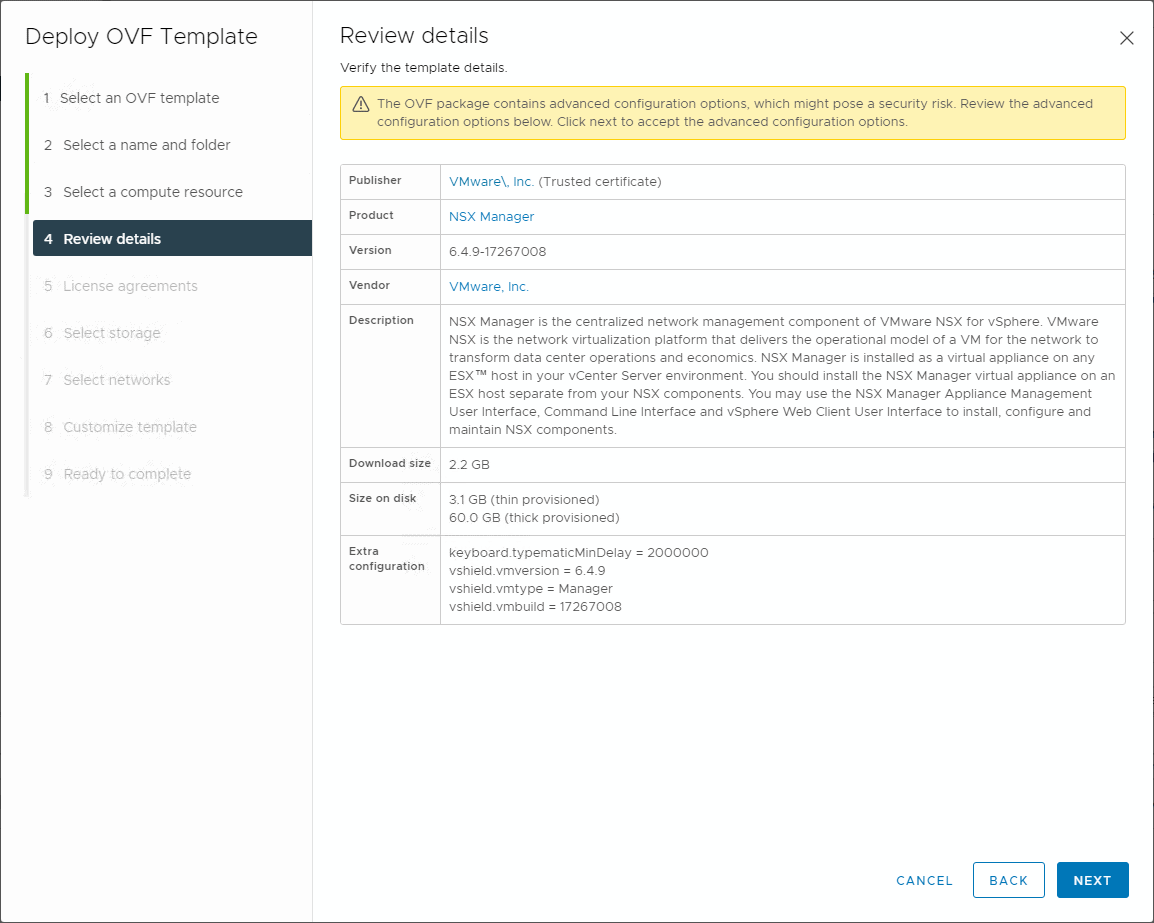
Review the details of the VMware NSX-V Manager deployment
Next, select the datastore in which you want to deploy the VMware NSX-V Manager. You can also select the disk format during the deployment.
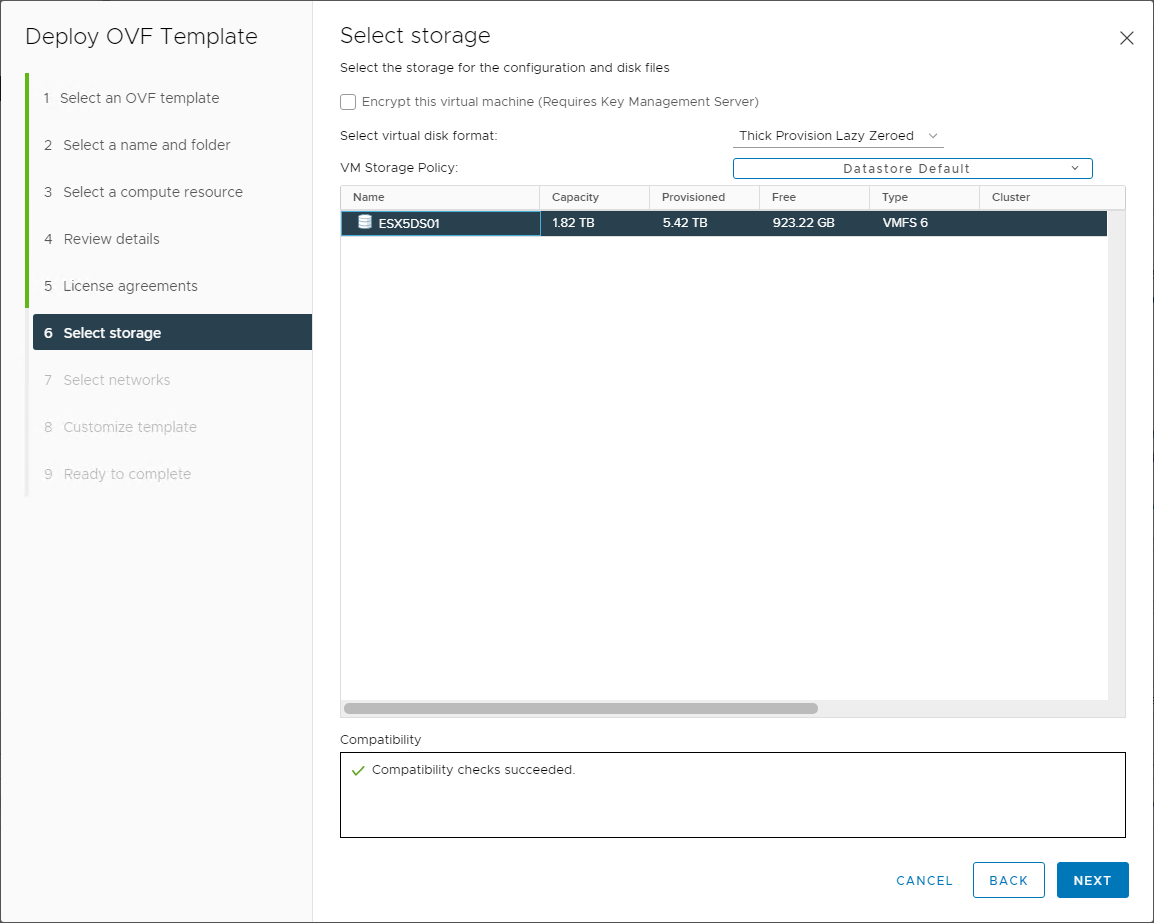
Choose the storage and disk policy
Select the virtual network to attach the VMware NSX-V manager appliance. This network connection is for connecting to the management interface that you will configure during the template customization process.
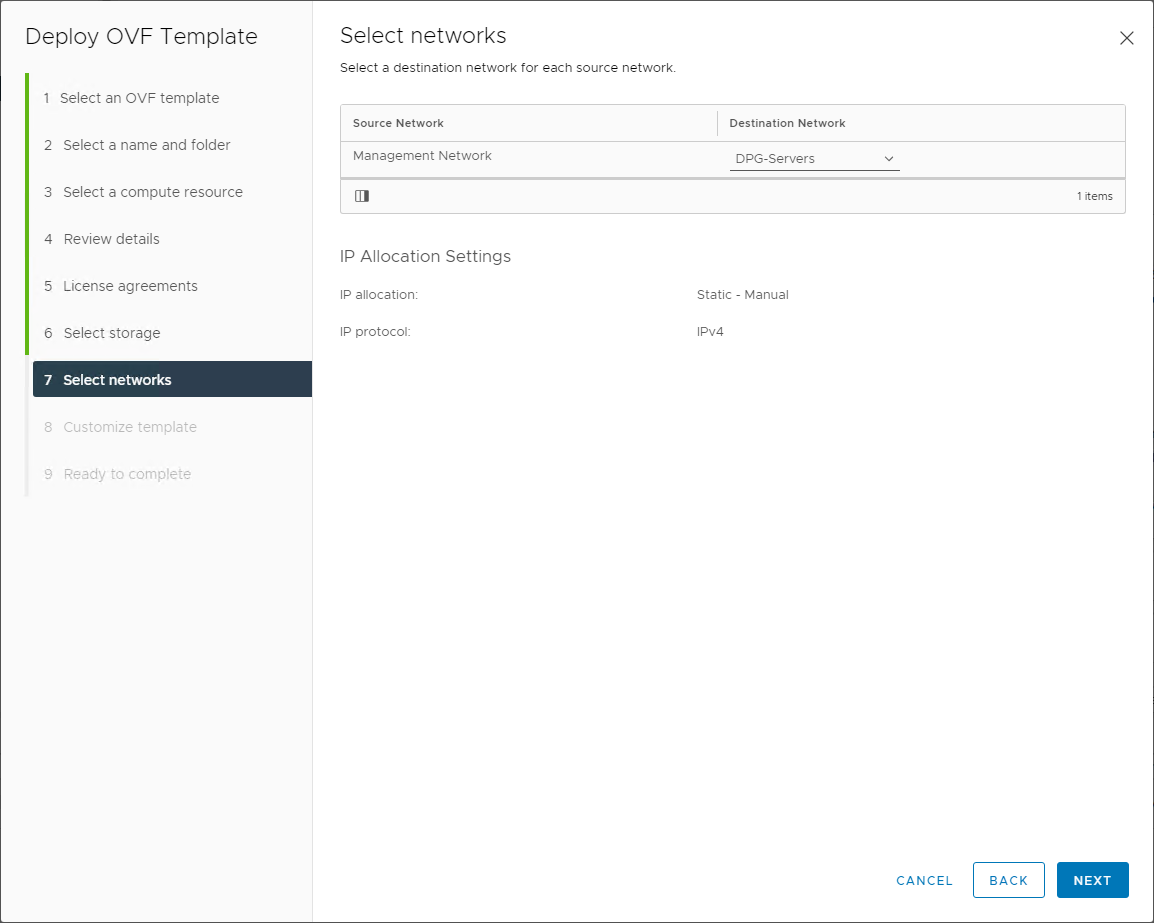
Choose the port group for the management network for the VMware NSX-V Manager
There are many important details to give attention to in the template customization step. Here you will configure the passwords for accessing the manager appliance as well as the pertinent network configuration information.
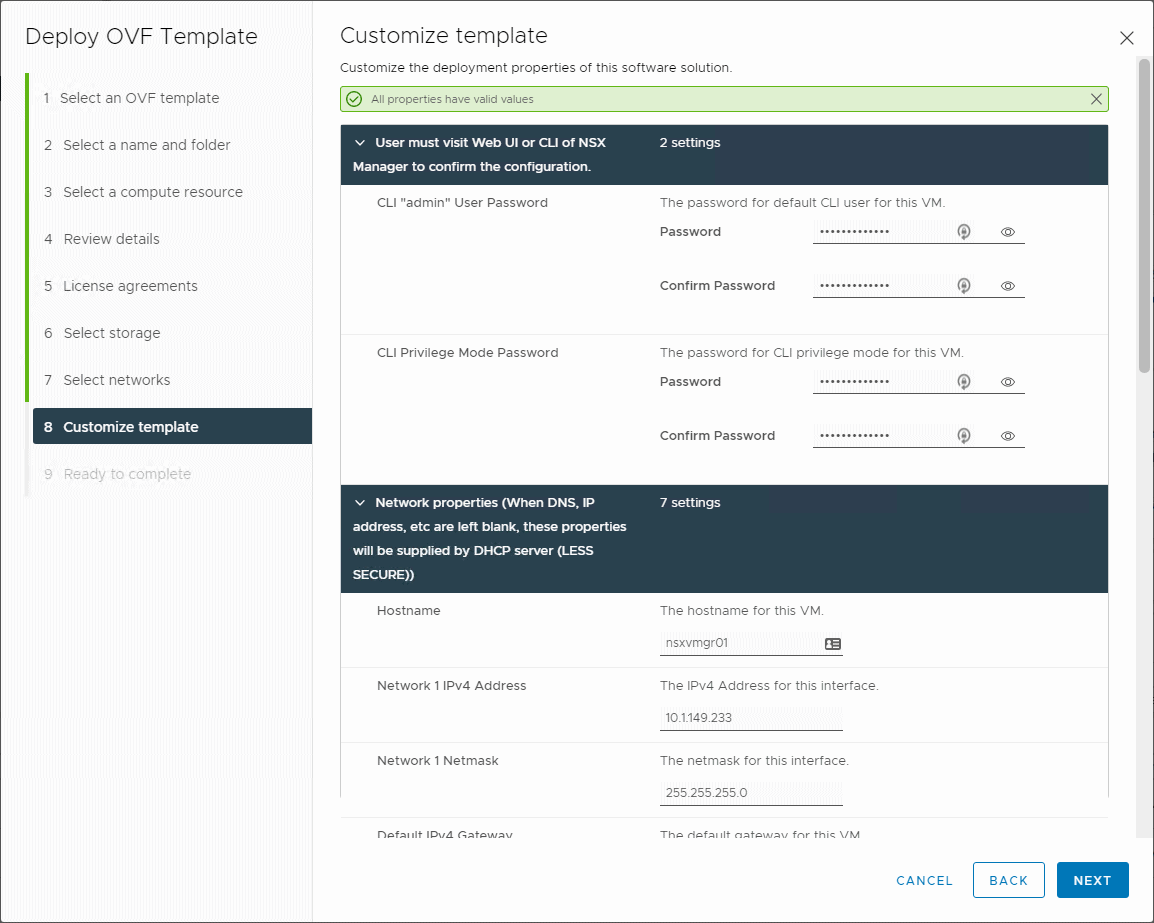
Customize the NSX-V Manager template
Finally, we arrive at the summary screen that displays the configuration before finalizing the deployment. Make sure all the information shown is correct before clicking Finish.
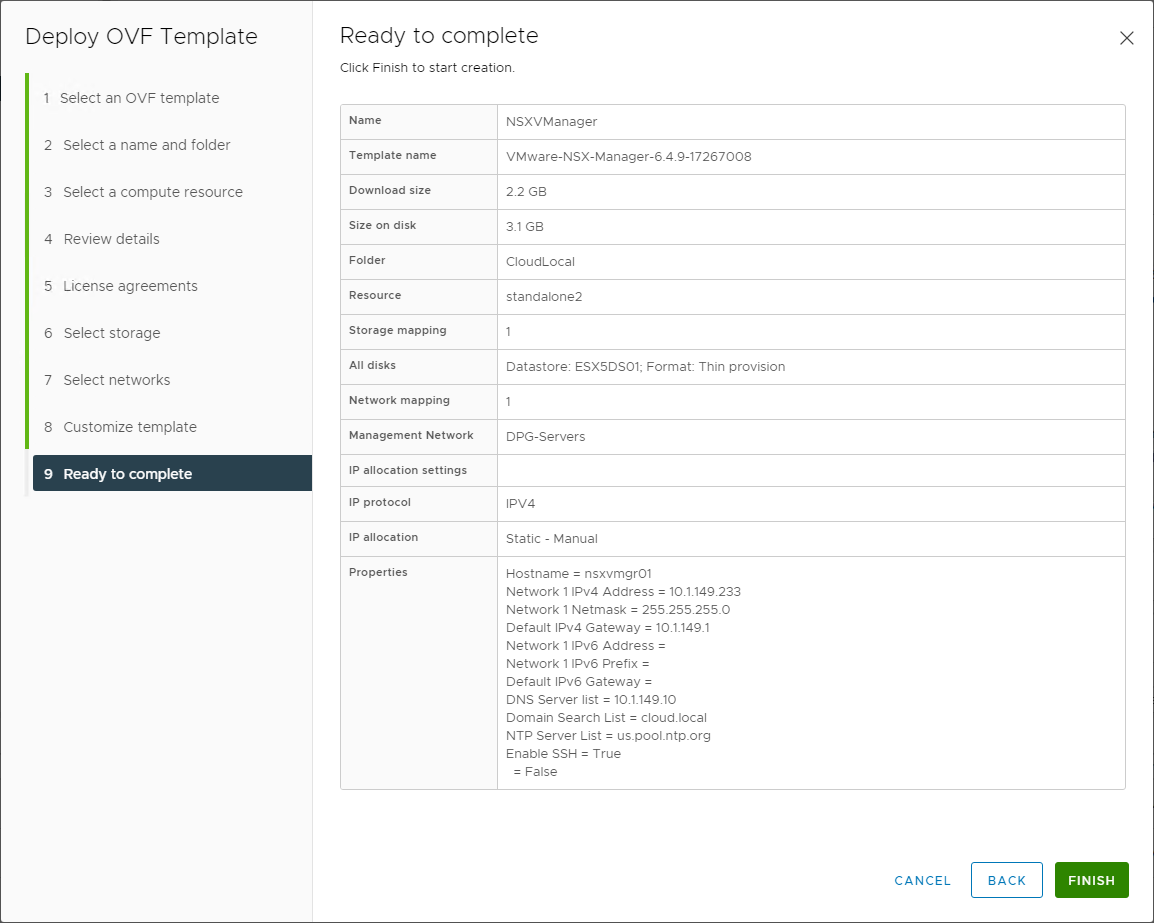
Ready to complete and finalize the VMware NSX-V Manager appliance deployment
Integrate VMware NSX-V Manager with vCenter Server
To enable VMware NSX-V’s functionality and configure VMware VXLAN in your environment, you integrate the newly deployed VMware NSX-V Manager with VMware vCenter Server. To do this involves registering the vCenter Server Lookup Service URL and the vCenter Server hostname. It will be the same address for most now who run the integrated Platform Services Controller configuration (recommended) with vCenter Server.
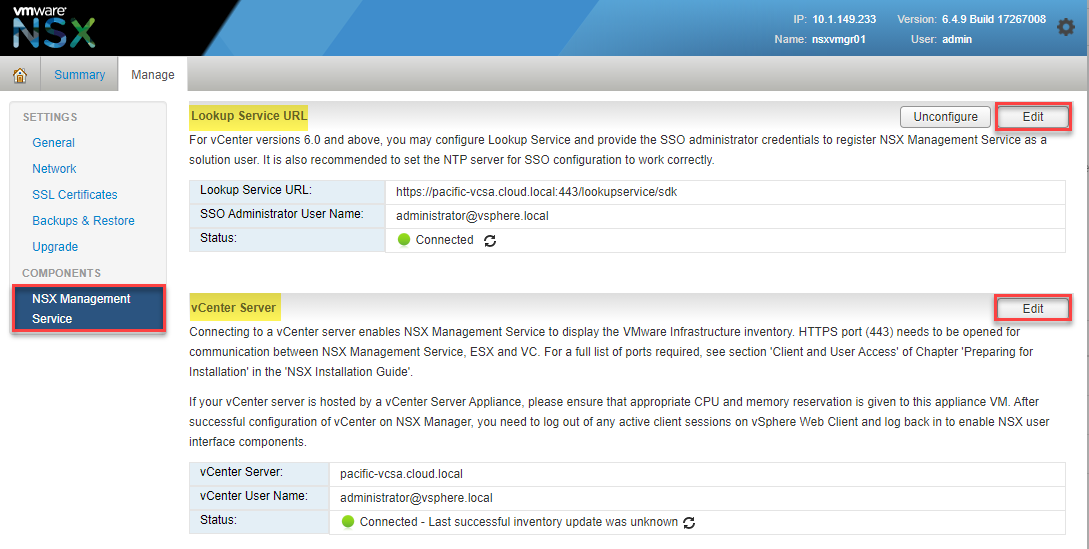
Registering the Lookup Service URL and vCenter Server address
Deploy NSX Controller Cluster
After deploying the NSX Manager and integrating it with vCenter Server, you will want to deploy the NSX Controller Cluster in your environment. The NSX Controller provides essential functionality in VMware NSX-V virtualized networking. The NSX Controller provides the control plane functions for NSX logical switching and Distributed Logical Router (DLR) functionality.
The NSX Controller maintains information about all hosts and logical switches and distributed logical routers in the environment. The Logical Switches are the VXLANs in the vSphere environment. The NSX Controller is a required component if you want to deploy DLRs and VXLAN in unicast or hybrid operation mode.
To deploy the NSX Controller, navigate to Networking and Security > Installation and Management > NSX Controller Nodes and choose to Add a new Controller Node.
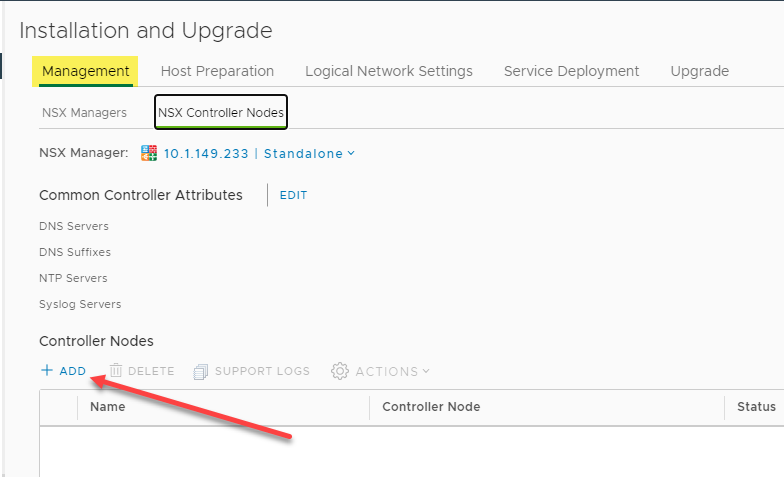
Adding a new NSX Controller Node
Choosing the Add function launches the Add Controller wizard. First, choose a password for the controller.
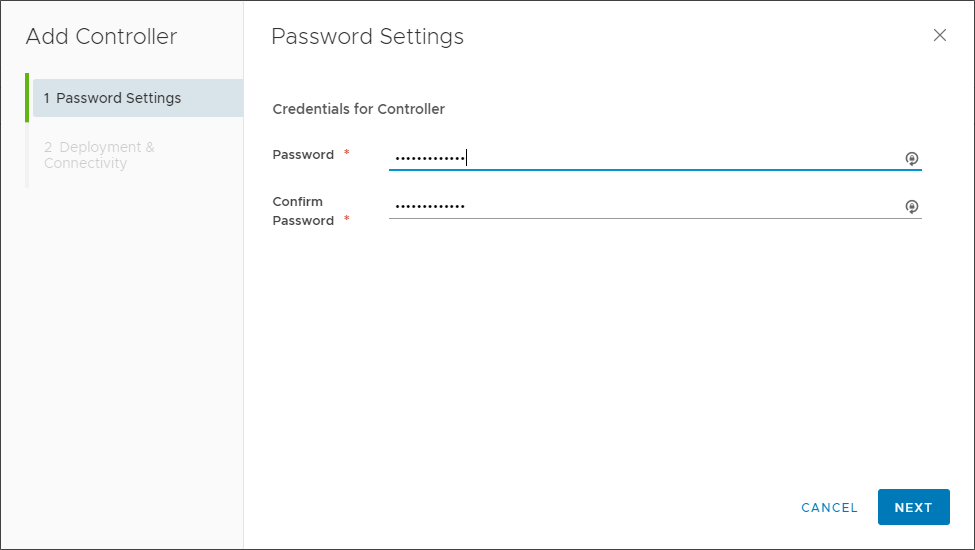
Configuring a password for the NSX Controller Node
Next, on the Deployment & Connectivity screen, choose a name for the controller, datacenter, cluster/resource, datastore, host, folder, IP Pool, and select which vSphere Distributed Switch it will connect.
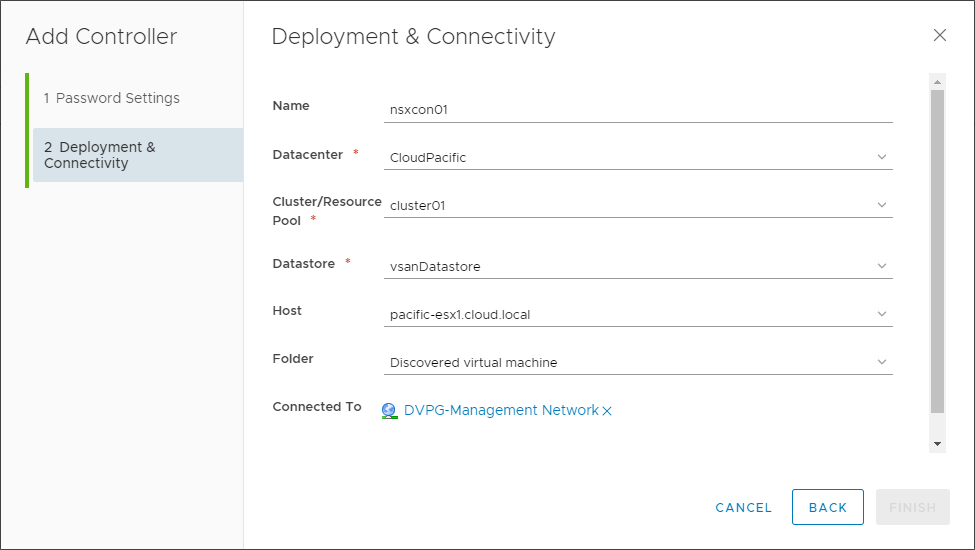
Configuring deployment and connectivity options for the VMware NSX Controller Node
After completing the wizard, the NSX Controller Node will begin deploying. The deployment will generally take a few minutes. As a note, you will want to deploy three controller nodes for high-availability for a production environment.
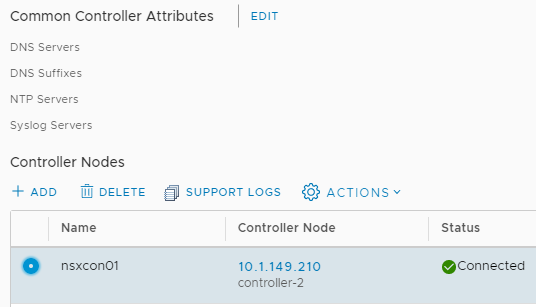
New NSX Controller Node is deployed successfully
Now, let’s prepare the ESXi hosts in the vSphere cluster for VMware VXLAN configuration.
Preparing ESXi Hosts for VMware VXLAN
One of the first steps you will go through to prepare the ESXi hosts for VMware VXLAN is installing NSX. This process installs the special VMware NSX-V ESXi VIBs needed for interacting with VMware NSX-V. Under the Networking and Security > Host Preparation screen, you will see your vSphere cluster(s) displayed with the option to Install NSX. Click the Install NSX button.
Before proceeding, you need to have a valid VMware NSX Data Center license installed before installing the NSX VIBs on your vSphere cluster ESXi hosts.
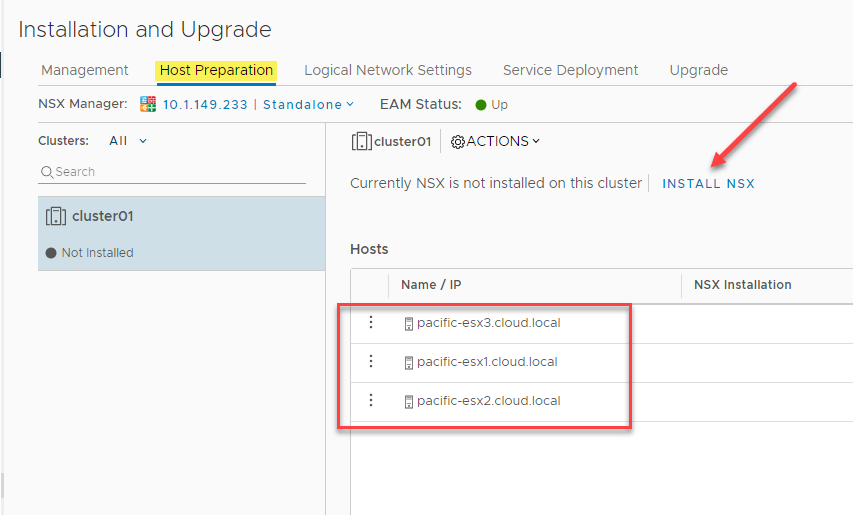
Choosing to Install NSX
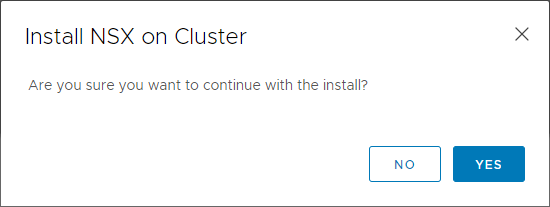
Verify the installation of the VMware NSX-V VIBs
Configure VMware VXLAN
After installing the special VMware NSX-V VIBs on your vSphere cluster ESXi hosts, the next step is configuring VXLAN. Configuring VMware VXLAN on your vSphere cluster ESXi hosts is the process that creates the VXLAN VTEPs on your ESXi hosts used for encapsulating and decapsulating the Layer 2 frames sent via network virtualization.
On the Networking and Security > Installation and Upgrade > Host Preparation screen, after installing the NSX VIBs, choose to Configure the VXLAN.
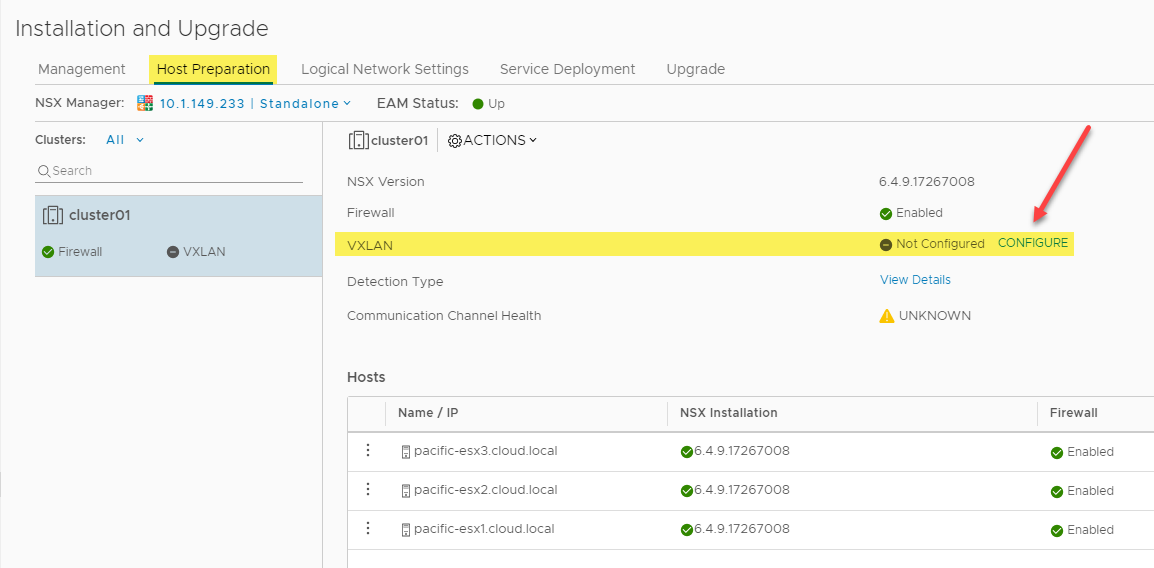
Configuring VXLAN as part of the VMware NSX-V configuration
The Configure VXLAN Networking dialog box appears. Here you choose the vSphere Distributed Switch you want to use for VXLAN traffic and how you want to perform IP Addressing on your vmkNICs created for VTEP endpoints. You can also configure the specific vmkNIC Teaming Policy for the vmkNIC configuration.
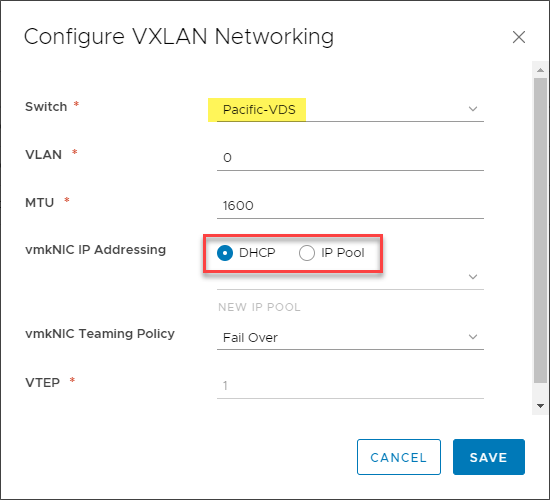
Configuring VMware VXLAN networking
Once you click Save, you will see the VXLAN configuration turn to a green checkmark showing it is configured. When you click the View configuration link, you can view the configured settings.
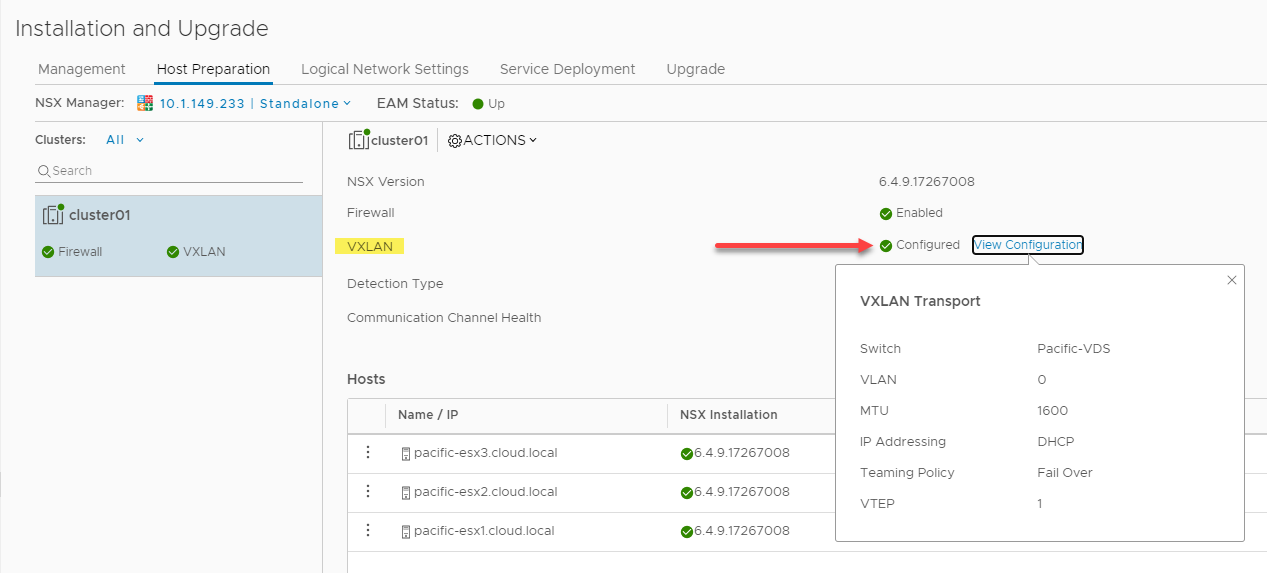
VXLAN successfully configured in VMware NSX-V
After configuring the VXLAN settings, on the Logical Network Settings tab, you will see the default VXLAN port shown – 4789. As noted, you will want to verify the VXLAN port is allowed between the various ESXi VXLAN hosts, particularly if these reside in different networks and need to form VXLAN tunnels.
On the Logical Network Settings tab, the Segment ID configuration is the configuration that
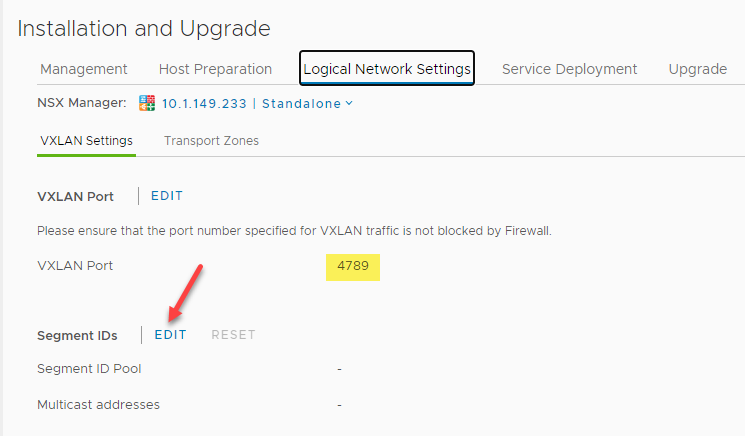
Verifying the VXLAN port and editing Segment IDs
On the Edit Segment ID Settings dialog box, you choose a Segment ID pool range. The Segment ID range will essentially be the pool of VNIs (VXLAN Network Identifiers) assigned to the logical networks. Note, this is a range and not a single value.
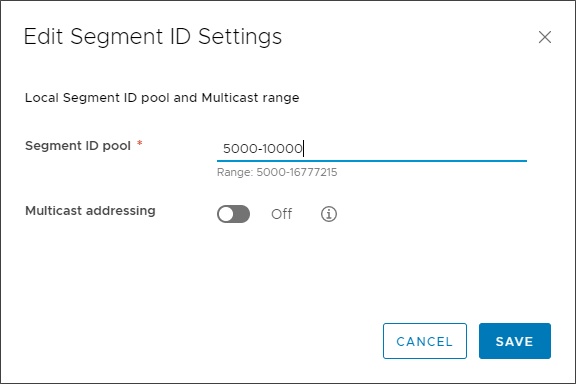
Assigning a Segment ID pool
Next, we need to create the Transport Zones that defines the scope of any Logical Switches or Distributed Logical Routers (DLR) created. It controls which hosts a logical switch can reach, and it can span one or more vSphere clusters. It also defines which clusters and, by extension, which virtual machines can participate in a particular logical network.
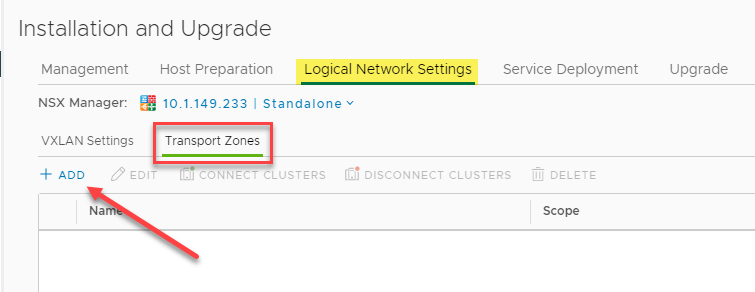
Beginning the process to create VMware NSX-V Transport Zones
When creating a new Transport Zone, you define the Transport Zone’s name, its replication mode and select which clusters participate.
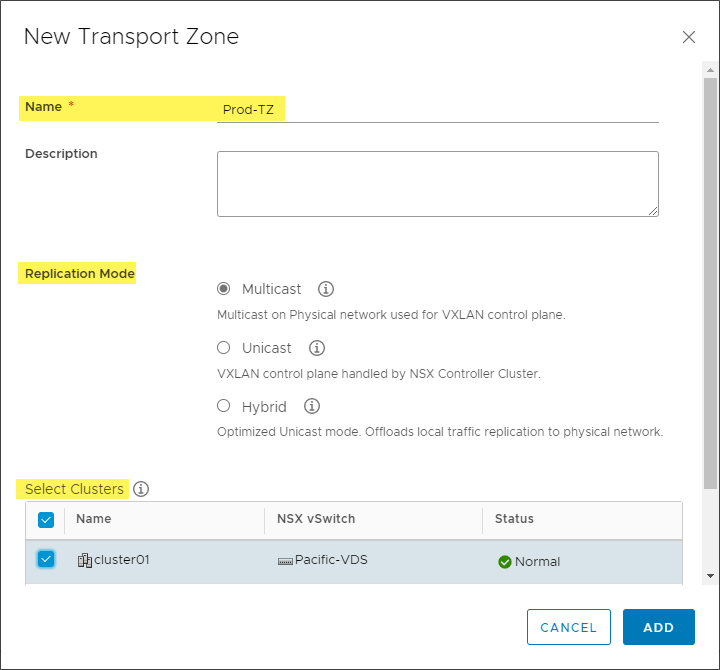
Creating a new Transport Zone
At this point, we have everything configured and ready to go for starting to create the Logical Switch (VXLAN) constructs in the environment. After assigning a Segment ID pool, we will start allocating logical resources as part of the VMware VXLAN implementation. Below, as you can see, the VXLAN configuration has been completed for the ESXi hosts in the vSphere cluster and we have “green” indicators across the board which is what we want to see.
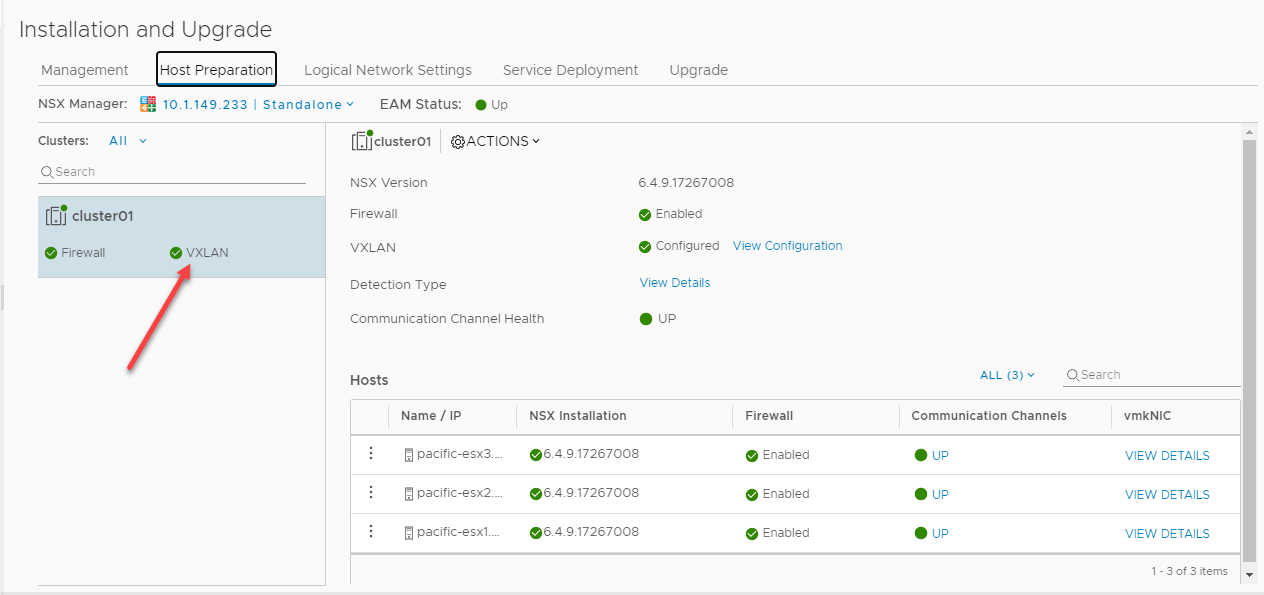
VXLAN VMware configuration completed
VXLAN VMware Logical Switch Configuration
After completing the infrastructure configuration required for VMware NSX-V, we are now ready to create Logical Switches. Each Logical Switch is essentially a VXLAN in the environment. Navigate to Networking and Security > Logical Switches. Click the Add button to create a new Logical Switch.
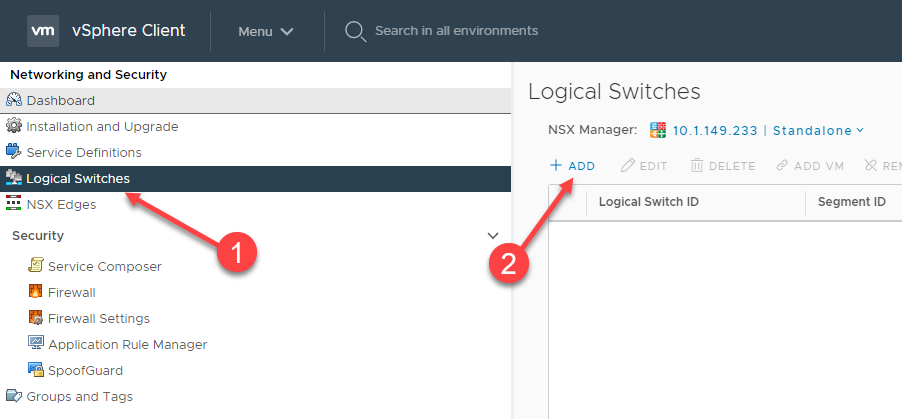
Creating a new VMware NSX-V Logical Switch
You will configure the Logical Switch name, description, Transport Zone, Replication mode, IP Discover, and MAC learning configuration on the New Logical Switch dialog.
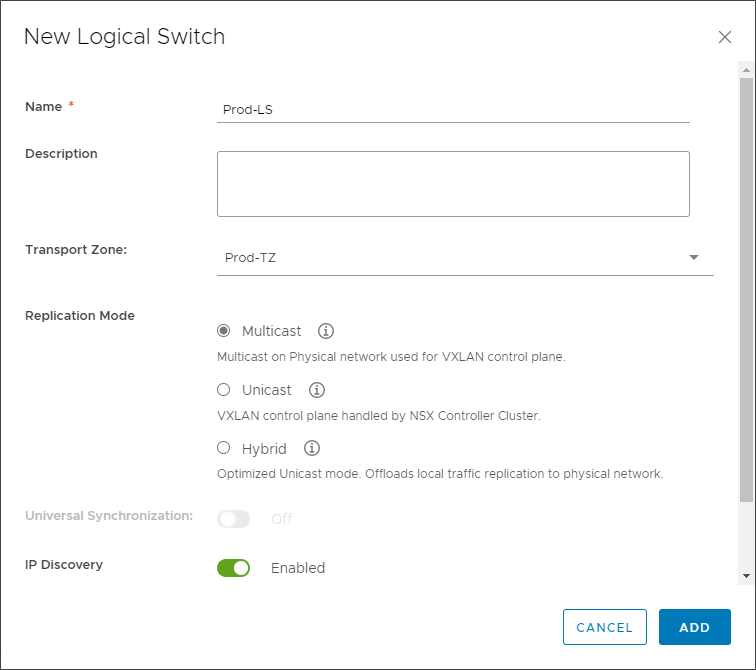
Configuring a new VMware NSX-V Logical Switch (VXLAN)
The new VMware NSX-V Logical Switch is created successfully. You will note the Segment ID configured uses the first available segment ID in the segment ID range configured earlier.
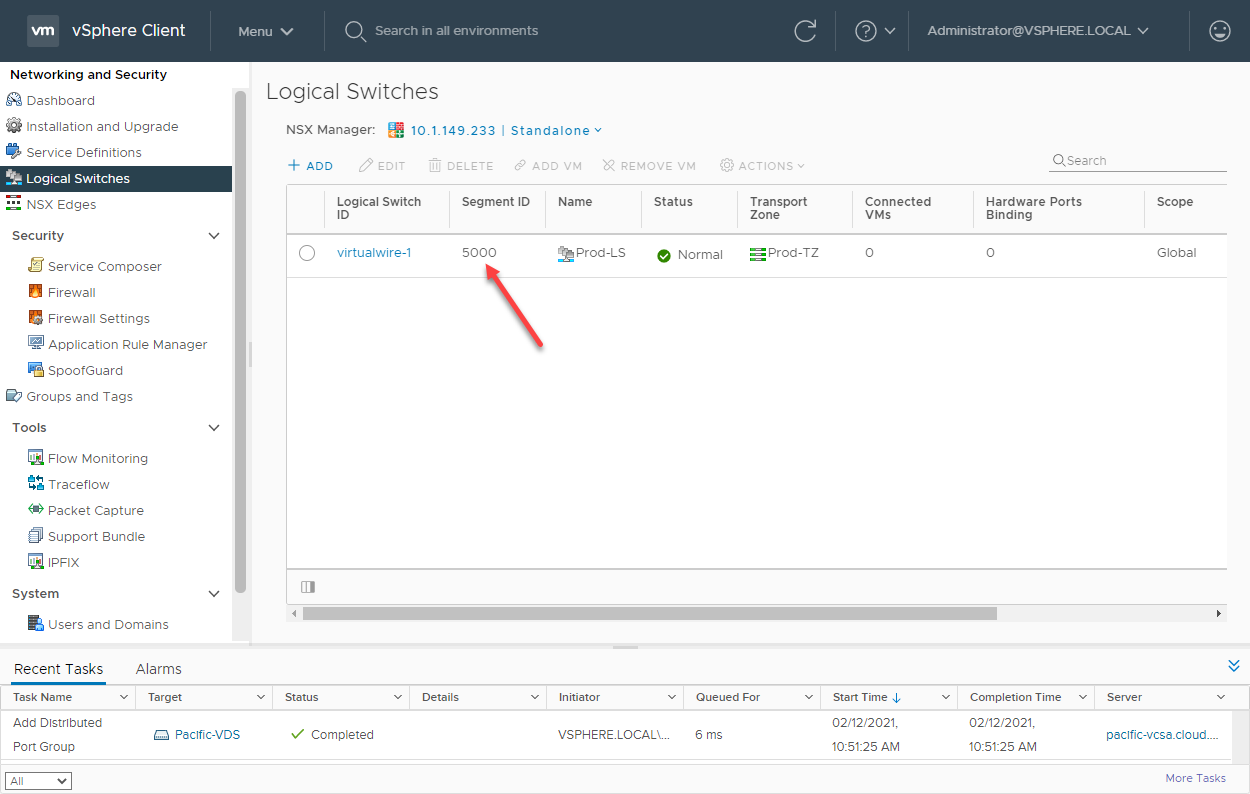
A VXLAN Logical Switch created in VMware NSX-V
Once the new Logical Switch is created, it will appear in the list of available networks to which a new virtual machine can be connected.
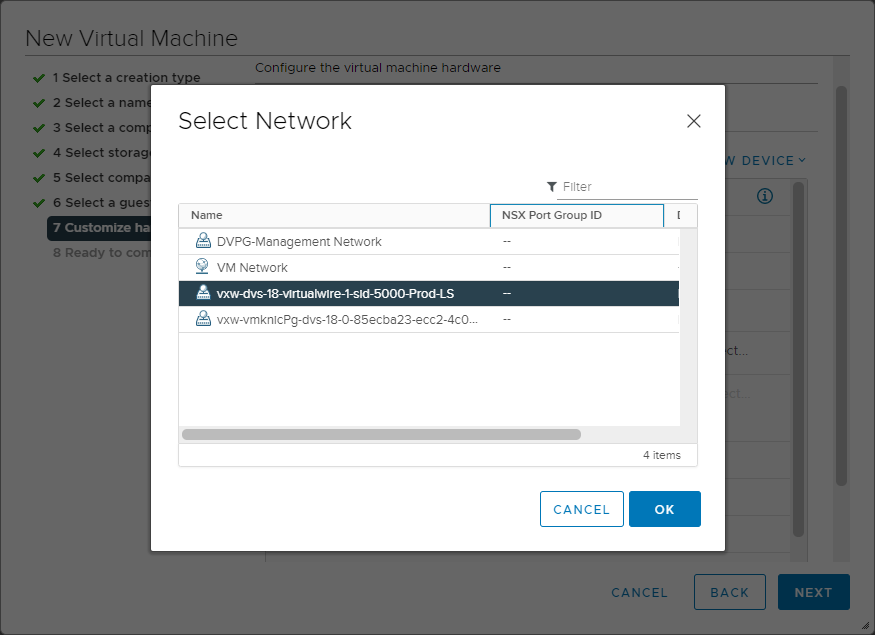
Connecting a new virtual machine to a new Logical Switch
Concluding Thoughts
VXLAN is a robust encapsulation protocol used to create software-defined overlay networks that can create Layer 2 segments across routed boundaries. It offers many benefits when compared to convention VLAN segments. Using VXLAN software-defined networks decouples the overlay network configuration from the underlay physical network. It allows making configuration changes on either the overlay or underlay networks without interdependencies between them. VXLAN encapsulates a Layer 2 Ethernet frame within an IP packet. These special packets are transmitted across the IP network and encapsulated/decapsulated using the VXLAN Tunnel Endpoint (VTEP).
VMware NSX-V is VMware’s software-defined networking technology based on VXLAN encapsulation that allows easily building out VXLAN-based SDN in VMware vSphere environments. As shown, various components allow creating the VXLAN tunnel in a VMware vSphere environment. These include the NSX Manager, NSX Controller, ESXi VIBs, Segment IDs, and Transport Zones.
By configuring the required VXLAN VMware components, you can provision Logical Switches in the environment representing a VXLAN allowing Layer 2 communication transmitted over the physical IP network. Using this approach, VMs that reside across Layer 3 boundaries can be connected to the same Logical Switch and communicate as if they reside on the same physical network switch.


Not a DOJO Member yet?
Join thousands of other IT pros and receive a weekly roundup email with the latest content & updates!


