Save to My DOJO
Auto Deploy is a fantastic feature that allows you to provision ESXi over the network to multiple bare metal servers, pretty much like you would image users’ workstations. This post, however, is about testing Auto Deploy within a nested vSphere 6.5 environment, for those of you wishing to test the waters before making the leap to production.
Auto Deploy is embedded in vCenter Server with its two main components being the Auto Deploy server and Image Builder. Both components live as services but are disabled by default. Once you enable them, create a software depot and import ESXi to it from an ESXi offline bundle. From then on, it’s just a matter of setting up deployment rules to govern the provisioning process and you’re good to go.
Well, that’s the short story anyway. In reality there are some other aspects of the environment you need to take care of before you start auto-deploying. The rest of the post covers most of the subtleties and if needed, the Installing ESXi using vSphere Auto Deploy VMware literature covers the fine print pretty well save for a few hazy parts.
As a side-note, vSphere 6.5 allows you to do Auto Deploy completely via GUI. Older versions, however, require the use PowerCLI to, well, power your way through.
ESXi Provisioning modes
Before I dive in, I need to explain the modes ESXi is provisioned in when using Auto Deploy.
Auto Deploy by default, provisions ESXi stateless. What this means is that the ESXi’s state and configuration resides on vCenter Server. Nothing is written to the host’s disks. In fact, you can deploy ESXi to a disk-less system since everything is executed entirely in memory thanks to ESXi’s compact OS footprint. The problem with this scenario is the total dependence on vCenter Server and the accompanying infrastructure which includes DHCP and TFTP services. If any of these are down, the ESXi server (host) is as good as dead once is rebooted for re-provisioning.
Subsequent vSphere versions improved further on the concept and introduced 2 new options.
Stateless Caching
This option is similar to stateless with one major difference. Upon provisioning, the ESXi image is written or cached to a host’s server local (internal) or USB disk. The option is particularly useful when multiple ESXi hosts are being provisioned concurrently so rather than hog the network, ESXi is re-provisioned from a cached image, state and all, from local or USB disk. There are a few gotchas to be aware of however. I’m reproducing the following text from VMware’s site:
If vCenter Server is available but the vSphere Auto Deploy server is unavailable, hosts do not connect to the vCenter Server system automatically. You can manually connect the hosts to the vCenter Server, or wait until the vSphere Auto Deploy server is available again.
If both vCenter Server and vSphere Auto Deploy are unavailable, you can connect to each ESXi host by using the VMware Host Client, and add virtual machines to each host.
If vCenter Server is not available, vSphere DRS does not work. The vSphere Auto Deploy server cannot add hosts to the vCenter Server. You can connect to each ESXi host by using the VMware Host Client, and add virtual machines to each host.
If you make changes to your setup while connectivity is lost, the changes are lost when the connection to the vSphere Auto Deploy server is restored.
Stateful Install
This option still provisions ESXi pretty much in the same way, the only difference here being that after provisioning, the OS, state and configuration are completely written to disk so that on subsequent reboots, the host will boots up from disk with zero dependence on the Auto Deploy infrastructure.
Choosing a provisioning mode
Both stateless caching and stateful install are enabled through a specific setting in a host profile (Fig.1: 2-3). If you haven’t read my article on host profiles, now would be a good time to do so unless you are already familiar with the concept.
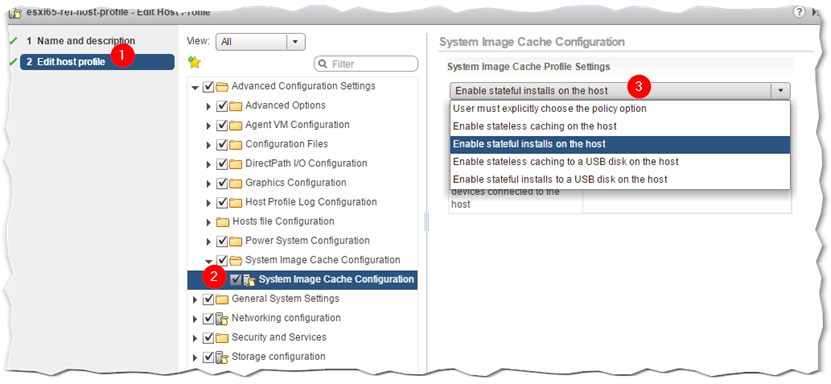
Figure 1 – Configuring stateless caching and stateful install
If you’re using vSphere 6.5 the embedded links provide full details on how to configure host profiles for both stateless caching and stateful install.
Setting up an Auto Deploy Environment
If you don’t have the physical machines to play with, you can still test Auto Deploy in a nested environment which is exactly what I’ll be doing here. Before moving on, we need to care of a few requirements.
The Prerequisites
A vSphere Auto Deploy infrastructure necessitates of the following items and components:
- vSphere vCenter Server -> vSphere 6.5 is the best and most comprehensive option to date.
- A DHCP server to assign IP addresses and TFTP details to hosts on boot up -> Windows Server DHCP will do just fine.
- A TFTP server to serve the iPXE boot loader -> I’m using SolarWinds TFTP Server but you can use the inbuilt Windows feature just as well.
- An ESXi offline bundle image -> Download from my.vmware.com.
- A host profile to configure and customize provisioned hosts -> Use the vSphere Web Client.
- ESXi hosts with PXE enabled network cards -> PXE is available by default when nesting ESXi (vmxnet3). For physical machines, make sure your servers have PXE compliant nics.
Let’s now go through all the steps following which you’ll be able to provision ESXi to a VM using Auto Deploy. In truth this is the same procedure used to deploy ESXi to physical machines.
Step 1 – Enable Auto Deploy on vCenter Server.
Using the vSphere Web client as shown in Fig.2, select Administration from the Home (1) menu and click on System Configuration (2). Next, click on Services and select the Auto Deploy service. Once you complete the following sub-steps, repeat the same for the ImageBuilder service.
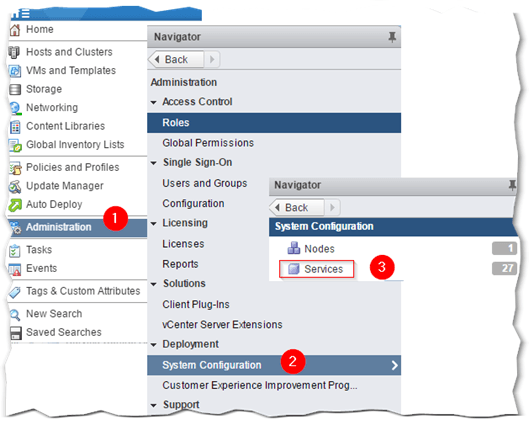
Figure 2 – Accessing the vCenter Server services page
Highlight the Auto Deploy Service and select Edit Startup Type from the Actions menu. Set the startup type to Automatic and start the service if needed. Repeat the same for the ImageBuilder service.
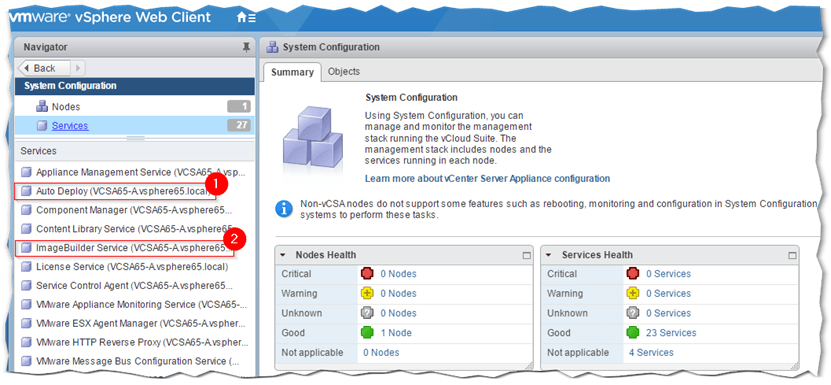
Figure 3 – The 2 Auto Deploy services displayed in vSphere client

Figure 4 – Setting a service to start automatically
You should now have an Auto Deploy green icon displayed under Navigator and on the Home screen. If you don’t, just log out and back in again and the icon should magically appear.
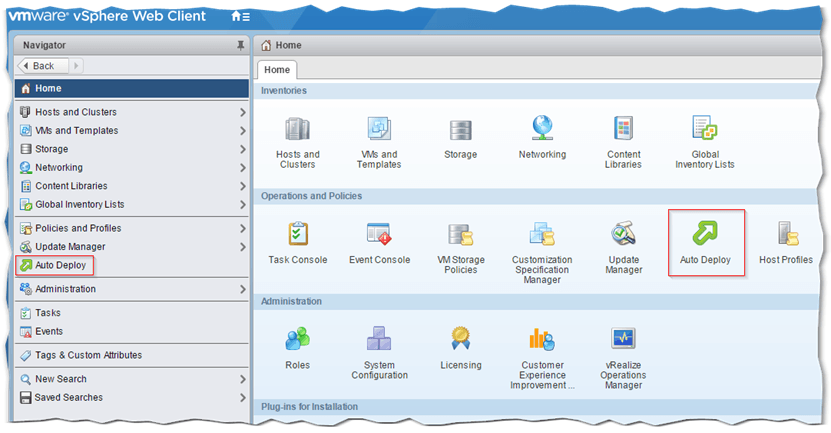
Figure 5 – The Auto Deploy icon added to the list once the corresponding services are up and running
Step 2 – Setting up DHCP
I’ll be using the DHCP services on a Windows Server. I will only limit myself to highlighting the relevant server options that need adding since there are plenty of resources explaining how to install and configure DHCP on Windows server.
Once you’ve created a DHCP scope, go on and add server options 066 and 067 as shown in Figure 6. To do so, click on the Server Options, select Configure Options and enable options 066 and 067 with the following values:
066 – Type in the IP address of the TFTP server. For this example, the TFTP server is hosted on the DHCP server machine.
067 – Type in the boot file name. Two options are available depending on the ESXi server mainboard firmware (same applies for VMs):
snponly64.efi.vmw-hardwired for UEFI
undionly.kpxe.vmw-hardwired for standard BIOS
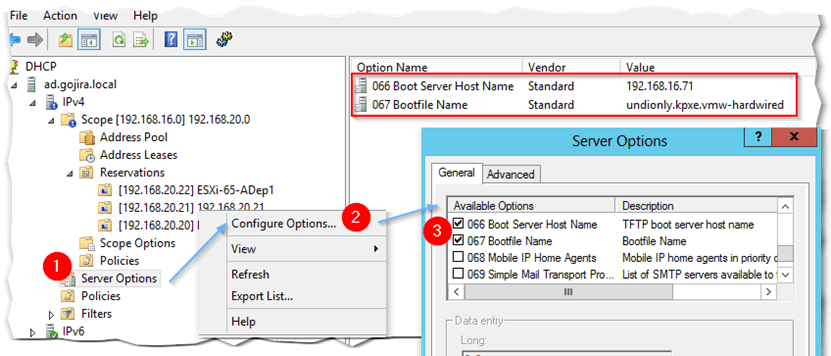
Figure 6 – Adding DHCP server options 066 and 067
TIP 1: I’ve set up DHCP reservations using the MAC address of the VM to which ESXi will be provisioned. The same applies to physical servers if need be. In my case, I wanted to make sure that nothing else grabbed DHCP leases from my server since other users share the same test network. I also limited the IP scope to the barest minimum number of IP addresses required.
TIP 2: Option 60, which by default is set to PXEClient, will interfere with the PXE process if a TFTP server is installed alongside DHCP, pretty much like I did. When the ESXi VM (or physical server) boots up, it will get a DHCP lease but will fail to locate the ESXi image. Deleting option 60 fixes this.
Step 3 – Setting up TFTP
As mentioned, I’ve used SolarWinds TFTP Server which is available for free. Create a folder called C:\TFTP and install the software. You do not need to configure anything as it will work straight out of the box using default settings.
Now for the important part. Under C:\TFTP, we need to copy the boot files which will point the ESXi server being provisioned to vCenter Server which is where the ESXi image is stored. The boot files are downloadable from vSphere Web Client as shown in Figure 7. Just click on the Download the TFTP Boot Zip. Extract the contents of the zip file and copy them to C:\TFTP on the TFTP server (Fig.8).
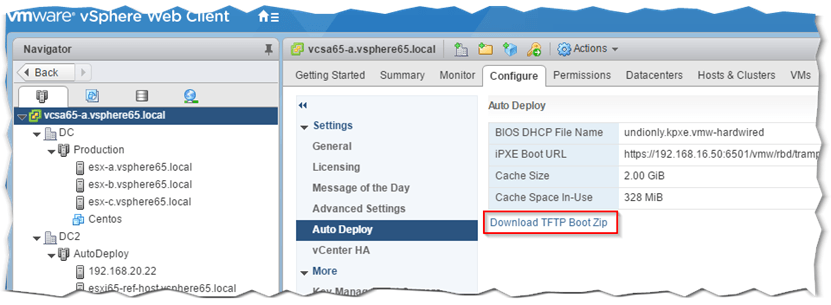
Figure 7 – Downloading the TFTP Boot files from vSphere Client
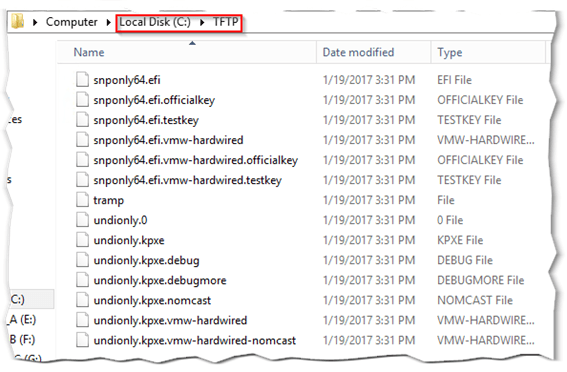
Figure 8 – The extracted TFTP boot images
Step 4 – Setting up the ESXi shell VM
For this post, I actually created 2 VMs, one acting as an ESXi reference host – the one used to extract the host profile from – and a second one onto which ESXi is provisioned via Auto Deploy. I included a hard drive on both VMs since I’m interested in deploying ESXi in stateful install mode.
Setting up a reference host is optional since the host profile can be extracted from any other existing ESXi host which you can then modify as necessary. Remember that the host profile is required not only for host customizations but also to specify the provisioning mode i.e. stateless caching or stateful install.
Once you create the shell VM, note down the MAC address as shown in Figure 9. I set the VM’s firmware to BIOS but you can change this to EFI, which is actually the recommended setting. Just remember to set DHCP option 67 accordingly.
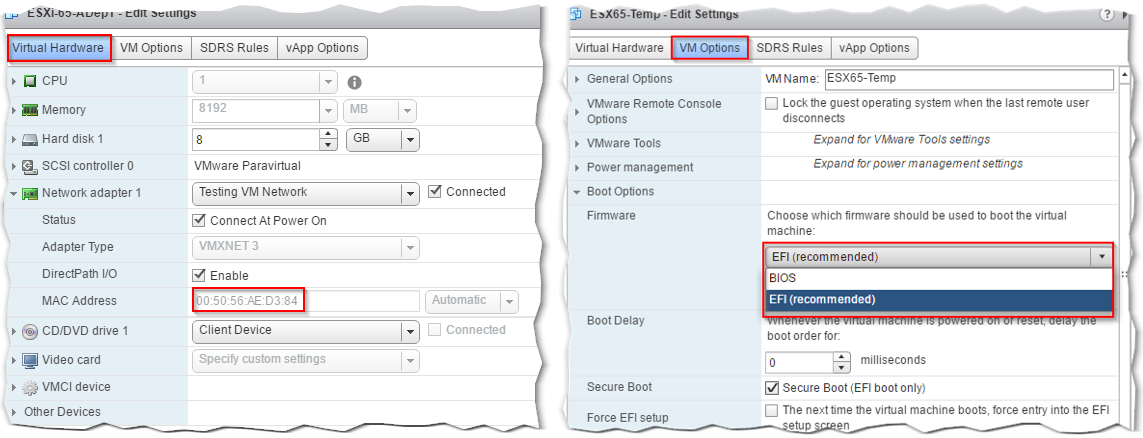
Figure 9 – Recording the VM’s MAC address and setting the firmware type to BIOS or EFI
Step 5 – Creating a Software Depot and importing an ESXi image
I’m assuming that you’ve already download or have available the ESX offline bundle zip file. If not, go ahead and grab a copy since you’ll be needing it now.
As per Fig. 10, click on the Auto Deploy (1) icon in Navigator or from the Home screen. Next, click on the Software Depots (2) tab and click on the green arrow (3). In the Import Software Depot window, click on Browse and select an ESXi offline bundle (4-6).
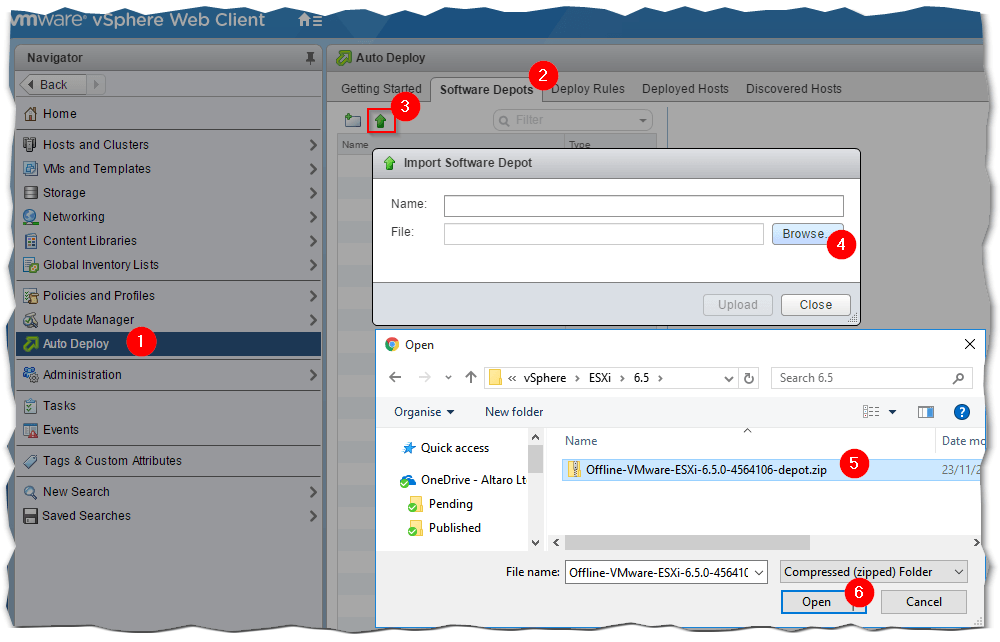
Figure 10 – Creating a software depot and uploading an image to it
Type a Name for the depot that will be created (1) and hit the Upload button (2). A progress bar helps you monitor the image upload process.

Figure 11 – Naming a software depot and importing to it
As per Figure 12, you should now see created a software depot of type ZIP. Notice also the 2 tabs in the adjoining pane. Under Image Profiles you will see two types of ESXi images (or image profiles), one with VMware tools included (standard) and one without (no-tools). When an image profile is selected, the software packages contained within are listed in the bottom pane. Clicking on the Software Packages tab gives you a list of all the unique software packages found in the selected depot.
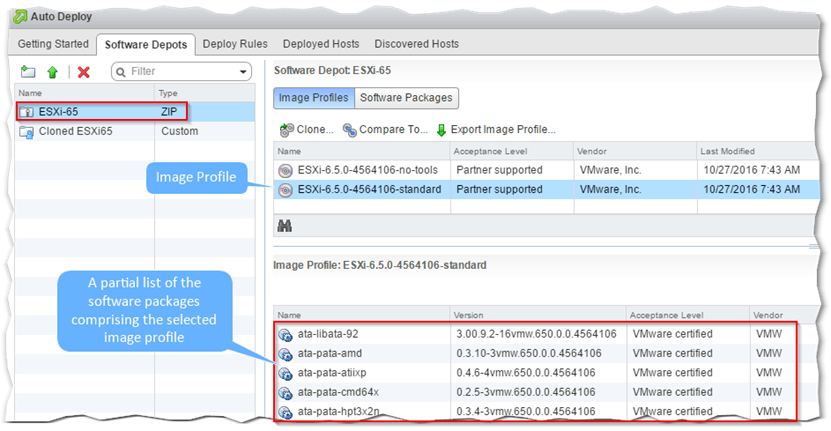
Figure 12 – Listing the software packages comprising an image profile
You can add custom drivers or other packages to the image once you clone it. You can also export a custom image to a ZIP or ISO.

Figure 13 – Cloning and editing a custom image profile
As you’ve probably deduced, this is all carried out via the ImageBuilder component of Auto Deploy.
Step 6 – Creating a Deploy Rule
A deploy rule, as the name implies, gives you complete control over the deployment process since you can specify which image profile is rolled out and on which server. Once a rule is created, you can also Edit or Clone it. Once created, the rule has to be activated for it to apply. If no rules are activated, Auto Deploy will fail as per Fig. 14.
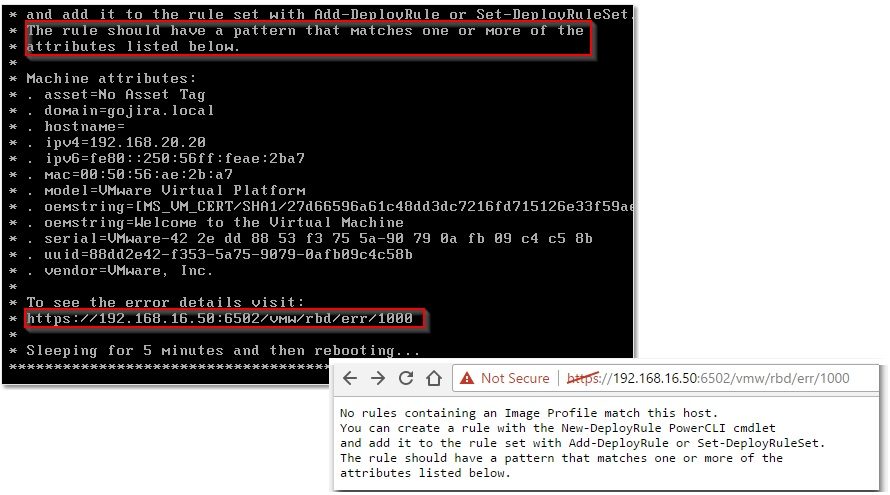
Figure 14 – A failed deployment due to a missing rule
To create a rule, click on the New Deploy Rule icon from the Deploy Rules screen. Give it a name (Fig. 16: 1). Next, specify the which hosts the rule will target. The options are to enable it for all hosts or select a pattern from the Add Pattern drop down box (Fig. 16: 2-3) to target a specific host. In this case, I’m using the MAC address (Fig. 16: 4) previously noted to target the VM on which I want ESXi deployed.

Figure 15 – Creating a new Auto Deploy Rule
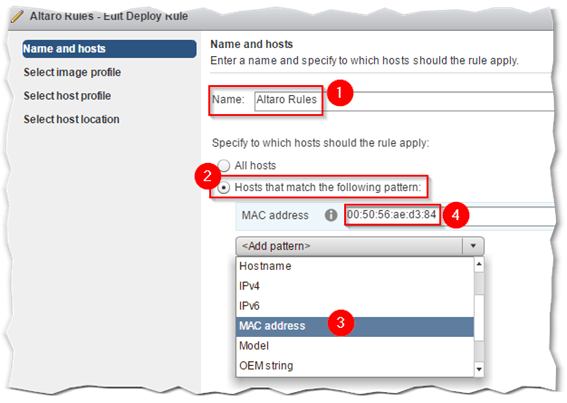
Figure 16 – Naming a deploy rule and setting the target
Next, select the image profile (Fig.17: 2) you wish to deploy. If you have more than one software depot set up, select the correct one from the Software Depot drop down menu (Fig. 17: 1).

Figure 17 – Selecting an image profile for a deploy rule
Here you set the host profile the ESXi host will be attached to. The profile will prompt you to provide the required host customizations inputs such as IP addresses, iSCSI details and a root password. Additionally, as already explained, it is used to determine the provisioning type i.e. stateless caching or stateful install.
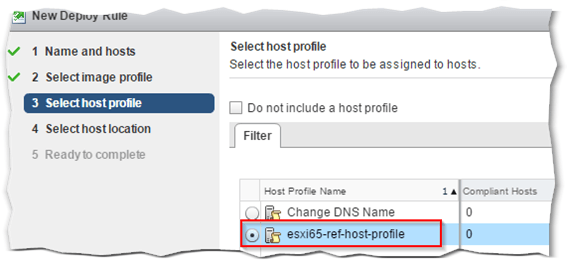
Figure 18 – Selecting the host profile the provisioned ESXi will be attached to
Finally, you can optionally specify the location the provisioned ESXi will be added to. For this example, I created a separate DC and cluster as shown in Fig. 19.
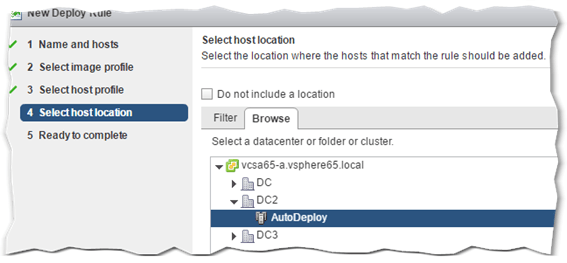
Figure 19 – Specifying the vSphere location the provisioned ESXi host will be added to
Press Finish to complete the rule creation process.
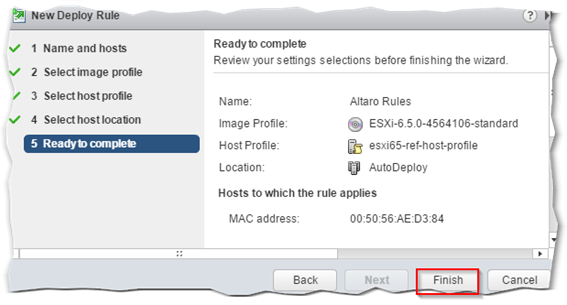
Figure 20 – Completing the Auto Deploy rule creation process
Step 7 – Activating a Deploy Rule
Once the deploy rule has been created you just need to activate it and you’re good to go. The rule is initially marked as inactive (Fig.21: 1).
Click on the Activate/Deactivate rules button (2). From the Activate and Reorder window, select the rule you want to activate from the rules list at the bottom (3) and press the Activate button (4). When editing the rule, you will have to come back to this screen to deactivate it before you can edit it.
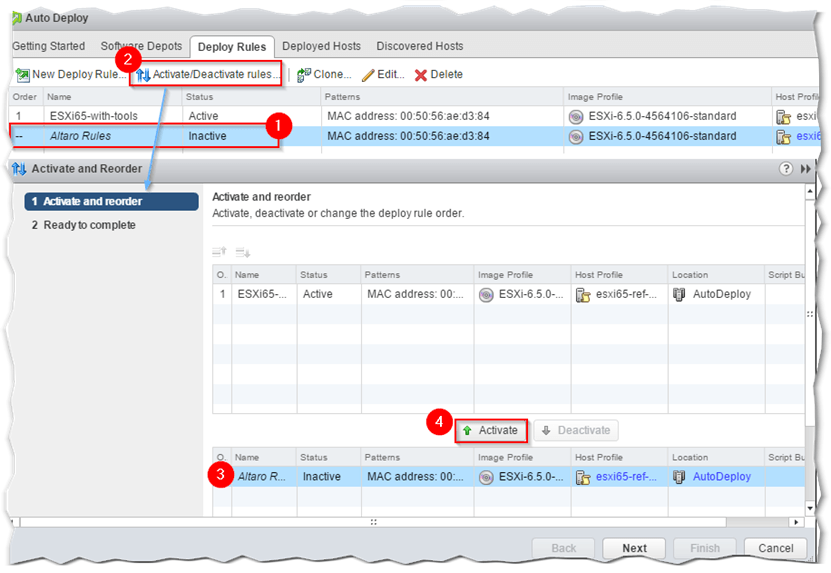
Figure 21 – Activating / Deactivating a deploy rule
Provisioning ESXi
Now that your Auto Deploy infrastructure has been finalized, everything configured and all, it’s finally time to give it a spin.
I’ve opted to capture the provisioning process in a video since this post has turned out to be a rather lengthy one so I’ll try and limit screenshots to a minimum. I’m not sure if I ever mentioned this but the reason I include lots of screenshots is out of the firm belief that a picture is worth a thousand words. Anyway.
Since we’ve attached the ESXi host to a host profile, it will promptly boot up in maintenance mode after it’s added to the specified location.
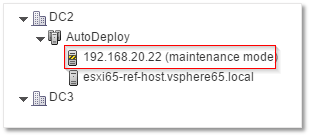
Figure 22 – Provisioned ESXi boots up in maintenance mode whenever a host profile is set
This means that we have to remediate the host as explained in my An Introduction to vSphere Host Profiles post. This also means that we need to supply input to the host customizations specified in the host profile like so.
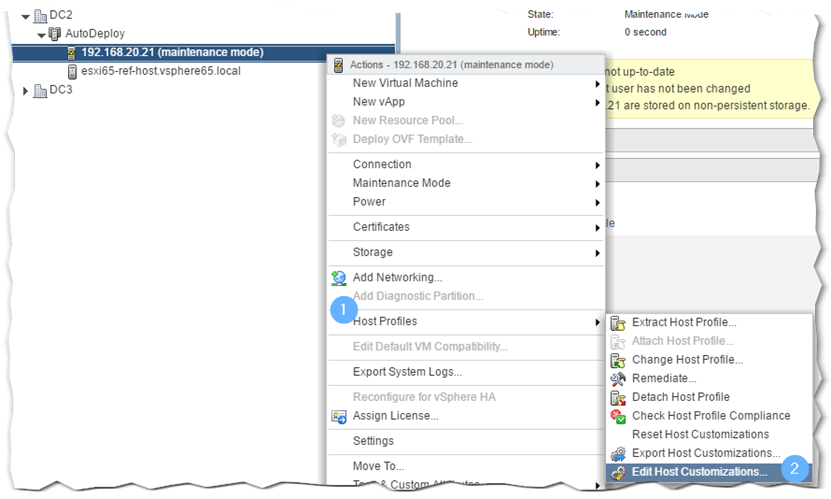
Figure 23 – Editing the host customization settings for a provisioned host
When prompted, type in the settings wherever the value under the Required column (Fig. 24 – 1st left) is set to Yes. To set the root password, you must click on the 3 dotted button next to the password field.
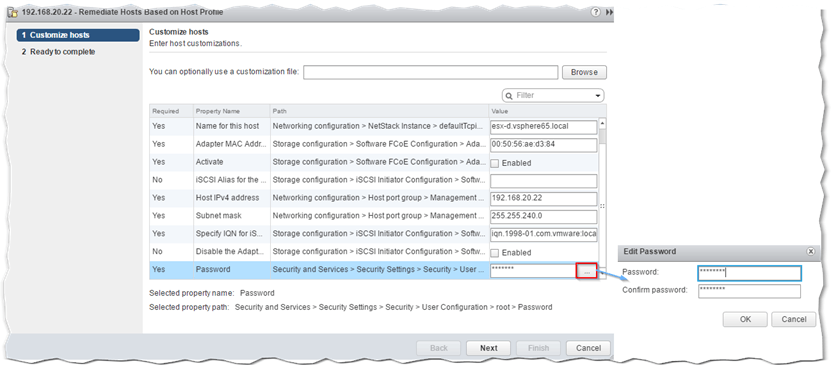
Figure 24 – Typing in the host customization settings
Running the Pre-Check Remediation test tells us that all’s ok and that the host will reboot once the remediation process completes.
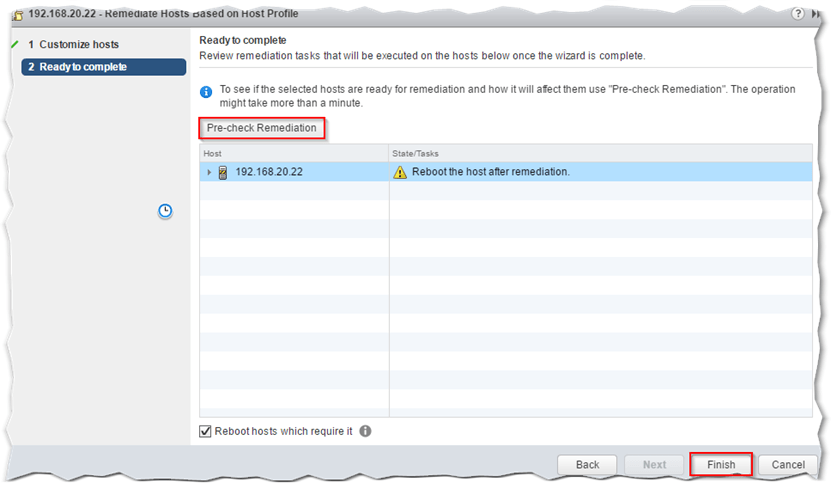
Figure 25 – Running a Pre-Check Remediation task prior to premeditating and rebooting
Depending on the provisioning mode specified in the host profile – where applicable – the host will now be running in either Stateless caching or Stateful install mode.
TIP 1: If you switch to the vmkernel log view while consoled – press Alt-F11 – you can actually see what’s being changed on account of the settings specified in the host profile.

Figure 26 – Following the host profile settings application in vmkernel view
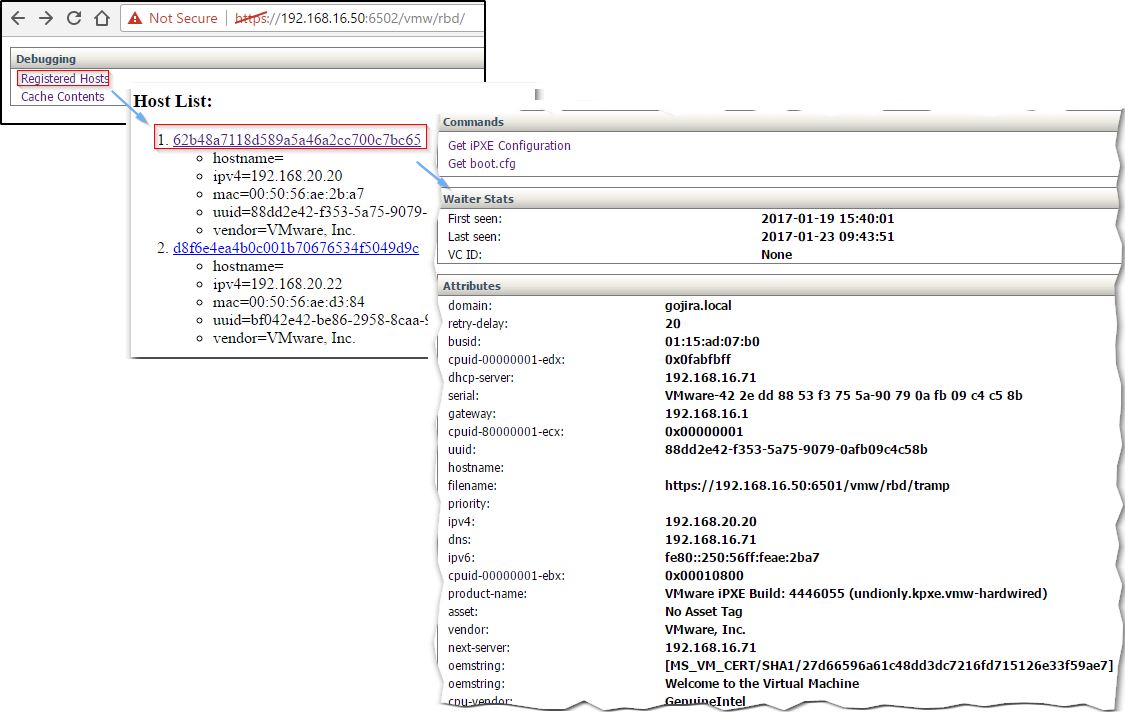
TIP 2: Typing in the following URL – https://<vCenter Server IP>:6502/vmw/rbd – in a browser takes you to the Auto Deploy Debugging page where you can view registered hosts along with a detailed view of host and PXE information as well as the Auto Deploy Cache content.
TIP 3: You can keep track of the ESXi hosts provisioned with Auto Deploy from the Deployed Host page as per Fig. 28.

Figure 28 – Monitoring provisioned ESXi hosts
Conclusion
I’m afraid I must end this post here. You should now be sufficiency prepared to be able to implement an Auto Deploy infrastructure and deploy ESXi over the wire in no time at all. I haven’t covered PowerCLI commands or troubleshooting tips for that matter, but I may do so in the future.
As always, make sure to bookmark this site so you can come back for more interesting posts.
[the_ad id=”4738″][the_ad id=”4796″]


Not a DOJO Member yet?
Join thousands of other IT pros and receive a weekly roundup email with the latest content & updates!


9 thoughts on "Testing ESXi Auto Deploy in a nested environment"
Incredible…just after our discussion about DVS, I started googling about another problem I had in my lab with Autodeploy and again, a post by Jason Fenech come up 🙂
Jason in my lab (vsphere 6.5U1) I had the following two problems:
1) Dhcp didn’t work
ESXi nested host didn’t receive ip from dhcp (windows server 2016) while other vm yes (I tried a couple of linux machine)
After a google search, I found a post somewhere (I couldn’t find it again) with other people having this problem and they solved adding the VLAN ID 4095 on the portgroup on which esxi hosts are attached
I’m not complitely sure but I suspect that the problem is related to the promiscous mode I had to configure on portgroups
due to the nesting. Maybe this is the explanation but I’m not sure https://kb.vmware.com/s/article/1004099
Question: did you have this problem? What do you thinkg about it?
2) UEFI
In my lab I have also been forced to disable UEFI and change it to BIOS but after reading your post, I did realize that the problem quire surely is the bad 067 option…in fact I used undionly.kpxe.vmw-hardwired but I should have used snponly64.efi.vmw-hardwired.
This is not a question 🙂
3) Update manager and Autodeploy relationship
How to manage esxi hosts patch and what about Update Manager?
I mean: with a standard (non autodeploy) installation, usually you can update hosts in 2 ways:
-using custom image by your hardware vendor. This is the suggested method, the only cons is that you must wait the new ISO.
-using just vsphere update manager. In this way is possible to update immediately your hosts in case of critical patches
Using autodeply I could easly accomplish the first method (waiting the vendo ISO) but, supposing that I need to use the second one because a critical patches has just been released, how could I update my hosts?
Anyway…what it is not definitevely clear to me is the relatationship between update manager and autodeoply. Could you please clarify?
Bye
Marco Reale
Italy
Hi Marco,
Yep, I have over 105 posts published so far and our Marketing team do a great job in getting them out there 😉
1) DHCP – Make sure you read carefully step 2. I had some issues with DHCP myself so what you’re reading is actually me jotting down the steps while testing them out. For nested ESX, the vnic type MUST BE set to vmxnet3 for this to work. VLAN ID 4095, afiak, comes into play only when you’re using vlans in your network.
2) Correct! The boot file is key here.
3) vSphere Update Manager is a separate component that is now embedded in vCSA 6.5. With the windows version of vCenter Server, you install it separately either on the same Windows box or a separate one. This much I think you already know but worth mentioning. What’s worrying you I think is how to patch stateless ESXi since any patches deployed are lost upon a reboot. The solution is to patch the source ESXi iso for patches to persists. If you have a large amount of stateless ESXi hosts this is something worth doing but for a couple of hosts it’s worth doing, imho, manually as in no autodeploy. You will need to use something like ESXi image builder as per this link.
Hope this helps.
Jason
about points 1 and 2 OK, this is clear.
About point 3, is it correct to say that using audeploy, Update Manager would be used just for VM tools/VM hardware update?
So, for a stateful install, you can patch / upgrade ESXi as you would normally do with standard deployed ESXi. The reason for this is that once installed via autodeploy, a stateful ESXi install will boot from disk so changes are retained. From https://kb.vmware.com/s/article/2032881:
“With the Enable stateful installs on the host host profile, Auto Deploy installs the image. When you reboot the host, the host boots from disk, just like a host that was provisioned with the installer. Auto Deploy no longer provisions the host.”
With stateless, your only option is to patch the pxe image and re-provision it via Auto Deploy. If not, you can only use Update Manager to upgrade vmtools / vm hardware.
Hope this makes things clearer.
Jason
Ok Jason this makes perfect sense. Thanks again for your clarifcation
Marco
You’re welcome, Marco.
Thanks for the article but I’ve been struggling all day to get this to work in my lab 🙁
I’ve tried several times to do a statefull install, checked the host profile – options selected correctly, used a reference ESXi (6.7) and set “auto partition” options up correctly before creating the host profile, still the install only does stateless! Keeps rebooting and does the cache stateless install every time. I have a 40gb disk attached to the VM as well so have no idea why it can’t install properly.
I also noticed that it reboots at PXE time saying no boot bank can be found, but on the next book it finds the TFTP and begins the process like in your video.