Save to My DOJO
As mentioned in my Backing up vCSA 6.5 natively using FTPS and How to natively backup vCSA using IIS and HTTPS posts, vCSA 6.5 can be natively backed up using a file-based approach where the resulting backup files are transferred to a remote share or repository using protocols such as HTTPS and FTPS.
This post is about restoring the appliance from backup using the vCenter Server installer inbuilt option as shown in Figure 1 below. The restore process is in fact almost identical to the 2-stage process used when installing vCSA. When performing a restore, a shell vCSA is created during Stage 1 followed by the application of the vCSA’s original configuration extracted from backup during Stage 2.
Today, I’ll be covering how to restore vCSA from a backup using the FTPS method. Let’s dig in.
Stage 1 – Creating the vCSA
1] Mount the vCSA installer ISO and run installer.exe from \vcsa-ui-installer\win32 assuming you’re running this on Windows.
2] Select the Restore bottom-most option as shown in Figure 1.
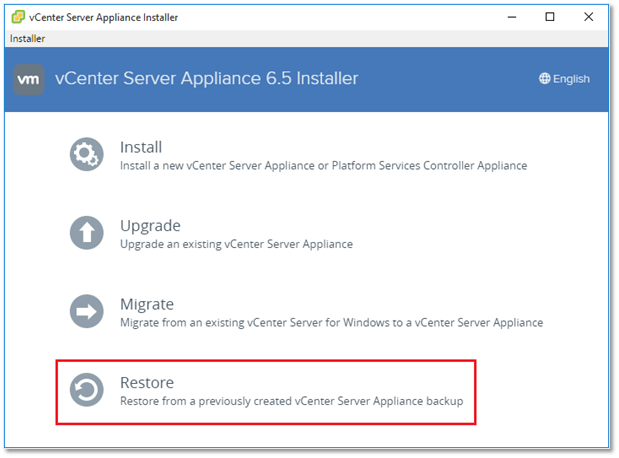
Figure 1 – The vCSA Installer running on Windows
3] Press Next on the Introduction screen (omitted).
4] Accept the EULA by ticking on the option at the bottom and pressing Next (omitted).
5] On this next screen (Fig.2), the details for the FTPS backup location are specified. In this case, I’m using FTPS on IIS. During this step, I ran into an issue related to how the installer tries to access the FTP root folder. Using the same setup, I had no issues backing up to 192.168.11.167/. This however was not the case when restoring using the same path as I kept getting the error message shown in Fig. 2. To work around this annoyance, I simply created a folder called root under the ftp root directory and moved the backup files to it. I then specified the full path in the Location field. This could be a bug or just an IIS quirk although it must be said that I did not come across the same behavior when testing with other FTP clients. Regardless, pressing Next takes you the the next screen, a review of the backup information. Press Next once more.
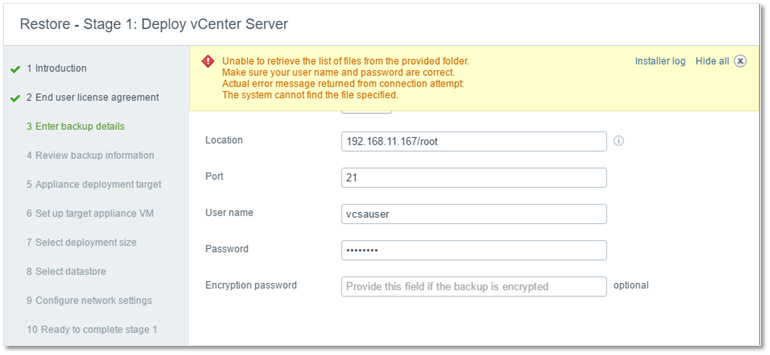
Figure 2 – Specifying the FTPS details from where the backup files are retrieved
6] Type in the details for the ESXi host or vCenter Server where you want the vCSA created. Press Next when done.
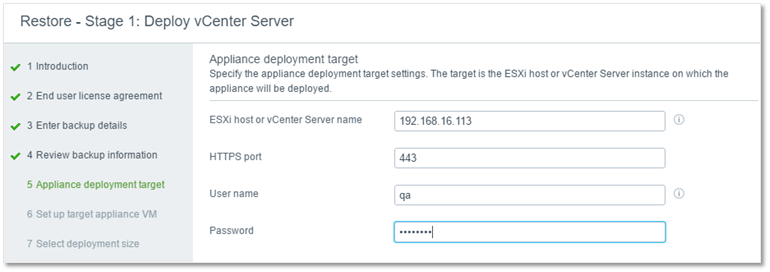
Figure 3 – Specifying where the restored vCSA will reside
7] Press Yes to accept the Certificate Warning and continue.
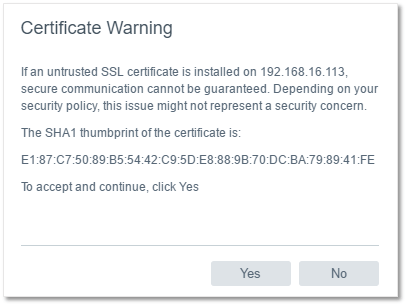
Figure 4 – SSL certificate warning
8] Specify the VM folder – if applicable – under which the vCSA is created and press Next.

Figure 5 – Specify a folder under which the vCSA is restored
9] Specify the ESXi host on which you want the vCSA created. This really only applies if you’ve specified a vCenter Server as the deployment target. Press Next.

Figure 6 – Selecting the ESXi host on which vCSA is restored
10] Pick a name for the vCSA (the one you’ll see listed in the inventory). Make sure that the name does not exceed 80 characters and excludes any of the following: %, \, /.

Figure 7 – Specifying the vCSA VM name and root password
11] Here you’re given the option to change the original vCenter Server deployment size. If you do, remember to change the hardware resources accordingly. Press Next to continue.
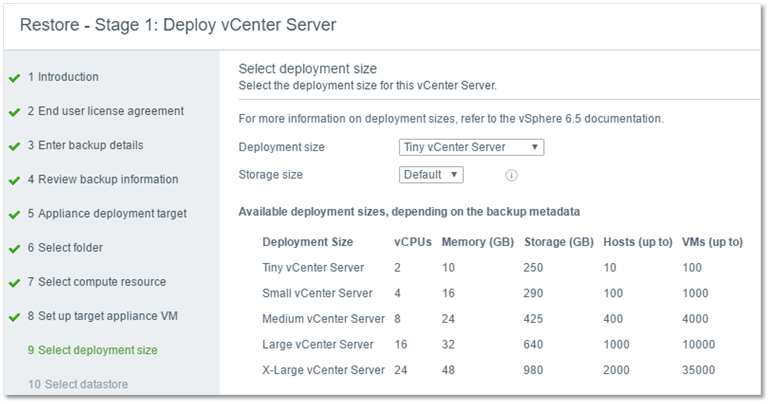
Figure 8 – Selecting a deployment size
12] Select the datastore where the vCSA will reside and press Next.
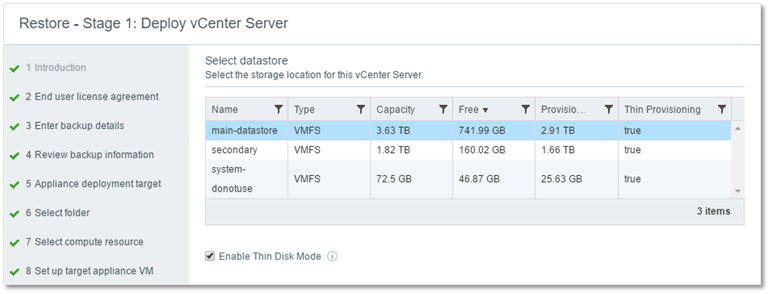
Figure 9 – Selecting a datastore
13] The details on this screen are populated automatically from the info retrieved from the backup-metadata.json file created when the backup was taken.
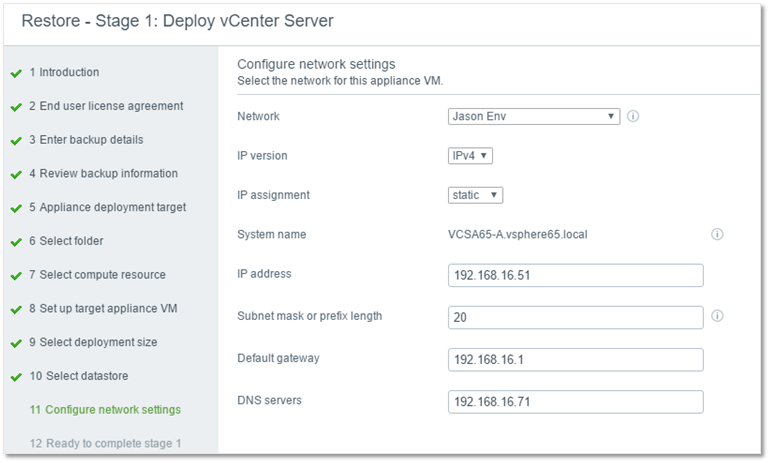
Figure 10 – Specifying the networking settings for the vCSA being restored
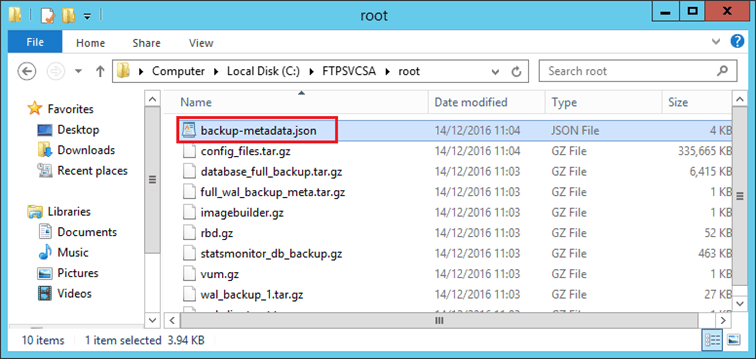
Figure 11 – The JSON file from which vCSA details are retrieved
14] Press Finish on the last screen (omitted) to start the restore process.

Figure 12 – Stage 1 VCSA deployment

Figure 13 – Deployment monitoring in vSphere client
Stage 2 – Restoring the original configuration
15] After Stage 1 completes, press Continue to move on to Stage 2 at which point, the configuration from the backed up vCSA is restored to the new one.

Figure 14 – Successful completion of Stage 1
16] Stage 2 simply involves pressing Next, Next and Finish respectively. Prior to the restore, you are warned that pausing or cancelling the restore process is not possible.
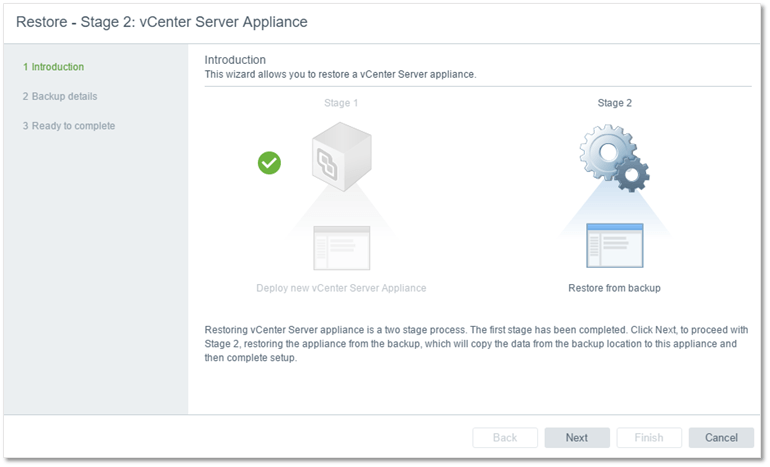
Figure 15 – Stage 2 landing screen
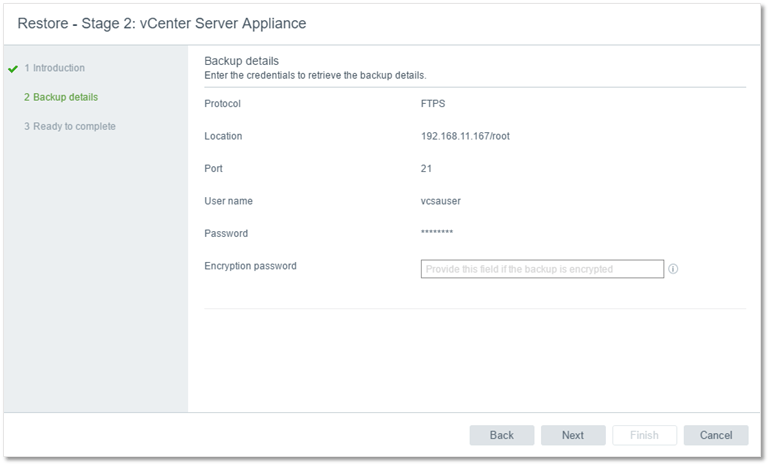
Figure 16 – FTPS details are re-populated from Stage 1 entry
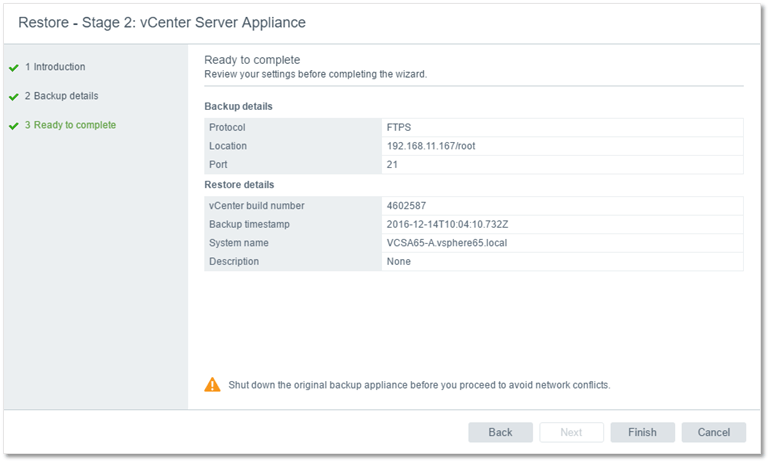
Figure 17 – Kicking off Stage 2 of the restoration process

Figure 18 – User warning about stopping or pausing the installation
What can go wrong?
Apart from the FTP root path issue mentioned earlier, I also came across a couple more issues, which is a good thing really since in my opinion, there is no better way to learn than experiencing problems firsthand and solving them.
The first hiccup was my doing to be honest. I specified the wrong portgroup on the network configuration screen during Stage 1 (Fig. 10 above). This particular portgroup happens to have no external network connectivity so when Stage 1 finished, Stage 2 was unable to talk to the new vCSA after it was powered on. It would have been great if VMware added a Back button of sorts since Stage 2 simply quits on you if it can’t continue.

Figure 19 – Specifying an unreachable portgroup will cause issues during Stage 2
After changing the portgroup to the correct one from the vCSA VM’s network connection setting, I was able to resume Stage 2 via VAMI i.e. https://<VCSA IP address>:5480 logging in as root. Once there, you just need to select the Restore From Backup option to continue the restore process.
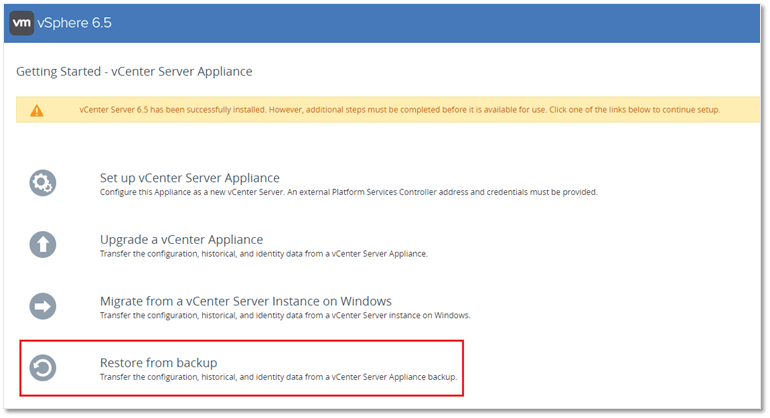
Figure 20 – Resuming Stage 2 from the vCSA Web Console (VAMI)
The only difference here is that the FTPS details need to be typed in as opposed to being populated automatically.
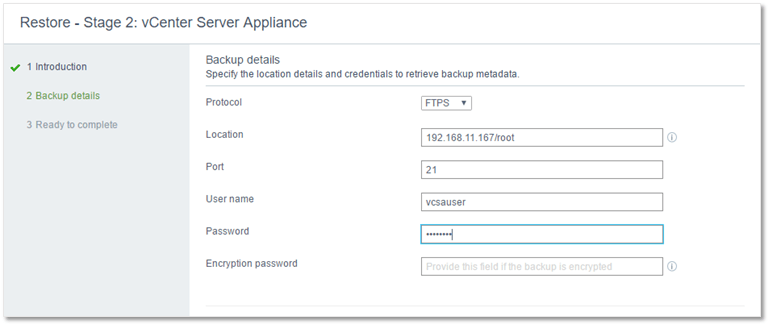
Figure 21 – Re-entering FTPS details when Stage 2 is resumed
The restore process quietly resumes and in my case, it completed successfully.
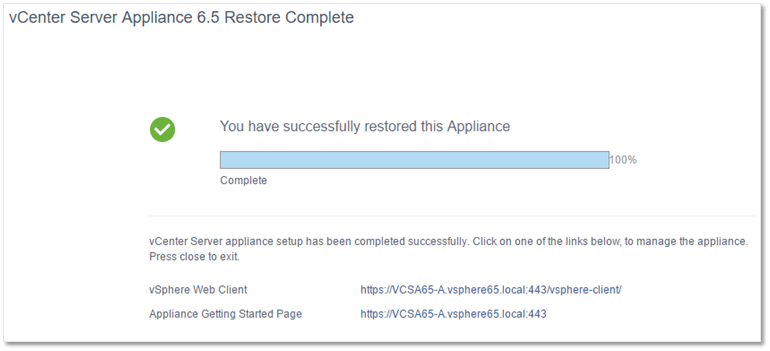
Figure 22 – Stage 2 successfully completed meaning the vCSA has been successfully restored
Another issue I came across during Stage 1 is that one cannot use the same IP address if the vCSA being restored is still active and part of the vSphere inventory. In a sense this should be obvious but the documentation is rather hazy about this. The work around of course is to pick a different address, install and then change the IP back to the original one after the restore operation has completed. To change the IP, just launch the vCSA Web Console (VAMI) and navigate to Networking -> Manage -> Networking Interfaces (Fig. 23a and 23b). Also note that the original vCSA is not powered off automatically when a different IP is set so you may end with two instances of the same vCSA albeit with different IPs.
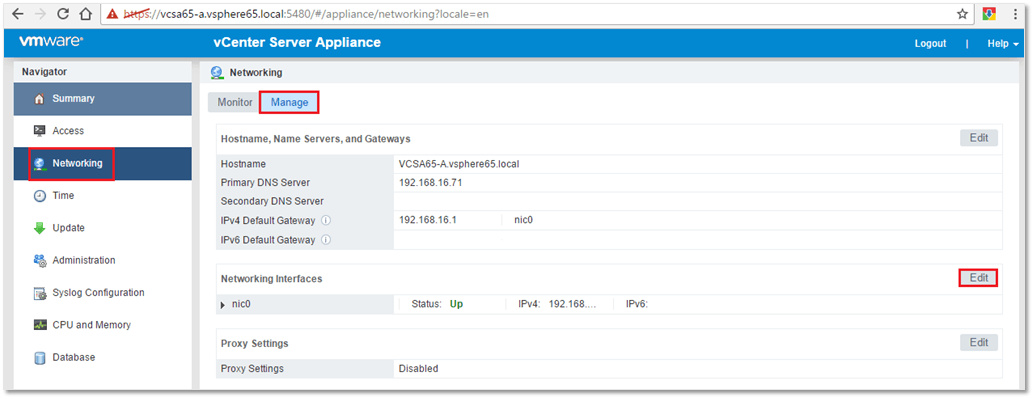
Figure 23a – Change the vCSA’s IP address using VAMI
Once there, click on the Edit button to change the IP address back to the original setting.
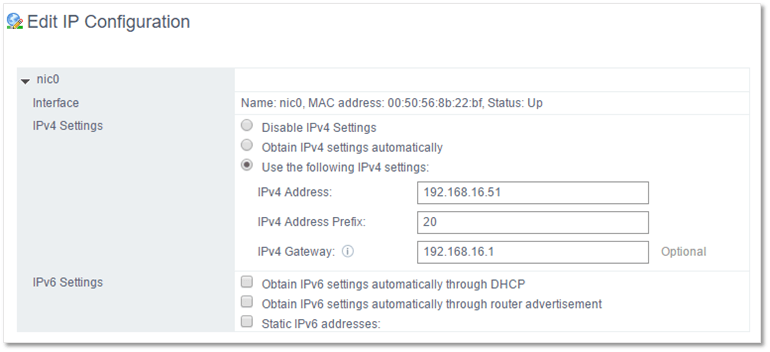
Figure 23b – Change the vCSA’s IP address using VAMI
The caveat to this is that after committing the change, the browser keeps targeting the original IP address where you essentially end up with an unresponsive VAMI instance. I’m assuming that the connection will eventually time out but time being precious, I just pressed cancel and verified that the vCSA responded to the amended IP address which was indeed the case. I also verified that all the vCSA’s original settings and configuration were successfully restored via the vSphere Web Client.

Figure 24 – VAMI keeps trying to connect to the old IP address when the latter is changed
Conclusion
This post brings to an end a series of three posts covering the native bckup capabilities of vCSA 6.5. I’ve covered how to set up HTTPS and FTPS using an IIS Web Server and how using VAMI once can backup the vCSA and transfer the resulting files to a remote share using any of the aforementioned protocols.
To summarize, I’ve covered how to restore a vCSA from an FTPS enabled location using the vCSA installer. I should also mention that while native backup is a very useful tool to have, one should not entirely rely on it. Instead you should use it in conjunction with scheduled full image backups using products such as Altaro VMBackup. Apart from the added peace of mind, dedicated backup software makes it intrinsically easier to automate and schedule backups. Having said that, native backup is without doubt a terrific feature as it gives you the ability to offload backup files to a remote location over HTTPS and other protocols. Just remember to tick the encrypt option when selecting unsecured protocols.
[the_ad id=”4738″][the_ad id=”4796″]


Not a DOJO Member yet?
Join thousands of other IT pros and receive a weekly roundup email with the latest content & updates!


7 thoughts on "Restoring vCSA 6.5 using the FTPS method"
Hi Jason,
Thanks for writing down the procedure !!
I had taken the full successful backup using FTP (not the FTPS), while restoring the same from restore option, after entering the FTP server details and everything, when I hit next, I get the error ” FTP location provided does not have the following file: backup-metadata.json”.
I double checked and found this file exists and of 4kb in size.
What could go wrong here?
Thanks for your help, Vinny
Hi,
I don’t have enough info about the setup you’re using so I’m assuming it’s IIS. I came across a similar issue which I outlined as follows:
“5] On this next screen (Fig.2), the details for the FTPS backup location are specified. In this case, I’m using FTPS on IIS. During this step, I ran into an issue related to how the installer tries to access the FTP root folder. Using the same setup, I had no issues backing up to 192.168.11.167/. This however was not the case when restoring using the same path as I kept getting the error message shown in Fig. 2. To work around this annoyance, I simply created a folder called root under the ftp root directory and moved the backup files to it. I then specified the full path in the Location field. This could be a bug or just an IIS quirk although it must be said that I did not come across the same behavior when testing with other FTP clients. Regardless, pressing Next takes you the the next screen, a review of the backup information. Press Next once more.”
Other than that check the web server and vcenter logs for clues.
Jason
Hi Jason,
That worked !!
I am using ftp on IIS and created a virtual directory underneath it.
Thanks a bunch !!
Appreciated it 🙂
Great to hear. Thanks!
Hi,
What happens to the original VCSA after the restoration to the New VCSA?
Can it be Deleted?
Hi, yes, you can safely delete it once you make sure that the “new” one is working without any issues.
Thanks
Jason