Save to My DOJO
Managing disk space on a VMware Linux VM, such as expanding existing drives, can turn out to be a complicated matter if Linux is not your thing. With Windows, it’s a simple matter of creating or expanding a VMDK and you’re a couple of clicks away from completing the task. Sadly, it’s not so simple with Linux. You need to factor in the Linux flavor, the file system type, whether LVM is used or not, mount points, boot persistence and so on.
In today’s topic, we’ll explore how to manage disk space on a Linux VM. I’ll be using a Centos VM as a test case to which I’ll add a second disk and expand it at a later stage. I chose not to use LVM selecting ext4 as the file system to keep things simple. Having said that, LVM has some major benefits, so do your homework when selecting a filesystem for Linux.
Throughout this post, I’m using the vSphere Web client that comes installed with vCenter Server 6.5.
How to add a new disk to a Linux Centos VM
Step 1 – Add the new hard disk (VMDK) from the VM’s settings. As per the next screenshot, I’ve created a 1GB drive which is thick provisioned and residing on an iSCSI datastore.
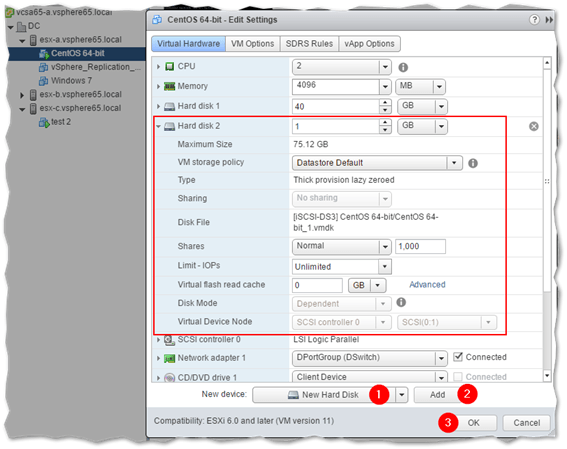
Creating a new disk using the vSphere Web Client
Step 2 – Console to the VM or SSH to it using putty or similar. Log in as root or one with similar privileges.
Step 3 – Run ls /dev/sd* to list the disks and associated partitions. Ideally, you’d do this prior to creating the new disk so you can compare outputs later. This allows you to easily spot the name of the new device. In my case, I began with one disk sda partitioned as sda1 and sda2. Given the next screenshot, this means that sdb is the newly added drive.

TIP: You can add and scan for new drives without the need to reboot the VM. To do this, run the following commands.
The first command returns the SCSI host in use which in this case is host2.
grep mpt /sys/class/scsi_host/host?/proc_name

The next command, performs a bus scan. Fdisk is used to list all the available drives on the machine. If the newly added drive is not discovered, reboot the VM.
echo "- - -" > /sys/class/scsi_host/host2/scan
fdisk -l

Step 4 – Just to be sure that we got the correct drive, run fdisk /dev/sdb to verify that it has no partitions as per the device does not contain a recognized partition table message. Note that there are instances where a disk in use does not have any partitions so try something like df -h to see if the drive is in use.

Step 5a – This first method, using fdisk, is the preferred option since disks without partitions can be a source of confusion. Run fdisk /dev/sdb and carry out these steps:
- Type n and press Enter.
- Type p and press Enter.
- Type 1 and press Enter.
- Press Enter to accept the default first sector.
- Press Enter to accept the default last sector.
- Type w and press Enter to write the changes to disk. You should now have a new partition called sdb1.
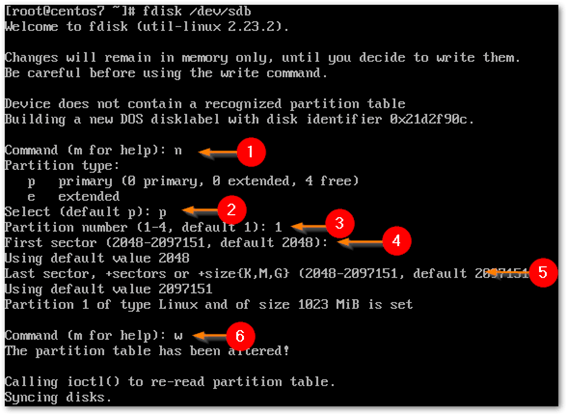
Running the fdisk command on Linux
- Run mkfs.ext4 -L logs /dev/sdb1 to format the newly created partition using the ext4 filesystem. You can use mkfs.ext3 instead, if you prefer.
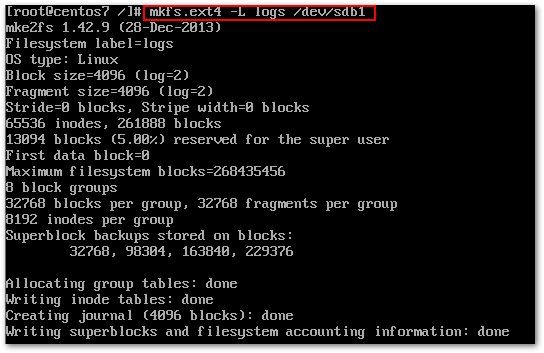
Formatting a partition in Linux
OR
Step 5b – Alternatively, using an mkfs tool, a disk can be formatted with the required file system without actually creating a partition. To do this, run mkfs.ext4 -L logs /dev/sdb. The -L parameter specifies the label that is assigned to drive while /dev/sdb is the drive we’re targeting. Press Y to acknowledge use of the whole drive. Again, I don’t suggest doing this unless absolutely necessary.
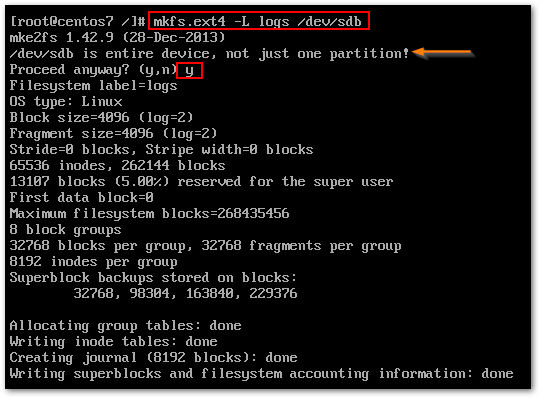
Formatting a drive in Linux
Step 6 – Next, create a folder (mount point) so we can mount the newly added drive to it. Run mkdir logs followed by mount /dev/sdb1/logs. Note: The folder name logs is arbitrary. Call it what you want.
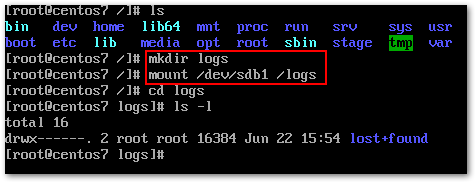
Creating a mount point in Linux
Step 7 – We want the mount point to persist reboots. Adding it as an entry in /etc/fstab as shown, achieves this. Use vi or another text editor, add the line to fstab.

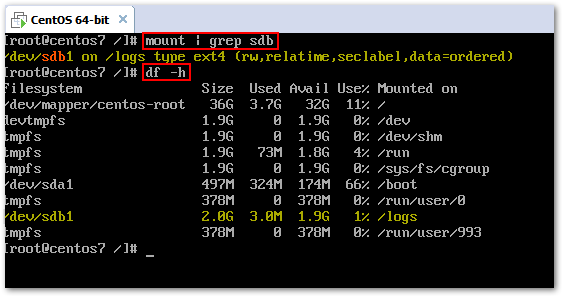
Step 8a – The next two steps are optional. It’s just to verify that the drive mounted correctly and is writable. The output from mount | grep sdb1 confirms this much as does df -h where the line /dev/sdb1 tells us that the drive is mounted along with the available and remaining disk space.
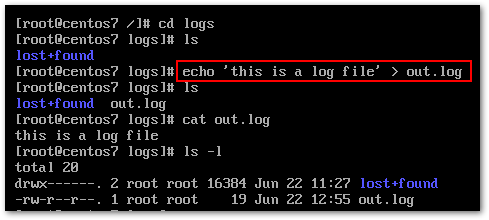
Step 8b – Use echo > <filename> or touch <file> to verify that you can write to the drive.
How to expand a disk on a Centos Linux VM
A 1GB drive won’t cut it, so we will expand it to 4GB. There are a few choices you could go for. You could, temporarily, move data from the existing partition to another disk, delete and re-create it from scratch and then expand it. You could also use the gparted utility to increase the partition size without deleting anything. Alternatively, you can simply add a second partition to the disk.
IMPORTANT: Stop now and take a backup if you’re doing this on a production system.
Step 1 – Power off the VM and expand the VMDK from the VM’s settings. Power the VM back on again.
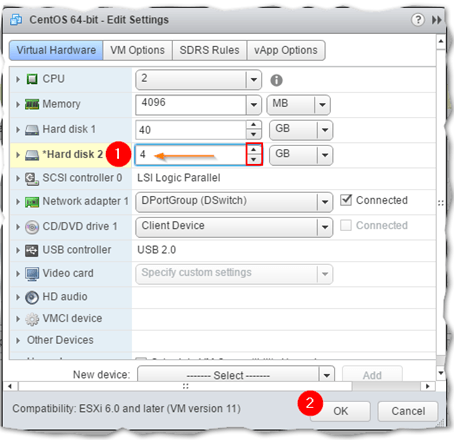
Increasing the size of a VMDK in vSphere Web client
Step 2 – Unmount the drive by running umount /dev/sdb1.
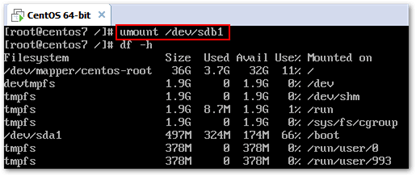
Step 3 – Using fdisk, delete the primary partition and create again it from scratch using the procedure outlined in step 5a above.
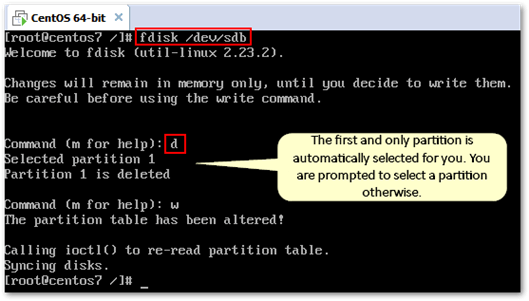
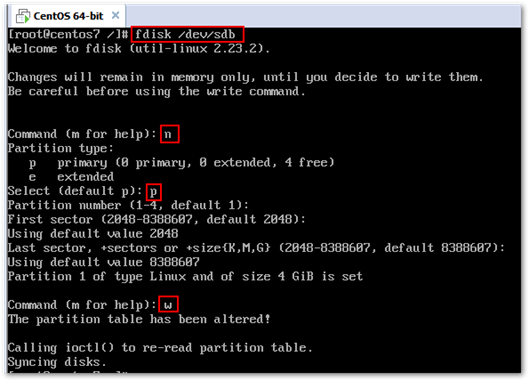
Note: If the partition table size remains the same, data on the disk will be preserved. If you have multiple partitions, do take a note of the starting and ending sectors making sure to keep them the same when re-creating the partition(s).
Step 4 – Remount the partition – mount /dev/sdb1 /logs – and run resize2fs /dev/sdb1 to resize it.
Step 5 – Run df -h to verify that the drive is correctly sized and that pre-existing data has been retained; just cd to it and ls.
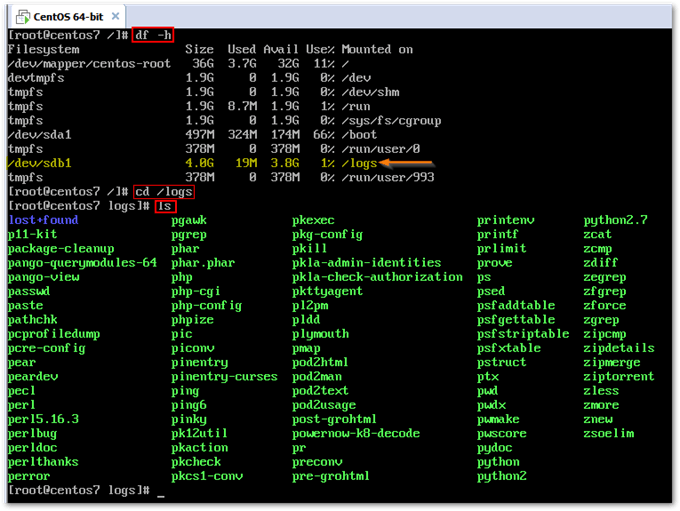
Checking disk space utilization via the df command in Linux
Conclusion
We’ve seen how you can quickly add and expand disks on Linux VMs. One thing you should keep in mind, however, is that the procedures outlined in this post may differ according to the Linux distro in use along with a number of other factors. That said, there’s a ton of information out there explaining how to manage storage on Linux. Regardless of the distro used, do yourself a favor and always take a backup or snapshot of the VM before playing around with disk management.
[the_ad id=”4738″][the_ad id=”4796″]


Not a DOJO Member yet?
Join thousands of other IT pros and receive a weekly roundup email with the latest content & updates!


10 thoughts on "How to Manage Disk Space on VMware Linux Virtual Machines"
Thanks. Will come in hand.
Can you make another post: how to reset the root admin password?
I checked youtube and the internet. I followed it and I damaged my esxi. I hope you can make it. Because your topics are on point. Thanks!
Regards
Hey Alex, thank you for the comment. I’m assuming it’s the ESXi root password you’re talking about. Do you mean resetting the password in cases where you get locked out?
Jason
Hi Jason,
Exactly. The root password of esxi. Well resetting it would be great.
We need to boot up from a linux centos or ubuntu iso right and from a disk management application we can see where esxi is installed and then open terminal and run some commands.
Well I did that and then my machine didnt boot up anymore! there are some videos on internet. It didn’t work on my end. Maybe it’s different for esxi 5.5 vs 6 and 6.5.
I trust your posts. So I trust it when you make a post about it. I hope you can!
Regards,
Alex
Hi Alex,
See my reply to Amir. According to this KB it is not possible to change the root password for later releases of ESXi. That said, I’ll still look into it.
Thanks
Jason
Hi Alex & Jason,
Please review this article :
https://www.vladan.fr/how-to-reset-esxi-6-x-root-password-and-under-which-conditions/
This procedure help me to reset the forgotten root password on ESXi.
Hi Amir,
Saw that post after reading Alex’s comment. It is assumed that ESXi is vCenter managed in which case using host profiles is a good idea. I will however see if it is possible to reset the password on standalone hosts using some live Linux CD or similar method. I trust someone already tried doing is but regardless if I succeed, I’ll include this in my list of topics to write about.
Thanks
Jason
Hi Jason, thank you so much about your’s amazing posts!
This blog updated almost every day with powerful information.
Hi Amir,
Your feedback is greatly appreciated.
Thank you so much.
Jason