Save to My DOJO
I’ve written a number of posts on how to install ESXi, vCenter and similar products but if memory serves me right, I don’t recall explaining in any detail how to apply license keys after you’re done installing. From a recently held conversation, I learned that licensing VMware products can be a tad confusing to some.
In today’s post, I go through the process of licensing the most frequently deployed VMware products these being ESXi and vCenter Server along with features such as vSAN. There are several options you can use to manage license keys; GUI, command line tools and PowerCLI. Let’s have a look.
How to license a standalone ESXi host
There are two ways to apply license keys on ESXi. You can either use the host client or run the vim-cmd shell command. The host must not be managed by vCenter Server – hence the term standalone – when using these methods.
Method 1: Using the host client
As always, navigate to https://<ESXi IP address> and log in as root. Click on Manage and select the Licensing tab.
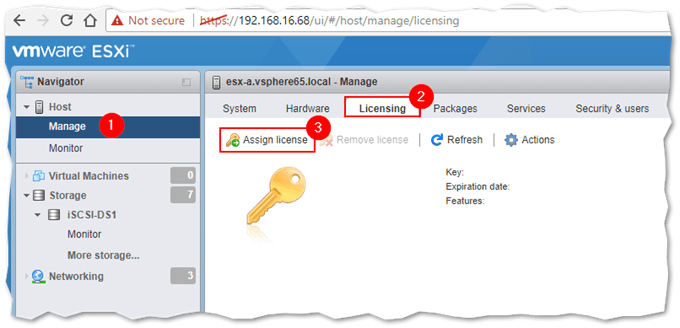
Figure 1 – Using the ESXi host client to apply a license key
Click on the Assign license button and type in the designated license key. Click on Check License to verify the key. If it is valid, press Assign License once more to apply it.
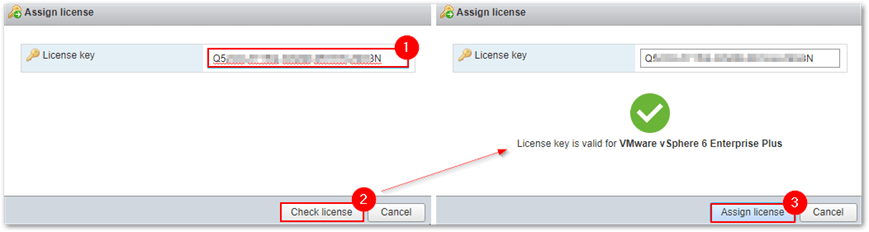
Figure 2 – Verifying and applying a license key on ESXi
If for any reason you need to remove a license, you can do so by clicking on the Remove License button. Since there can only be one license assigned at any time, the last one entered is picked up by default.
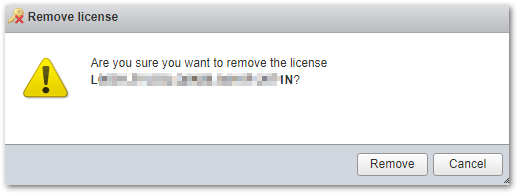
Figure 3 – Removing a license key from ESXi
Method 2: Running vim-cmd from shell
You first need to enable shell on ESXi using either the DCUI or the host client. Once you that, SSH to the ESXi host and log in as root. Run the following command:
vim-cmd vimsvc/license --set=L133G-UTGBF-7G344-04444-XFDGB
Note: The key used in the above line is not valid.
If the command is successful, the output will show which features have been unlocked following the key’s assignment along with product expiry details (if applicable), the type of key applied as well as the number of instances supported (per physical processor).
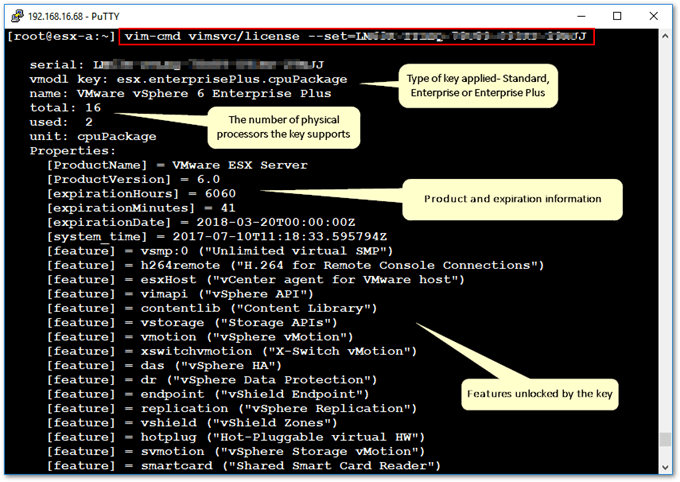
Figure 4 – Licensing an ESXi host using the vim-cmd vimsvc/license command
To check which license key is currently applied, run the following.
vim-cmd vimsvc/license --show | grep 'serial' -w
The output is piped into grep so that only the product key is listed. Removing will list all the information associated with the key as per the previous screenshot.
How to license vCenter Server and managed ESXi
The vSphere Web client is the recommended method to use when you’re licensing vCenter Server. This applies to both the Windows and appliance versions. You will need to license vCenter itself and, optionally, any ESXi hosts it is managing. A separate license is required for vCenter. If the managed ESXi hosts have already been licensed, you can simply stick with the currently assigned license when adding hosts to vCenter Server as shown in Fig. 5. If on the other hand, the features unlocked by the current key do not suffice, you will need to replace the current key with a new one that does.
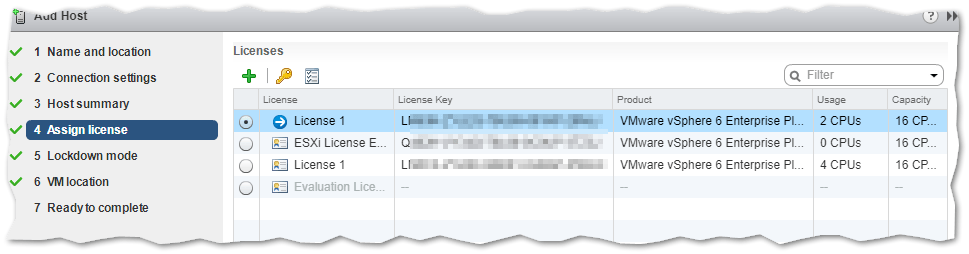
Figure 5 – Selecting an existing license key when adding an ESXi host to vCenter
Step 1 – Adding license keys
Adding license keys to vCenter is the first step. In general, you’ll have 2 keys, one for vCenter and a second one for the ESXi hypervisors. After you load vSphere Web client, click on Licensing from the Home screen.
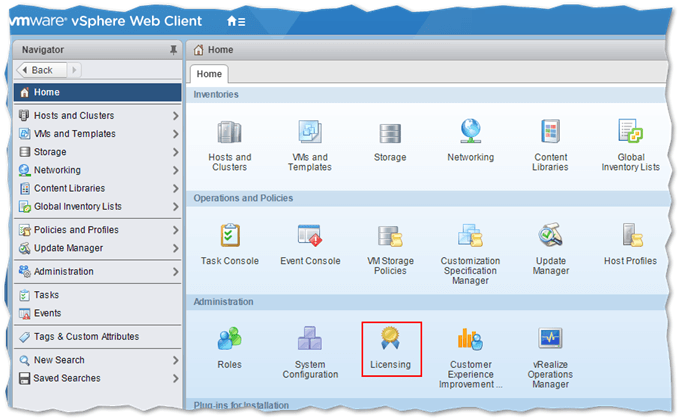
Figure 6 – Accessing the licensing module in vCenter
Select the Licenses tab on the Licenses screen and click on the green arrow button to add the new license keys.
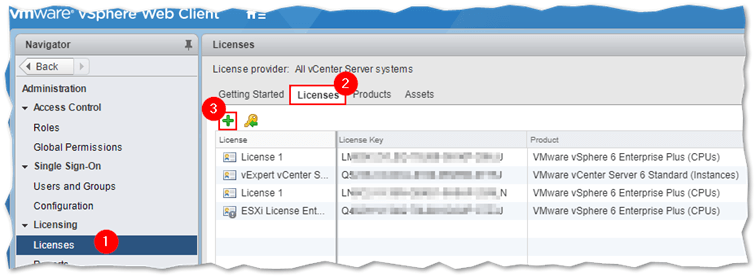
Figure 7 – Adding a license key to vCenter Server
Enter every key on its own line. As can be seen in Fig.8, I’ve added 3 license keys for vCenter Server, ESXi Enterprise Plus and vSAN Advanced. The keys are obfuscated for obvious reasons!
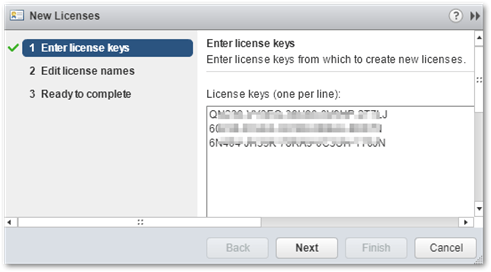
Figure 8 – Adding multiple license keys to vCenter Server
On the next screen, you can name the license keys. This makes it easier to identify which key is being assigned to what. This screen also provides details about the product expiry and capacity relevant to each key.
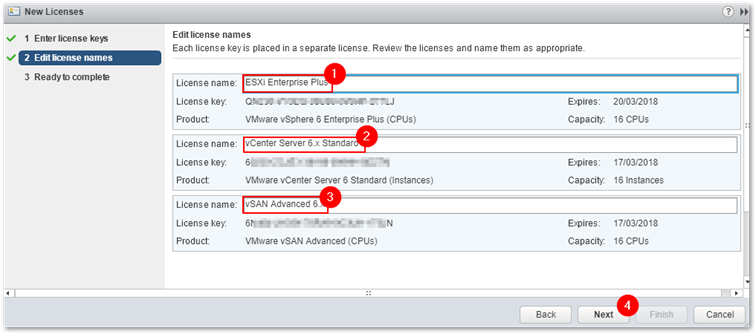
Figure 9 – Assigning a name to license keys
Press Finish on the last screen (not shown) and then verify that the new keys have in fact been added. The new keys should be listed alongside the previous ones.
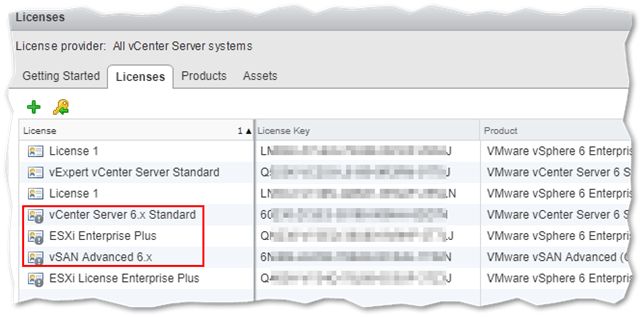
Figure 10 – A listing of all the available license keys on vCenter Server
Step 2 – Assigning license keys
After the keys have been added, we can go ahead and use them to license the corresponding VMware products. The Products tab gives you an overview of the products you can license, with all the license keys grouped accordingly. You can also view the features unlocked by the currently assigned key for the specific product by right-clicking on the product name and selecting View Features.
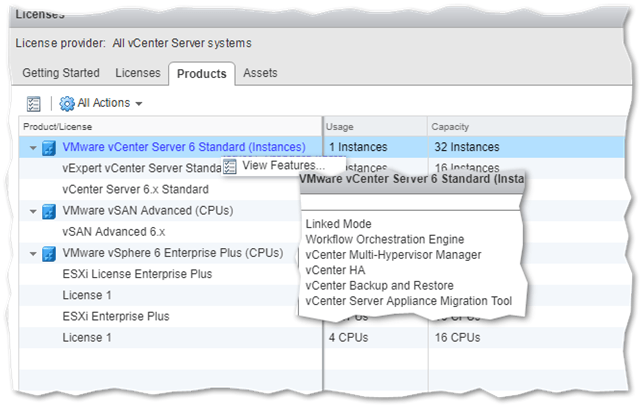
Figure 11 – A view of currently licensed VMware products and related features
To license a product, switch to the Assets tab. Under the 4 additional tabs – vCenter Server systems, Hosts, Clusters, and Solution – you will find the respective products including one or more vCenter instances and managed ESXi hosts. The Clusters tab is there to license cluster-centric features such as vSAN. The Solutions tab is instead used to license products such as NSX.

Figure 12 – In vCenter you can assign a license to vCenter, ESXi, clusters, and solutions
Step 2a – Licensing vCenter Server
To license vCenter Server, switch to the vCenter Server systems tab and right click on the vCenter Server name listed under the Asset column selecting Assign License as you do.
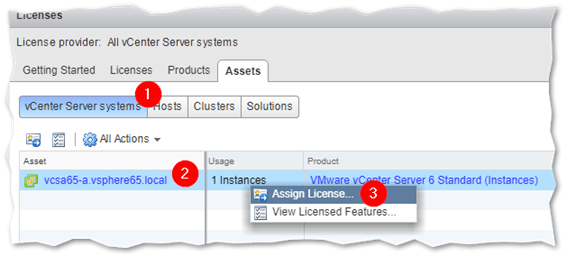
Figure 13 – Assigning a license key to vCenter Server
Select the license key you wish to assign to vCenter Server and press OK. This is where the license names, previously mentioned, come in handy.
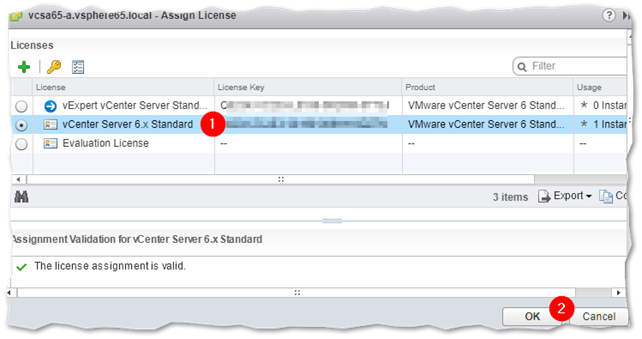
Figure 14 – Choosing a license key to assign to vCenter Server
Step 2b – Licensing ESXi
Likewise, you can easily license one or multiple ESXi hosts by way of the Hosts tab. You can license hosts individually using different licenses or, as is generally the case, simply select all the hosts (Ctrl-A) and enter a common license. To do this, just right-click on the selection made and select Assign License. Again, select the required license from the list and press OK.
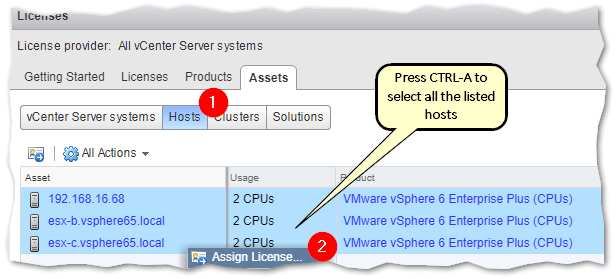
Figure 15 – Assigning a license to vCenter managed ESXi hosts
How to license vSAN
Some vCenter and/or ESXi features require a separate license key. Virtual San (vSAN) is one such example. Since this is a cluster-centric feature, you can either license vSAN using the Clusters tab on the Licenses page or directly from the cluster’s context menu.
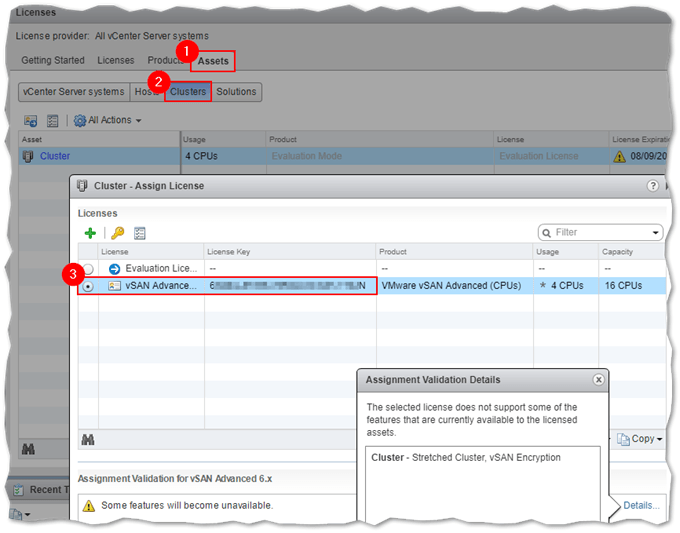
Figure 16 – Assigning a license to vSAN from the Licenses page
The other method you can use to license vSAN is to right-click on the cluster name while in Hosts and Clusters view selecting Assign License as you do.
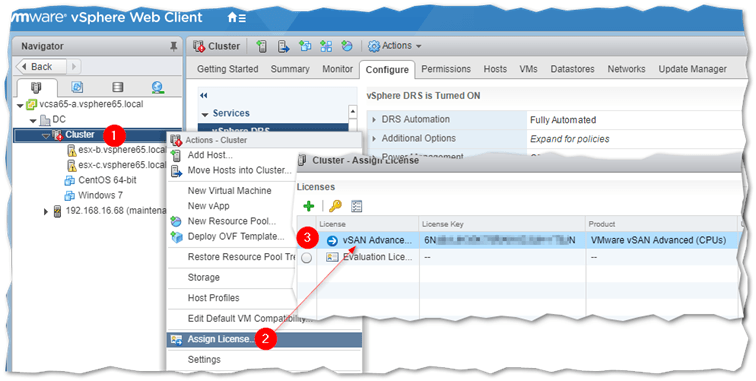
Figure 17 – Assigning a vSAN license using the cluster context-menu option
Using PowerCLI to add license keys
No post would be complete without mentioning PowerCLI. Yep, you can query and add license keys to vCenter using PowerCLI.
First, launch a PowerCLI instance. Make sure you are connected only to the vCenter Server you want to query or make changes to. If in doubt, run Disconnect-VIServer * -Confirm:$false first. As always, use Connect-VIServer to connect to vCenter Server.
Task 1 – List existing license keys on vCenter:
$licMan = get-view $defaultviserver
$licInfo = get-view $licm.content.LicenseManager
$licInfo.Licenses
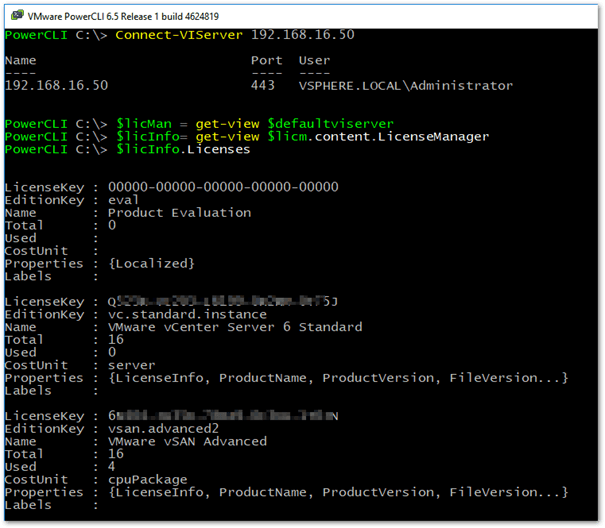
Figure 18 – Listing applied licenses on vCenter using PowerCLI
Task 2 – Add a license key to vCenter Server
Run the following to add a key to vCenter Server.
$licInfo.AddLicense("XXXXX-XXXXX-XXXXX-XXXXX-XXXXX",$null)
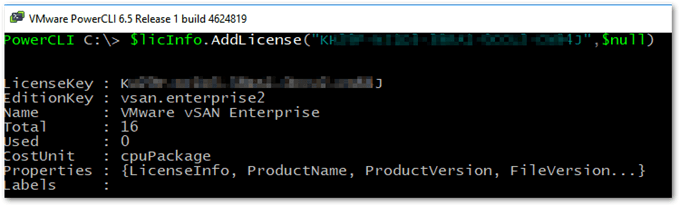
Figure 19 – Adding a license key to vCenter Server using PowerCLI
Conclusion
Here are a few references on the subject matter in addition to the information presented in this and other posts you’ll find on our VMware Blog.
- Licensing ESXi 6.x and vCenter Server 6.x
- Licensing NSX for vSphere 6.x
- Solution Licensing
- Adding License Keys to vCenter with PowerCLI
- VMware Licensing Help Center
- A quick look at VMware vSphere Editions and Licensing
[the_ad id=”4738″][the_ad id=”4796″]


Not a DOJO Member yet?
Join thousands of other IT pros and receive a weekly roundup email with the latest content & updates!
More in this category


About the Author
Jason Fenech


11 thoughts on "Learn How to License vCenter, ESXi and vSAN"
I am trying to remove the license from my vCenter Server 6 now that I have created and assigned the same license to my 6.5 vCenter Server. The optin to Remove License is grey out even though I am logged in as the local administrator. Can you assist me with this?
Hi,
Have a look at this -> http://vspherearena.com/2016/10/31/unable-remove-license-key-vcenter-server-6-0-due-stale-licensing-entry-vmware-directory/
regards
Jason