Save to My DOJO
Table of contents
As is often the case, I decided to revamp my vSphere lab. In general, this means starting all over from scratch, well, almost. My standard setup, at the time of writing, comprises vCenter Server for Windows and 3 nested ESXi hosts, just enough to let me play with things like VSAN. Shared storage is provided courtesy of a virtualized Windows Server via its default iSCSI server. Ok, it is definitely not the fastest of solutions but, for the time being, it’s all I need. This time round, I opted for vCenter Server Appliance (vCSA) with an external Platform Services Controller (PSC). Additionally, I’ll be adding a second vCenter Server Appliance set up in Enhanced Linked Mode.
I can see very little value in sticking with vCenter Server for Windows with the release of vSphere 6.5 round the corner.
UPDATE: Since writing this post, vSphere 6.5 has long been released followed by Update 1. You can read about this latest update in my vSphere 6.5 Update 1 – What you need to know.
Let’s go back to the topic at hand. Enhanced linked mode, allows you to manage multiple vCenter instances from one place using vSphere Web client. You can have a mix of vCenter Server for Windows and vCenter Server Appliance all under one roof. A few other benefits include the ability to replicate security principles and product licenses across all vCenter instances. You can also migrate virtual machines across clusters on separate vCenter instances; subject to network limitations.
In this post, I will give you a quick run-through on my lab requirements and how I went about setting the whole thing up.
The final setup will consist of:
- An Active Directory Domain Controller (DC) and DNS
- An external or standalone Platform Services Controller (PSC) appliance
- Two vCenter Server Appliances in Enhanced Linked Mode
On the ESXi side, I opted to reconnect my existing nested hosts which I recently patched to the latest. I’ve thrown Active Directory in the mix just to show how vSphere can be configured to leverage AD security principals for improved authentication and authorization purposes.
Last but not least, I opted for the appliance version of PSC rather than installing it on Windows, if anything because of its small 2 GB memory footprint. Also, an appliance voids the need for a Windows box meaning less time spent on patching the OS and one less license to worry about.
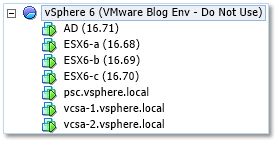
Figure 1 – Finalized environment from a vm perspective
Basic requirements
Here’s a list of the main components and the progress status for each.
- Windows Server 2012 Active Directory – DNS + DC for a single forest with one domain (Implement).
- Forward and reverse lookup DNS zones and records (Implement).
- A Platform Services Controller Appliance (Implement).
- 2x vCenter Server Appliance 6.0 (Implement).
- 3x ESXi 6.0 hosts (Available).
- Shared storage (Available).
Before diving in
These are the items I prepared in advance before installing the various components needed.
1) A list of hostnames and IP address I’ll be needing.
| IP Address / Mask | FQDN | Role |
| 192.168.16.71 / 20 | ad.gojira.local | Active Directory Domain Controller |
| 192.168.16.50 / 20 | psc.vsphere.local | Platform Services Controller |
| 192.168.16.51 / 20 | vcsa-1.vsphere.local | 1st vCenter Server Appliance |
| 192.168.16.52 / 20 | vcsa-2.vsphere.local | 2nd vCenter Server Appliance |
2) A VM running Windows Server 2012 with 4GB RAM, 1 vCPU and a 50GB VMDK (thin mode) assigned. I’ll configure Windows as an AD Domain Controller and DNS server.
3) On the Windows DNS server just installed, I created the host (A) and reverse lookup (PTR) records for the vCSAs and PSC under the respective DNS zones (Fig. 2) making sure they resolve correctly. I can’t emphasize enough how important this step is. Get it wrong and you’ll end up having to reinstall PSC, vCSA or both from scratch.
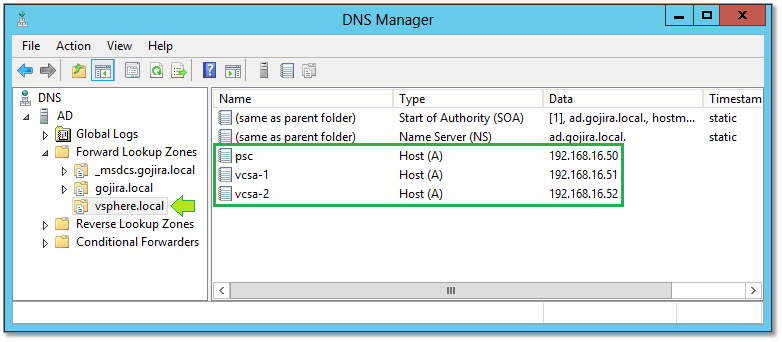
Figure 2 – DNS Forward lookup zone and records for the appliances
4) I mounted the vCenter Server Appliance ISO image as a drive on my Windows laptop.
Setting it up
Active Directory
I will not cover the entire process of setting up an AD Domain Controller as this is a pretty straight forward. If you’re using Windows Server 2012, just run the Add Roles and Features wizard from Server Manager and select Active Directory Domain Services (Figure 3) followed by dcpromo. Here’s an excellent article on how to do this. The hardware resources allocated to the Windows VM suffice for its intended use, however you can increase these at any time if you planning on hitting AD hard or perhaps adding more roles and features to the server.
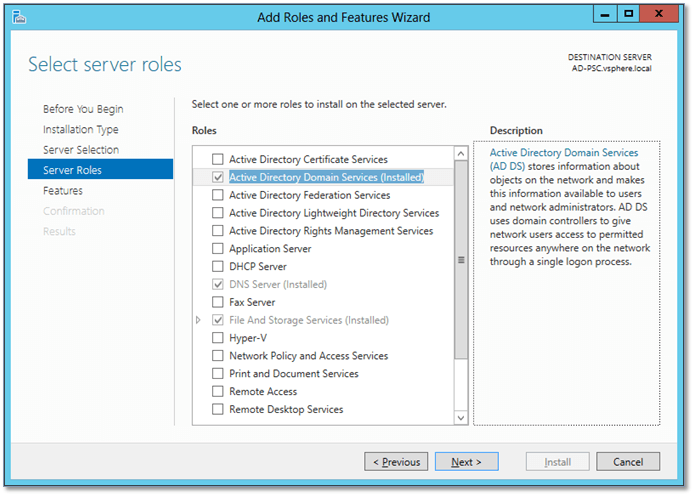
Figure 3 – Adding the AD Domain Services role in Windows Server 2012
The Platform Services Controller
Before I decided to deploy a PSC appliance, I thought about installing PSC on the Domain Controller but it turns out that you can’t. So, note this down for future reference.
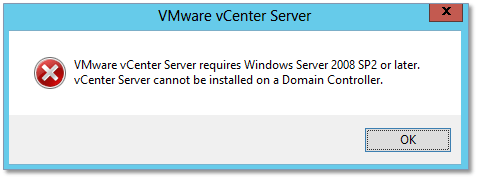
Figure 4 – A PSC may not be installed on a Domain Controller
You might also be tempted to link a secondary vCenter Server to one with an embedded PSC. There’s nothing stopping you from doing just that but again, it’s a case of reading the manual since this topology is no longer supported. The left bit of Fig. 5, shows the supported topology I went for. The bit on the right is now deprecated. For a detailed list of supported topologies, review the following KB.
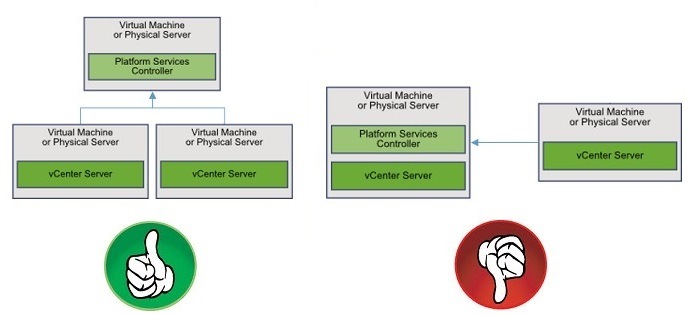
Figure 5 – A supported enhanced linked mode topology and a deprecated one
To kick off the standalone PSC installation, I mounted the vCSA ISO on my laptop and ran vcsa-setup.html from the root folder.

Figure 6 – Mounting the VCSA ISO image as a drive on Windows
If the Client Integration plugin isn’t not found, you will be prompted to install it. To do this, you must kill all browser sessions. Once you install the plugin, run vcsa-setup.html and wait for the plugin to be detected.
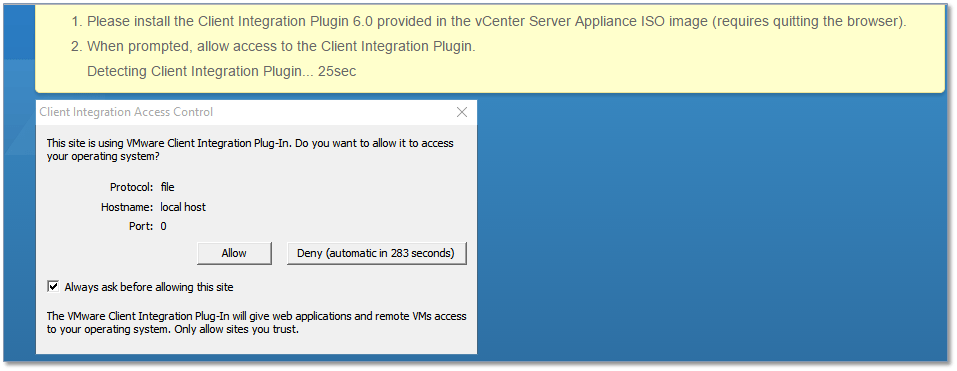
Figure 7 – Detection of the Client Integration Plug-in
The installation process is exactly the same as outlined in this post save for deployment type selection. In this case, I’ve selected an external PSC (Fig. 8).
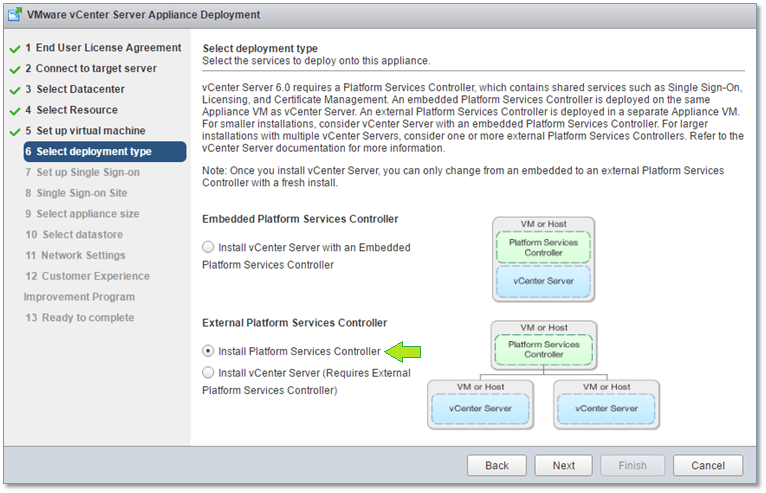
Figure 8 – Deploying an External Platform Services Controller
Fig. 9, shows the screen where all the SSO details are recorded. Make sure that the SSO and AD domain names are different from one another.
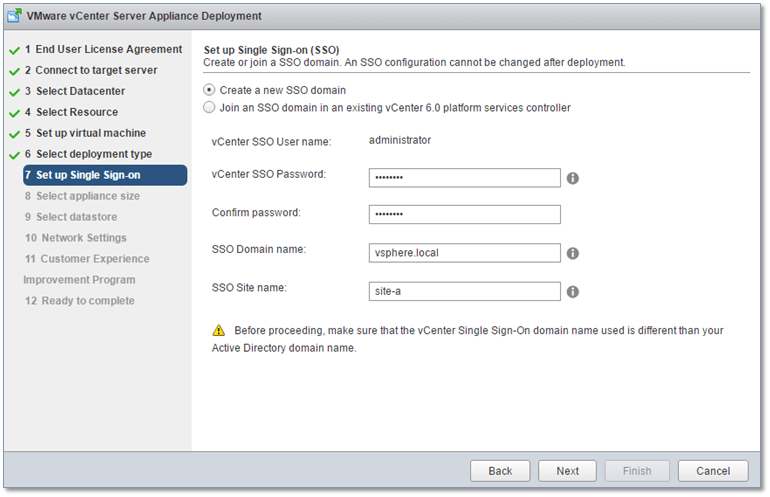
Figure 9 – Setting up SSO on the PSC
The next step is arguably the most important. The screen in Fig. 10, is where hostname (FQDN) of the PSC, the network details and time sync options are specified. The option to enable SSH after completion, is a nifty little feature.
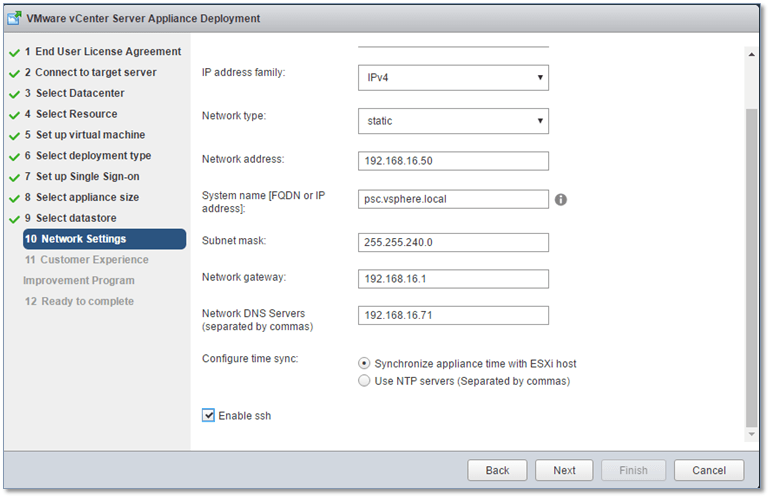
Figure 10 – Setting the network details and FQDN for the PSC
Hopefully you should end up with a screen as per Fig. 11.

Figure 11 – PSC successfully installed!
If something goes awry, you’ll probably face the dreaded Firstboot Error (Fig. 12) as I did when I mistakenly typed pcs.vsphere.local instead of psc.vsphere.local. This is why it’s always a good idea to double check everything.
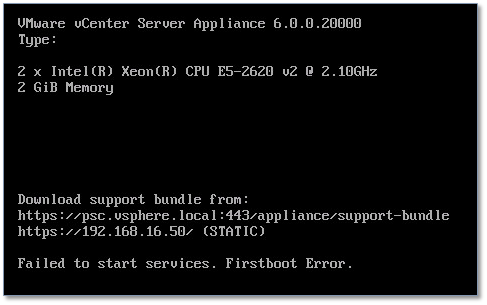
Figure 12 – Firstboot error due to a hostname / DNS mismatch
Truth be told, the installer can be as dumb as a box of rocks at times, which is a shame really. It skips some easy to implement checks which is why I emphasize the need to check, re-check and triple check all your details. Try as I may, I haven’t found a way to work around the Firstboot Error, even when you correct wrongly typed hostnames or network settings from shell. The only solution, so far, is to re-install from scratch. The same applies to a blotched VCSA install.
Installing the first VCSA
Again, I won’t go through the full installation process. Please refer to the vCSA article previously mentioned for the full details. Similarly to installing PSC, the only difference is when it comes to selecting the deployment. In this case, I’ve selected Install vCenter Server (Require External Platform Services Controller) as per Fig. 13.
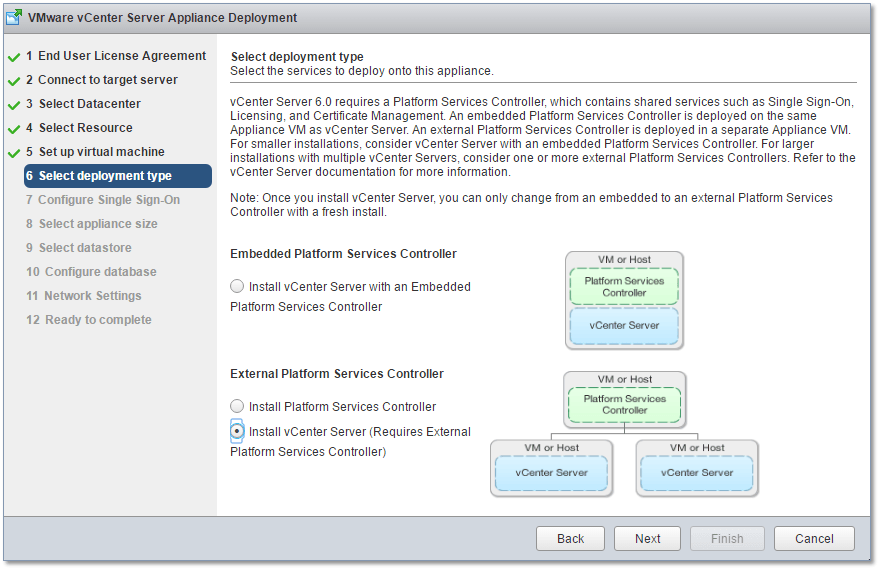
Figure 13 – Installing VCSA using an external PSC
Fig. 14 is where the details for the PSC we just installed are entered. Basically, we are pointing the vCSA to use the external PSC just installed. The remainder of the screens, is where you set the appliance size and the datastore on which you want the vCSA created. You will also configure the database and network settings.

Figure 14 – Telling the VCSA which PSC to use
After the installation completes, you should see the boot up screen in the VM’s console window (Fig. 15). Note that how the appliance’s OS is none other than SUSE Linux Enterprise Server.
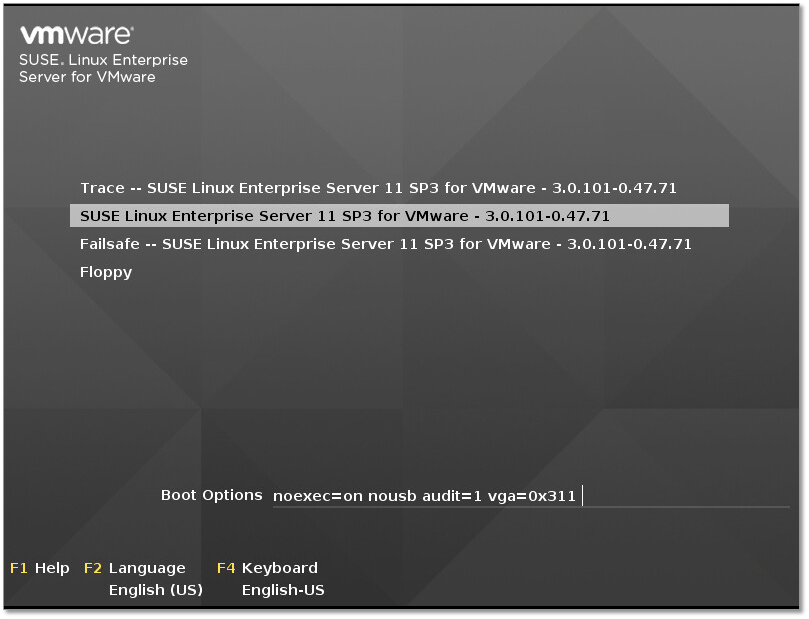
Figure 15 – VCSA booting up …
And as luck would have it, I typed in the wrong subnet mask; 255.255.255.240 instead of 255.255.240.0. This prevented the installer from talking to the rest of the network resulting in a failed install. Fig. 16 illustrates this.

Figure 16 – A failed VCSA installation
Installing the second VCSA
After re-installing the first vCSA I went ahead and installed the second one. This is where Enhanced Linked Mode finally comes into play. The good news is that no additional steps are required to set it up. You just need to point the second vCenter instance to the same PSC used before. This will link the two vCenter Server instances.
After the installation completed, I logged in the first vCSA. As per Fig. 17, both instances can be seen in the Navigator pane. Logging in the second vCSA, yields the same result. The fact that you can see both vCenter instances displayed on the same pane, is in itself indicative that enhanced linked mode is working. Additionally, you can select any vCenter instance from Navigator and verify that a Linked value is given under the Related Objects -> Linked vCenter Server Systems -> Mode column.
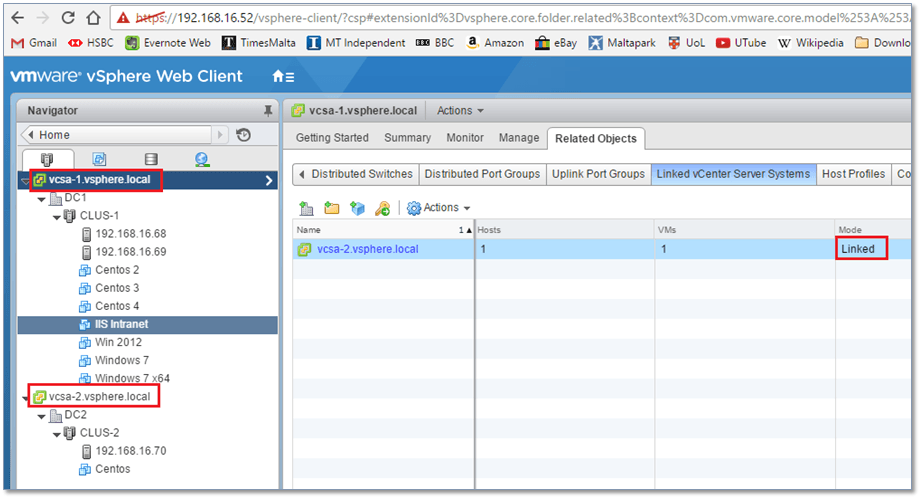
Figure 17 – Verifying that vCenter Server is running in enhanced linked mode
Adding the PSC to Active Directory
In this section, I go over the procedure of adding / joining the PSC to an AD domain, which in my setup is called Gojira. Note that you only need to add the external PSC and not the vCSA instances. The steps are as follows;
1) Select System Configuration from the Home screen
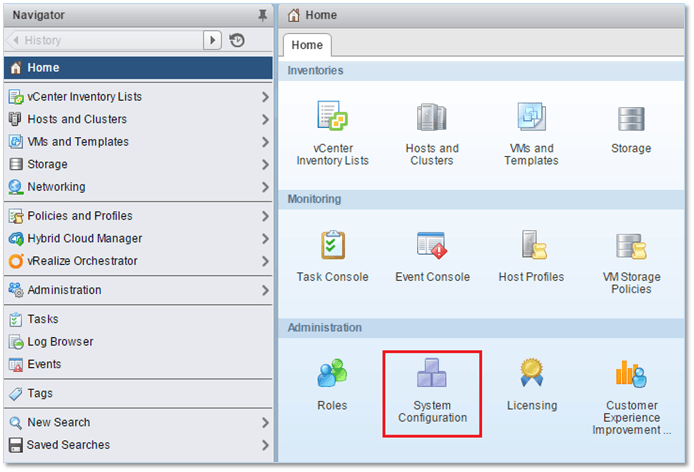
Figure 18 – Selecting System Configuration from the Home screen
2) Click on Nodes as shown in Fig. 20. In my example, there are three nodes listed these corresponding to the PSC and the two vCSAs.

Figure 19 – Viewing all the nodes in System Configuration
3) Click on the PSC node name listed in the Navigator pane. Under Settings -> Advanced, select Active Directory and click on the Join button at the top as shown in Fig. 20.
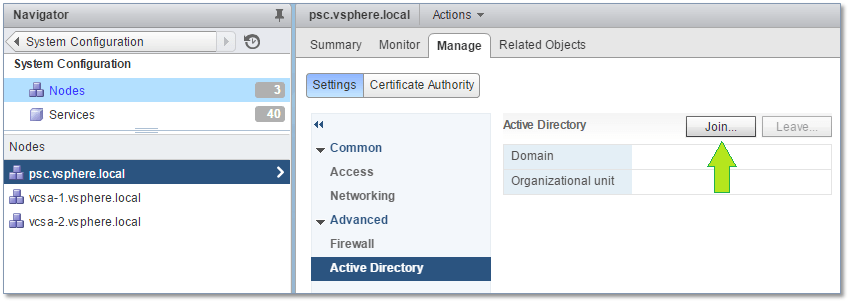
Figure 20 – Joining a node to Active Directory
4) Enter the AD domain name and a set of credentials with the right to join computers to a domain. The PSC needs to be rebooted for the changes to take effect.
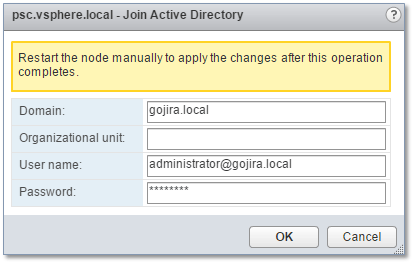
Figure 21 – Specifying the AD domain and credentials

Figure 22 – The domain is correctly listed after the PSC has been rebooted
Adding the AD domain as an SSO Identity Source
The last and final step needed to complete my setup, is adding the AD domain as an SSO identity source. This allows me to use AD security principals (translated users and groups) for authentication and authorization purposes.
There are two steps involved. First, select Configuration from the Home screen in vSphere Web Client. Select the Identity Sources tab and click on the green plus sign. On the Add Identity Source dialog box, select both the Active Directory (Integrated Windows Authentication) and Use machine account options. This is shown in Fig. 23.
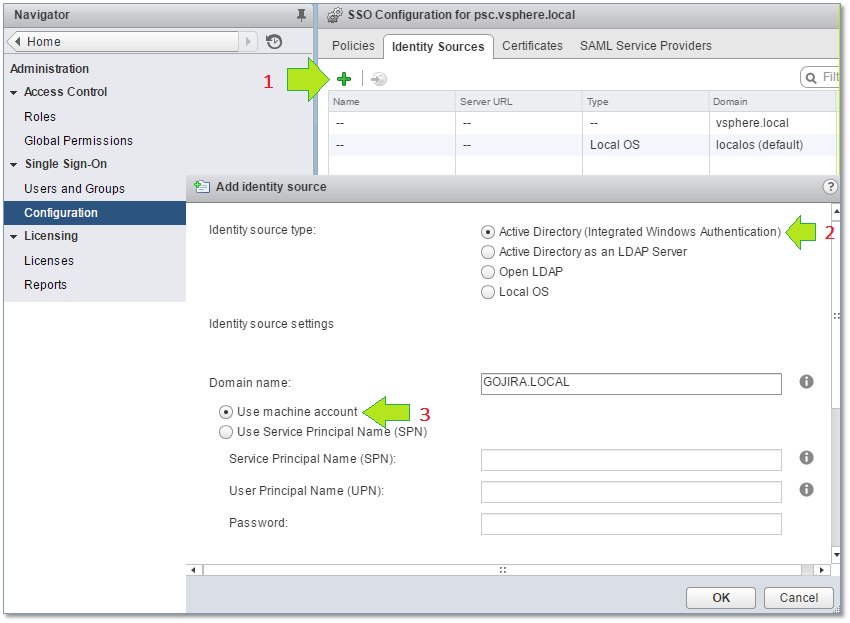
Figure 23 – Adding an AD domain as an SSO identity source
I then add the domain administrator account – the Domain Admins or Administrators group will work just fine – to the local vCenter Administrators group as per Fig. 24. Under Administration, select Users and Groups and click on the Groups tab. From the Group Members pane, click on the Add Member icon. On the Add Principals dialog box, select the AD domain and add domain administrator using the Add button, Press OK to finish. The various steps are numbered in Figure 24.
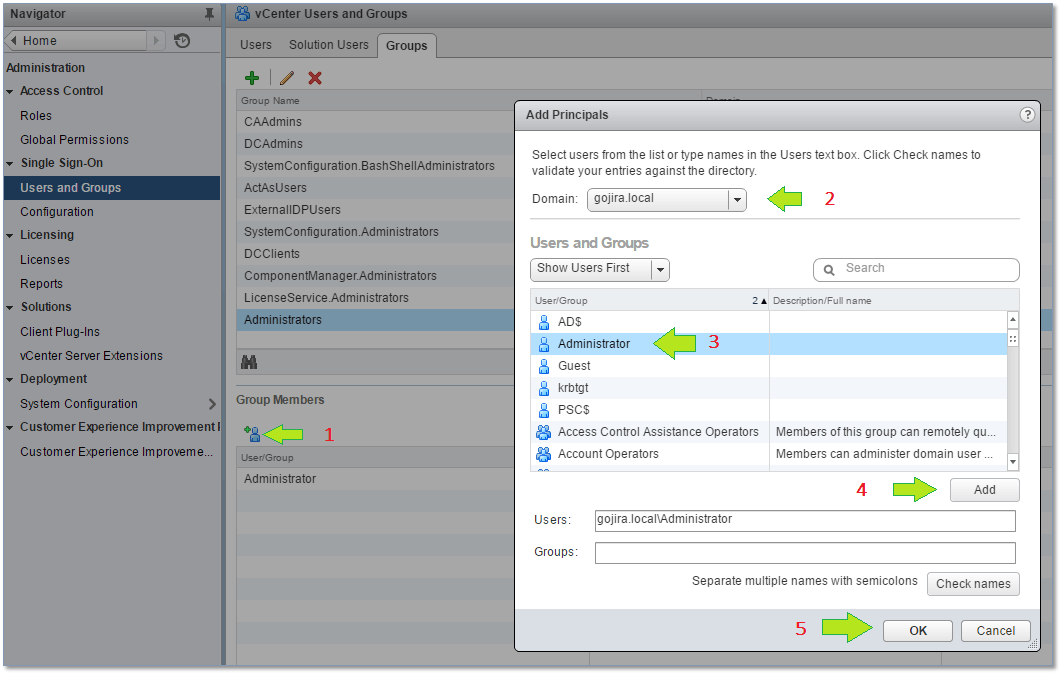
Figure 24 – Adding a domain’s administrator account to the local vSphere Administrators group
To verify that AD based authentication is working, I logged in with administrator@domain account and verified that I was able to access any resource irrespective of the view selected.
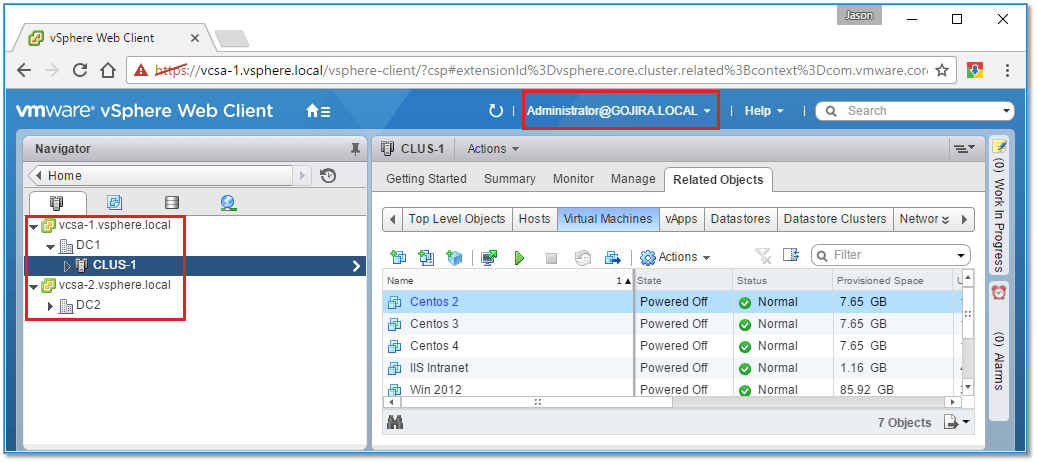
Figure 25 – Authenticated to a vCenter Server using an Active Directory account
In a production environment, you’d should restrict the use of administrative accounts opting instead for lesser privileged accounts depending on the tasks / roles you wish to delegate. The main benefit of using AD accounts is of course, a more effective and better managed mechanism by which to assign rights and set permissions. AD integration also facilitates Single Sign-on so you can log on a vCenter Server using the same AD credentials with which you log on your management station. You are also provided with a more pronounced audit trail should you need it.
Conclusion
We’ve seen that setting up Enhanced Linked Mode involves some preparatory work but, really, there’s nothing to it. In this post I also covered, however briefly, setting up a DC so we can integrate vCenter Server and leverage AD for vSphere authentication purposes as well as for assigning permissions on vSphere resources. I also demonstrated the importance of planning in advance before installing anything.
Finally, we’ve seen that the installer can be rather finicky if it is not fed the correct details so, again, plan carefully and have everything written down before moving on.
UPDATE: If you want to learn how to install vCSA 6.5, have a look at How to install vCenter Server Appliance 6.5 from scratch.
[the_ad id=”4738″][the_ad id=”4796″]


Not a DOJO Member yet?
Join thousands of other IT pros and receive a weekly roundup email with the latest content & updates!


23 thoughts on "How to set up Enhanced Linked Mode and more"
it is very simple & neat.
just refreshed my knowledge by going through this article.
Thank you for the feedback. Appreciated!
Many thanks for your tutorial. Simple and clear explanation Jason 🙂
Thanks. Much appreciated!