Save to My DOJO
Table of contents
Last week I wrote about one of vCSA’s 6.5 new features, native backup, and how file transport protocols such as FTP and SCP are used to copy backup files to a remote repository. I took you through the steps of setting up IIS on Windows Server to 2012 for FTPS but dropped the idea of tackling HTTPS due to space restrictions and because I thought the steps would be, give and take, the same. To refresh your memory, native backup can use any of the FTP, FTPS, HTTP, HTTPS or SCP protocols to transfer backup files to a remote location.
As it turns out, setting it up for HTTPS is a little bit more involving. I found very little documentation on the matter, so testing the feature ended up being a hit and miss affair. In fact, it took me the better part of the day to get it working
If IIS is new to you, I suggest having a look at Backing up vCSA 6.5 natively using FTPS just to get a grip on how to install and configure it. If you do have IIS experience, just skip to the final section of the aforementioned post which explains how to carry out a vCSA native backup from the Appliance Management tool.
Prerequisites
- Windows Server 2012 with IIS installed.
- A local user account called vcsauser.
- A self-signed SSL certificate created using IIS Manager (Refer to the Creating a certificate section from a previous post).
- A folder such as c:\httpsvcsa to which vcsauser has been granted read and write permissions.
Note: The server I used for testing is not joined to Active Directory, so the next procedure might differ given a different setups.
Adding missing components to IIS
If you need to install IIS, go ahead and launch the Add Roles and Features Wizard from Server Manager. Select and tick on the Web Server option (1) and then expand Common HTTP Features (2) selecting WevDAV Publishing (3) from the bottom of the list. Scrolling further down, expand Security and select the Basic Authentication option (4). Complete the wizard to install.
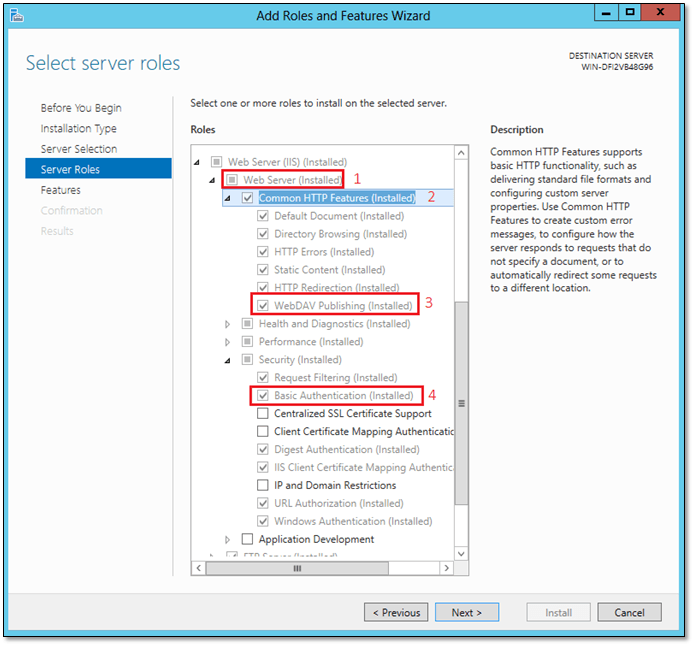
Figure 1 – Installing and adding features to IIS
Once the required features are in place, the first step, of course, is creating a website. Launch IIS Manager and right-click on the server name. Select Add Website.
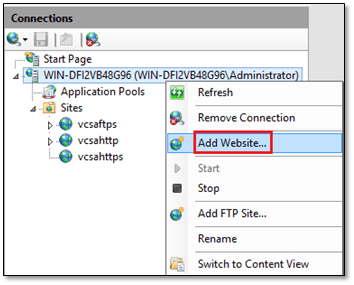
Figure 2 – Creating a website in IIS
Fill in the details as shown in Figure 3. Once you’ve finished typing, click on Connect as (Fig 3:1 ) and type vcsauser and the corresponding password in the Set Credentials dialog box. Make sure to select https as the Binding Type and to point to the SSL certificate created earlier on.
Click on Test Settings (Fig. 3:3) to make sure vcsauser can be properly authenticated and authorized.
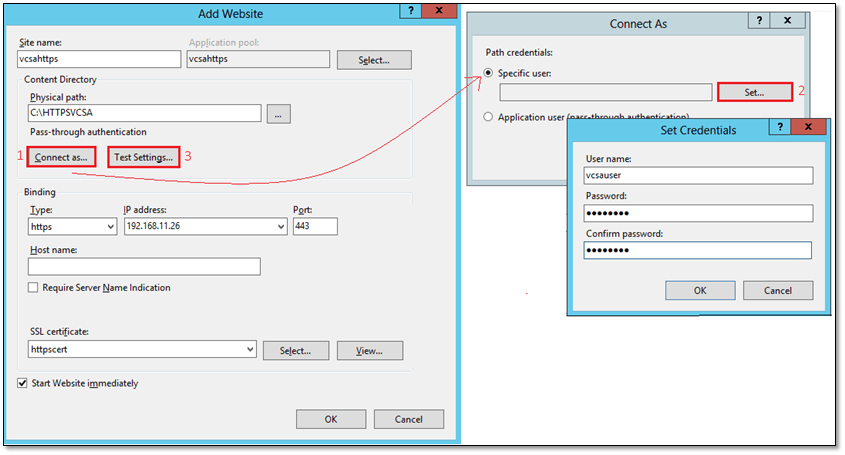
Figure 3 – Setting up an https website in IIS
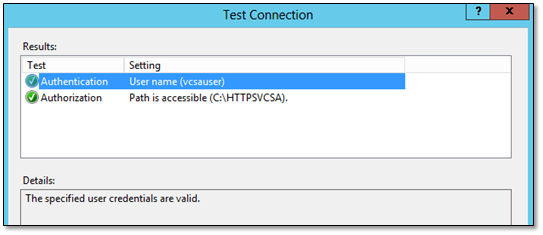
Figure 4 – User authentication and authorization test
When you’re done creating the website, it’s then time to tweak it up. Figure 5 shows the items that need to be configured with each label corresponding to the steps next listed in the same order. Where applicable, I’ve included error messages from the backup.log file on the vCSA. This is what helped me iron out most of the issues faced while trying to get vCSA to transfer files to IIS over https.
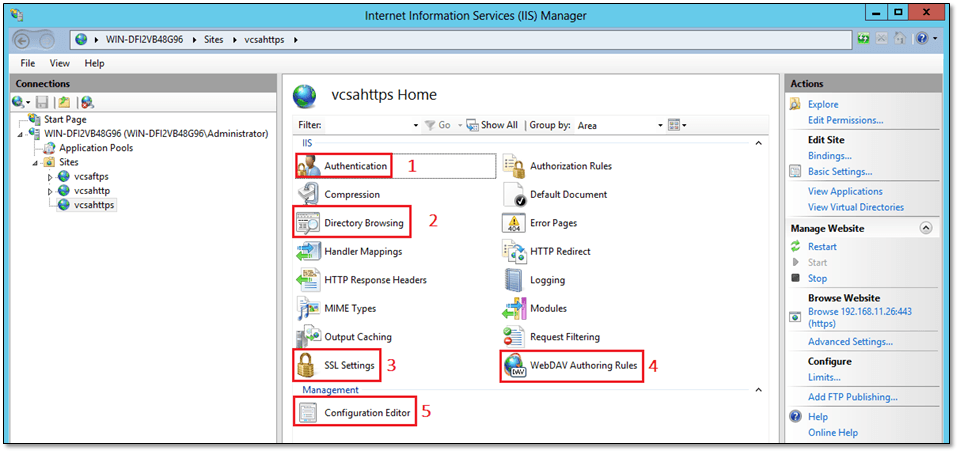
Figure 5 – Tweaking the website’s settings to enable vCSA backup transfers over https
Step 1 – Authentication
By default, Basic Authentication is not included when IIS is first installed. Initially, I only tested with the Anonymous Authentication and ASP.NET Impersonation options enabled, the result being recurrent 401 errors. Error 401 implies that the credentials used are not valid. When this happens, you’ll find entries such as stderr: curl: (22) The requested URL returned error: 401 in the backup.log file pointing to this issue. After countless tries, I took a shot at adding Basic Authentication which indeed proved to be the solution to the 401 error.
To enable Basic Authentication, click on authentication from the Home screen, right-click on Basic Authentication and select Enable.
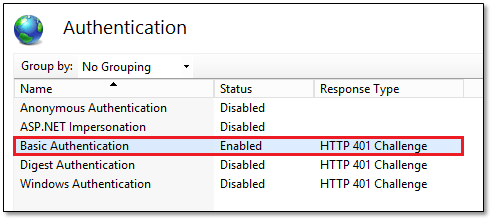
Figure 6 – Enabling or disabling an authentication method in IIS
Step 2 – Directory Browsing
The vCSA needs to be able to browse the directory (or folder) where the backup files are copied to. It is just a simple case of enabling Directory Browsing on the website. From the Home screen, double-click on Directory Browsing, click Enable followed by Apply. If this step is omitted, the vCSA backup wizard will throw an HTTPS location is invalid error.


Figure 7 – Enabling directory browsing
Step 3 – SSL Settings
This step is explicit since SSL is obviusly required when https is used. From the Home screen, click on SSL Settings and tick on the Require SSL option.
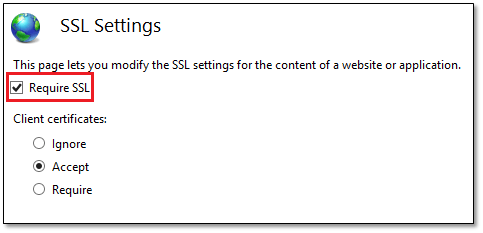
Figure 8 – Enabling SSL for the website
Step 4 – WebDAV
This is the part where I got stuck for a while. I totally forgot about WebDAV and its adding to IIS to allow vCSA to write files to the backup folder. In the backup.log file, you’ll see 405 errors every time a write attempt to the folder fails; stderr: curl: (22) The requested URL returned error: 405 Method Not Allowed
To enable WebDAV, just click on the WebDAV Authoring Rules on the Home screen and click on Enable WebDAV. Once you do this, you must also add a rule that grants read and write access to vcsauser. Figures 9a and 9b illustrate both steps.

Figure 9a – Creating a WebDAV rule
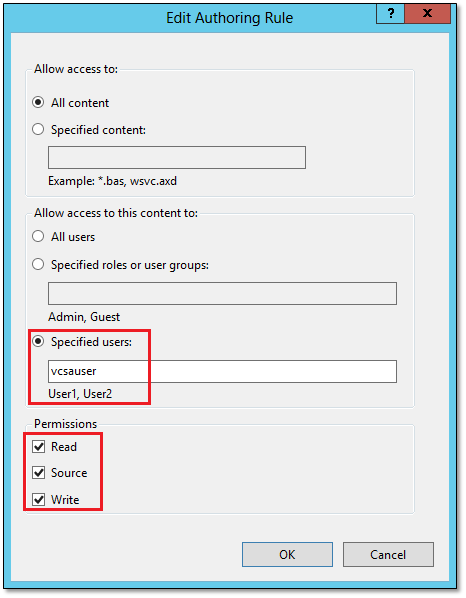
Figure 9b – Granting WebDAV authoring permissions to a specific user
Step 5 – Data transfer limits
By default, IIS restricts the size and amount of data it can handle to prevent from being overwhelmed by DDOS attacks and similar. Since the vCSA can in theory send some pretty large files, there are at least two settings I found that need to be tweaked for the successful transfer of files over https. More information on these settings can be found here.
When these limits are exceeded, you’ll come across 413 errors specifically stderr: curl: (22) The requested URL returned error: 413 Request Entity Too Large in the backup.log file.
To change the limits, click on Configuration Editor from Home and navigate to system.webServer/serverRuntime. You will need to experiment with the values for maxRequestEntityAllowed and uploadReadAheadSize. Note that both values are given in bytes.
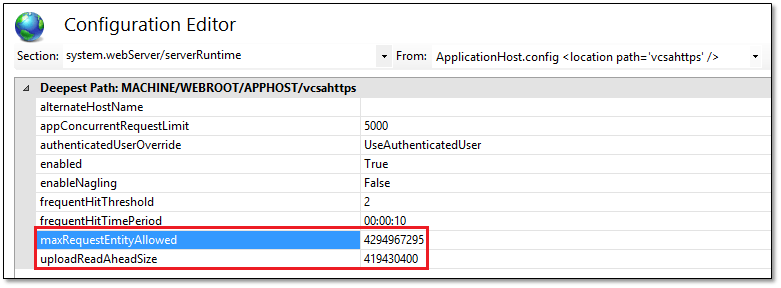
Figure 10 – Changing the data size IIS can handle at any one point in time
Once you finish setting up all the above, it is just a matter of using the Appliance Management tool to create a backup job selecting HTTPS as shown in Figure 11.
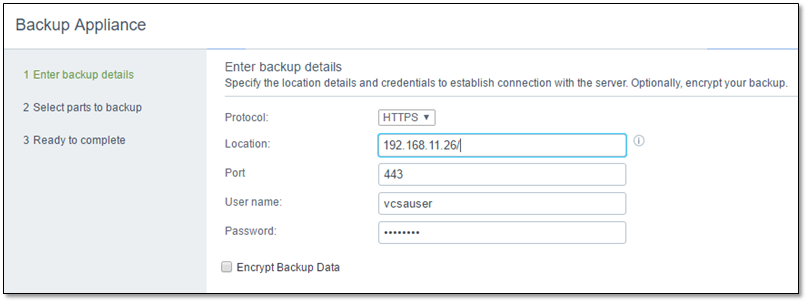
Figure 11 – Setting up a vCSA native backup job that uses HTTPS
Conclusion
Today, we have seen how IIS can be configured to have vCSA natively backed up over HTTPS to the web server.
I should also mention that file transfers appeared to be significantly slower when compared to speeds achieved using FTPS. I’m not sure if this is related to my setup, where everything is virtualized, but it should not take that long to transfer a few MB. It took circa five times as long as transferring the same via FTPS. It could well be a Windows thing on the lines of the excruciating slow transfer speeds experienced when using SMB. On that note, you can perhaps try using other web servers such as Apache or Nginx and see if the process fairs any better.
In the mean time have a look at my other posts on the VMware Blog and drop me a comment if you’d like to share your feedback and suggestions.
[the_ad id=”4738″][the_ad id=”4796″]


Not a DOJO Member yet?
Join thousands of other IT pros and receive a weekly roundup email with the latest content & updates!


17 thoughts on "How to natively backup vCSA to IIS using HTTPS"
Great job! Thank you so much.
Thank you!
Can anybody share the referenced link for “Creating a certificate” which is mentioned in Prerequisites section?
Hi,
This should take you to it -> https://www.altaro.com/vmware/backing-up-vcsa-6-5-natively-using-ftps/#S2
Edit: I amended the post to include a link to the Creating a certificate section.
regards
Jason
Thanks for sharing Jason. Excellent article and web site.
Thanks for the great feedback. Appreciated.
Jason
I had to create a virtual directory in IIS to get this to work. It kept failing and vCenter logs were saying directory not found. After I created the virtual directory, the vCenter was able to backup.
Hi,
Did you enable webdav and directory browsing as per the steps included?
I don’t recall creating a virtual directory. If I did, I would have listed it as a requirement. I write these posts while carrying out the task or procedure at hand just to be sure I don’t leave anything out. I don’t believe it makes any difference but for this post I used Windows Server 2012 with IIS v8.0.9200.
Jason
I had the same issue and it did not work so will do as suggested and provide an update.
Thanks for sharing
Worked fine for me following Jason’s steps. Not virtual directory required. I forgot to update.
The only thing I noticed was when you generate the self signed cert it uses SHA1. Can I change to Sha256? That would be handy.
Many thanks for sharing Jason
Hi,
I haven’t tried it myself but I don’t believe that using sha256 should make any difference in terms of being able to take backups.
Jason