Save to My DOJO
Table of contents
Despite all our best efforts, there’s always be something, somewhere, that is not performing as expected or simply decided to call it a day. This is where monitoring tools come in handy. The term monitoring is a bit of a misnomer as many of today’s tools also provide alerting, reporting, response and capacity planning features to name a few. vRealize Log Insight from VMware is one such example. However, today I’ll be writing about Nagios Core, a free monitoring tool that has proved popular amongst many admins. The great thing about it is that you can use it to monitor virtually anything and this includes ESXi given the right plugin.
In this two-part series, I’ll begin by showing you how to set up Nagios Core on a VM running Centos 7. In part 2, we’ll go over the process of setting Nagios up to monitor ESXi hosts.
Some Requirements
Nagios Core runs exclusively on Linux and is supported on RHEL, Centos, Ubuntu, FreeBSD and many more. For this post, I chose Centos 7 just because I had a VM readily available for use. Other than choosing a Linux OS where to host Nagios, RAM and disk space are the only other requirements you need to take into consideration. The resources required will depend on the number of hosts and services you plan on monitoring.
I set my Centos VM with 4GB of RAM and a 40GB drive abiding by the hardware requirements suggested for Nagios Core elder brother Nagios XI.
Note: Nagios is not for the faint of heart so be aware that it takes time to set it up properly. Make sure to read the basics before moving on to more advanced topics.
Installing Nagios Core on CentOS 7
I will not go through the process of installing Centos. If you need help, have a look at this excellent walkthrough on how to install Centos. With regard to downloading Nagios, the source files can be pulled from the company’s website or using wget. I opted for the latter method as included in the 12-step procedure below.
Note that all the commands referred to in the procedure are executed using root privileges.
Step 1 – Disable Selinux
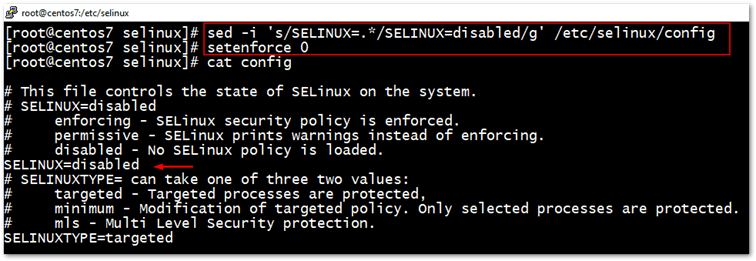
Selinux, which is a mechanism for supporting accesses control policies, must be disabled for Nagios Core to work properly although there are workarounds to this issue as per this post. I, however, went with the official documentation and disabled it as follows.
sed -i 's/SELINUX=.*/SELINUX=disabled/g' /etc/selinux/config
setenforce 0

Step 2 – Install package dependencies and update Centos 7 to the latest
We need to install a few packages such as a C compiler and a web server to install and run Nagios. Once we do, it’s a good idea to update Centos to the latest patch level.
yum install -y gcc glibc glibc-common wget unzip httpd php gd gd-devel
yum update
Step 3 – Download Nagios Core
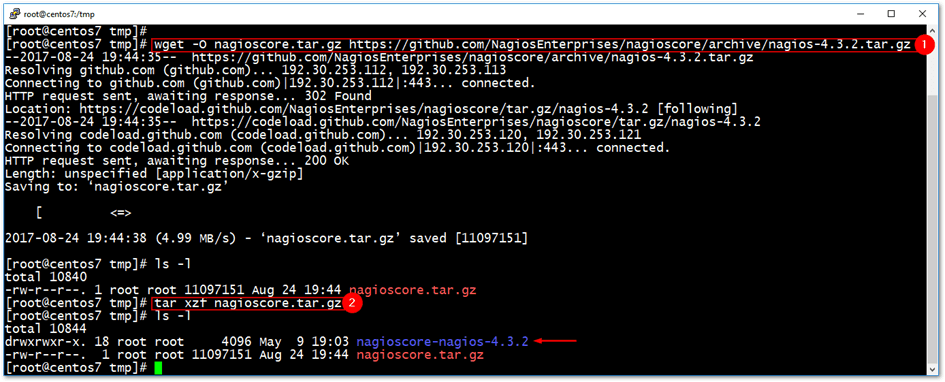
To download the Nagios source files, we’re going to use the wget command to fetch them directly from the Nagios GitHub repository.
cd /tmp
wget -O nagioscore.tar.gz https://github.com/NagiosEnterprises/nagioscore/archive/nagios-4.3.2.tar.gz
tar xzf nagioscore.tar.gz

Step 4 – Compiling and building Nagios
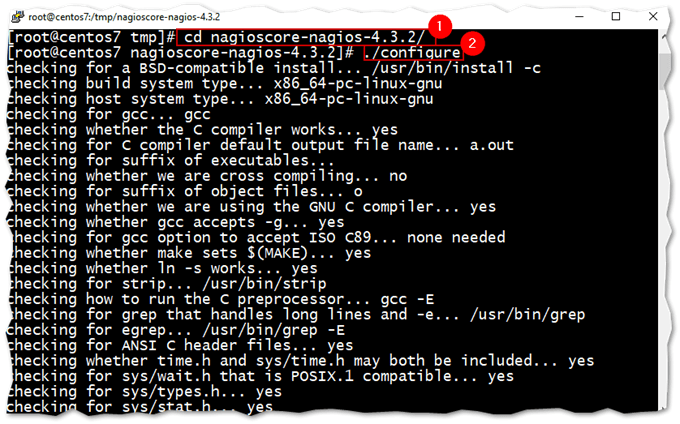
Since this is Linux, we need to compile and build the Nagios application from the source files just downloaded.
cd /tmp/nagioscore-nagios-4.3.2/
./configure
make all

Step 5 – Create a Nagios user account and group
The next two commands will create a nagios user and an associated group. We also add the apache user to the nagios group.
useradd nagios
usermod -a -G nagios apache
Step 6 – Install Nagios and services
Now that Nagios has been compiled and built from source, it’s time to install it. This is achieved by running the following commands.
make install
make install-init

We also configure both Apache and Nagios to start on boot-up.
systemctl enable nagios.service
systemctl enable httpd.service

Step 7 – Install Command Mode and other configuration files
Next, we need to install some configuration files for Nagios and Apache.
make install-commandmode
make install-config
make install-webconf
Step 8 – Configure the firewall
If you have the firewall enabled and running on CentOS, you must add the following rules.
firewall-cmd --zone=public --add-port=80/tcp
firewall-cmd --zone=public --add-port=80/tcp --permanent
TIP: In CentOS 7, use systemctl status firewalld to check if the firewall daemon is running.

Step 9 – Create the Nagios Admin user account
This is the admin account we will use to log on once Nagios is up and running. To create it, run the following command. You’ll be asked to enter a password twice.
htpasswd -c /usr/local/nagios/etc/htpasswd.users nagiosadmin

Step 10 – Installing Nagios Plugins
Nagios needs a number of plugins to work properly. You can install these by running the following commands.
Install Dependencies
yum install -y gcc glibc glibc-common make gettext automake autoconf wget openssl-devel net-snmp net-snmp-utils epel-release
yum install -y perl-Net-SNMP
Download plugins source
cd /tmp
wget --no-check-certificate -O nagios-plugins.tar.gz https://github.com/nagios-plugins/nagios-plugins/archive/release-2.2.1.tar.gz
tar zxf nagios-plugins.tar.gz
Compile, Build and Install
cd /tmp/nagios-plugins-release-2.2.1/
./tools/setup
./configure
make
make install
Step 11 – Start Apache and Nagios services
And finally, we can start both the Apache Web Server and Nagios Core.
systemctl start httpd.service
systemctl start nagios.service
Although technically this is not required, I opted to reboot CentOS just to make sure everything comes up running as supposed to.
reboot
Step 12 – Testing Nagios
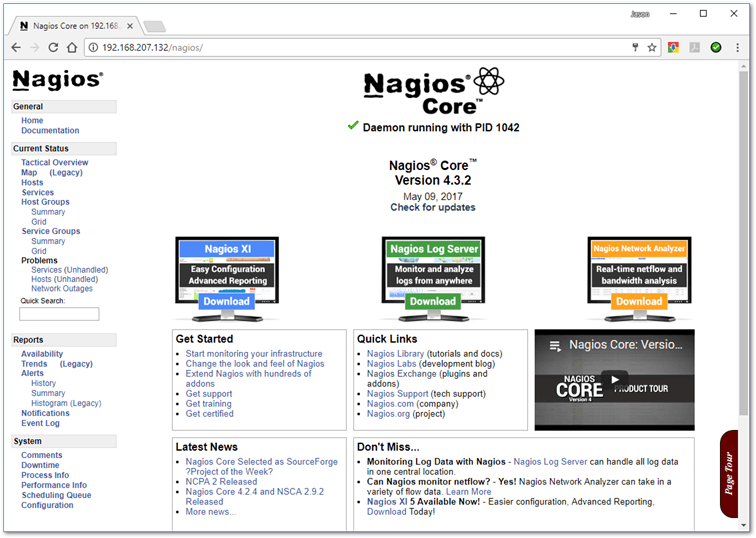
Once the VM is back online, navigate to http://<Nagios IP address>/nagios as shown in the next screenshot. You should be able to log in using the nagiosadmin user and password previously created.


Conclusion
At this point, we have a functional Nagios Core server but the only thing being monitored, so far, is the Nagios server itself. In the second part of the series, I’ll show you how to add ESXi hosts to Nagios’ configuration to enable you to monitor misbehaving hardware and services, and get alerted in the process.
How to monitor ESXi with Nagios Core – Part 2


Not a DOJO Member yet?
Join thousands of other IT pros and receive a weekly roundup email with the latest content & updates!


