Save to My DOJO
Table of contents
New Webinar: Sharpen your VMware vSphere Troubleshooting skills with Ryan Birk & Andy Syrewicze. Save your seat here!
_______________________________________________
PowerShell is a great tool to have and it’s worth putting in the effort to at least learn the basics. If you happen to be a VMware admin, chances are that at some point you will cross paths with PowerCLI. For the uninitiated, PowerCLI is nothing more that an interface – an extension of sorts – VMware developed for PowerShell. Mastering it will open the door to endless applications from the automation of tasks to generating your own vSphere reports.
This post dissects a script I appositely revived for this session. Occasionally, you will find yourself needing a report on the number and type of virtual machines present in your environment but lack the tools to quickly create one. The script I’ll go on to explain, addresses this need. It quickly retrieves vm related information such as memory usage and OS type converting the whole lot into an HTML report.
I do cover a few scripting basics but the assumption about the reader’s familiarity with PowerCLI / PowerShell stands, otherwise this would end up being one very lengthy post.
The Basics
Before going over a few basic commands, make sure you download and install the latest version of PowerCLI.
Once you’ve installed PowerCLI, the next thing to do is connect to an ESXi host or vCenter Server. To do so, fire up the PowerCLI console and type the following commands;
Connect-VIServer <the IP address of your vCenter Server or ESXi host>
$vms = get-vm
$vms | get-member
The first cmdlet Connect-VIServer, as the name implies, is used to connect to an ESXi host or vCenter Server. A dialog box should pop up. This is where you type in the username and password you would normally use to access vCenter Server or ESXi. Alternatively, use the -user and -password command parameters to specify the credentials at the command line.
The 2nd line $vms=get-vm, initializes the variable $vms (the dollar sign indicates it as such) to the contents retrieved by the get-vm cmdlet. When working with PowerShell, you need to start thinking of variables in terms of objects with properties and methods, which is what the 3rd line $vms | get-member exposes. Figure 1 is the output from this line of code where the methods and properties of the objects referenced by $vms are boxed in green.
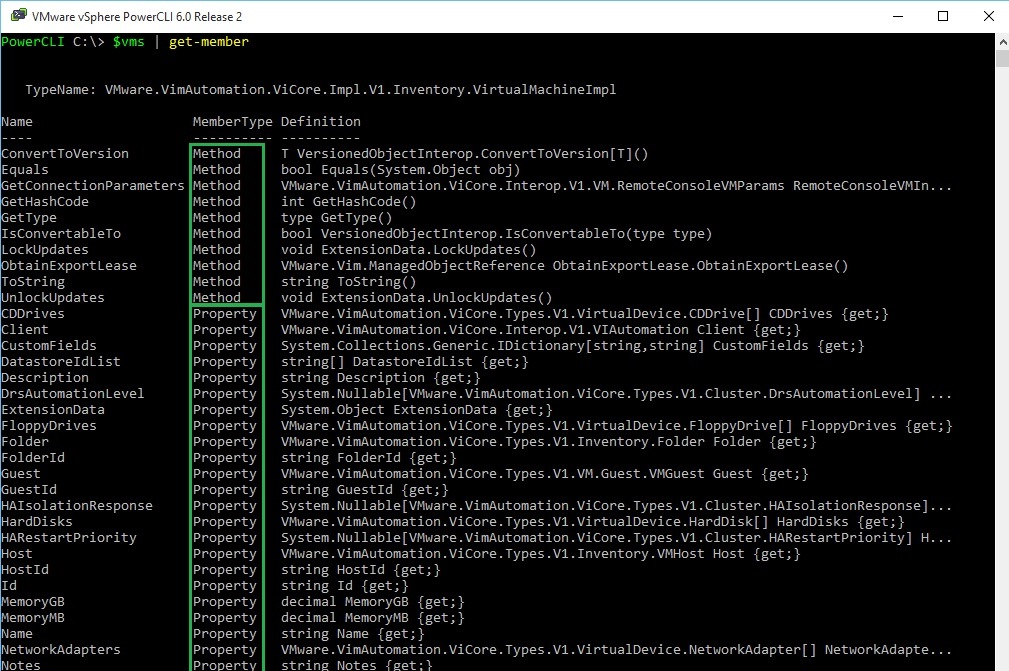
Figure 1 – An object’s method and properties
The $vms variable in reality represents an array of objects with every element corresponding to a specific vm. To test this, let’s display a random element followed by a count of the number of elements. We do this as follows;
$vms[2]
$vms.count
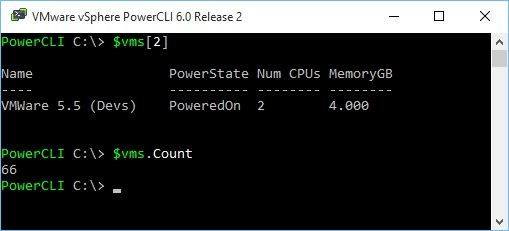
Figure 2 – Display the properties of a randomly selected object and counting the number of objects in an array
This $vms[2] command returns only a subset of the properties associated with the object. $vms.count tells us there are 66 instances of this object. To view all the of the object’s properties type in any of the following;
$vms | ft -property *
$vms | fl *
$vms | select *
You should also note that some properties are in fact objects which properties can be further expanded. Think of them as being nested properties (see Figure 3).

Figure 3 – Expandable properties
Once such expandable property is guest. To find out which guest OS is installed on say the 5th vm in the array, you’d use;
$vms[4].guest.OSFullName
If you want to apply a condition to narrow down the results returned, using the where-object cmdlet is one way of doing it. For instance, the following statement returns only those vms on which Windows Server 2008 has been installed;
$vms.guest | Where-Object {$_.OSFullName -like "*Windows Server 2008*"}
Note the use of the | character by which the output of the previous command is pipelined into the next, a concept derived from UNIX and something which PowerShell excels at. I should also point out that $_ simply means the current object in the pipeline such that $_.OSFullName is in fact $vms[n].guest.OSFullName given the previous example.
Functions are another handy feature you can use to make your scripts both modular and easier to follow. Suppose for instance you want something that always returns a list of powered on vms. You could use a function similar to the one that follows (the output is seen in Figure 4). Better still, you can pipe the output into any other cmdlet since PowerShell is not at all concerned where the input originates from. Calling the function is a simple matter of typing its name.
function listRunningVMs{
 $vms | Where-Object {$_.PowerState -like "*On"}
}

listRunningVMs
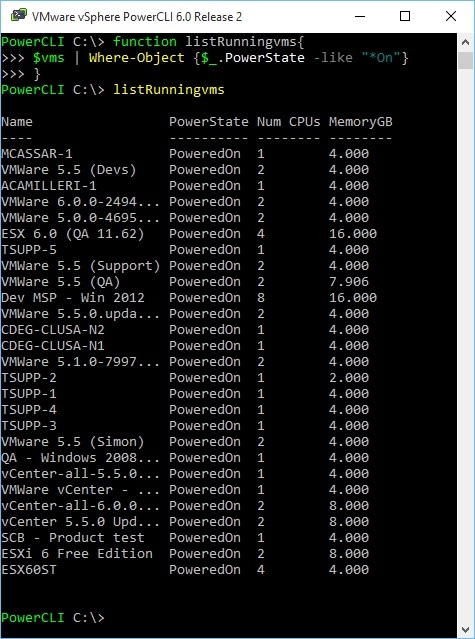
Figure 4 – An example of a function in PowerShell
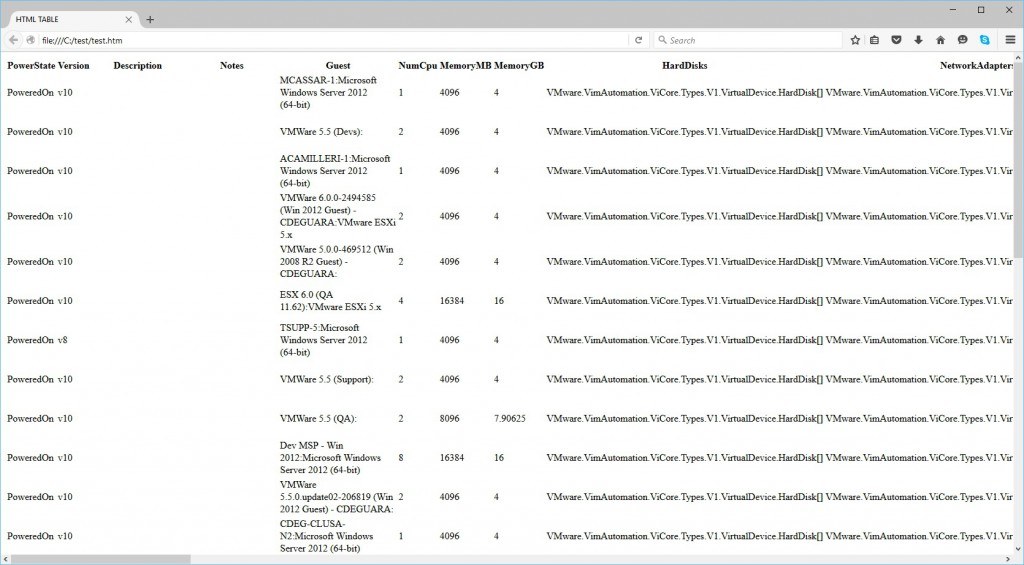
We can easily convert the output of the function just described to HTML using the convertto-html cmdlet and the set-content cmdlet to write it to disk, like so;
listRunningvms | ConvertTo-Html | Set-Content c:\test\test.htm
However the result (Figure 5) is not exactly eye-candy so it’s time for some fine-tuning to make the output a little bit more interesting. You can also see that the data listed under HardDisks doesn’t really make much sense. That’s because the data are in fact object references, meaning object expansion is needed to expose the underlying properties, something I mention further up.
I suggest you first experiment with PowerShell in general and then PowerCLI if you’re still learning the ropes. There are plenty of resources available on the net as any search engine request will quickly reveal.
The Script
I’ll now quickly run through the script split up roughly into 4 parts, these being;
1) Command-line parameter declaration.
[CmdletBinding()]
Param(
 [Parameter(Mandatory=$True,Position=1)]
 [string]$hostIP,

 [Parameter(Mandatory=$false,Position=2)]
 [string]$user,

 [Parameter(Mandatory=$false,Position=3)]
 [string]$pass,

 [Parameter(Mandatory=$false,Position=4)]
 [string]$sortBy
)
All we’re saying here is that the script will accept 4 command-line arguments or parameters. The first one, $hostIP is mandatory as in it cannot be omitted. The remaining arguments are optional and include the credentials needed to run the report against a vCenter Server or ESXi host together with a parameter corresponding to a vm property value used as a sorting criterion.
2) Next is a function called vmProperties whose job is to retrieve a set of vm properties using the get-view cmdlet. The retrieved property values are written to an array of objects of type PSCustomObject. This is needed for the convertto-html cmdlet which will only play nice when fed objects.
This is were most of the work is performed. The function takes as a parameter the results returned by the get-view call made from the script’s entry point. You can learn more about the get-view cmdlet here but if you’re familiar with database views, think of it as being a somewhat similar construct.
A for-loop iterates over the get-view results, populating $list with objects consisting of property values retrieved from every retrieved vm, like so (see full script further down);
 [PSCustomObject]@{
    "Name" = $vm.Name
    "OS" = $vm.Guest.GuestFullName
    "Hostname" = $vm.summary.guest.hostname
    "vCPUs" = $vm.Config.hardware.NumCPU
    "Cores" = $vm.Config.Hardware.NumCoresPerSocket
    "RAM Alloc" = $vm.Config.Hardware.MemoryMB
    "RAM Host" = $vm.summary.QuickStats.HostMemoryUsage
    "RAM guest" = $vm.summary.QuickStats.GuestMemoryUsage
    "NICS" = $vm.Summary.config.NumEthernetCards
    "IPs" = $ips
    "MACs" = $macs
    "vmTools" = $vmtools
    "State" = $state
    "UUID" = $vm.Summary.config.Uuid
    "VM ID" = $vm.Summary.vm.value
 }
 }
You can see that the object comprises pair values consisting of a key name and a corresponding value. The function also includes a few conditional statements which are used to beautify the output and ensure that the correct number of property values are returned. For instance, the $vm.guest.net.ipaddress can either hold an array of values – if the vm has multiple IPs – or just one value if the vm has only been assigned a single IP address. To check for this, we use;
$ips=$vm.guest.net.ipaddress
if ($ips.count -gt 1) {$ips=$vm.guest.net.ipaddress[0] + " " + $vm.guest.net.ipaddress[1]}
What I did is initialize $ips to the guest.net.ipaddress value. Next, I count the number of elements in $ips where a value greater than 1 would imply that multiple IP addresses have been assigned to the specific vm. If $ips.count=1 then we know that the vm will has only one IP address assigned. The same method is used to read and handle the MAC address property.
3) Next is a function called header which we use to format the HTML output. The convertto-html cmdlet takes on a -head argument which inserts a style element in the HTML document generated, pretty much like using a cascaded style sheet (CSS). Here you can learn more about styling and it’s really a matter of experimenting to see the effect each individual style tag has on the output. There’s actually little functionality in declaring the styling elements as a function other than to make the code more legible and to keep things tidy.
4) Last but not least is the script entry point. I start by declaring a couple of vars one of which contains the path to where the report will be written. You can change this as required. A set of conditional statements check whether the $sort command line argument has been specified or not. This sets the sorting criterion which can be one of four, the operating system type (os), the total memory on the host used by the vm (ramhost) or the memory allocated to the vm (ramalloc). If the argument is an empty string, the script defaults to using the vm’s name.
That out of the way, the script will drop any previous ESXi or vCenter Server connections. This prevents the script from pulling in results from another source other than that specified by the $hostIP command-line argument. Yet another conditional statement, checks if a user and password have been passed from the command-line. When these are omitted, the script falls over to using the ConnectVi-Server cmdlet without the -user and -pass parameters where a credentials dialog box is displayed instead.
if (($user -eq "") -or ($pass -eq ""))
 {Connect-VIServer $hostIP -ErrorAction Stop}
 else
 {Connect-VIServer $hostIP -User $user -Password $pass -ErrorAction Stop}
Next we initialize $vmView to the results returned by get-view making sure that view returned is of type VirtualMachine.
$vmView = Get-View -viewtype VirtualMachine
The next line of code is an example of how PowerShell is the undisputed champion of pipelining!
vmProperties -view $vmView) | Sort-Object -Property @{Expression=$sortBy;Descending=$desc} | ConvertTo-Html -Head $(header) -PreContent $title | Set-Content -Path $repPath -ErrorAction Stop
It does the following;
- Call the vmProperties function passing $vmView as its parameter.
- Next the output of (1) is piped into the sort-object cmdlet which, as you have guessed, sorts the output. I’m using some of the properties returned from (1) as sort criteria. Both the sort criteria and the sorting order are governed by the set of conditional statements previously described.
- The output from (2) is piped onto the convertto-html cmdlet which converts it to HTML. Here you can see how the -head argument takes on as value the header function. Notice also how the latter is enclosed in parentheses preceded by the $ char.
- Finally the output from (3) is piped into the set-content cmdlet which writes the HTML document to disk.
The script ends by disconnecting from the ESXi or vCenter Center and launching the default browser to display the report just written to disk. The latter is achieved as follows;
Invoke-Expression "cmd.exe /C start $repPath"
I’ve also included some basic error trapping using try and catch and the -ErrorAction argument which controls the behavior of a cmdlet when an exception is encountered. Again there are plenty of resources on the net many of which go into great detail.
And here’s the complete script;
# Script: ListVMs.ps1 - Jason Fenech Mar. 2016
#
# Usage  : .\listvms <vcenter or host ip>:[Manadatory] <user>:[Manadatory] <password>:[Manadatory] <sortBy>:[Optional]
# Example: .\listvms 192.168.0.1 root mypassword ramalloc
#
# Desc   : Retrieves a list of virtual machines from an ESXi host or vCenter Server, extracting a subset of
#          vm properties values returned by Get-View. The list is converted to HTML and written to disk.
#          The script automatically displays the report by invoking the default browser.

#Command line parameters
[CmdletBinding()]
Param(
 [Parameter(Mandatory=$true,Position=1)]
 [string]$hostIP,

 [Parameter(Mandatory=$false,Position=2)]
 [string]$user,

 [Parameter(Mandatory=$false,Position=3)]
 [string]$pass,

 [Parameter(Mandatory=$false,Position=4)]
 [string]$sortBy
)

#Populate PSObject with the required vm properties
function vmProperties
{
 param([PSObject]$view)

 $list=foreach ($vm in $view){

 #Get net info
  $ips=$vm.guest.net.ipaddress
  $macs=$vm.guest.net.MacAddress

 #State info
  if ($vm.Runtime.PowerState -eq "poweredOn") {$state="ON"}
   elseif ($vm.Runtime.PowerState -eq "poweredOff") {$state="OFF"}
    else {$state="n/a"}

 #VMtools state
  if ($vm.summary.guest.ToolsRunningStatus -eq "guestToolsRunning") {$vmtools="Running"}
   elseif ($vm.summary.guest.ToolsRunningStatus -eq "guestToolsNotRunning") {$vmtools="Not running"}
    else {$vmtools="n/a"}

 #Check for multi-homed vms - max. 2 ips
  if ($ips.count -gt 1)
  {$ips=$vm.guest.net.ipaddress[0] + " " + $vm.guest.net.ipaddress[1]}

  if ($macs.count -gt 1)
   {$macs=$vm.guest.net.macaddress[0] + " " + $vm.guest.net.macaddress[1]}

 #Populate object
 [PSCustomObject]@{
  "Name" = $vm.Name
  "OS" = $vm.Guest.GuestFullName
  "Hostname" = $vm.summary.guest.hostname
  "vCPUs" = $vm.Config.hardware.NumCPU
  "Cores" = $vm.Config.Hardware.NumCoresPerSocket
  "RAM Alloc" = $vm.Config.Hardware.MemoryMB
  "RAM Host" = $vm.summary.QuickStats.HostMemoryUsage
  "RAM guest" = $vm.summary.QuickStats.GuestMemoryUsage
  "NICS" = $vm.Summary.config.NumEthernetCards
  "IPs" = $ips
  "MACs" = $macs
  "vmTools" = $vmtools
  "State" = $state
  "UUID" = $vm.Summary.config.Uuid
  "VM ID" = $vm.Summary.vm.value
  }
 }

 return $list
}

#Stylesheet - this is used by the ConvertTo-html cmdlet
function header{
 $style = @"
 <style>
 body{
 font-family: Verdana, Geneva, Arial, Helvetica, sans-serif;
 }

 table{
  border-collapse: collapse;
  border: none;
  font: 10pt Verdana, Geneva, Arial, Helvetica, sans-serif;
  color: black;
  margin-bottom: 10px;
 }

 table td{
  font-size: 10px;
  padding-left: 0px;
  padding-right: 20px;
  text-align: left;
 }

 table th{
  font-size: 10px;
  font-weight: bold;
  padding-left: 0px;
  padding-right: 20px;
  text-align: left;
 }

 h2{
  clear: both; font-size: 130%;color:#00134d;
 }

 p{
  margin-left: 10px; font-size: 12px;
 }

 table.list{
  float: left;
 }

 table tr:nth-child(even){background: #e6f2ff;}
 table tr:nth-child(odd) {background: #FFFFFF;}

 div.column {width: 320px; float: left;}
 div.first {padding-right: 20px; border-right: 1px grey solid;}
 div.second {margin-left: 30px;}

 table{
  margin-left: 10px;
 }
 –>
 </style>
"@

 return [string] $style
 }

#############################
### Script entry point ###
#############################

#Path to html report
 $repPath=(gci env:userprofile).value+"\desktop\test.htm"

#Report Title
 $title = "<h2>VMs hosted on $hostIP</h2>"

#Sort by
 if ($sortBy -eq "") {$sortBy="Name"; $desc=$False}
  elseif ($sortBy.Equals("ramalloc")) {$sortBy = "RAM Alloc"; $desc=$True}
   elseif ($sortBy.Equals("ramhost")) {$sortBy = "RAM Host"; $desc=$True}
    elseif ($sortBy.Equals("os")) {$sortBy = "OS"; $desc=$False}

Try{
 #Drop any previously established connections
  Disconnect-VIServer -Confirm:$False -ErrorAction SilentlyContinue

 #Connect to vCenter or ESXi
  if (($user -eq "") -or ($pass -eq ""))
   {Connect-VIServer $hostIP -ErrorAction Stop}
  else
    {Connect-VIServer $hostIP -User $user -Password $pass -ErrorAction Stop}

 #Get a VirtualMachine view of all vms
  $vmView = Get-View -viewtype VirtualMachine

 #Iterate through the view object, write the set of vm properties to a PSObject and convert the whole lot to HTML
  (vmProperties -view $vmView) | Sort-Object -Property @{Expression=$sortBy;Descending=$desc} | ConvertTo-Html -Head $(header) -PreContent $title | Set-Content -Path $repPath -ErrorAction Stop

 #Disconnect from vCenter or ESXi
  Disconnect-VIServer -Confirm:$False -Server $hostIP -ErrorAction Stop

 #Load report in default browser
  Invoke-Expression "cmd.exe /C start $repPath"
 }
Catch
 {
  Write-Host $_.Exception.Message
 }
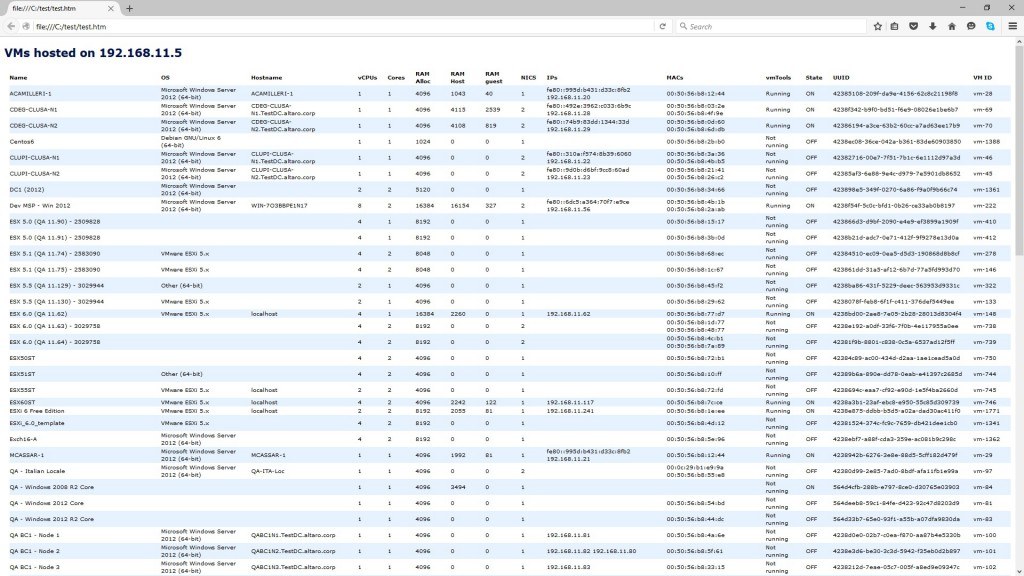
And here’s the finished result after running the script from the command line like so ./listvms 192.168.11.5.
Conclusion
As you have seen PowerShell and PowerCLI are both great tools to master. In the long run they will make your life easier in terms of automation, management and reporting, just to name a few. The script reviewed today is only the tip of the iceberg in what you can do and achieve so get your hands dirty and start scripting!
[the_ad id=”4738″][the_ad id=”4796″]


Not a DOJO Member yet?
Join thousands of other IT pros and receive a weekly roundup email with the latest content & updates!


21 thoughts on "How to generate a vSphere report using PowerShell"
Hi, I have created an HTML reporting module to help generate HTML code from within Powershell. You can group data, color rows, create sections, load your own logos and more all without any HTML coding. This will work with any Powershell data sets. Follow this link for code and examples, it is also loaded in github for collaborative development.
http://www.azurefieldnotes.com/2016/08/04/powershellhtmlreportingpart1/
Hi,
At a first glance, your work looks great. Well done.
Jason
Hi! thks for this contribution.
But there are 2 errors in the code with blank spaces in line 109 and “rep Path” in line 137.
I suggest using the next code:
$repPath=”$env:USERPROFILEDesktopReport-$hostIP.html”
To avoid permissions errors when writing to C:
Hi,
Good catch. WordPress sometimes likes to include white space when code is formatted. This is fixed now. I copied it back to the script editor and ran it just to be double sure.
I included $repPath=(gci env:userprofile).value “desktoptest.htm” which is similar to what you mentioned and replaces the hard coded path, which yes, could have been dealt with better.
Thanks
Jason
Splendid work, thanks a bunch~
Glad you found it useful!
It would be great to see the datastore name as well as the vcenter added to this. Plus functionality to import a list of VM names (note: the vms could reside on multiple vcenters).
Thanks for the feedback. Time is not on my side atm but this should be an easy fix.
Jason
I have a quick question. What would I need to do to add provisioned storage space in GB and, if possible, the resource pool the VM’s are located in?
Thanks for your time
Jason Hartley
VMware Systems Specialist
Private Cloud Architects
Hi Jason,
To add resource group and VM storage size, add the following two lines to the end of the PSCustomObject block:
#Populate object
[PSCustomObject]@{
“Name” = $vm.Name
“OS” = $vm.Guest.GuestFullName
“Hostname” = $vm.summary.guest.hostname
“vCPUs” = $vm.Config.hardware.NumCPU
“Cores” = $vm.Config.Hardware.NumCoresPerSocket
“RAM Alloc” = $vm.Config.Hardware.MemoryMB
“RAM Host” = $vm.summary.QuickStats.HostMemoryUsage
“RAM guest” = $vm.summary.QuickStats.GuestMemoryUsage
“NICS” = $vm.Summary.config.NumEthernetCards
“IPs” = $ips
“MACs” = $macs
“vmTools” = $vmtools
“State” = $state
“UUID” = $vm.Summary.config.Uuid
“VM ID” = $vm.Summary.vm.value
“Resource Pool” = $vm.ResourcePool
“Used Space GB” = [math]::Round((get-vm $vm.Name).UsedSpaceGB)
}
}