Save to My DOJO
From time to time, you may come across a virtual machine that is marked as orphaned in the vSphere inventory. What this means, in general, is that the VM exists as data in the vCenter server database but has either been deleted or is wrongly registered elsewhere. A number of factors can lead to this unwanted scenario. These include a failed host failover or a DRS migration gone wrong. It could also be the case of someone removing a VM from inventory when connected directly to ESXi instead of vCenter Server.
Another common cause is when vCenter server – or its database – is restored from a backup or a snapshot. In my case, this latter scenario is what prompted me to write this post. I recently had to revert a vCenter Server back to a snapshot after the VC database decided to call it a day. A few of the VMs deleted after the snapshot was first taken, found their way back in the inventory albeit marked as orphaned. Removing them, turned out to be an impossible task were it not for my trusty old friend PowerCLI
There are a number of ways to deal with orphaned VMs some of which I’ll be covering today where I’ll be targeting vSphere 6.5 and using the vSphere Web client throughout the post.
The Easy Fix
The first remedial action you should take is as follows.
Step 1 – SSH to the ESXi host where the orphaned VM resides and run the following:
/sbin/services.sh restart
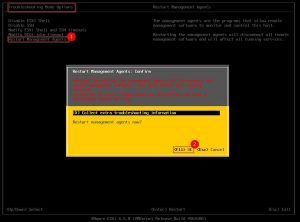
This commands restarts all the host management services. Repeat this for every ESXi hosting orphaned VMs. The same can be carried out from DCUI by selecting Restart Management Agents from Troubleshooting Options as per Fig. 1.
Step 2 – Restart the vpxd service (vCenter Server service) on vCenter Server. The method used varies according to the vSphere release at hand and whether you have vCenter Server for Windows deployed or vCenter Server Appliance. Regardless, here are the relevant KB articles:
- How to stop, start, or restart vCenter Server services (1003895)
- How to stop, start, or restart vCenter Server Appliance services (2054085)
- How to stop, start, or restart vCenter Server 6.x services (2109881)
Recovering Orphaned VMs (that still exist on disk)
The vSphere Way
An orphaned virtual machine will have the string (orphaned) appended to its name like so.
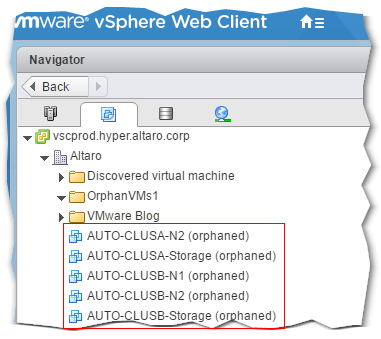
Figure 2 – Orphaned VMs as they appear listed in vSphere Web Client
If you’re pretty sure that an orphaned VM still exists on disk, then it’s just a matter of locating the parent datastore and folder and use its VMX file to properly add it back to inventory.
The following procedure will enable you to register an orphaned VM back to inventory.
Step 1 – Locate the VM folder on the respective datastore. If the VM has multiple hard drives spread across different datastores, chances are that the VMX file is to be found at the location set for Hard Disk 1 as shown in Fig. 3.
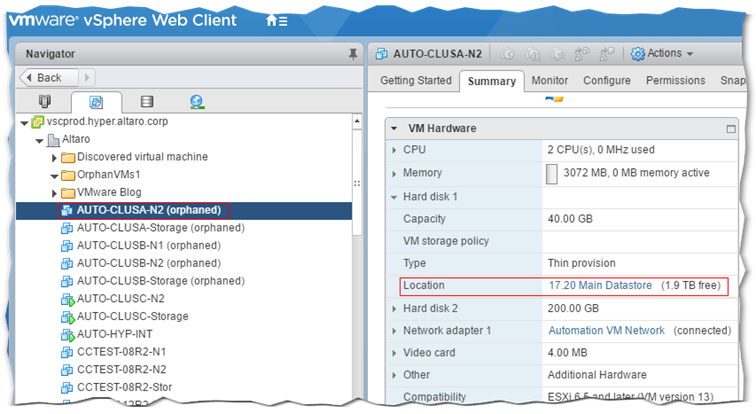
Figure 3 – Finding an orphaned VM’s primary folder on a datastore
Step 2 – Click on the datastore link. This launches the browser view which exposes the VM folder hierarchy for the specific datastore.
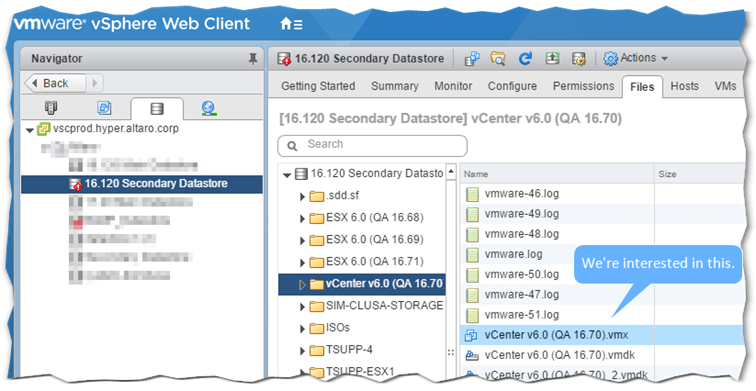
Figure 4 – Navigating the VM folder hierarchy in vSphere Web Client
Now, you might not be able to find the folder for the orphaned VM simply because the VM was renamed and the name change was not reflected in the folder name. I tackle how to solve this issue in my Fixing VM folder naming discrepancies post.
Note: It could also be the case that a VM exists as files on a datastore but is not registered anywhere. Although technically not an orphaned VM, it is important to keep this scenario in mind when troubleshooting. I’ve written a post on the subject that explores a PowerCLI script that should fix things for you.
Step 3 – Once you verify that the VM files exist and are the correct ones, right-click on the VMX file and select Register VM. However, before you do this, return to the VMs and Templates view in vSphere client, right-click on the orphaned VM and select Remove from inventory. The complete procedure is available here.

Figure 5 – Registering and removing a VM from inventory
The ESXi command line way
Additionally, you can use the ESXi command line to achieve the same result as follows:
vim-cmd solo/registervm /vmfs/volumes/datastore_name/VM_directory/VM_name.vmx
Figure 6 shows an established SSH session on an ESXi host. You will find all the datastores under the /vmfs/volumes directory. In this example, I’m interesting in registering a VM called loginsight as per the commands captured in the screenshot.
The vim-cmd throws an error if it finds that the VM is already registered. This was my case since the VM was correctly registered on ESXi but not on vCenter Server. Just to demonstrate command usage, I first removed the VM from inventory while connected to ESXi using the vSphere client.
After running the vim-cmd a second time, the VM registered and showed up properly in vCenter Server.
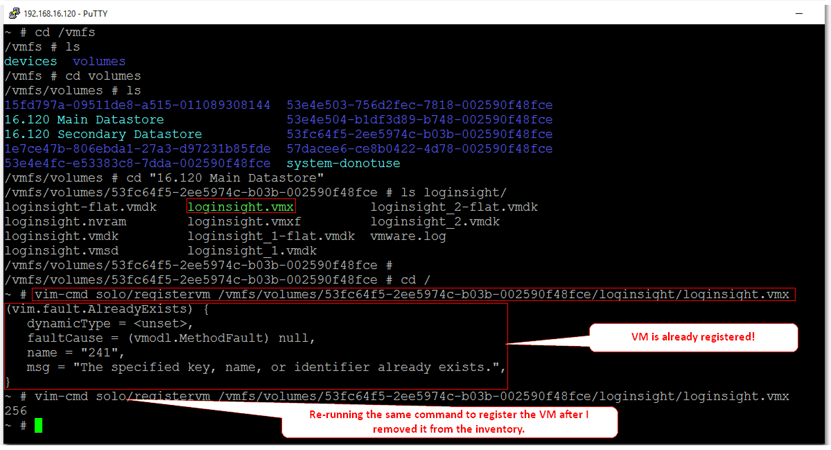
Figure 6 – Using vim-cmd solo/registervm on ESXi to register a virtual machine
Removing Orphaned VMs from Inventory (those that do not exist on disk)
Going back to my primary issue, as mentioned, I came across an instance where I could not remove a number of orphaned VMS from the inventory after having reverted vCenter Server from a snapshot. I was 100% sure that the VMs no longer existed as files on any of the mounted datastores, meaning that I could just go ahead and delete them. The problem turned out to be one where the VM context menu offered no options to this effect.
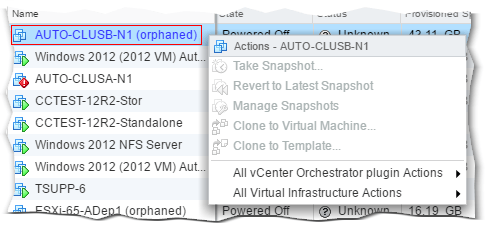
Figure 7 – An unmanageable orphaned VM
This KB article suggests that one should create a VM folder and drag the offending VMs to it in vSphere Web client. Deleting the folder should supposedly delete the VMs as well. The problem with this, however, is that yet again all the VM menu options were either ghosted out or not available at all. Not really a good start! So, what to do?
While playing around with PowerCLI, I came across the ExtensionData.Runtime.ConnectionState property when querying one of the orphaned VMs. In the case of orphaned VMs, the value for this is set to, wait for it, orphaned. This, for a starter, allows you to easily list all the orphaned VMs in your environment. Here’s one way of doing it.
Connect-VIServer 192.168.1.1
$allVMs=Get-VM

foreach ($vm in $allVMs) {
 if ($vm.ExtensionData.Runtime.ConnectionState -eq "orphaned") {$vm.name}
}
On the command line, if you wish, you can also type this as a one-liner:
foreach ($vm in (get-vm)) {if ($vm.ExtensionData.Runtime.ConnectionState -eq "orphaned") {$vm.name}}
Figure 8 shows the result of the executed code.

Figure 8 – A list of orphaned VMs in vSphere
A minor modification to the code will allow you to delete all the offending VMs in one go. To do this, we use the Remove-VM cmdlet. We just need to change the behavior of the If statement like so:
foreach ($vm in $allVMs) {
 if ($vm.ExtensionData.Runtime.ConnectionState -eq "orphaned") {$vm | Remove-VM}
}
To suppress prompting, just add -Confirm:$false to the Remove-VM cmdlet.
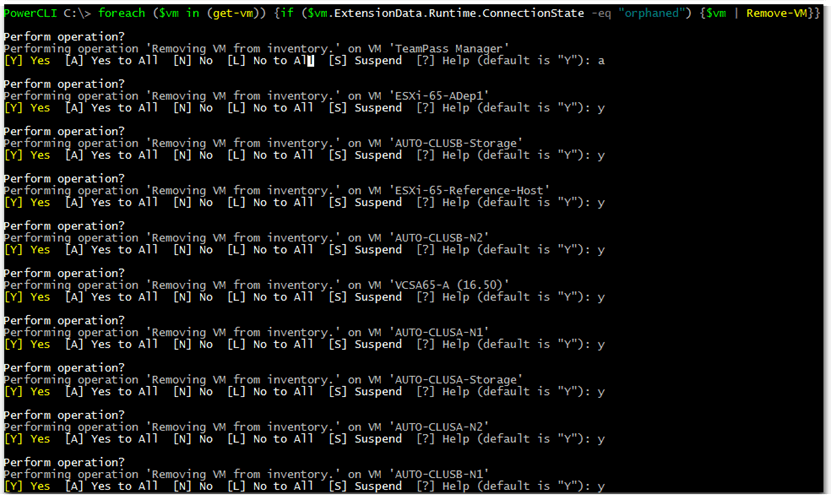
Figure 9 – Removing orphaned VMs with the Remove-VM cmdlet in PowerCLI
Conclusion
This pretty much sums up all I wanted to say about orphaned VMs. On rare occasions, orphaned VMs will find their way into your environment due to a number of reasons. The more complex your environment, the harder it will be to locate the exact cause but in general orphaned VMs are an easy fix as we’ve seen.
If you have any questions or would like me to add anything, by all means leave me a comment below.
[the_ad id=”4738″][the_ad id=”4796″]


Not a DOJO Member yet?
Join thousands of other IT pros and receive a weekly roundup email with the latest content & updates!


27 thoughts on "How to deal with orphaned virtual machines"
I have the problem where the VM’s are orphaned and the files do not exist. However, I’m on MacOS and do not have access to a Windows computer to run powershell commands. Is the another way to delete the orphaned VM’s?
Hi, not really a Mac user but there is in fact an ongoing project which sees PowerCLI released to Mac and Linux. Have a look at this:
https://www.virtuallyghetto.com/2016/09/vmware-powercli-for-mac-os-x-linux-more-yes-please.html
Another option would be to create a Windows VM and install PowerCLI on it if the resources are available. Probably, but I need to look this up, you can also use esxcli or vim-cmd from ESXi shell.
Hope this helps.
Jason
I used the script above and it resolved the orphan problem. However, when I was using get-vm applet I found that I was seeing double – so to speak – on all the vms that I listed. For instance I have 7 vms that start with the word build but when I run get-vm build* I get 14 items in my list. What is happening here?
Hi Paul,
Are you observing this after running the script or at any time?
Jason
just when running the script. The UI in the web clients (vcenter, host web interface) report the correct list of vms.
Can you copy and paste the script and the output so I can see if I can reproduce it?
Exec summary – problem no longer presents since the last time I wrote.
This is what I did. I ran your script and noticed that the problematic (orphaned and unwanted) vm showed up twice. Once I was convinced that I wouldn’t remove something I didn’t want to delete I ran your cleanup script. Thanks for that.
Then I just entered by hand at the Powershell prompt get-vm *. I also piped it into a sort applet to make it easier to compare what I was seeing and I saw each vm twice.
OK – i just tried this again and I am no longer getting double results – so no problem. The last time the system had gotten into an error state due to some network configuration problems that have since been resolved. It may have had something to do with that. I have one network reserved for public facing servers and another for internal dev-ops. However there are three servers that are on both systems and these dual homed servers were having some LAN side connectivity problems and I was in the middle of moving one of them when I orphaned this server that started the conversation.
Good to hear. I just wanted to rule out anything fishy with the commands I posted.
Thanks Paul.
Hi
is there a way to filter VMs that are locked and therefore i cant delete them?
i am using esx 6.0
Thanks
Hi Amiel,
Not quite sure what you mean by locked. Are you referring to file locks on the VMDK? If that’s the case have a look at this -> https://kb.vmware.com/s/article/10051.
regards
Jason
This is an awesome article and great step by step instruction to resolve this annoying issue. Thanks again!
Thanks. Glad you found it useful!
This is a superbly useful post. Thank you. Really saved my bacon today.
Glad you found it useful!
This is a great post !!
Thanks. Glad you found it useful!
I have the same problem but I use ESXi standalone (without vCenter). Any way of fixing this configuration?
Hey Mark, believe it or not, in an environment that didn’t have vCenter, I spun up an appliance and added my host to take care of it. The eval time frame was more than enough to clean it up.
Hey Ryan, thanks for that, unfortunately my eval expired ages ago otherwise that would have been perfect.