Save to My DOJO
Running the ESXi installer from a bootable USB flash drive or memory stick is a very useful method you can use to install VMware’s hypervisor. In How to install vSphere ESXi on a bare metal server, I describe how software such as Rufus can help you create bootable ESXi media using Windows. If you are strictly a Linux user or prefer using Linux based methods instead, then read on since today we’ll be doing just that, creating a bootable USB pen drive with the ESXi installer on it using only Linux commands.
What you’ll need
- A Linux virtual or physical machine running most Linux distros should do. As always, I’m sticking to my CentOS 7 VM.
- An ESXi ISO image. For this post, I’m using the one for ESXi 6.5 U1.
- The Syslinux package. This is installed on Linux via a package manager such as YUM APT, and RPM. This is the bootloader ESXi uses.
- A USB flash drive. A 1GB drive will suffice since ESXi’s footprint is roughly 350MB.
If you’re using VMware Workstation
For this post, I’m running a CentOS 7 VM on VMware Workstation. If your setup is similar, make sure that the VM has a USB Controller included in the hardware list. You can check this from the Hardware tab.
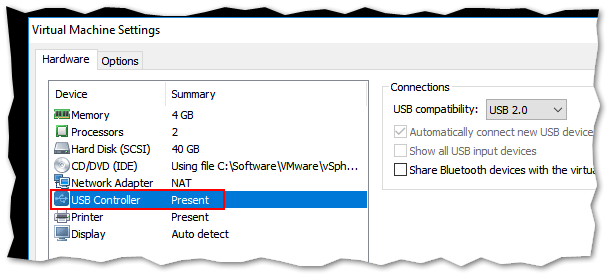
Adding a USB controller to a VM in VMware Workstation
The USB drive will be listed under Removable Devices as shown in the next screenshot. If it is not connected, go ahead and connect it.
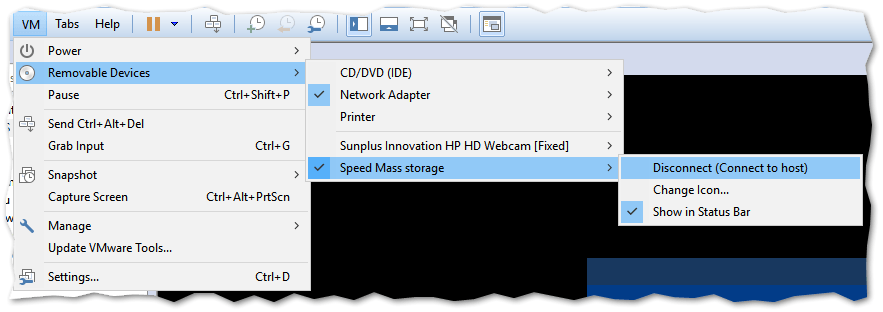
Connecting a USB device to a VM in VMware Workstation
Note: While writing this post, I initially could not get Workstation to see the USB flash drive. As it turns out, the VMware USB Arbitration Service service was permanently stuck in Starting mode. Make sure that the service’s status is set to Running. To get it to run correctly, I had to uninstall Workstation, delete all VMware related keys using Registry Editor (regedit) and re-install Workstation after rebooting the PC.

With VMware Workstation installed on Windows, always make sure that the USB Arbitration Service is running properly
If Linux is installed on a physical box, make sure that the necessary USB related BIOS options are enabled. Once you do, the USB device will be listed as /dev/sdb or similar in Linux. On my setup, the USB drive was added as /dev/sdc and mounted using the USB label in Gnome after formatting it as explained further down.
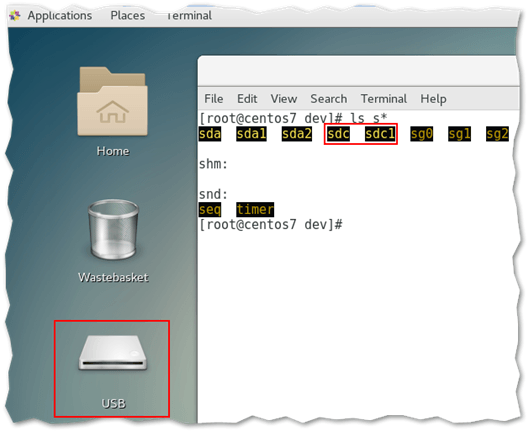
A mounted USB drive as shown on X Windows or terminal-only based Linux systems
Preparing the USB drive for ESXi
In this section, I describe the procedure used to create a bootable ESXi installer USB drive. All commands are executed in a terminal window using root.
Step 1 – Install Syslinux
You must have the Syslinux package to make the USB drive bootable. If it is not available on your system, go ahead and use YUM or similar to add it. The command I used, in my case, is as follows:
yum install syslinux
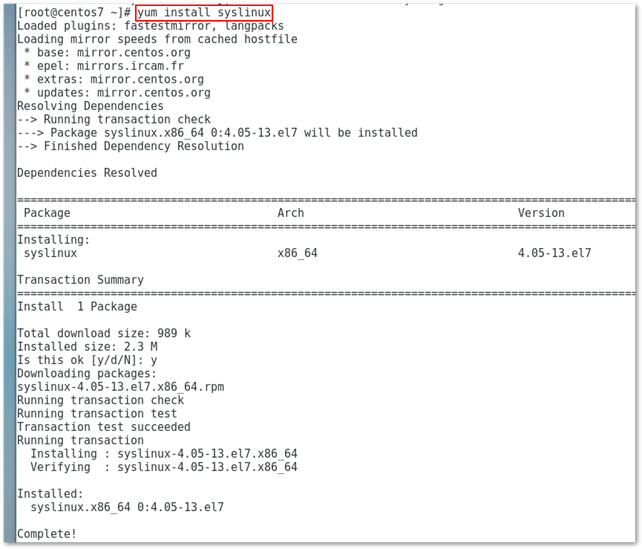
Adding the Syslinux package using YUM
Step 2 – Create a primary FAT32 partition
The next step is to prepare and format the USB drive for ESXi. To this, we’re going to use the fdisk command. Run it as follows.
fdisk /dev/sdc
Carry out any required task by pressing the corresponding key. Pressing [m] gives you a list of possible options. In our case, follow these steps:
- Press [d] to delete any existing partitions. (Optional step).
- Press [n], [p] and press Enter 3 times to accept the default settings. This step creates a primary partition for you.
- Press [t] to toggle the partition file system type.
- Press [c] to set the file system type to FAT32
- Press [a] to make the partition active.
- Press [w] to write the changes to disk.
Step 3 – Format the USB drive
The partition just created must be formatted with the file system specified. This allows us to copy the bootloader file as well as the ESXi binaries. To format the USB drive, run the following command.
/sbin/mkfs.vfat -F 32 -n USBESXi /dev/sdc1
Remember that you’re drive may differ from mine (sdc). We also need to format the partition (sdc1 in this case). The -n USBESXi bit is used to label the USB drive and can be omitted.
Step 4 – Copy the boot loader
To make the USB drive bootable, the syslinux utility is used. We also need to copy mbr.bin, the file containing the boot code, to the USB drive. To do this, run the following commands. Again, the location of Syslinux may differ according to the version of syslinux installed and the Linux distro used.
/usr/bin/syslinux /dev/sdc1
cat /usr/share/syslinux/mbr.bin > /dev/sdc
Step 5 – Create mount points
Next, we create two mount points, one for the USB drive and another for the ESXi ISO we’ll mount in the next step. We do this by creating two folders under root and using the mount command to create the mount points, like so.
mkdir /usbdisk
mount /dev/sdc1 /usbdisk
mkdir /esxicd
Steps 2 to 5 are reproduced in the following video.
Step 6 – Copy the ESXi binaries to the USB drive
We’re almost there. In Workstation or ESXi, mount the ESXi ISO image to the VM. If you’re using a physical box, insert the ESXi DVD media or USB stick containing the ESXi binaries.
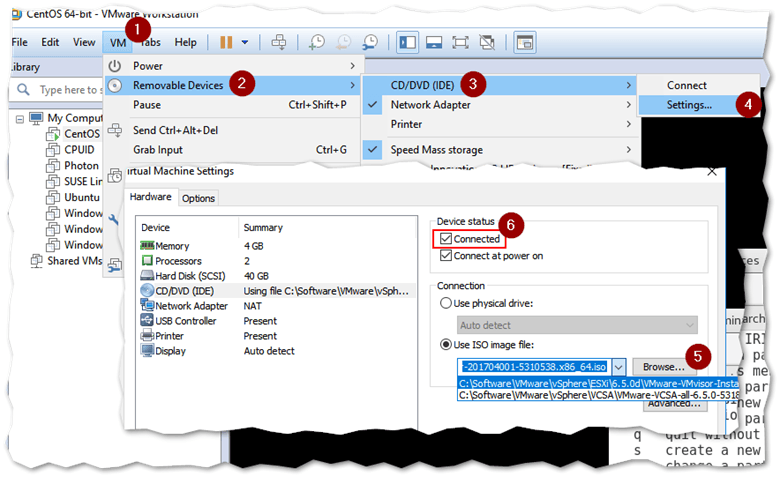
Mounting an ISO image on a VM using VMware Workstation
If you’re using Gnome or similar, you can easily copy the ESXi binaries from the mounted drive to the USB drive using copy and paste via the UI.
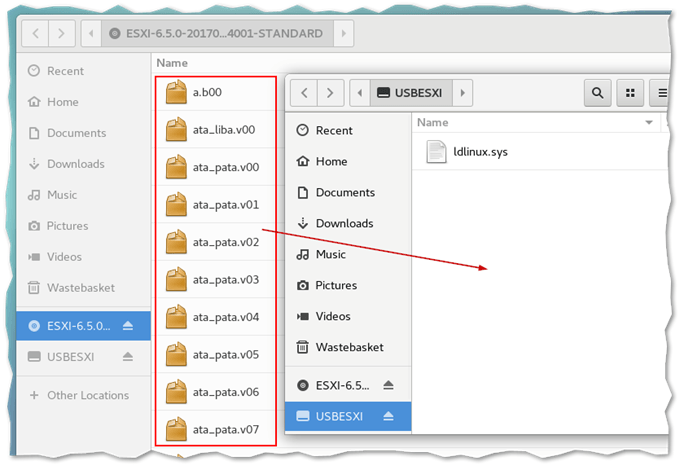
Copying and pasting ESXi binaries to the USB drive using Gnome
If you’re running Linux without X Windows, run the following commands to mount the ESXi ISO using the /esxiso directory created earlier and copy the ESXi binaries to the USB drive.
mount /dev/cdrom /esxicd
cp -r /esxicd/* /usbdisk
Step 7 – Edit the boot configuration file
In this final step, we just need to rename the isolinux.cfg file to syslinux.cfg, amend a single entry and we’re done. To do this, run the following commands.
mv /usbdisk/isolinux.cfg /usbdisk/syslinux.cfg
vi /usbdisk/syslinux.cfg
Using vi, add -p 1 to the APPEND -c boot.cfg line as shown next
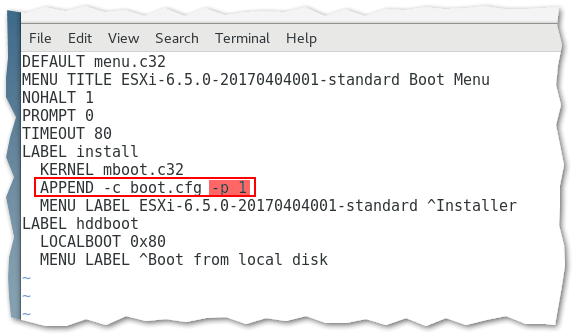
Editing an entry in the syslinux.cfg
Testing it out
To verify that my bootable ESXi USB drive works, I simply left it plugged in one of the USB ports on my laptop running Workstation which I then rebooted. Success! The error message displayed is due to me pulling out the flash drive while the ESXi binaries were being loaded to memory, something you probably should avoid doing on a server or anywhere else for that matter.
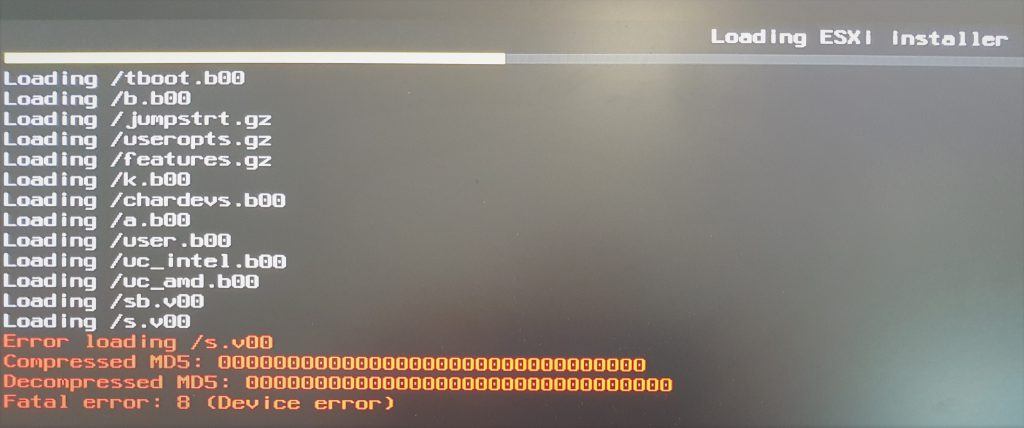
The ESXi installer running off the bootable USB pen drive
Note: If you run in a not a COM32R image error or similar message during boot-up, hit the tab key at the boot: prompt, select Install from the menu and press Enter. This will take you to the ESXi installer, something I had to do while booting from the USB pen on my laptop. This seems to happen due to incompatibility issues between the version of syslinux used and the ESXi version used.
Conclusion
Personally, I find that using Rufus or similar under Windows, or the equivalent on Linux systems, is a more convenient alternative to running Linux commands. Nevertheless, if you’re learning Linux or like doing it the hard way so to speak, the method outlined today will provide a more challenging and fruitful learning experience.
How do you normally install ESXi? Do you use a USB flash drive and if so do you use Linux to do it? Let us know in the comments or if you need any help setting up your bootable ESXi USB flash drive I’m happy to help you out!


Not a DOJO Member yet?
Join thousands of other IT pros and receive a weekly roundup email with the latest content & updates!


10 thoughts on "How to Create a Bootable ESXi USB Flash Drive using Linux"
Great JOB.. I get so frustrated when a simple dd dose not work.. You just saved me many of hours ..
Thanks for this article!
Just a note: I had to install mtools because I got the error “sh: mcopy: command not found”. Also, on Manjaro, the installation location is /usr/lib/syslinux/bios/mbr.bin, and you can use syslinux /dev/sdx1
This got me a bootable USB, where dd did not (normally it does). Shamefully, the ESXI installation can’t find the correct network driver, so I’ll have to continue the troubleshooting, but we’re getting there!
I have to say, I don’t really get all the steps here, but it worked and will give me experience when I learn more about it later.