Save to My DOJO
In vSphere Networking Basics – Part 2, I talked about the vSphere Distributed Switch (vDS) and how it can help you centralize network management across your vSphere environment. On re-reading my post, I realized I left out an interesting vDS feature which is the ability to clone, for lack of a better word, the networking configuration of an ESXi host over to other hosts when hooking them up to a vDS.
This feature, or option if you prefer, is called template mode something only accessible when adding new or existing hosts to a distributed switch. To use this feature, we first set up the template host by creating the required VMkernels and the services they’ll be running such as vMotion and vSAN. When we get to the part of adding hosts to the switch, we just tick an option to have the template host’s network configuration copied over to the remaining hosts. While testing the feature I came across one major drawback, if I can call it that. I’ll address this issue at the end of the post.
Notes:
- My lab is currently running vSphere 6.5 U1 meaning that some of the steps may differ or will not be available in older versions of vSphere. I’ll also be using the vSphere Web Client since the vSphere client (HTML5), at the time of writing, does not expose the template mode option.
- Remember that distributed switches are a vCenter Server feature and available only to Enterprise Plus licenses users.
Let’s start off by configuring the template host.
Setting up a template host
Setting up an ESXi host for networking involves a few basic items amongst which;
- Create the VMkernels.
- Configure TCP/IP information for every VMkernel.
- Configure each VMkernel for the respective service it will be used for.
For this post, I’m using two ESXi 6.5 hosts. The first will act as the template host and the second will inherit the network settings from the first.
Create and configure your VMkernel adapters
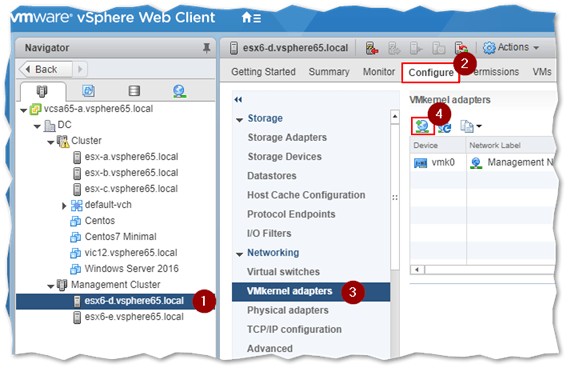
To start with, your ESXi hosts must have at least one preconfigured VMkernel adapter if the plan is to join them to vCenter Server and hook them up to a vDS. In this example, I’m creating a second VMkernel on the template host in addition to the default vmk0.
To do this, select the ESXi host in Navigator (1) and click the Configure tab (2). Expand Networking and select VMkernel adapters (3). Click on Add Host Networking button to create a new adapter.
Adding a VMkernel adapter on ESXi
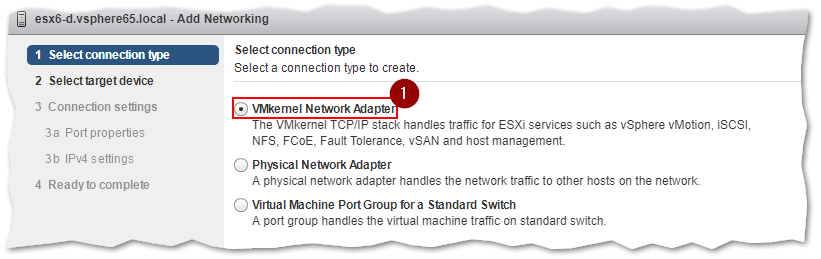
Select the first option – VMkernel Network Adapter – and click Next.
Adding a VMkernel adapter on ESXi
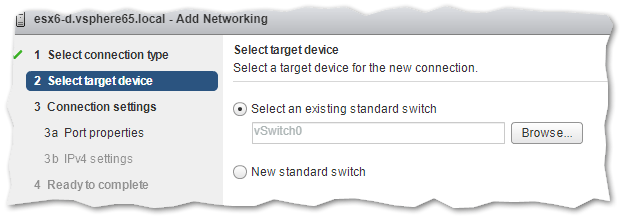
Leave the switch option as set. We will be migrating the host to a vDS at a later stage. VSwitch0 refers to the default standard switch created on ESXi when installed. Press Next.
Selecting network switch placement
On the next screen, type in a name for the adapter in the Network Label field (1). Choosing a meaningful name, allows you to quickly identify an adapter and its purpose. In this case, I named it vMotion VMkernel since it will be used only for vMotion traffic.
If VLANs are used on your network, set the VLAN ID for the network earmarked for vMotion traffic. Select the IP version – 4, 6 or both – from the IP Settings drop-down box.
As per my vSphere Networking Basics – Part 2, you can change the TCP/IP stack for optimal performance. You can only do this for vMotion and Provisioning traffic unless you create a custom stack. If you do go for a stack other than the default one, keep in mind the following 2 caveats:
- The TCP/IP stack type cannot be changed once defined. The only method is to delete the VMkernel and start afresh.
- The template mode feature does not copy over the TCP/IP stack type values from the template host. Instead, the value on the target hosts is always set to Default. I did not find any information on the matter so I am not sure if this is a limitation, bug or by design. If anyone knows, please share via a comment in the box below.
In this example, I set the TCP/IP stack type to vMotion (2) to show, further down, that the value is indeed not copied over to the target host(s). Also note, that vMotion is automatically selected as the only Enabled Service with every other option ghosted out which is the expected behavior.

Configuring a VMkernel adapter
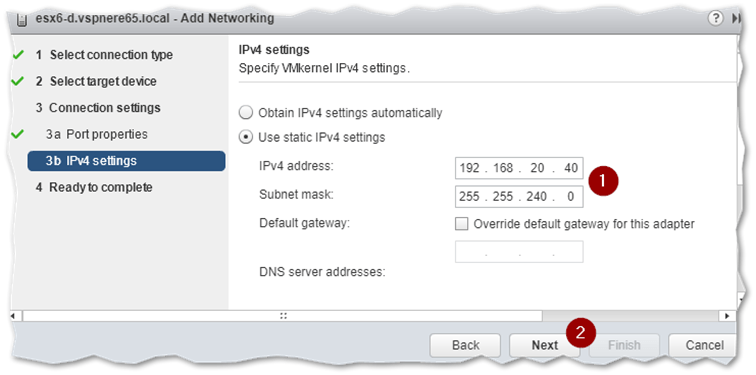
Next, set the IP setting for the adapter. It’s always a good idea to go for static settings instead of relying on DHCP assigned addressing. Press Next.
Configuring IP addressing for a VMkernel adapter
Before pressing Finish, review the settings one more time.
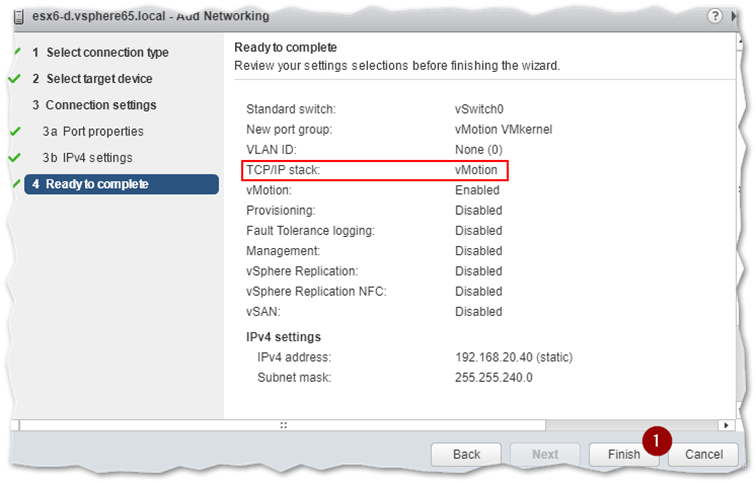
VMkernel adapter configuration summary
The template host has two VMkernel adapters which, at this point, are still connected to the default standard switch vswitch0 present on each host. As a side-note, you can use PowerCLI to quickly retrieve a list of VMkernels on one or all hosts like so:
(get-vmhost).NetworkInfo.VirtualNic | ft VMHost,name,IP
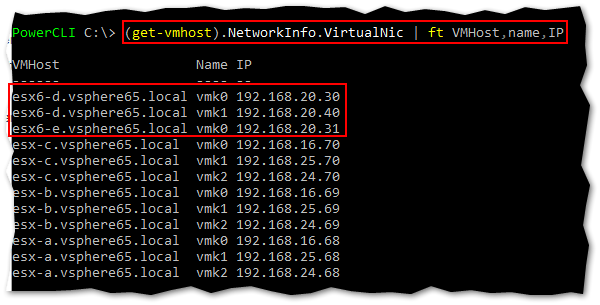
Using PowerCLI to retrieve VMkernel details
Looking at the command output, esx6-d.vsphere65.local is the designated template host having two VMkernels, vmk0 and vmk1. The target host, esx6-e.vSphere65.local, is configured with one adapter.
Adding hosts to a distributed switch in template mode
This section outlines the process of adding ESXi hosts to a distributed switch using template mode. In vSphere Web Client, select the Networking tab (1) and either create a new vDS or select an existing one as I illustrate next. Right-click on the vDS name and select Add and Manage Hosts from the context menu.
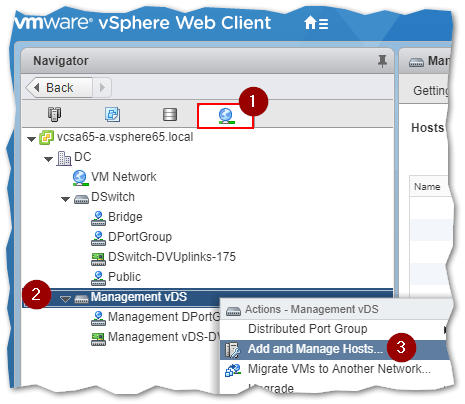
Adding ESXi hosts to a distributed switch
Select Add hosts on the next screen and press Next.

Adding ESXi hosts to a distributed switch
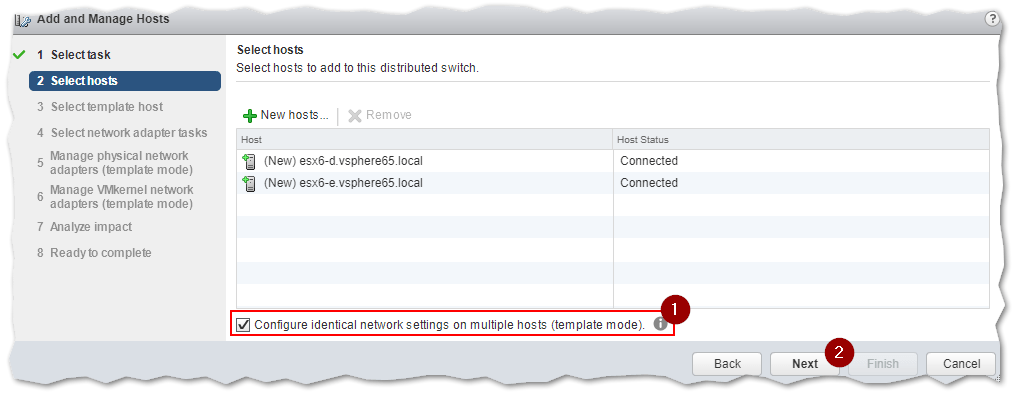
A list of all the ESXi hosts managed by vCenter and not already connected to the vDS are displayed. Select the hosts you want to connect (1) and press Next.
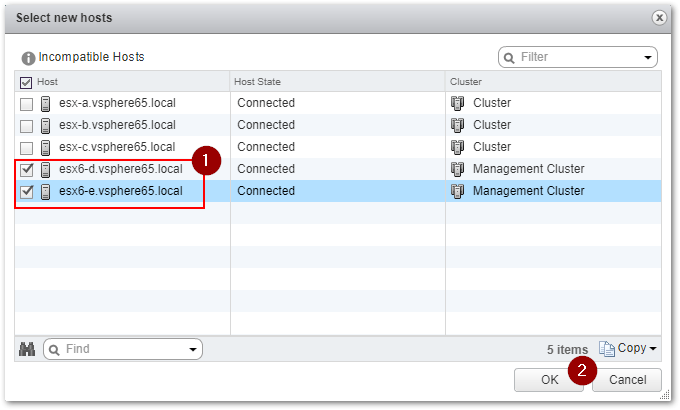
Selecting which hosts to add to a vDS
In the next screenshot, notice the option (1) at the bottom of the next screen which is what enables template mode. Tick on the option and press Next to continue.
Note: Clicking on the information icon next to the option gives you the following:
Use this option if you want to make the network configuration of the physical and VMkernel network adapters on this distributed switch identical on the selected hosts. Mark one of the hosts as a template. Use its existing network configuration or create a new one on the distributed switch, and apply it automatically on the other hosts. The configurations of the physical and VMkernel network adapters are applied separately. You can repeat this process as many times in the wizard as needed to achieve the desired network configuration. A host remains a template only during the lifetime of this instance of the wizard. The distributed switch is not aware of your choice and the network configuration will not be synchronized in the background if a network configuration change occurs on the template or any other host in the selection.
An important point is made here. The template host’s settings are only applied once and only once. New hosts added to the vDS at a later stage will not inherit settings from the host that was previously designated as the template host or from any other host.
Enabling the template mode option
On this next screen, make sure you select the template host, esx6-d in my case, from the list of hosts displayed.
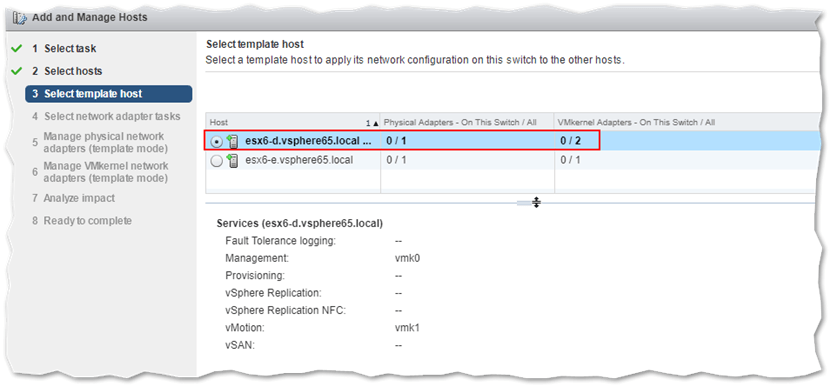
Designating the template host
Since I’m adding newly installed hosts, the first 2 network adapter tasks will suffice. The first one takes care of connecting the ESXi’s physical NICs to the vDS uplinks. The second handles VMkernel adapters, to port mapping on the vDS.
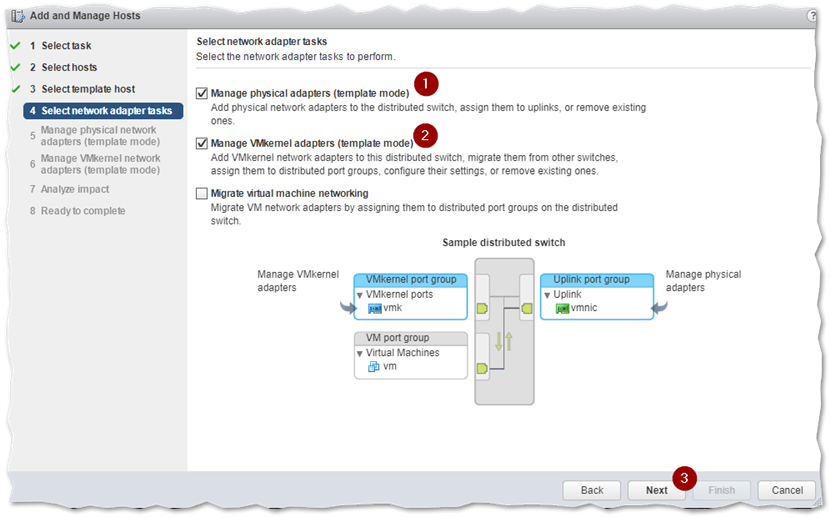
Network adapter tasks
This is where we start applying the template host’s network configuration to the other hosts.
In the upper pane, you review the template host’s current uplink settings. Since we’re moving from a standard to a distributed switch, we must change the uplink to one on the vDS as per standard procedure.
The rest of the hosts are listed in the bottom-most pane. You must click on the Apply to all button (4) to copy over the uplink settings from the template to the rest of the hosts. Click Next to continue.
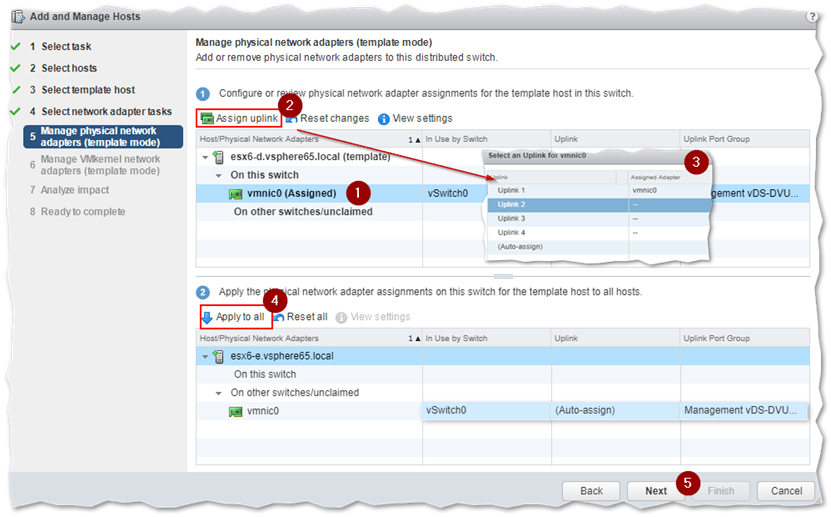
Setting uplink ports in template mode
Next, we set the template host’s VMkernel adapters (1) to use the distributed port group on the vDS we’re connecting to via the Assign port group button (2). Clicking on Apply to all (3) copies the portgroup settings to the hosts. Notice how the wizard creates an additional vmk1 VMkernel adapter marked new as shown next.
This basically answers a question a reader had brought up – Does template mode create new VMkernel adapters? – something I wasn’t sure about myself, hence this post!
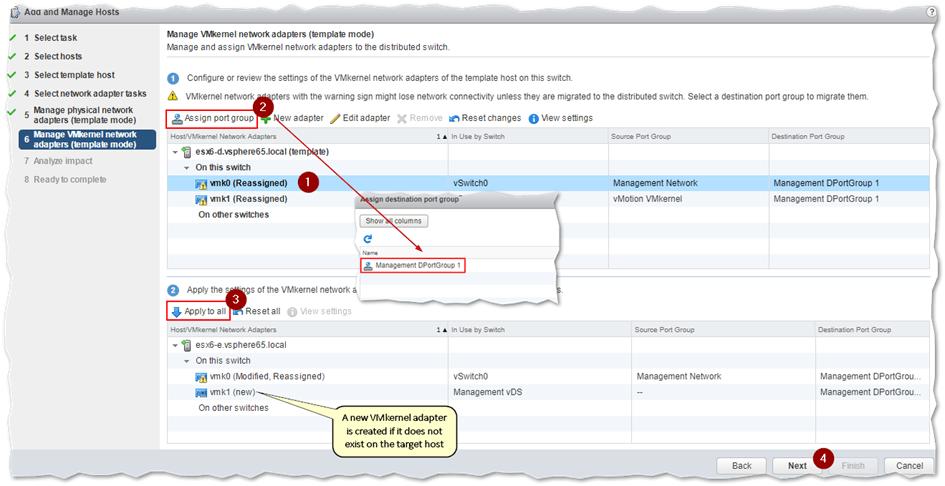
Setting VMkernel adapters in template mode
Since it’s a very bad idea to have ESXi hosts and VMkernels configured with identical IP addresses, you will be prompted to enter new IP addresses for all the target VMkernel adapters, both existing and any new ones being created. Since vmk0 on target hosts will be already configured – this is always the case since it would be impossible to add it to vCenter – your only option is to type in the currently assigned IP address (1) as you cannot leave the IPv4 address field blank. Likewise, you must type in the IP address of any other VMkernel being created.
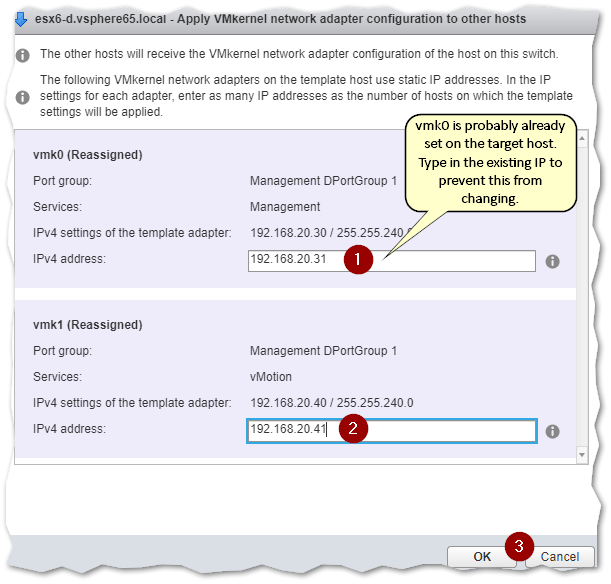
Configuring IP addressing for the various VMkernel adapters
Press Next to skip the next screen.
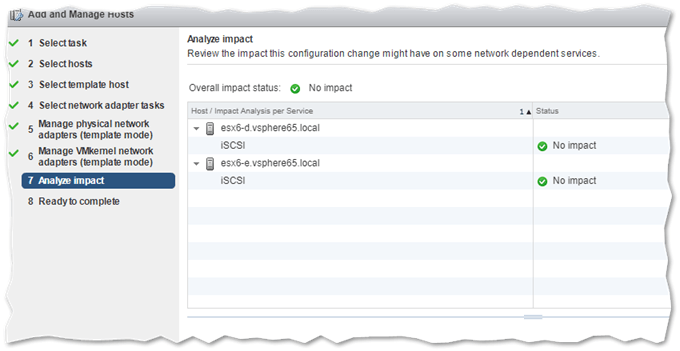
Pressing Finish completes the template host network configuration cloning process.
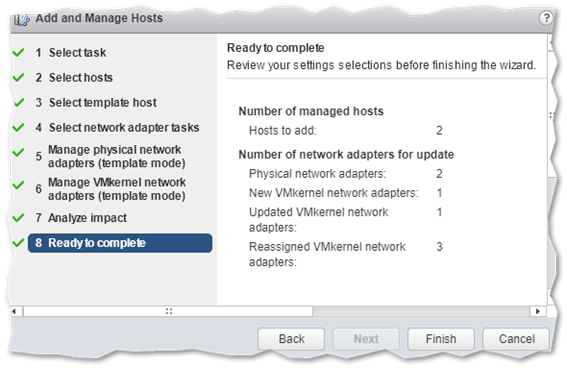
Completing the process
When configuring multiple hosts, use the status or recent tasks window to monitor the progress. The next screenshot shows the addition and configuration of vmk1, the second VMkernel adapter created on esx6-e.vsphere65.local.
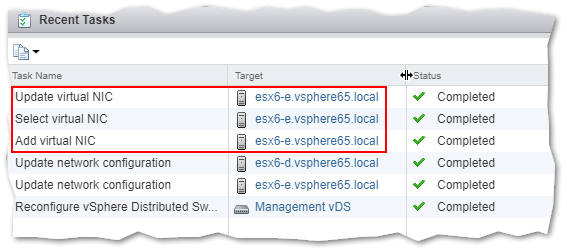
Monitoring network tasks in the recent tasks window
You can run the previous PowerCLI command to verify that the vMotion VMkernel has been created and assigned the correct IP address.
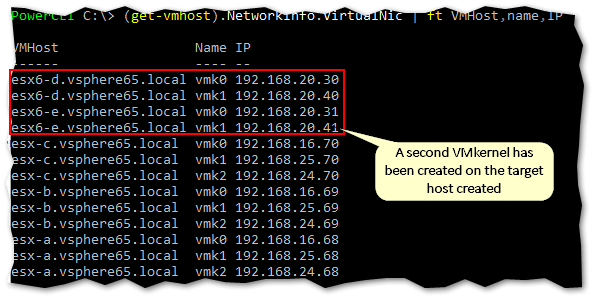
Using PowerCLI yet again to retrieve VMkernel information
Additionally, use the vSphere Web client or the esxcli command to verify the same. As shown next, the correct configuration has been applied save for the TCP/IP stack type which is set to Default instead of vMotion as originally configured.
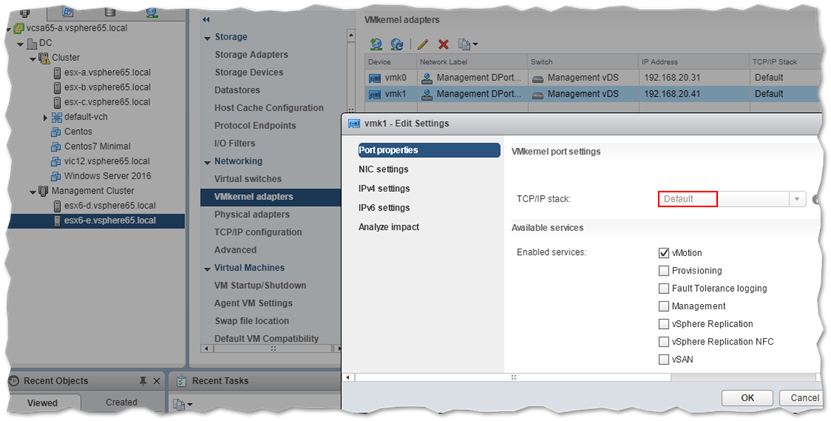
Inspecting VMkernel details in vSphere Web Client
Being a doubting Thomas, I had to rule out possible glitches with the web client’s UI. To do this, I ran the following esxcli command from an SSH session. The command outputs information about ESXi’s VMkernel adapters. The Network Instance property is set to defaultTCPipStack, meaning there’s nothing wrong with the UI!
esxcli network ip interface list
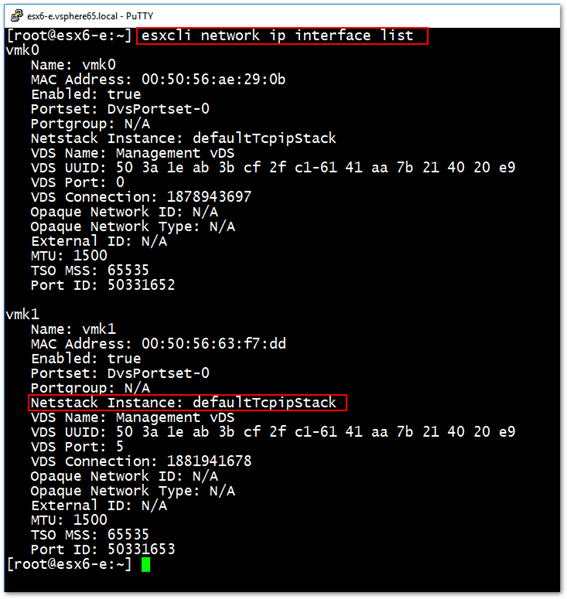
Using the esxcli command for more detailed VMkernel info
Conclusion
Adding hosts to a vDS using template mode is a convenient way of ensuring a homogeneous network configuration across your ESXi hosts. The one drawback I came across, is the inability to set the TCP/IP stack value as per the template host’s configuration. The fact that you have to type in the IP addresses for preconfigured VMkernel adapters is also somewhat annoying but something I can live with.
Besides Part 2 of the networking series, you might also want to give Part 1 a read to learn about standard switching in vSphere if this is all new to you.
Ask Me Anything!
If anything here is unclear or you have anything to add please don’t hesitate to write to me in the comments section below. I’m always happy to help my fellow IT pros (and I also learn from you guys too!)


Not a DOJO Member yet?
Join thousands of other IT pros and receive a weekly roundup email with the latest content & updates!
More in this category


About the Author
Jason Fenech

