Save to My DOJO
Table of contents
In Disaster Recovery using vSphere Replication part 1, I went over the details of installing and setting up the vSphere Replication Appliance on both source and target vCenter Server instances. The next step is to set up a replication connection allowing you to replicate VMs to the target node whether it consists a vCenter Server instance at a local or remote data center or a secondary instance within the same SSO site.
Today, I’ll go over the steps carried out to replicate a VM and restore it on a target site.
Replicating a VM
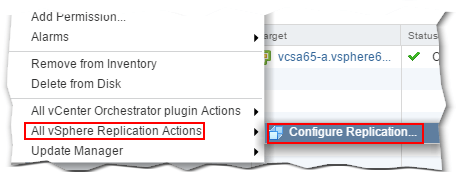
Step 1 – Right-click on the VM you wish to replicate, selecting Configure Replication from the All vSphere Replication Actions menu.
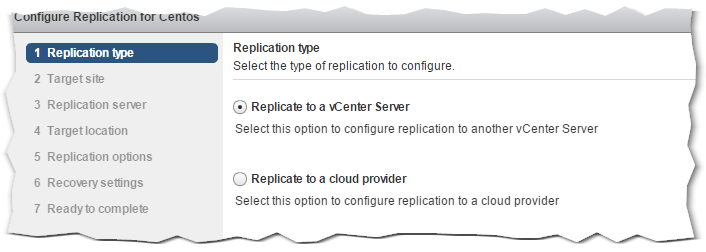
Step 2 – Select Replicate to a vCenter Server. The second option is selected when replicating to a vCenter instance hosted on a cloud provider such as vCloud Air.
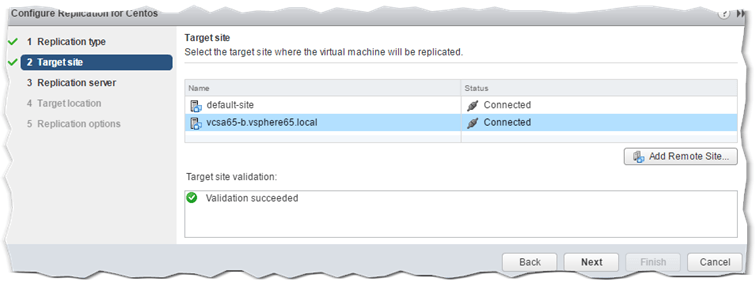
Step 3 – Select the target where the VM will be replicated to. In this example, I’ve selected a vCenter Server at the remote site. The Add Remote Site button is used when you need to add new connections between source and target sites.
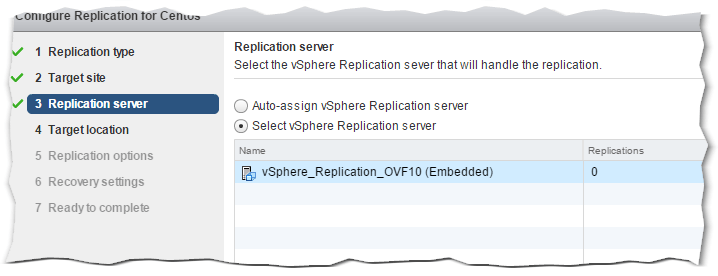
Step 4 – Any configured vSphere Replication servers available at the remote site are automatically picked for you. Select one from the list or simply accept the default selection.
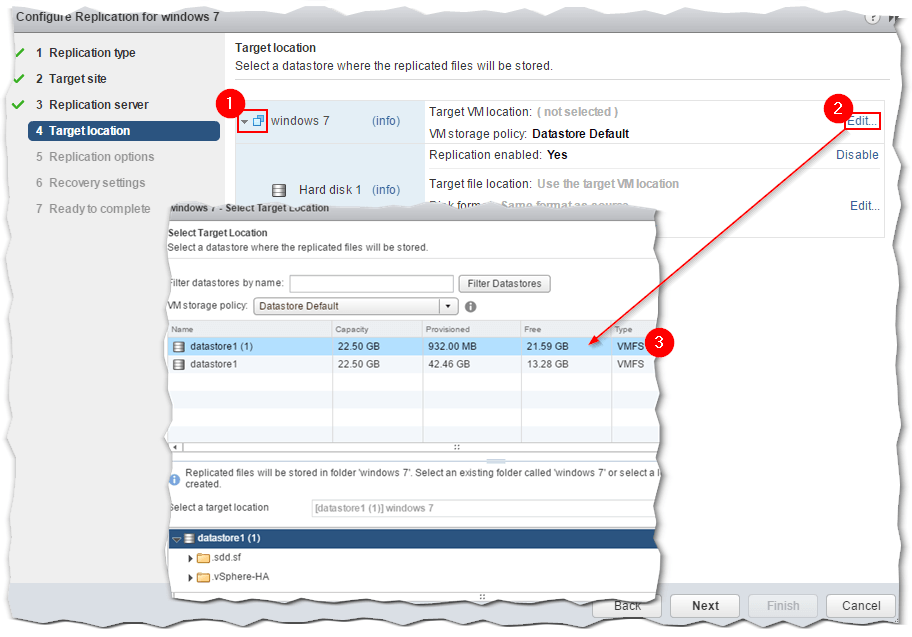
Step 5 – Click on Edit (2) to select a datastore from the target site where the replica will be created. A list of all the datastores managed by the target vCenter instance is displayed. Optionally, expand the details (1) to list additional VM disks. This allows you to set the storage policy, disk format and replication behavior for every individual VM disk.
Step 6 – If supported, you can optionally enable guest OS quiescing which allows the replica VM to be restored in a consistent state. This should be enabled only where applications running on a VM specifically call for VSS quiescing. Network compression can also be enabled to reduce bandwidth utilization. This, however, may result in an increased CPU utilization at both ends of the connection.

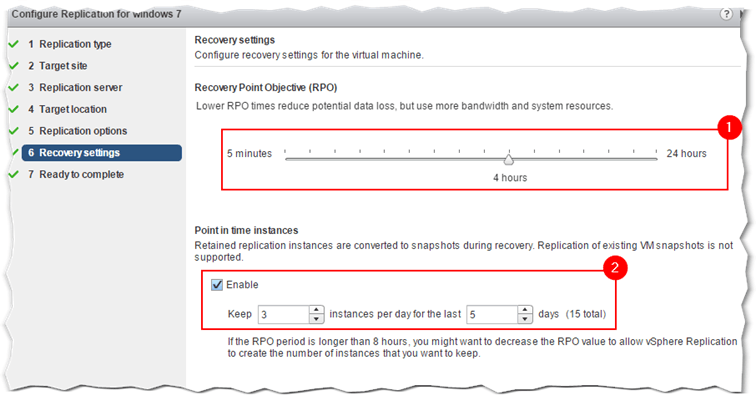
Step 7 – Use the RPO slider (1) to set an acceptable time period for which data can be lost in case of a site failure. Optionally, enabling the Point in time instances option (2) creates multiple instances or recovery points of the VM. A maximum of 24 instances per VM is supported which are converted to snapshots when a replica is restored as a VM.
Note: “The number of replication instances that vSphere Replication keeps depends on the configured retention policy, but also requires that the RPO period is short enough for these instances to be created. Because vSphere Replication does not check whether the RPO settings will create enough instances to keep, and does not display a warning message if the instances are not enough, you must ensure that you set vSphere Replication to create the instances that you want to keep. For example, if you set vSphere Replication to keep 6 replication instances per day, the RPO period should not exceed 4 hours, so that vSphere Replication can create 6 instances in 24 hours.”
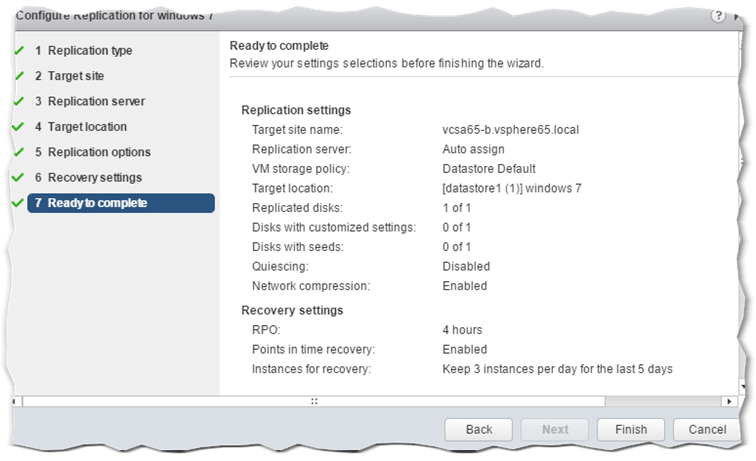
Step 8 – Review the settings and press Finish to commit.
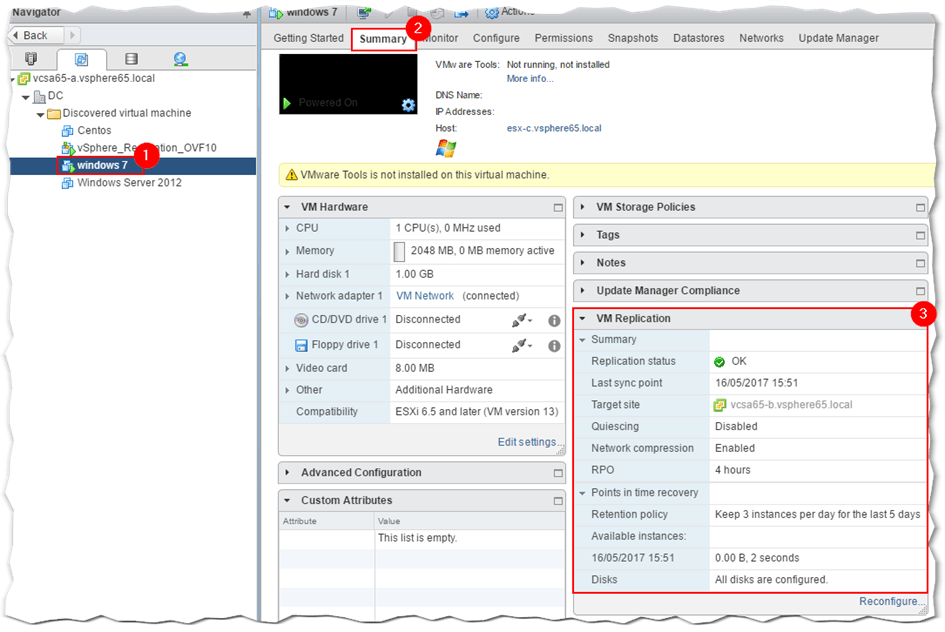
Note that the VM must be powered on for replication to take place. You can monitor the replication status for a VM from the VM Replication window (3) on the Summary page (2) for the highlighted VM.
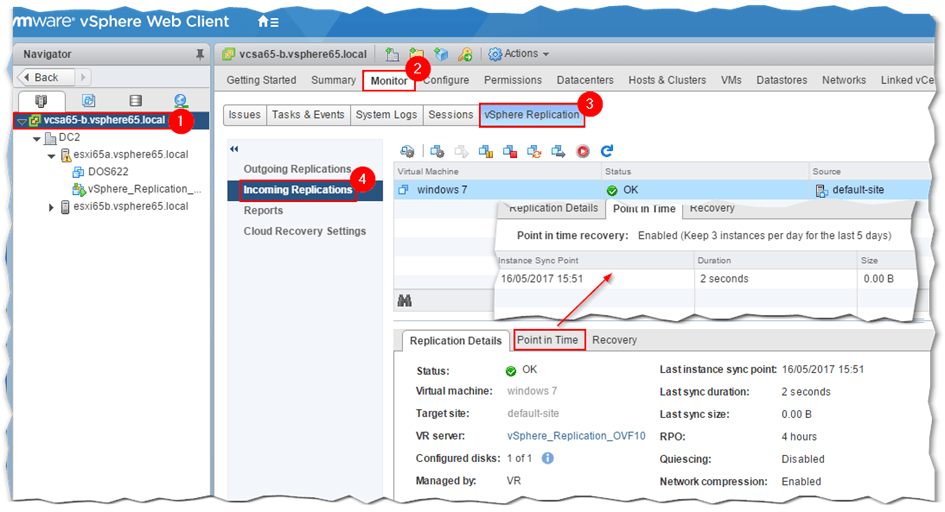
Likewise, you can monitor incoming replications on the target vCenter instance as shown in the following screenshot. The same applies to monitoring outgoing replication connections. If Point in Time has been enabled for a VM, a list of all the instances taken to date are displayed under the Point in Time tab. In this example, only one instance has been created thus far.
The embedded VMware video demonstrates the procedure just outlined.
Restoring a VM
Step 1 – Log in the target vCenter Server using the vSphere Web client. Select the vCenter Server (1) from Navigator and click on the Monitor (2) tab. Next, click on vSphere Replication (3) and select Incoming Replications (4). Select the VM you want to restore from the Virtual Machine list (5) and click on the Start Recovery button (6).

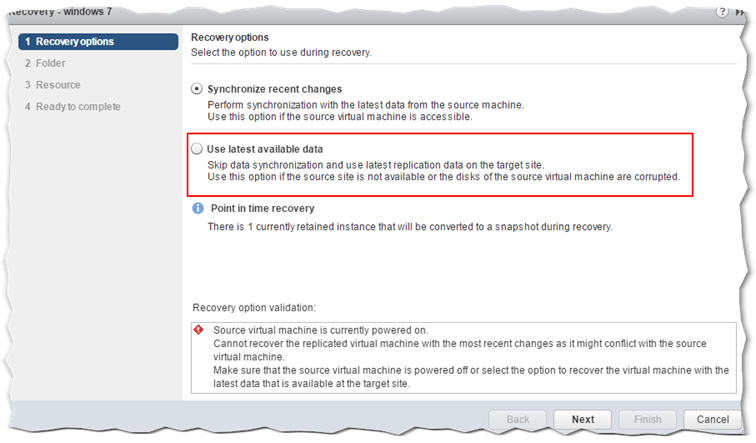
Step 2 – Select the recovery option you wish to use. The first, Synchronize recent changes, cannot be used when the source virtual machine is still powered on to avoid conflicts. Additionally, when selecting this option, the VM must be reachable in order to replicate the latest changes to the target which ensures no loss of data.
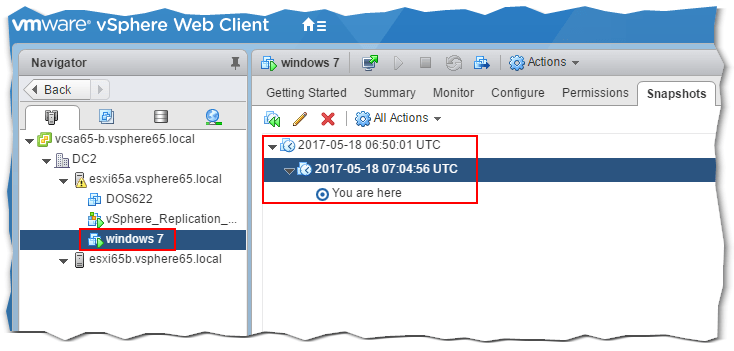
In this case, I opted for the second option as shown. Also, notice that the VM I’m about to recover has an associated instance that will show up as a snapshot when the VM is added to the inventory. This allows you to revert to a point in time when the VM was fully functional in terms of the guest OS installed and running applications.
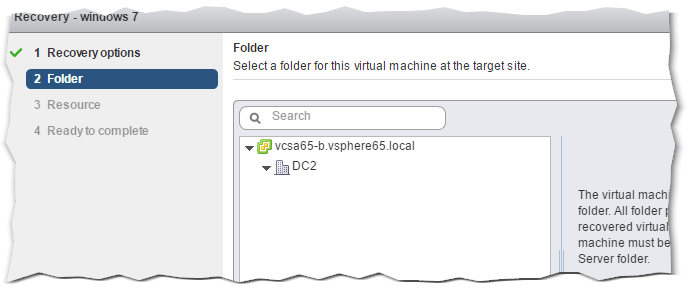
Step 3 – Select a location where the VM will be restored.
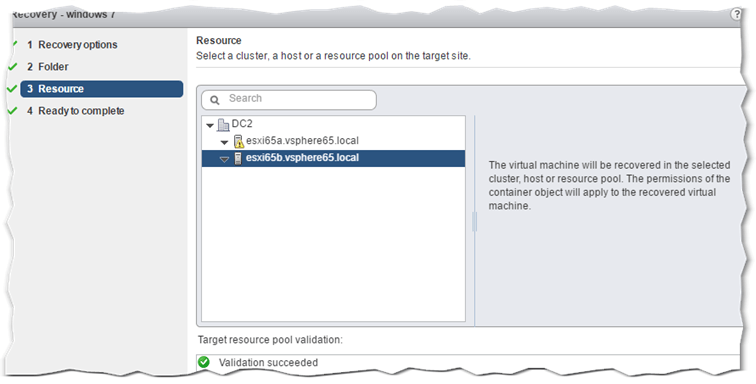
Step 4 – Select the cluster, host or resource pool to which the VM will be restored.
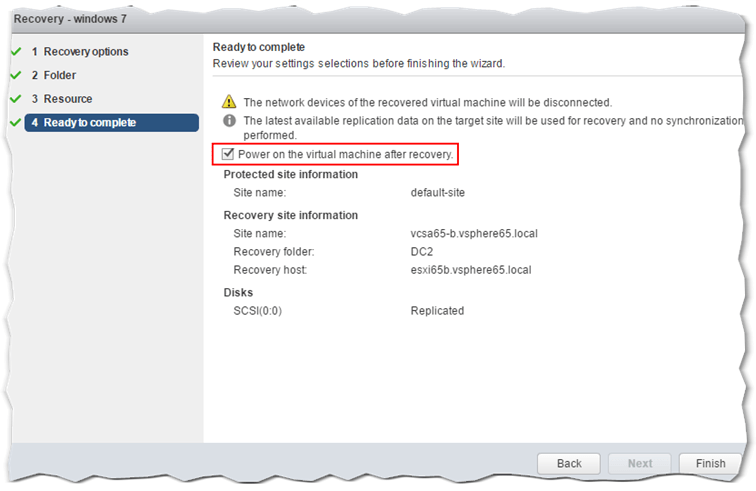
Step 5 – The Power on … option is enabled by default but can be disabled if you don’t want the VM powered up on restore. As a precaution, any network card on the VM is left disconnected meaning that they are enabled manually after the VM has been restored. Pressing Finish initiates the recovery process.
This other video from VMware, demonstrates the recovery process just outlined.
Once the VM is restored, you can revert to a snapshot if point in time was enabled. If the source VM is running, you won’t be able to edit its settings unless the source VM is powered off first. This is something you need to keep in mind knowing that the vnics are disabled automatically. Once the VM is restored, you will not be able to restore it a second time.
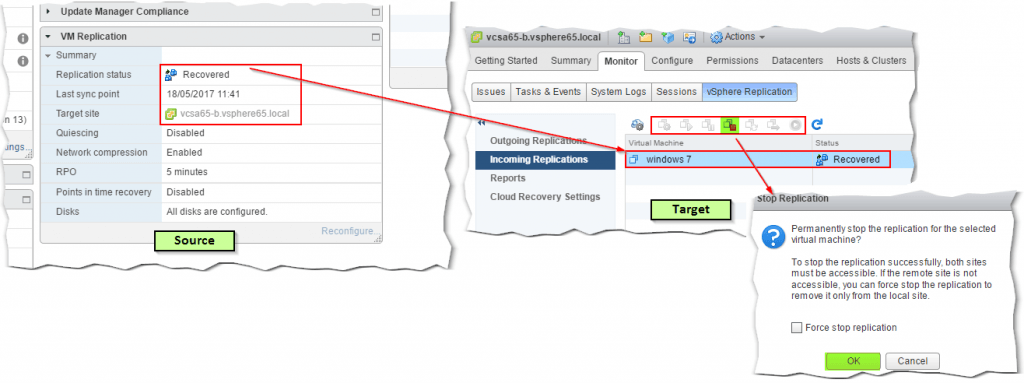
After the VM is restored, you can safely delete the incoming replication connection for the specified VM from the vSphere Replication tab. This is done by selecting the VM and clicking on the Stop Replication button as shown next. Doing this, deletes the files associated with the replica from the target datastore and removes any corresponding replication settings for the VM at source.
Conclusion
VMware vSphere Replication is a vCenter integrated solution that effectively protects your virtual machines thus complementing any DR strategy you might have in place. Since replication occurs at the host level, vSphere Replication is compatible with a number of storage architectures and technology including SAN, NAS, DAS and vSAN which makes the solution extremely versatile.
Configuring a VM for replication is a no-brainer. From a network perspective, replication traffic is kept in check by using compression and replicating only data that has changed. We’ve also seen that RPO can be set to anywhere from 5 minutes to 24 hours on an individual VM basis. Multiple recovery points (snapshots) and VSS quiescing ensure maximum protection for your VMs and hosted applications.


Not a DOJO Member yet?
Join thousands of other IT pros and receive a weekly roundup email with the latest content & updates!


6 thoughts on "Disaster Recovery using vSphere Replication – Part 2"
Is there a way to script setting up the replication? I don’t want to set this up individually for all the vm I need to protect.
Not that I know of. PowerCLI does not provide any support at the time.
https://communities.vmware.com/thread/553961
What about the re-protect and roll back procedures with VRA? Are they possible?
Hi Marco,
This would be a manual process in vSphere replication. You would have to set up replication again in the reverse direction in order to roll back to the other direction after a recover has already been done.