Save to My DOJO
I did cover nested ESXi in the past, so if the title sounds a bit odd, don’t worry. The term nested is just jargon for running a hypervisor, such as ESXi, under another hypervisor. That’s right, we will be running ESXi as a VM under ESXi and you could just as well do the same on other hypervisors such as Hyper-V or XenServer.
vSphere 6.5 makes deploying nested ESXi easier than ever before not least due to the new nesting related features introduced. Ironically, nesting is still something VMware does not support!
When creating a nested ESXi instance on a physical ESXi 6.5 host, the VM creation wizard picks up on this and configures the VM for optimal performance by automatically selecting the VMXNET3 network driver, a Paravirtual SCSI controller and EFI firmware. So today, I’ll be outlining the following.
- Creating the VM on which to install ESXi 6.5.
- How to install VMRC and mount the ESXi ISO image
- Installing ESXi 6.5.
- Configure ESXi’s network settings
- Testing
–
–
Creating the VM
I’m using the vSphere Web client since the ESXi 6.5 host where I’m creating the VM is vCenter managed. Alternatively, you can use the embedded host client to directly connect to ESXi. The only assumption is availability of a physical ESXi 6.5 host where you can try this exercise out. You will still be able to nest ESXi 6.5 on older ESXi versions however you will suffer some performance penalties. In addition, some of the latest ESXi nested options will be unavailable.
| Run the New Virtual Machine wizard and select Create a new virtual machine. Click on the Next button (not shown). | 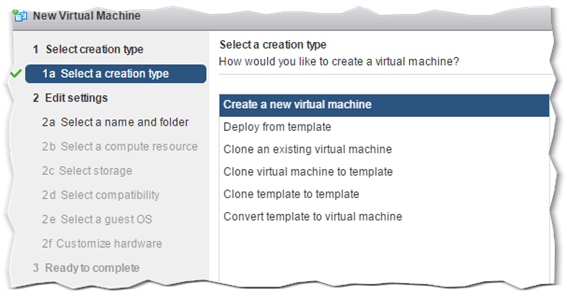 |
| Type in a name for the VM and select the location where you want it created. Press Next. | 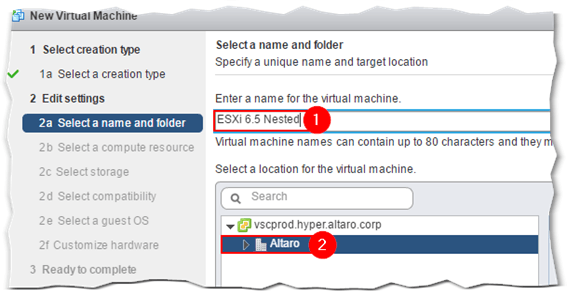 |
| Select the ESXi host on which the VM will reside.
You’ll need to select a host only when multiple ESXi hosts are managed by vCenter and DRS is not enabled. Press Next. |
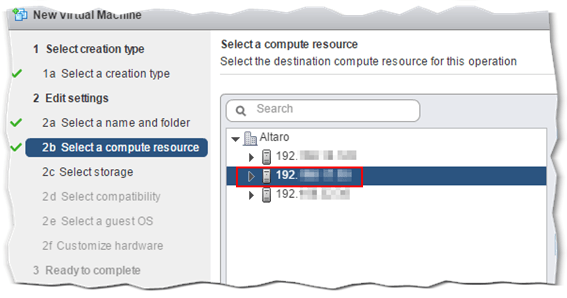 |
| Select the datastore where the VM will be created and the VM storage policy. Press Next to continue. | 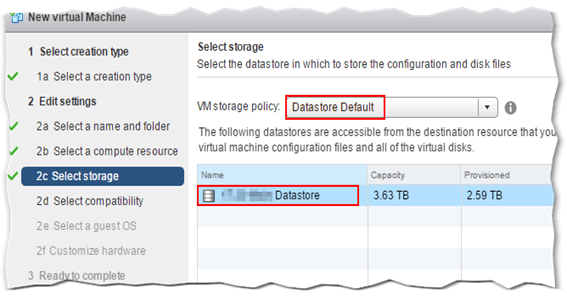 |
| Set the compatibility level – hardware version – to ESXi 6.5 and later and press Next. | 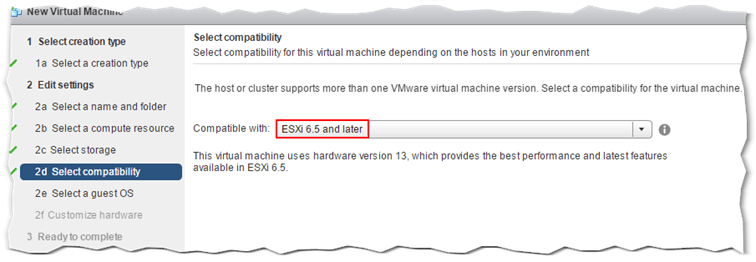 |
| Set the Guest OS Family to Other and Guest OS Version to VMware ESXi 6.5.
Ignore the Unsupported warning at the bottom. This is just indicative of the fact that VMware does not support ESXi nested instances. |
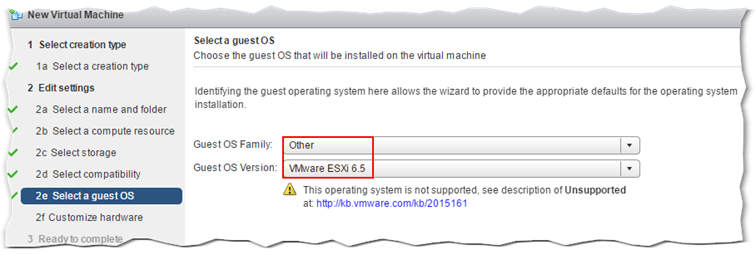 |
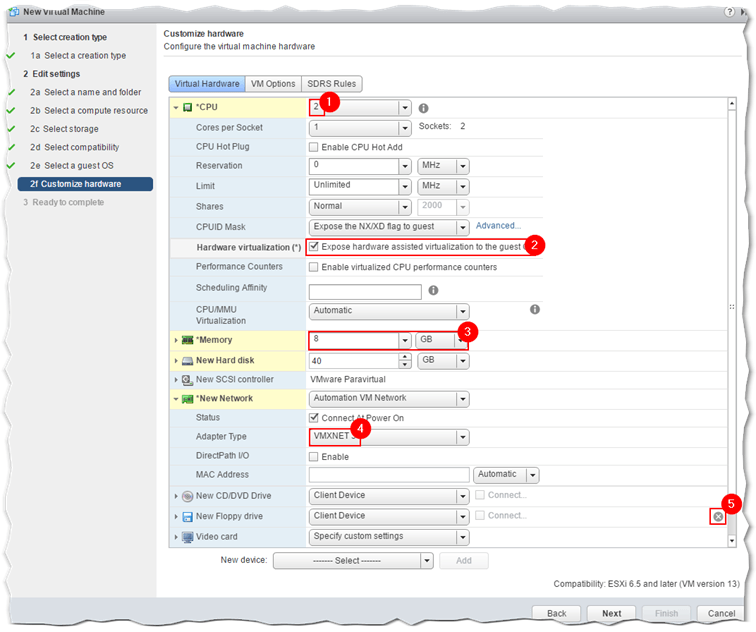
| This is the most important step when creating a VM that will run ESXi.
First set the CPU number to 2 and Memory to at least 4GB (minimum hardware requirements). Next, tick on the Expose hardware assisted virtualization to the guest option to allow nested 64 bit OSes to run on the nested ESXi instance. Finally, delete the Floppy drive since you will not be needing it. Notice how the network adapter type and SCSI Controller are automatically set to VMXNET3 and VMware Paravirtual for optimal performance and lower overheads. |
 |
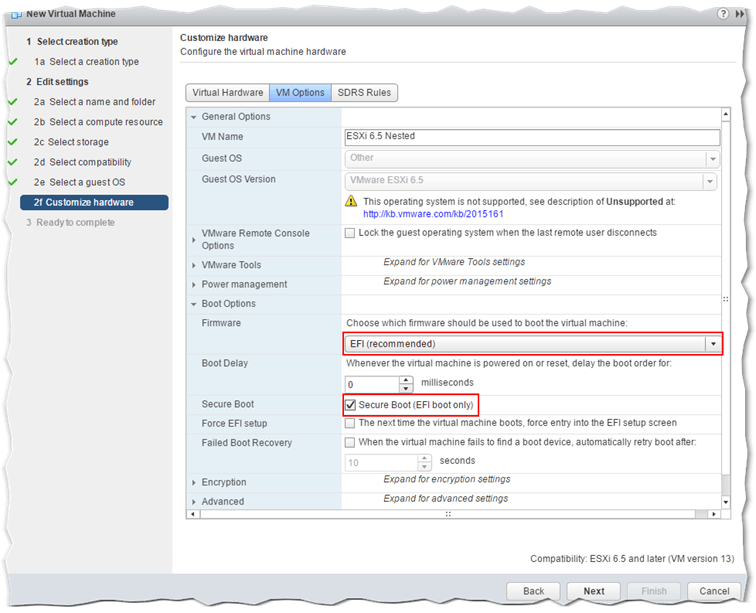
| Select the VM Options tab. Here you can see that unlike previous versions, the firmware is set to EFI.
The new vSphere 6.5 Secure Boot option is also selected by default. Secure Boot does not allow unsigned drivers or software to load during the booting process as part of a security hardening process. Click on Next to continue. |
 |
| Press Finish to complete the VM creation process. | 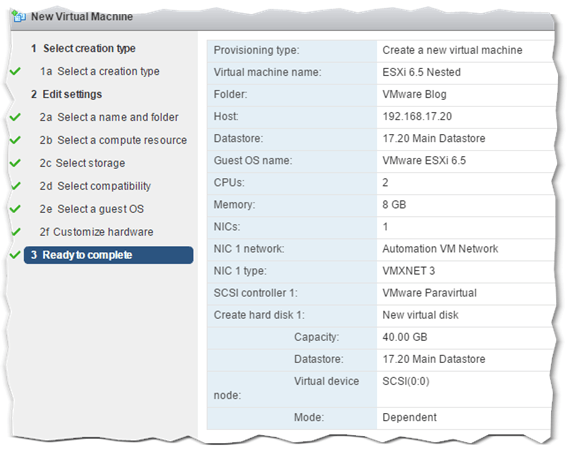 |
–
–
Mount the ESXi ISO image
At this point we can go ahead and install ESXi on the VM just created. We first fire up the VM and mount the ESXi ISO image downloaded from my.vmware.com. Using the vSphere Web client or otherwise, power up the VM and then click on the Summary tab. As per the next screenshot, click on the settings icon, right-hand corner of the VM’s console (1), and select Install Remote Console (2). Skip this step if remote console is already installed or if you’re using VMware Workstation.
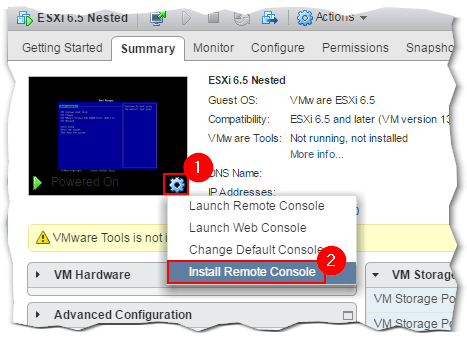
Installing VMware Remote Console (VMRC) to better manage VMs
After remote console (VMRC) is installed, repeat the above step this time choosing Launch Remote Console. From the VMRC pull-down menu, select Removable Devices -> CD/DVD Drive1 and Connect to Disk Image File (iso). Locate the previously downloaded ESXi 6.5 ISO image and click on it.
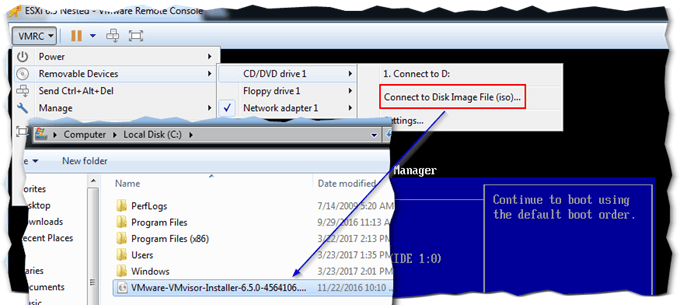
Mounting an ISO image from local disk on a VM using VMRC
Click inside the VMRC console window so you can access the VM’s boot manager. Select the … IDE CDROM … menu item as shown next and press Enter.
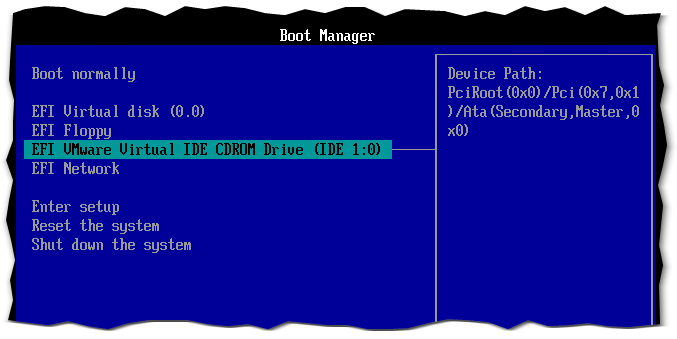
Accessing the VM’s EFI boot manager options
The ESXi 6.5 installer should pop-up.
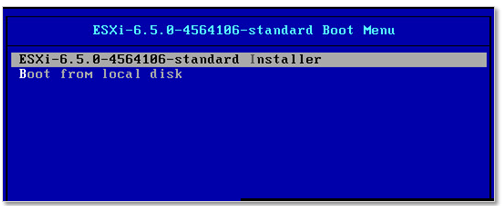
The ESXi installer displayed after booting from the ISO image
–
–
Installing ESXi 6.5
Since this is not the first time I’ve written about how to install ESXi, I will limit myself to including a bulleted installation procedure. For more details, refer to links in the reference section.
- Boot from CD-ROM.
- Press Enter to continue with the installation or ESC to cancel.
- Press F11 to accept the EULA.
- Press Enter to install ESXi selecting the VMWare virtual disk.
- Select the keyboard layout and press Enter.
- Type in the root password, twice and press Enter.
- Ignore CPU_SUPPORT warning and press Enter.
- Press F11 to start installing.
- Press Enter to reboot after the installation completes. Before rebooting, unmount the ISO image as shown.

Unmounting the ESXi ISO image prior to rebooting ESXi after a successful install
References
- https://www.altaro.com/vmware/deploying-vsphere-esxi-6-5/
- https://www.altaro.com/vmware/how-to-install-esxi-6-0-on-bare-metal-servers/
- https://www.altaro.com/vmware/how-to-set-up-a-nested-vsphere-6-environment-part-1/
–
–
Configuring the network
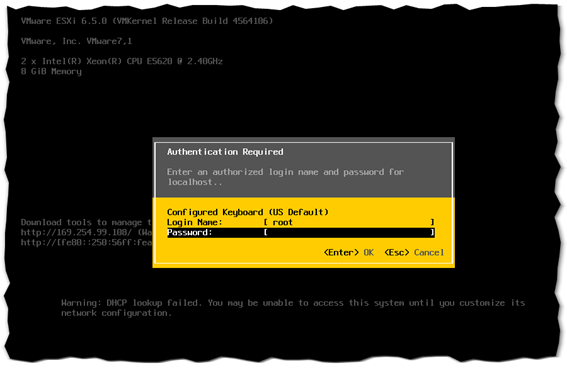
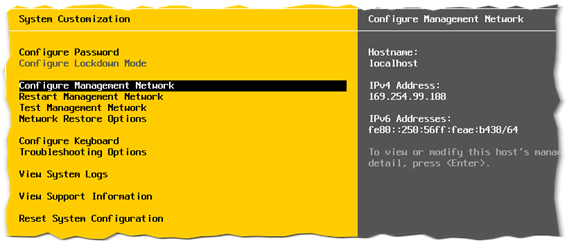
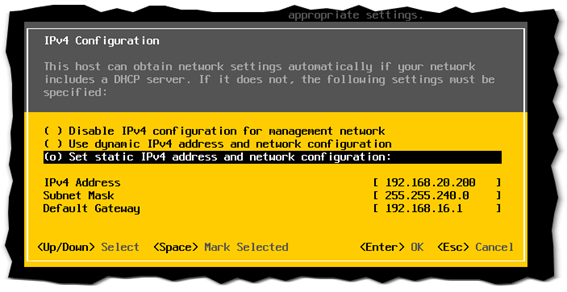
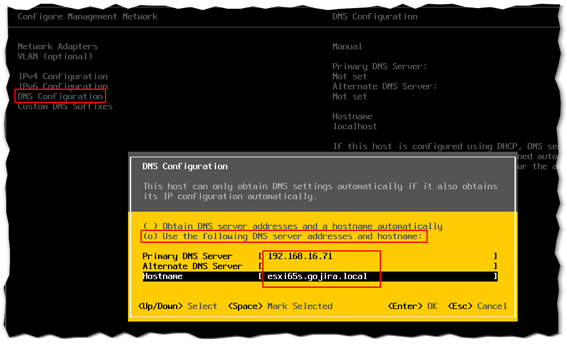
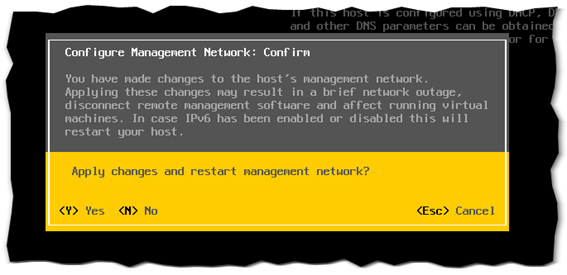
I’ll be configuring ESXi’s networking from the DCUI while consoled to the VM in VMRC. This reminds me that we need to enable promiscuous mode and forged transmits on the virtual switch to which the nested ESXi host is hooked up to.

Enabling promiscuous and forged transmits mode on a standard switch or portgroup. This allows proper networking functionality on nested ESXi hosts.
–
–
Testing!
There are several things you can do to verify that your ESXi 6.5 nested instance is working as supposed to especially from a networking standpoint.
ICMP and DNS resolution
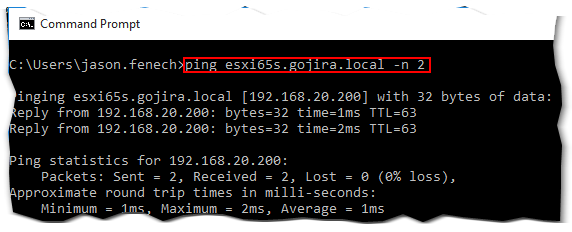
Successfully pinging a host’s DNS address implies correct DNS resolution and unhindered network access assuming there are no acls dropping ICMP traffic
Accessing ESXi using an SSH client
Putty is the SSH client I use the most, primarily because it is lightweight and portable. You can download it freely from here. To SSH to ESXi, type in its IP address as shown below making sure that SSH and port 22 (1) are selected.
Click on the Open button (2) and acknowledge the security alert (3) by pressing Yes on the security dialog. Verify that you can log as root (4). Once logged in, you will be able to perform various tasks or checks using inbuilt commands such as esxcli.
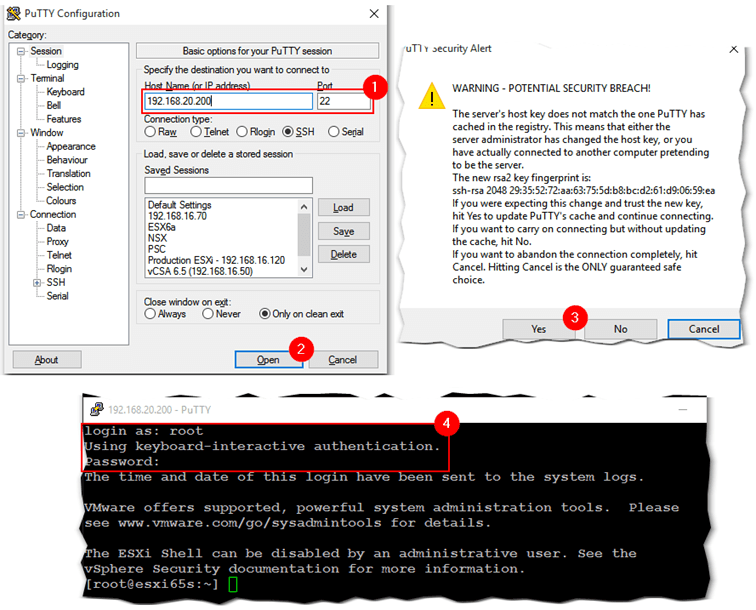
Using putty to SSH on the nested ESXi host
ESXi embedded host client
Starting with ESXi 6.0 U2, ESXi can be managed natively using the embedded host client via https://<ESXi IP address or hostname>/ui/. You can perform many of the tasks usually carried out with the traditional and Web vSphere clients.
Verify that you can access ESXi by logging in as root.
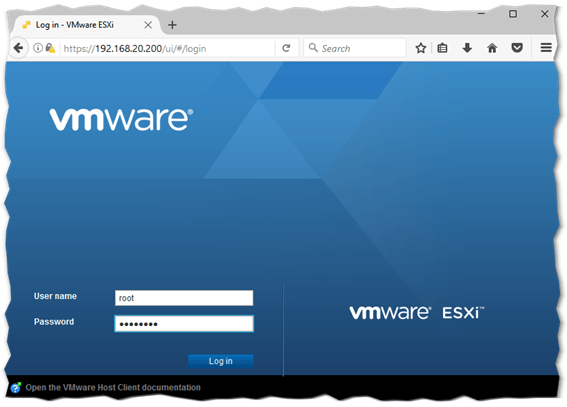
The ESXi embedded host client logon page
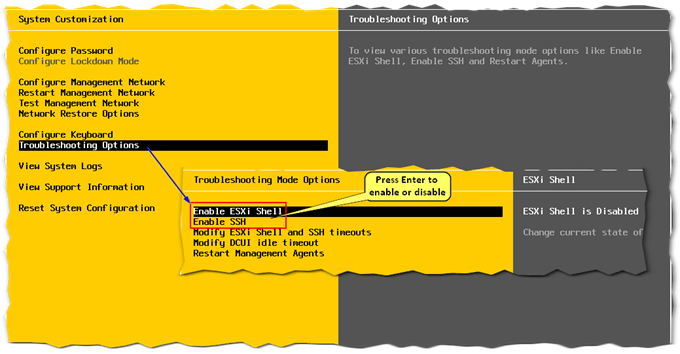
Once you log in, you should be able to create a VM. You can also check out storage and network settings by selecting accordingly from the Navigator menu displayed on the left of the screen. As per the next screenshot, you are reminded that both ESXi shell and SSH are currently enabled. Security best practices entail that both settings are enabled strictly when required.
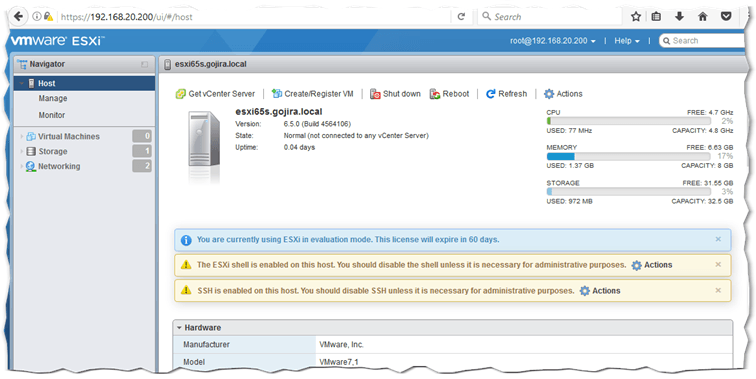
Accessing ESXi using the embedded host client
Conclusion
With vSphere 6.5, we’ve seen how easy it is to deploy nested ESXi instances whether you want them deployed for testing purposes or otherwise. Deploying ESXi 6.5 nested on ESXi 6.5 brings to the table a number of benefits such as Paravirtual SCSI support which boosts up I/O performance on nested ESXi instances. You can now also use GOSC with VMs hosted on the nested ESXi instance as well as enjoy support for NVMe drives.
[the_ad id=”4738″][the_ad id=”4796″]


Not a DOJO Member yet?
Join thousands of other IT pros and receive a weekly roundup email with the latest content & updates!

