Save to My DOJO
Security matters!
One reads about security breaches and hacks on a daily basis so it probably does not come as a surprise to learn that VMware products are just as prone to being comprised as any other product out there. It is also true that a substantial number of security “mishaps” are the result of badly configured systems, insider jobs or a casual misuse of company resources or perhaps the wilful circumvention of security policies. Whatever the case may be, there are a number of things you can do to improve the security of vSphere resources by which I mean, predominantly, ESXi and vCenter Server.
In this post, I’ll talk about one of the most basic and possibly most overlooked concepts one can implement with respect to securing vCenter Server. This is known as the principle of least privilege. Simply put, a user should be granted only those privileges and permissions that would allow him or her to carry out work unhindered. The concept comes highly recommended and lends itself nicely to securing environments which are shared and used by users from different departments and with varying functions and roles.
Securing vCenter Server. Other stuff you should know about
Another security axiom to abide by is that of ensuring that all systems are running at the latest patch level. Where vSphere is concerned, this is relatively easy to accomplish using either vSphere Update Manager or manual patching if the corresponding updates have been downloaded directly from the VMware downloads page.
Deploying vCenter Server for Windows, entails an up to speed Microsoft operating system in terms of installing the latest updates using Windows Server Update Services or any other patch management software. This is a definite must. You simply cannot overlook it.
You should also make sure to disable all redundant services and block unused network ports using firewalls or otherwise, regardless of an internet facing server or not.
Another important aspect to consider is network traffic isolation. This is, in general, a mandatory product requirement, or at least a highly advisable one, not only from a security perspective – as in preventing eavesdropping – but also to prevent performance from being adversely impacted; think network traffic congestion for example. VLANs are a great way to segregate traffic but you could also go for totally independent physical networks to isolate say your storage, vMotion or management services.
A very good read is VMware’s comprehensive document titled vSphere Security which covers all the security aspects one can think of.
Single Sign-On (SSO)
vCenter Single Sign-On (SSO) is a component that handles identity management for administrators and applications that interact with the vSphere platform. SSO is based on identity management technology built by RSA and specifically tailored for VMware Cloud Infrastructure deployment. SSO works by federating authentication and principal data queries to Active Directory (AD) or any other LDAP based instance. SSO also has its own internal user store or domain – vsphere.local unless you named it differently during installation – so you don’t necessarily have to have Active Directory or another LDAP based authentication mechanism to run SSO. Unlike LDAP or Windows based authentication instances, the principal data stored in the internal store (i.e. user accounts and groups) can be managed using the “vCenter Users and Groups” interface in vSphere Web Client as shown in Figure 1.
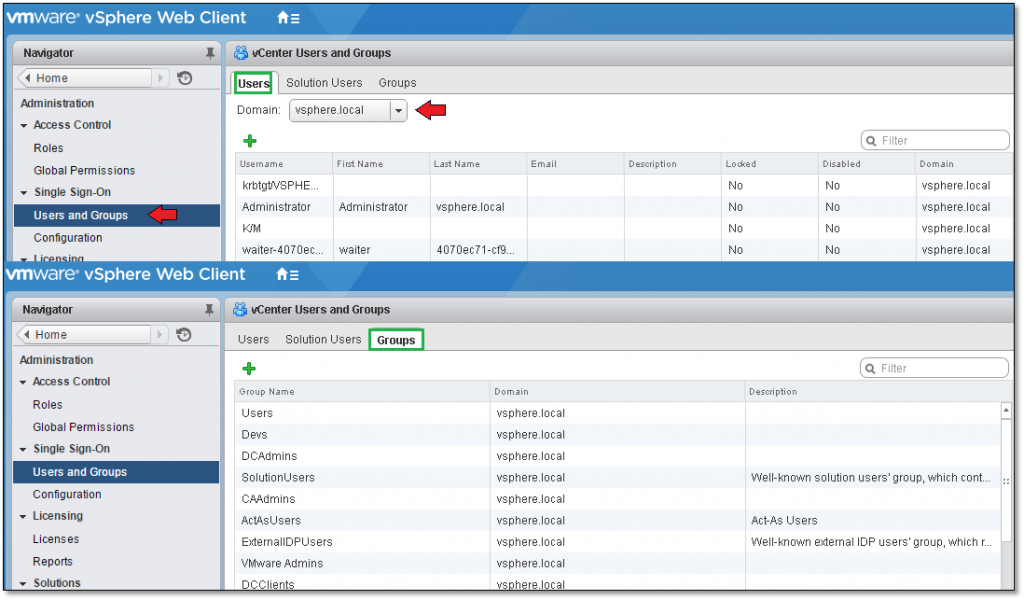
Figure 1 – Managing local domain user and groups
Looking carefully at Figure 2, you probably have noticed that three identity sources have been defined, these being;
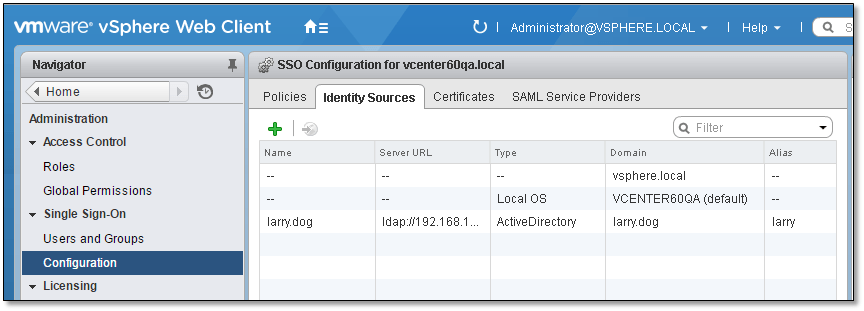
Figure 2 – SSO Identity Sources
- vSphere.local – the vCenter Server local domain consisting of predefined groups and users such as [email protected].
- Vcenter60QA – this is the NetBIOS name of the Windows box running vCenter Server. What this implies is that users and groups created in Windows may be used to assign permissions on vSphere resources.
- Larry.dog – this is an Active Directory (AD) domain, the users and groups from which can be used to assign permissions on vSphere resources. Just in case you’re wondering, Larry is the name of my dog, hence the domain name larry.dog! You should be aware that SSO provides two distinct AD interaction methods. The first and most common is where the Windows server, on which vCenter Server has been installed is in fact a member of the AD domain. The second method simple relays authentication using LDAP without the need for the vCenter Server to be set up as a member of an AD domain. This is achieved by completing the configuration for the “Active Directory as an LDAP Server” option while adding an SSO identity source as explained in the upcoming section.
Adding a new SSO Identity Source
To configure SSO, you’ll need to log on using [email protected] (or an account with similar privileges) using the vSphere Web Client. From Navigator, select the Configuration option under Single Sign-On. In the right hand pane, select the “Identity Sources” tab and click on the green addition sign icon to specify and add an identity source as shown in Figure 3.
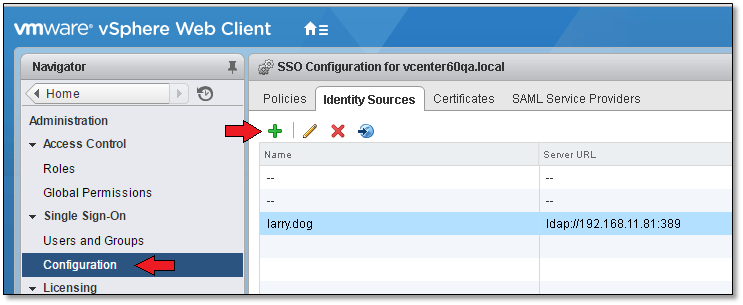
Figure 3 – Adding an SSO Identity Source
I’ll go ahead and add an AD SSO identity source using the LDAP server option. My setup for this post does not include a vCenter Server joined to an AD domain, so my only recourse apart from joining the server to the domain, is to use the LDAP Server option.
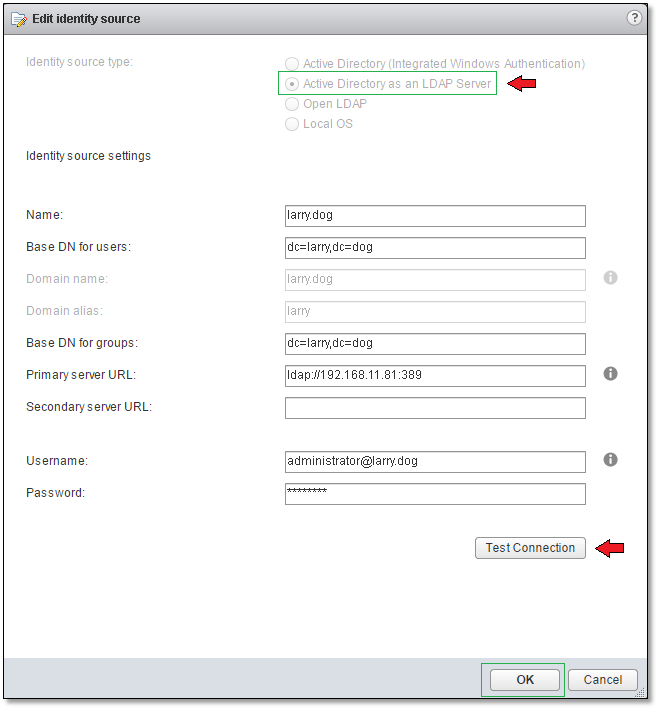
Figure 4 – Adding an Active Directory LDAP Server identity source
Make sure to enter the LDAP information as shown above in Figure 4. If you have multiple AD Domain Controllers in your environment, you may wish to add a secondary URL for redundancy purposes. Once the form is completed, press the “Test Connection” button to verify that vCenter Server can in fact communicate with AD.

Figure 5 – Successful LDAP connection
Adding an AD SSO identity source for a vCenter Server joined to the domain is even easier since you only need to specify the domain name or an SPN if you plan on changing the DC’s name at a later stage.
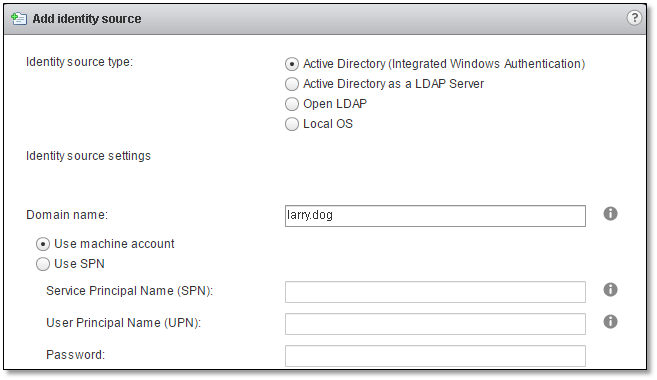
Figure 6 – Enabling Active Directory Integrated Windows Authentication
For further details on how to configure SSO for AD make sure to visit this link.
The vCenter Server Permission Model
The vCenter Server permission authorisation model shown below (Figure 7), outlines the process by which permissions are set on a vSphere object be it a folder, virtual machine or otherwise. The steps you need to follow are;
- Create or clone an existing role.
- Add or modify privileges assigned to the role.
- Grant permission to an object by specifying a user or group to which a specific role has been assigned.
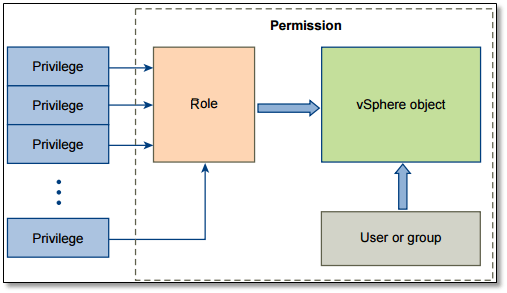
Figure 7 – The vCenter Server Permissions Model (Source: VMware)
I’ll be quoting some of definitions directly from the vSphere Security document to better explain some of the terminology used. Under each item, I’ve included snippets of the vSphere Web Client showing where from these items can be configured or set.
-
Permissions – Each object in the vCenter Server object hierarchy has associated permissions. Each permission specifies for one group or user which privileges that group or user has on the object.
-
Global Permissions – Global permissions are applied to a global root object that spans solutions, for example, both vCenter Server and vCenter Orchestrator. Use global permissions to give a user or group privileges for all objects in all object hierarchies. Each solution has a root object in its own object hierarchy. The global root object acts as a parent object to each solution object. You can assign global permissions to users or groups, and decide on the role for each user or group. The role determines the set of privileges. You can assign a predefined role or create custom roles.
Note: The [email protected] user account as well as the vsphere.local\Administrators group are by default members of the global permissions list so it is imperative to use the judiciously and sparingly as well as limit who has access to them.
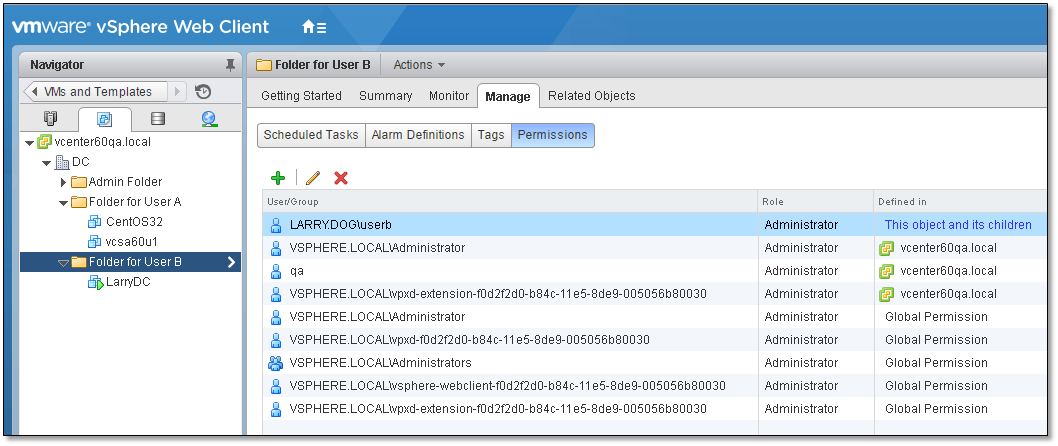
Figure 8 – Viewing the permissions assigned on a vSphere object
-
Users and Groups – On vCenter Server systems, you can assign privileges only to authenticated users or groups of authenticated users. Users are authenticated through vCenter Single Sign-On. The users and groups must be defined in the identity source that vCenter Single Sign-On is using to authenticate. Define users and groups using the tools in your identity source, for example, Active Directory.
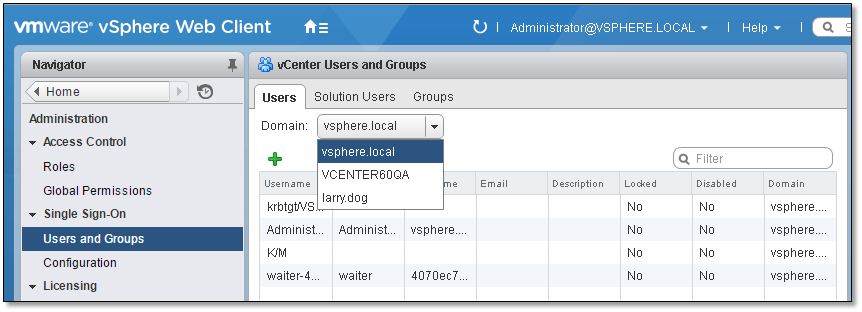
Figure 9 – Viewing users from different domains (AD, Windows and local)
-
Roles – Roles allow you to assign permissions on an object based on a typical set of tasks that users perform. Default roles, such as Administrator, are predefined on vCenter Server and cannot be changed. Other roles, such as Resource Pool Administrator, are predefined sample roles. You can create custom roles either from scratch or by cloning and modifying sample roles.
-
Privileges – Privileges are fine-grained access controls. You can group those privileges into roles that you can then map to users or groups.
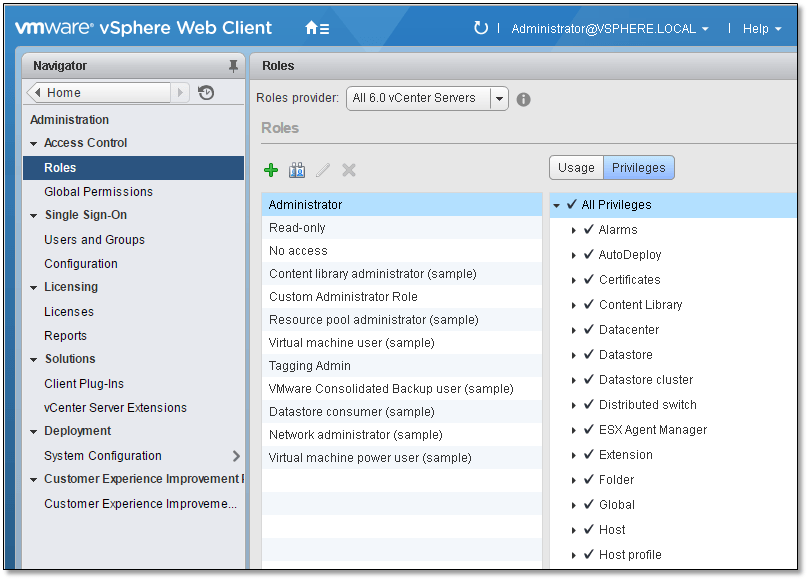
Figure 10 – Viewing user roles and privileges
An example on how to assign permissions
Let’s imagine a scenario where User A is tasked to manage a set of virtual machines. The only privileges you wish to grant User A are those that would allow him or her to perform basic tasks such as powering on or rebooting a virtual machine. As it happens, User A has already has an Active Directory account issued in his name so it’s just a matter of assigning permissions on vSphere objects using this same account. For better management, the vms User A will be responsible for, have been moved to a folder ingeniously named “Folder for User A” as shown in Figure 11. Note that I’m logged on with an administrative account.
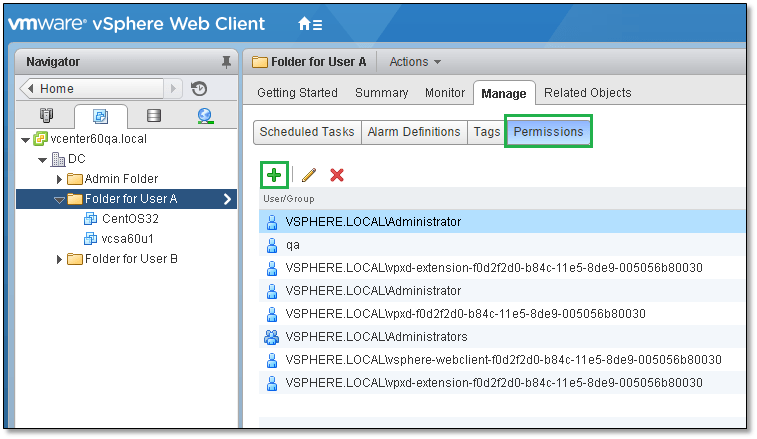
Figure 11 – Viewing the permissions on a vSphere folder
As basic as it may look, Figure 12 shows how one could go about grouping accounts used for vSphere authentication in Active Directory. As shown, I simply created an organisation unit called “vSphere Users” to which I moved those user accounts used to access to vCenter Server.
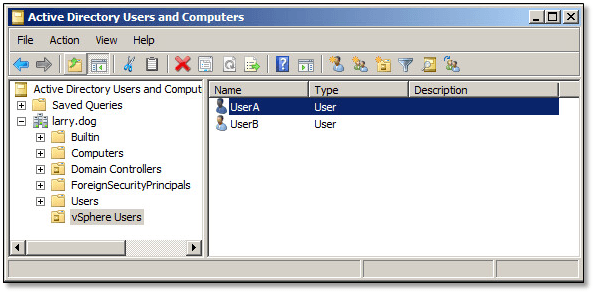
Figure 12 – Active Directory management console
As shown in Figure 13, we move on to modify or create a role to which we tie the required privileges. From Navigator, select Administration followed by Roles (1). In the right hand pane, you’ll see a number of predefined roles (2) each assigned a specific set of privileges (5). Click on the Privileges (4) button to change view from Usage (4) which simply shows where, in the vSphere object hierarchy, these privileges are being used. At this point you can either clone an existing role or create a new one. To do so, click on the corresponding icon (3) or right-click on the role and use the context menu.
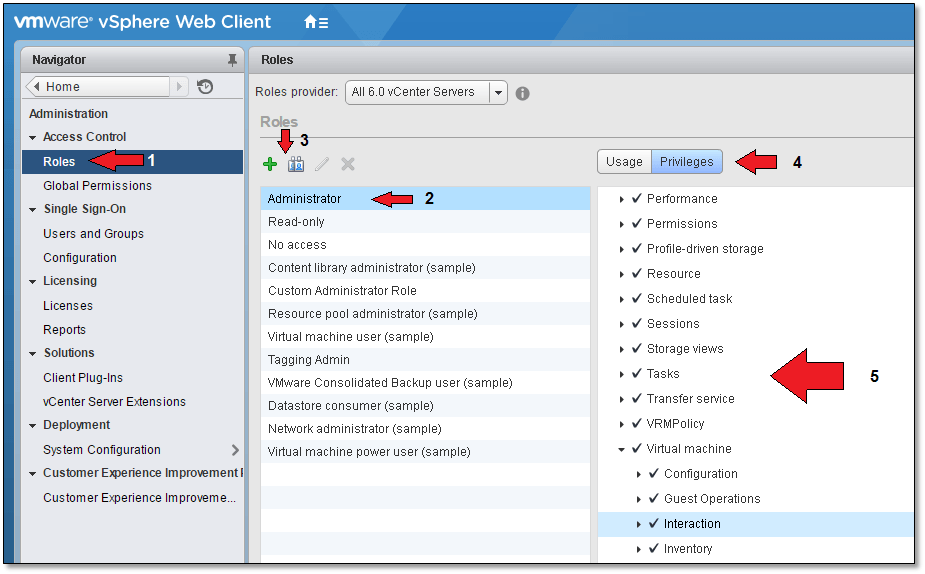
Figure 13 – Creating / Cloning a role and assigning privileges to it
I’ve decided to go ahead and clone an existing role for this exercise. I’ll name the new role “Altaro VM User” and bind to it only those privileges that would allow a user to carry out the basic tasks previously mentioned. Once a role is cloned and renamed, deselect “All Privileges” from the top of the privileges list. Next, scroll down the list and locate “Virtual machine”, selecting only the items shown in Figure 14. You can always go back and edit the role, if you wish, adding and removing privileges as you go along.
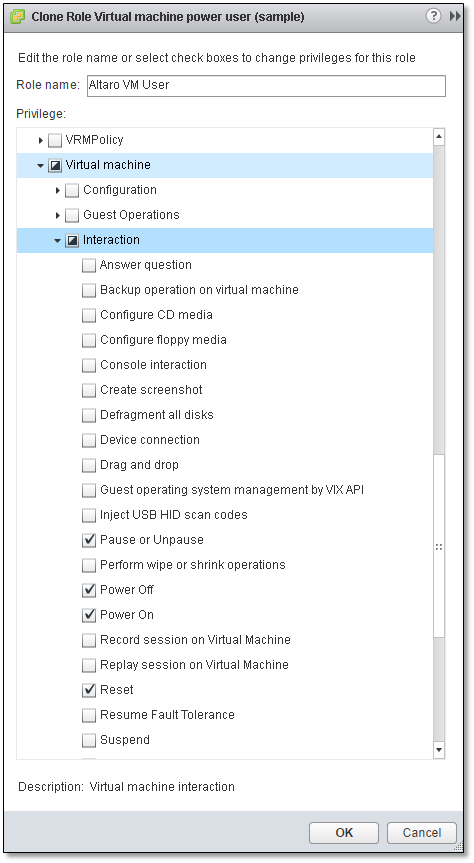
Figure 14 – Naming the new role and selecting privileges assigned to it
Next, while still logged on as [email protected] , I selected the folder holding the virtual machines managed by User A. To add a new permission entry, click on the green addition sign icon as shown in Figure 15.
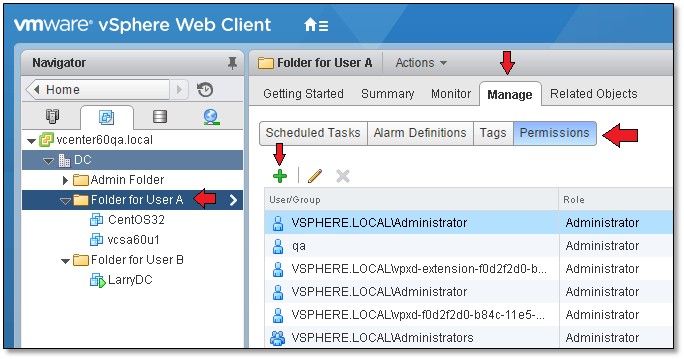
Figure 15 – Assigning new permissions
Moving on, I select the correct role, which in this case is the one previously created (1). You should also decide on whether you want the “Propagate to children” (2) option enabled. What this means is that any permissions set at this level will trickle down to every object placed under this folder. Click on “Add” to bind the role to the AD user account “User A”.
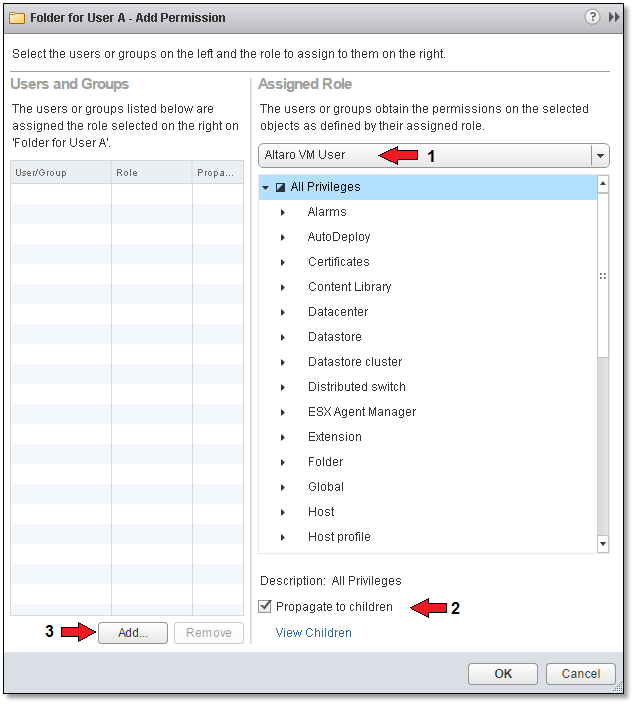
Figure 16 – Selecting the role that will be assigned to a user
From the Domain drop-down box (1), select an AD domain. Next, select the required user or group (2) and click on “Add” (3). Press “OK” to close off the form.
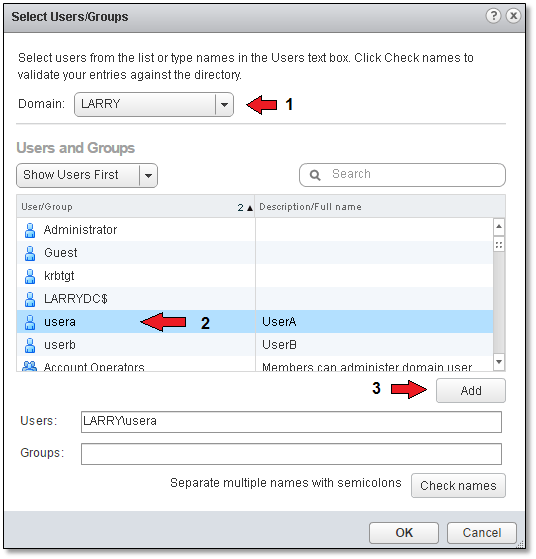
Figure 17 – Selecting a user from an AD domain
I next log in as User A to verify that what I intended to achieve in the first place has in fact been achieved!
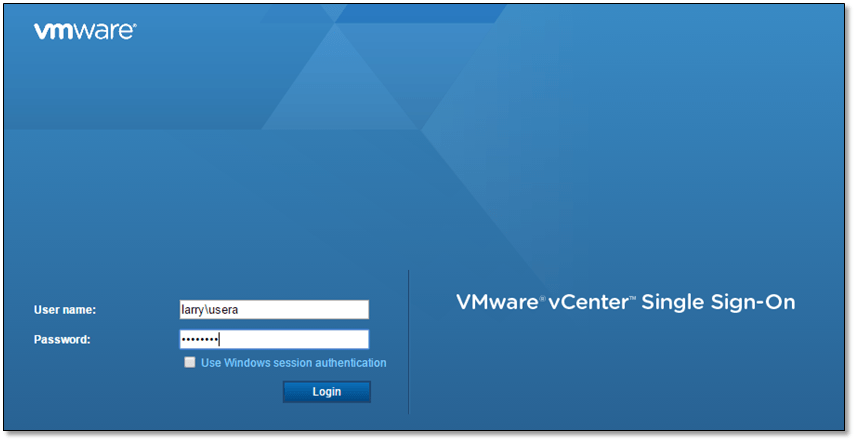
Figure 18 – Logging on using an AD user account
As can be seen in Figure 19, User A can only view the contents of folder “Folder for User A” and manage the virtual machines placed in it.
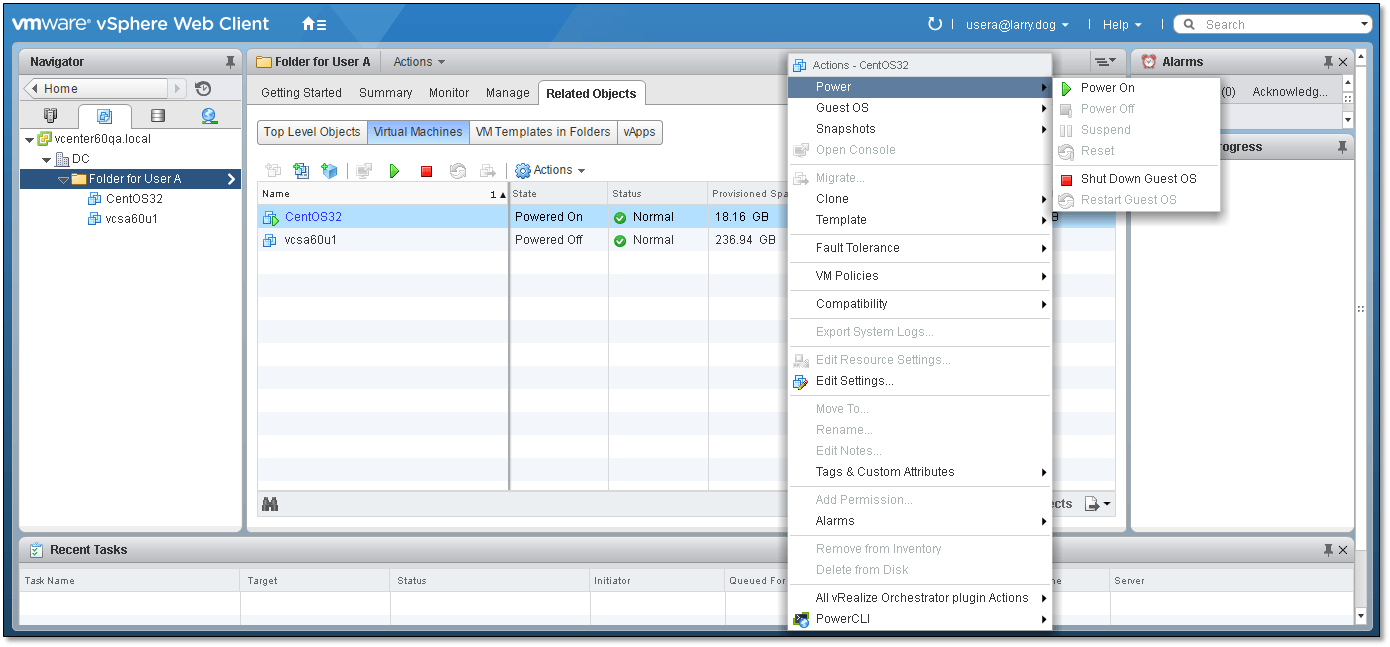
Figure 20 – Verifying correct behaviour once permissions have been assigned
As per Figure 20, a few restricted options still seem to be accessible from the context menu but once expanded you’ll find that most are indeed ghosted out. Similarly, changing view or perhaps to another folder results in an access denied message due to missing permissions.
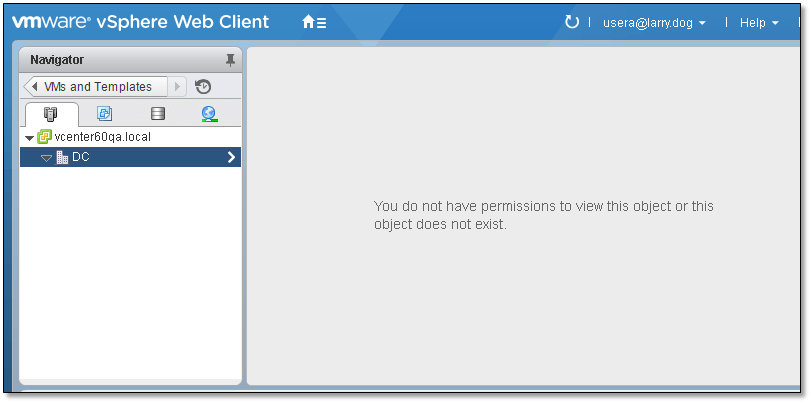
Figure 21 – No permission to access a specific view
Conclusion
So there you have it. We’ve just explored one effective measure you can implement to control access to your vSphere environment using roles, privileges and user permissions. Ideally you would want to use an LDAP based mechanism the likes of Active Directory. This makes things a hell of a lot easier from a management perspective, since you don’t need to replicate user accounts amongst other things. Employing a centralised authentication framework such as Active Directory better facilitates auditing and task delegation as you have better control on who is doing what and when as well as being able to offload mundane tasks to interested users without having them comprise other aspects of your vSphere environment.
In addition, AD users will be able to log onto vSphere components, such as vCenter Server, using one user account wherever the “Use Windows session authentication” option is available. Of course all this requires considerable planning time and experience on part of the administrators in order to come up with a robust and well laid out Active Directory hierarchy that makes effective use of SSO but it’s definitely well worth the effort.
I hope you found this article useful and as always leave a comment down below if you have any questions and please don’t forget to rate this post if you liked it.
[the_ad id=”4738″][the_ad id=”4796″]


Not a DOJO Member yet?
Join thousands of other IT pros and receive a weekly roundup email with the latest content & updates!


