Save to My DOJO
Table of contents
- How to Install vSphere Update Manager (VUM)
- How to Install the Update Manager Download Service
- Enabling VUM when using the thick vSphere client
- Enabling VUM when using the vSphere Web client
- How to Configure the VUM Server
- Importing an ESXi image and attaching an upgrade baseline
- Scanning, Staging and Remediation
In the first post from this series, I talked about vSphere Update Manager and the role it plays in securing vSphere environments by keeping your hosts and resource updated with the latest updates and patches. In today’s post, I’ll be taking you through the actual installation process for VUM 6.0. Some of the topics discussed include baselines and upgrade an ESXi host.
Without further ado, let’s dive in.
How to Install vSphere Update Manager (VUM)
Before you begin, make sure that .NET Framework 3.5 is installed otherwise the VUM installation wizard alerts you to it and will try to install it automatically. There’s a chance this will fail, so you’d be better off installing it manually prior to running the VUM installation wizard.
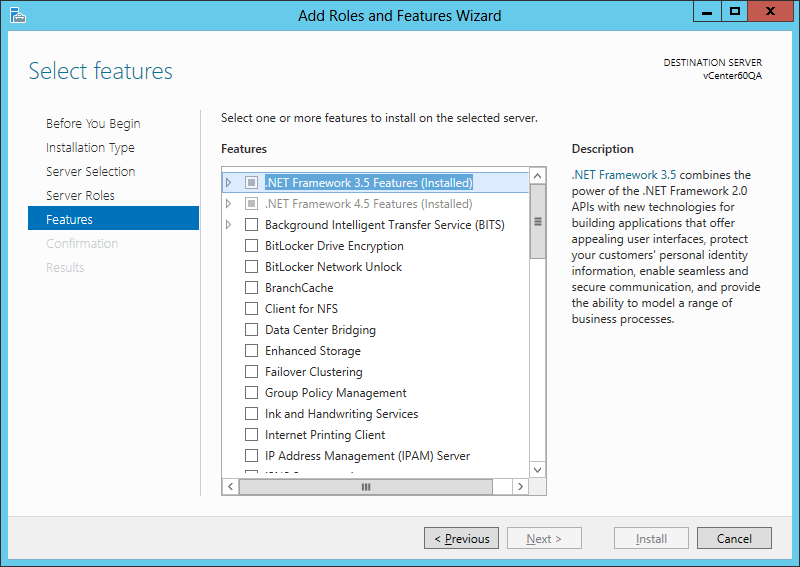
Figure 1 – Verifying that .NET 3.5 is installed
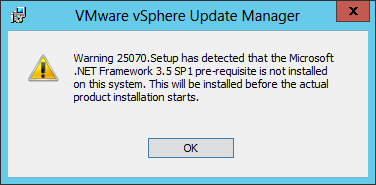
Figure 2 – VUM installed alerts of missing .NET 3.5 framework
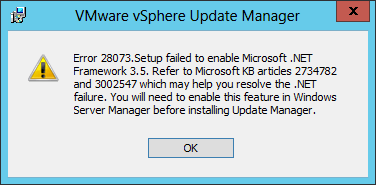
Figure 3 – .NET 3.5 fails to install
Next, get hold of the vCenter Server ISO image (ex. VMware-VIMSetup-all-6.0.0-3040890.iso) which you can download from VMware’s site unless you already have it, which is probably the case if you’re reading this. Regardless, copy the ISO image to the server on which you wish to install VUM and mount it as a drive; you can choose to extract it to a folder if this works better for you.
- Click on the autorun.exe file to launch the installation wizard
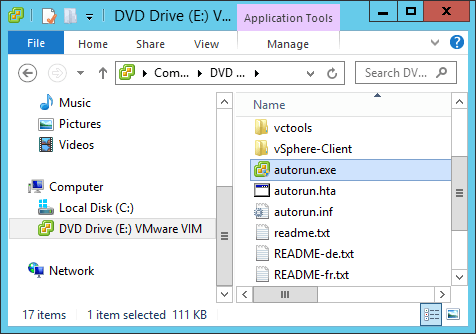
Figure 4 – Running the vCenter Installer
- Select Server under vSphere Update Manager. Tick on the Use Microsoft SQL … check box right under the Embedded Database Option. We’ll be using the bundled Microsoft SQL Express edition to host the VUM database.
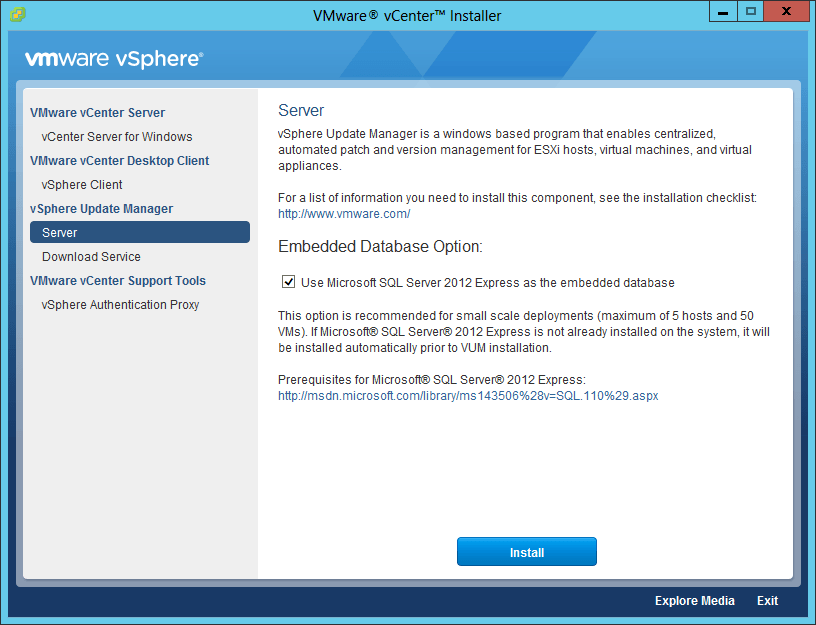
Figure 5 – Selecting the VUM installation wizard
- Installation of the SQL Server proceeds automatically as shown by the following two screenshots.

Figure 6 – Loading the SQL Express binaries
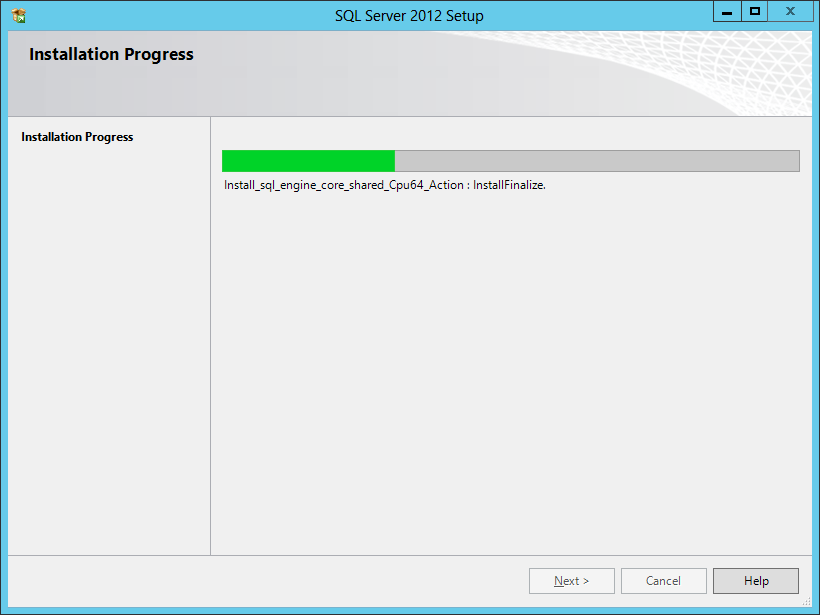
Figure 7 – SQL Express installation progress
- Choose the default language after SQL finishes installing.
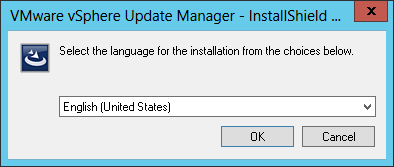
Figure 8 – Specifying the default language
- Click Next to starting installing VUM
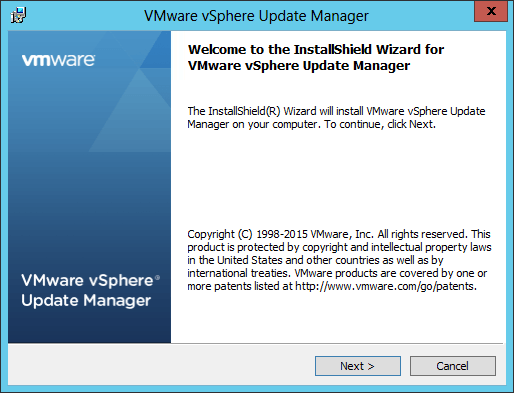
Figure 9 – Launching the installation wizard
- Accept the EULA and click Next.
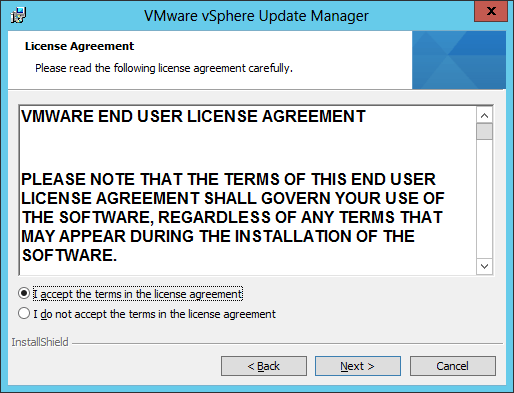
Figure 10 – EULA
- Tick on the Download updates from … check box to force VUM to download updates right after it’s done installing. You can leave the option unchecked if you’re planning on installing the Download Service instead. Click Next.
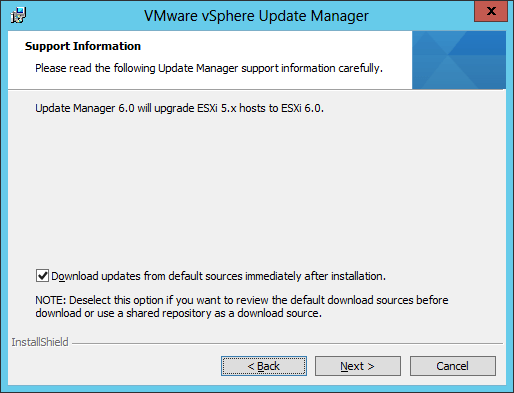
Figure 11 – Setting VUM to automatically download patches on completion
- Next, type in the IP address or hostname of the vCenter Server, the credentials for an administrative account and the HTTP port. The latter is set to the default value of 80. Click Next.
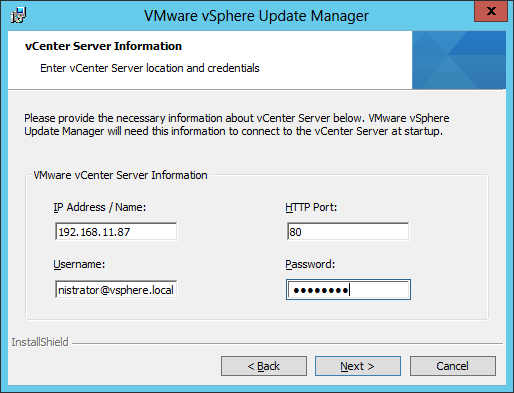
Figure 12 – vCenter details
- From the drop-down list, select the hostname or IP address which identifies VUM on the network. If in doubt, choose the IP address making sure it’s accessible from all the ESXi host VUM will be managing. Leave the network ports set to their default values unless required. If you’re using an Internet proxy, tick on the Yes, I have Internet connection … check box and enter the relevant details. Click Next.
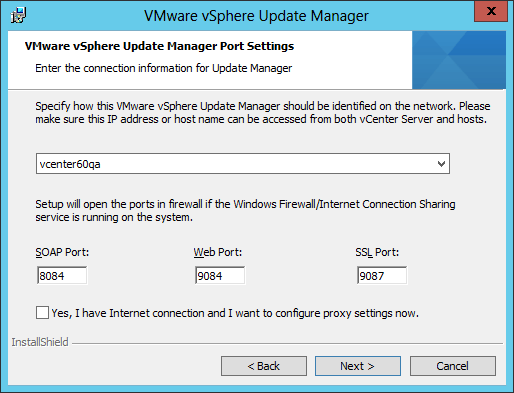
Figure 13 – Network settings
- Specify the location where VUM is installed and the patch repository is created. Click Next.
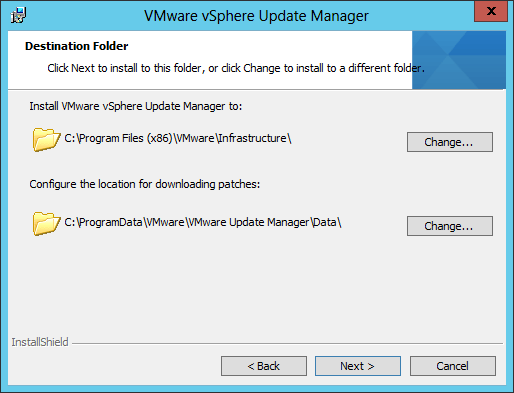
Figure 14 – VUM Installation and repository locations
- In part 1, I showed you how the Sizing Estimator is used to calculate disk space requirements. You can safely ignore the disk space warning if you did your homework! Click OK.
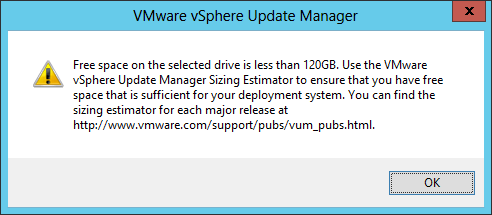
Figure 15 – Disk space warning
- Click Install to start installing VUM
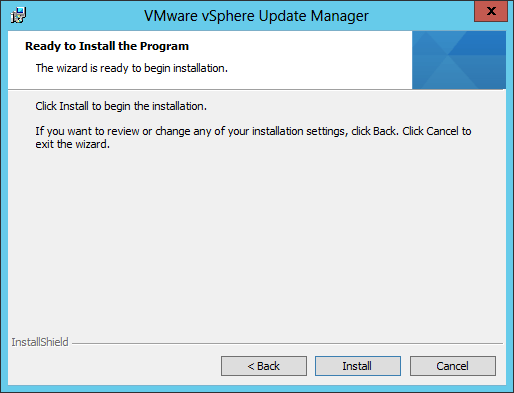
Figure 16 – Installing VUM at last!
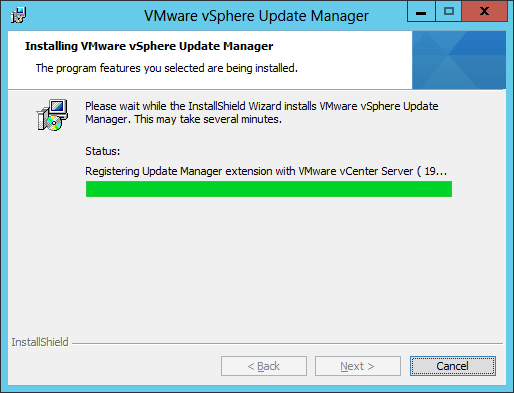
Figure 17 – Installation almost complete. VUM plugin extension registered with vCenter Server
How to Install the Update Manager Download Service
In part 1, I alluded to the possibility of being asked to install the Update Manage Download Service (UMDS) as a DMZ service to conform with security policies enforced by your organization.
I won’t be listing the steps required to install UMDS, however you will find a complete walk-through here.
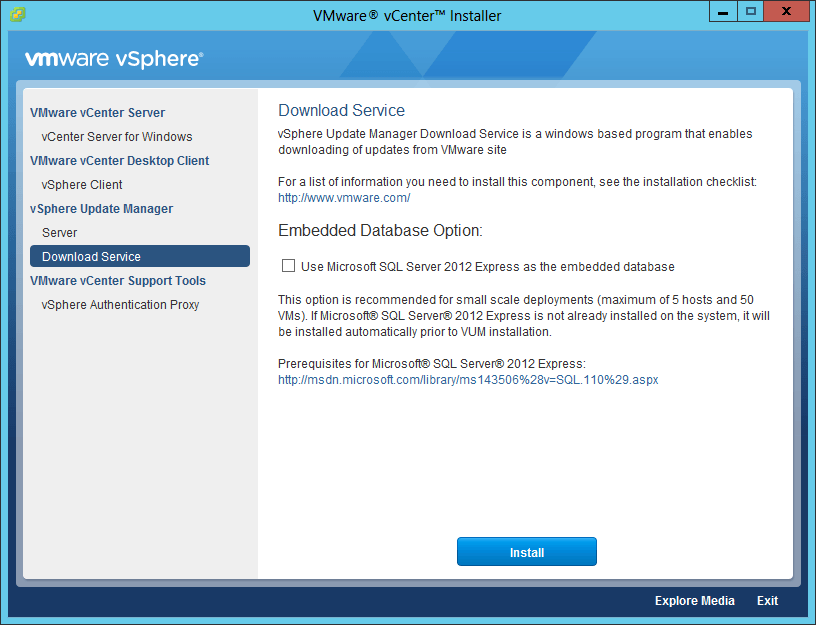
Figure 18 – Installing UMDS
Similar to the VUM pre-installation process, you will create a database, a DSN, the ODBC connection as well as making sure that MSI 4.5 is installed on the computer if you plan on using the SQL Express bundle.
Note: UMDS must and cannot not be installed on the same server running VUM (Figure 19).
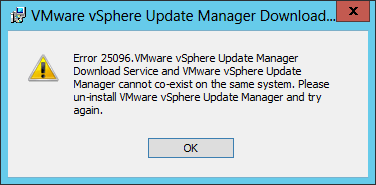
Figure 19 – UMDS and VUM application incompatibility
Enabling VUM when using the thick vSphere client
Having installed the VUM server, it’s now time to install the respective client. You will install the client on whichever workstation you use to manage vCenter Server. Needless to say, the vSphere thick client (C#) needs to be installed first unless you only use the vSphere Web Client, in which case you might as well skip this section.
- Using the vSphere Client (C#), log onto the vCenter Server specified during the VUM install. Change to Home view and in doing so select Plugins and Manage Plugins from the top menu.
- Locate the VMware vSphere Update Manager Extension plug-in as listed in Figure 21. Click on the Download and Install link. The plug-in installer should download and execute automatically.

Figure 21 – VUM Extension Plug-in
- Chose the language for the installer and click OK.
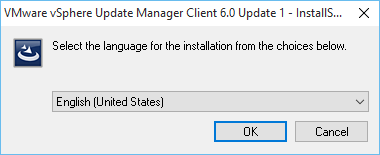
Figure 22 – Setting the installer’s language
- Click Next to move past the Welcome screen.
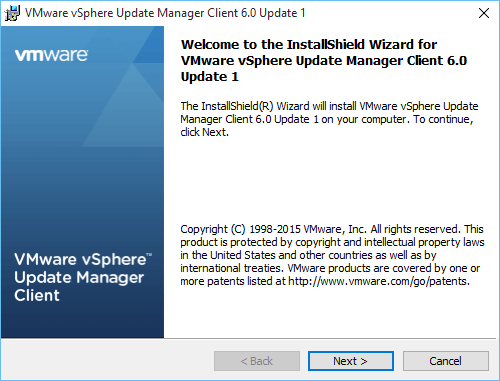
Figure 23 – VUM Client Installation wizard
- Review and accept the EULA and click Next.
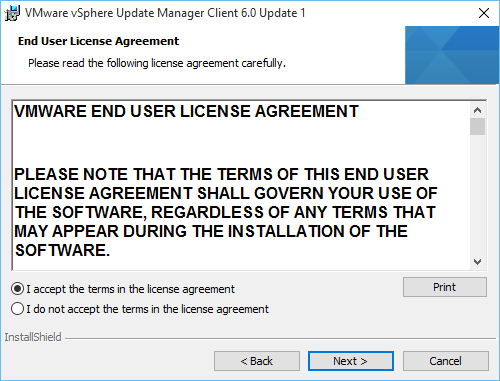
Figure 24 – Plug-in EULA
- Click Install to finalize the plug-in installation.
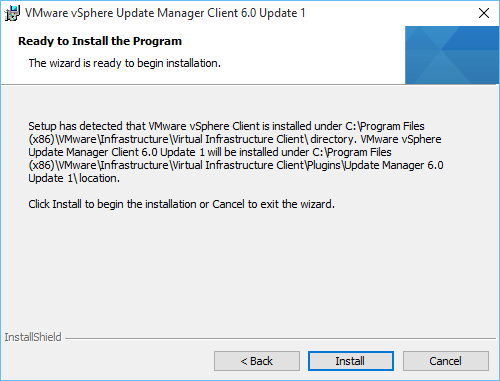
Figure 25 – Installing the VUM client plug-in
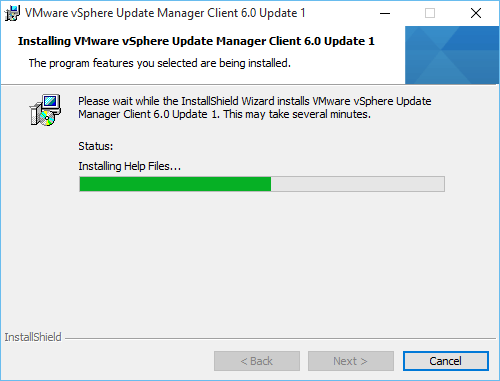
Figure 26 – VUM client plug-in installation progress
- Press Finish to terminate the installation wizard.
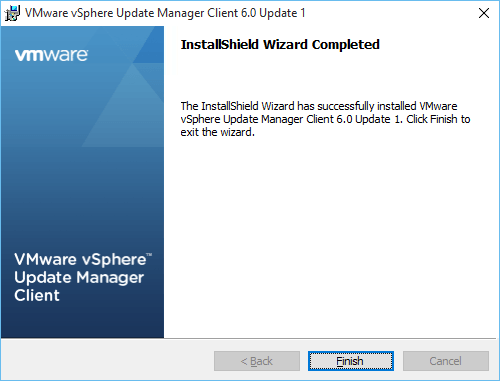
Figure 27 – Closing the installation wizard
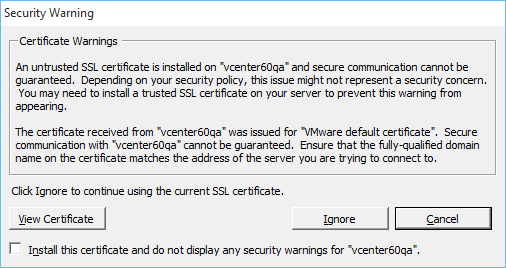
- At this point, a security warning may pop up the cause of which is generally the infamous untrusted SSL certificate due to a hostname mismatch. You can safely ignore the warning by clicking Ignore.
- Back in Home view, you should see a new icon called Update Manger listed under Solutions and Applications. Clicking on it will take you to the Update Manager Administration screen.
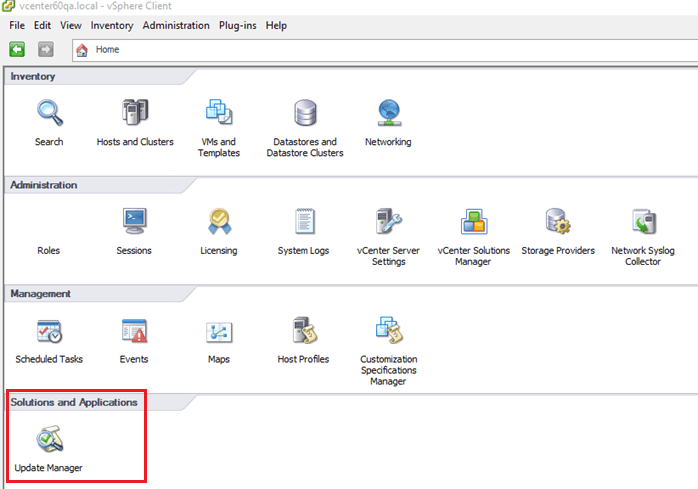
Figure 29 – Update Manager icon
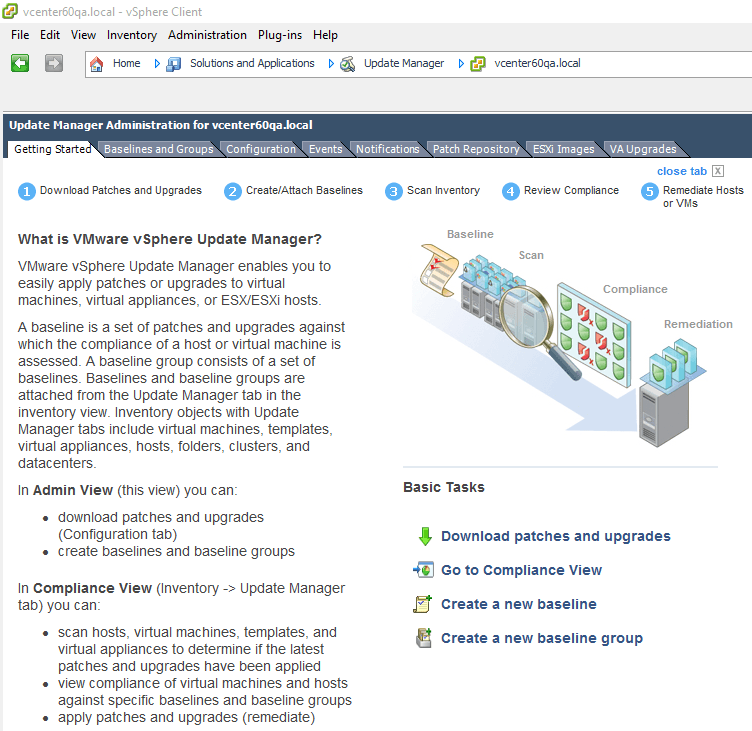
Figure 30 – VUM Administration screen
- You might see a Download patch definitions task running in the status window. This happens when you enable the automatic download of updates once the VUM server finishes installing (see Figure 11).

Figure 31 – Automatic download of patch definitions
Enabling VUM when using the vSphere Web client
As mentioned in part 1, the VUM plugin is automatically enabled in vSphere Web Client voiding the need for user intervention. Similarly, you’ll find that an Update Manager icon is created under the Home as is an Update Manager menu item in Navigator.
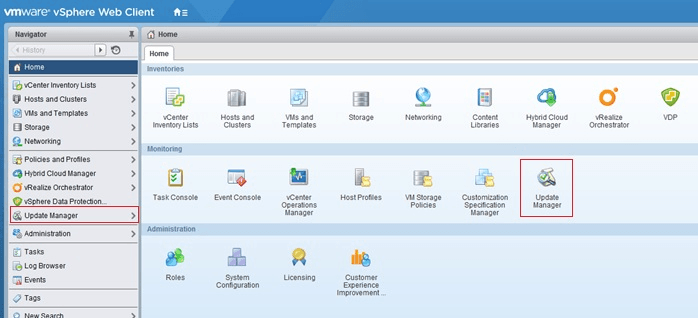
Figure 32 – VUM client enabled inside vSphere Web Client
How to Configure the VUM Server
Now that the clients have been installed and enabled, we can review some of the VUM server settings. To do this, switch over to the “Configuration” tab on the “Update Manager Administration” screen in the vSphere Client. The list of configurable items are grouped under “Settings” amongst which the patch download and schedule settings shown in Figure 33.
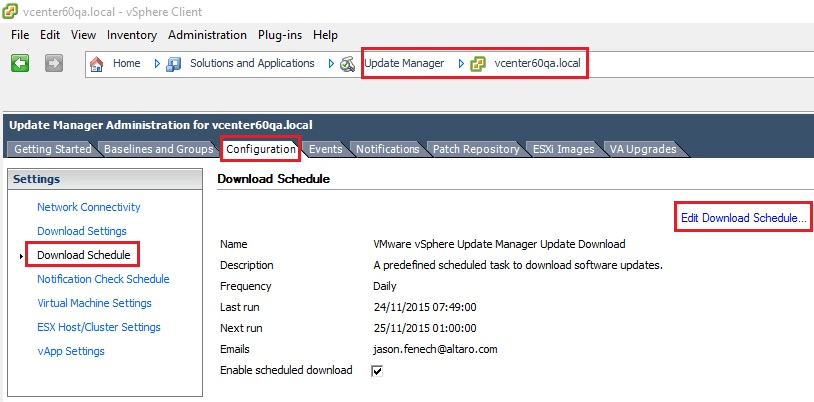
Figure 33 – VUM Server Settings
You should also double-check that the Take a snapshot … option under Virtual Machine Settings is enabled. I also make it a point to retain snapshots for a couple of days. Any VM or application issues arising after an upgrade or applied patch, may not be immediately apparent so it’s best to be safe than sorry.
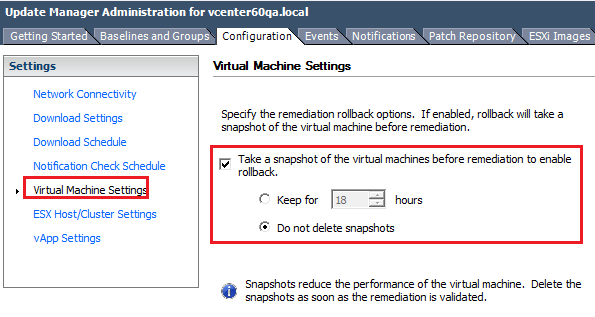
Figure 34 – Virtual machine snapshot settings
Importing an ESXi image and attaching an upgrade baseline
Let’s briefly cover baselines. A baseline is simply a collection of one or more patches, upgrades or extensions. Different baselines may be combined in what are called baseline groups, if need be. Furthermore, they may be static or dynamic with the latter simply meaning that criteria are used to filter out redundant patches. By default, VUM creates the following baselines;
|
Critical Host Patches (Predefined) |
Checks ESXi hosts for compliance with all critical patches. |
| Non-Critical Host Patches (Predefined) | Checks ESXi hosts for compliance with all optional patches. |
| VMware Tools Upgrade to Match Host (Predefined) | Checks virtual machines for compliance with the latest VMware Tools version on the host. Update Manager supports upgrading of VMware Tools for virtual machines on hosts that are running ESXi 5.0 and later. |
| VM Hardware Upgrade to Match Host (Predefined) | Checks the virtual hardware of a virtual machine for compliance with the latest version supported by the host. Update Manager supports upgrading to virtual hardware version vmx-11 on hosts that are running ESXi 6.0. |
| VA Upgrade to Latest (Predefined) | Checks virtual appliance compliance with the latest released virtual appliance version. |
Make sure to refer to this link for further details. Moving on.
- The first step before upgrading one or more ESXi hosts is to import the respective ESXi ISO image(s) to the patch repository. You do this by clicking on the Import ESXi Image… link under the ESXi Images tab (Figures 35-36).

Figure 35 – Importing an ESXi image
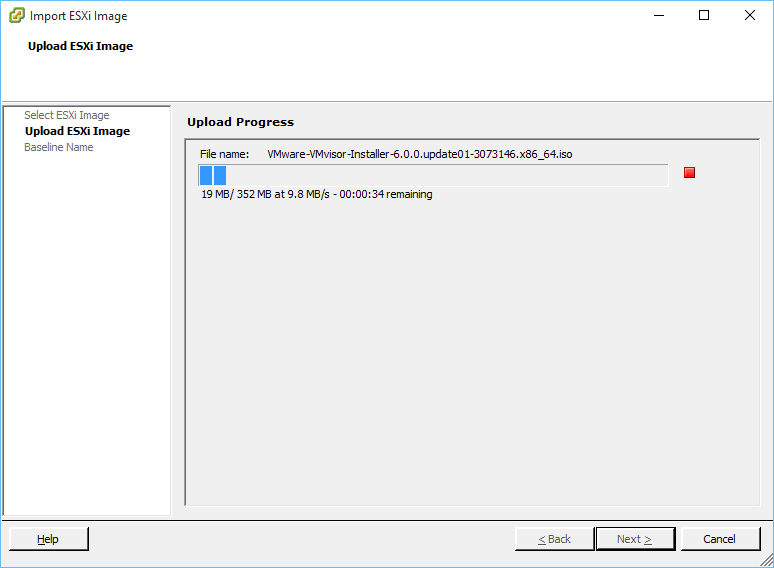
Figure 36 – Import in progress
- Next, create the baseline containing the uploaded ESXi image
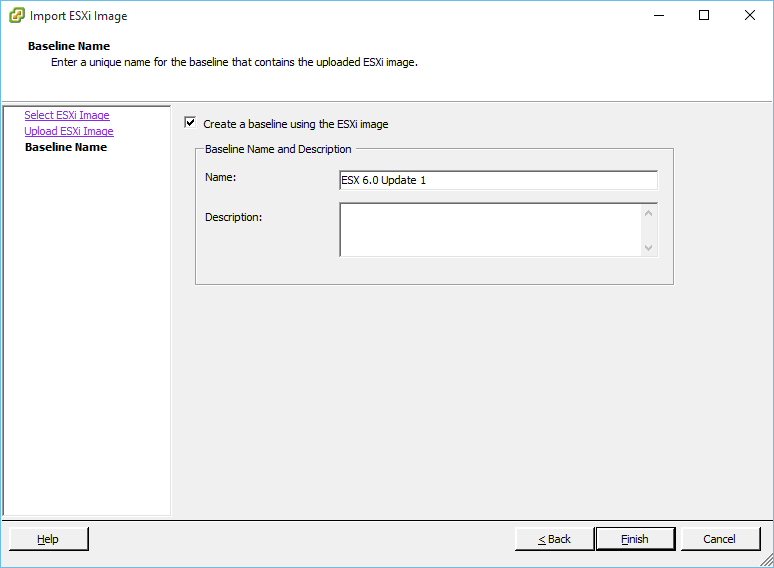
Figure 37 – Creating a baseline

Figure 38 – An uploaded ESXi image
- Finally, you will attach the baseline to one or more ESXi servers. You do this by changing to the “Hosts and Clusters” view, selecting the ESXi host you want to attach the baseline to and selecting Attach …

Figure 39 – Attaching a baseline to a host
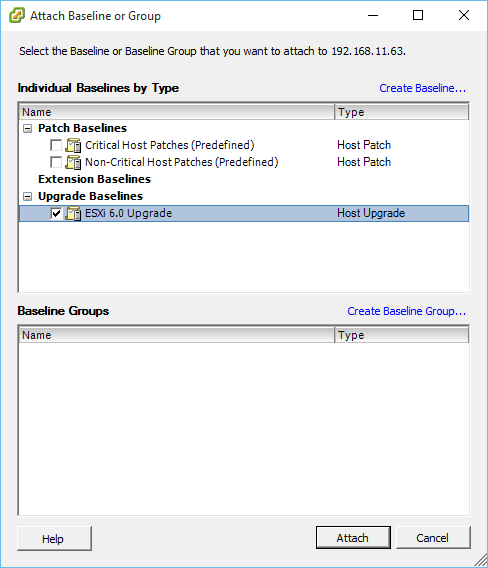
Figure 40 – Selecting the baseline to attach
This next video illustrates the process just covered.
Note: The Update Manager Administration screen switches over to the “Compliance” view when working with hosts, VMs and vApps. You’ll also notice the extra Update Manager tab added to all the views when a host, VM or vApp is selected.

Figure 41 – Fully compliant ESXi host
Scanning, Staging and Remediation
Now that we’ve created our first upgrade baseline we can proceed to upgrade any non-compliant ESXi host. First, I’ll attach the default baselines to my ESXi hosts just to illustrate the difference between scanning, staging and remediation.
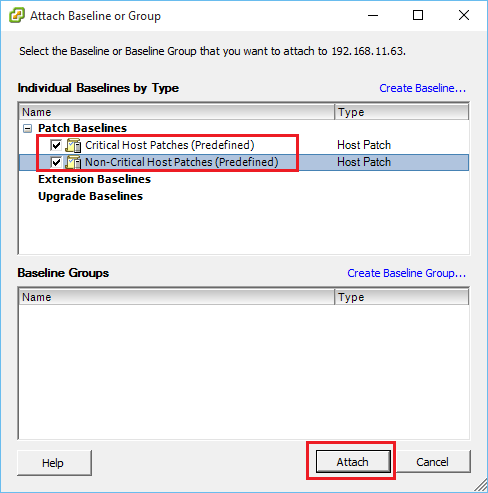
Figure 42 – Attaching default baselines
For completeness sake, I’ll define these three tasks and in doing so, I’ll quote directly from VMware’s documentation;
- Scanning is the process in which attributes of a set of hosts, virtual machines, or virtual appliances are evaluated against the patches, extensions, and upgrades included in the attached baselines and baseline groups.
- Staging allows you to download patches and extensions from the Update Manager server to the ESXi hosts without applying the patches and extensions immediately.
- Remediation is the process in which Update Manager applies patches, extensions, and upgrades to ESX/ESXi hosts, virtual machines, or virtual appliances after a scan is complete. Remediation makes the selected vSphere objects compliant with patch, extension, and upgrade baselines.
Any of these tasks are generally carried out by right-clicking on the vSphere object needing remediation (Figure 43). Note that staging is applicable only to ESXi hosts and the containers in which they reside including clusters and datacenters.
In the case of ESXi hosts, these tasks are carried out sequentially. A scan is first carried out to determine which updates and upgrades are applicable. We then stage to make sure that there are no issues impeding VUM from talking to the ESXi hosts and vice-versa. Lastly, we remediate. This is where patching and/or upgrading takes place.
Note: In most cases the ESXi host is put in maintenance mode and rebooted. This is not much of an issue if the host is part of a cluster, since any vms and vApps hosted on it are vMotioned over. It will however become one if you have a single ESXi host and haven’t scheduled planned downtime!
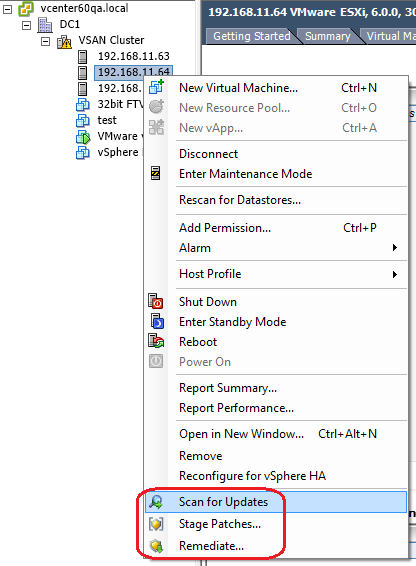
Figure 43 – VUM options for an ESXi Host
This is turning to be one lengthy article so it’s best if I use another video to illustrate how to upgrade an ESXi host. I’ll be upgrading from ESXi 6.0 U1 to ESXi 6.0 U1a. The host has already been scanned and found to be non-compliant meaning that the upgrade and perhaps some updates apply. I’ll first stage and then remediate. I’m upgrading a nested ESXi host, so mid-way through the video, you can see the upgrade steps being executed on the host’s console. Finally, once the host is upgraded, I scan it once more to verify that it is fully compliant in relation to the attached baselines.
The same principles apply when it comes to upgrading virtual machine hardware and vmtools so I won’t be tackling this today. This concludes this 2-part series on VUM which I hope you enjoyed. For more interesting posts on everything VMware, make sure to check out the complete list of posts on our blog.
[the_ad id=”4738″][the_ad id=”4796″]


Not a DOJO Member yet?
Join thousands of other IT pros and receive a weekly roundup email with the latest content & updates!


16 thoughts on "All You Need to Know About vSphere Update Manager – Part 2"
For organizations like ours where we have a few hosts running ESXi Essentials with just a handful of VMs this feels like massive overkill. I would have to license 2 more Windows VMs to install this.
What is the alternative? Would I just need to wait until VMware releases 6.0 u# and then upgrade to it using a boot disc? With our small environment that isn’t a huge deal because I can take the servers offline after hours if I need to.
When we were running ESXi 5.5 I did have update manager set up and it was nice except that since vCenter and the Windows Server that hosted the SQL database were in VMs on one of the hosts I was never able to remediate that host. We use ESXi Essentials so we don’t have vMotion and a SAN is way outside my IT budget.
I totally understand why these tools are set up for big organizations with huge virtual infrastructures but what is a small shop running ESXi Essentials supposed to do for patching the hosts?
Hi,
If you can afford taking hosts offline after office hours than the easiest solution is to upgrade / patch manually, if that’s what you’re after. Incidentally, I wrote a post on the subject but it has yet to be published. It should be published soon.
This KB captures the gist of it.
You could always review your hardware and determine if it would be worthwhile consolidating by perhaps acquiring better servers just so you decrease the number of hosts, since you mention you have a few.
I’m not a licensing guru but assuming you’re running Essentials (not plus) there isn’t that much of a cost difference between vSphere Standard and vSphere Essentials (http://www.vmware.com/products/vsphere/pricing). With fewer hosts, the standard vSphere package may end up being more cost effective.
Again I don’t know the type and number of vms you have in your environment but a 2-node ESXi cluster (managed by vCenter) would solve your issues. You could even virtualize your SQL server and use it to host both the VUM and vCenter databases. This would allow you to put one node in maintenance mode – this would vmotion all vms to the other host – and patch / upgrade as needed with zero downtime. Things can get a bit tricky if you go down the virtualized SQL route as you may experience some downtime when moving the SQL server off one host to another.
Other than that, you will have to upgrade and patch manually, which to be honest isn’t that much of a big deal.
Let me know if this helps.
regards
Jason
Step 1. Power down all VM’s
Step 2. Enter Maintenance mode
Step 3. Ensure SSH is ON
SSH into ESXi host
Step 4. esxcli software vib install -d /vmfs/volumes/datastore28/patch/ESXi600-201505001.zip
Step 5. Reboot ESXi host
Step 6. Exit Maintenance Mode
Step 7. Manually power up VM’s or Restart ESXi server for VMs to auto-start
*you will need to download patch from VMWARE and place in Datastore. You will need your location of patch as mine is “datastore28” (step 4)
*I also only have 2 ESXi hosts. I have updated manually in the past. I have now set up Update Manager and only required 1 VM.
Hi,
I covered this method in a recent article.
regards
Jason
We are running ESXi 5.1, and want to go to 6U2.
What version of VUM should I download? 5.1, since it is the version we’re currently at, or 6, as that’s the version we want to go to?
Hi,
Update Manager is installed using the vCenter Server installer so you generally would want to install the same version of Update Manager. So if you go for vSphere 6.0 U2, you’ll be installing Update Manager 6.0 U2.
regards
Jason
This was turning out to be a lengthy article of course, but one would not have to go to anywhere else after reading this. I found it almost COMPLETE.
Thanks for this.
Hi again,
You’re welcome. I’m glad you found it useful. I try to include as much detail as possible but sometimes one has to trim the fat off! Having said that, please feel free to point out to anything that should be included and I’ll try to oblige accordingly.
Thanks again.
Jason