Save to My DOJO
Table of contents
Packer is an application created by Hashicorp that gives IT Pros the ability to automate their VM template builds. With the rise of hybrid cloud environments, it is quickly becoming one of the top recommended utilities for managing multiple VM images for each platform under one tool. It automates the process of standing up a completely fresh VM and incorporates custom build scripts to customize the VM on the fly and then convert back to a template to use for deployments in either the cloud or on-premise. Using Packer in your VMware environment can provide the following benefits:
- Platform Agnostic– Packer can be used to deploy the same image and configuration to not only VMware environments, but also public cloud providers like AWS and Azure as well. This greatly reduces the time spent on maintaining images for each environment as well as ensures that each image is consistent.
- Faster Deployments – Including as much as possible into the image build instead of running a customization script upon deployment creates a much faster VM deployment.
- Automated Template Management – Instead of manually running Windows Updates on templates each month, the entire process can now be automated and a Packer image rebuild can be run on a scheduled task.
- Infrastructure as Code for Templates – Packer allows IT pro’s to take their template builds and define it in code. This allows us to store our template configuration in source control which provides easier management and tracking against all changes made to templates.
- Open Source – Packer is an open-source software which means it is completely free to use which makes it, even more, a must to try out.
Before we get into the how-to of using Packer, are you interested in other awesome automation content for VMware? Check out our latest eBook – PowerCLI: An Aspiring Automaters Guide!
How to Install Packer
Packer is just a single executable file that can be placed in any folder and executed from there. You can download packer here. In our example, we will be running Packer from a Windows 10 machine. In order to allow us to open up a command prompt and start using packer no matter what directory we currently in, we will need to configure the OS with the proper environment variables. Open up an administrative command prompt and type in the following syntax pointing to the directory where the Packer.exe file is located. In my example I have my Packer.exe in the C:\Packer directory:
setx PATH "$env:path;C:\Packer" -m
![]()
Now close out of all open shells and start a new one. After typing in the command “Packer” we can see that the executable is called:

Packer uses “builders” to provides ways to generate images for the various platforms out there today like Azure, VMware, and AWS. There are many builders that come natively with Packer, however, currently the default VMware builders allow you to only use SSH to connect to a single host in order to provide the template. This also requires custom configurations that need to be made on the host in order to interface with packer. Luckily, Packer is open-source software and has an amazing community that is always improving upon the product. There is a custom builder available called VSphere-ISO by JetBrains that allows us to use the VCenter API’s to connect to our VMware environment and simply start provisioning templates. So in this example, we will install the Vsphere-ISO plugin by running the following PowerShell syntax while in the same directory as our Packer.exe:
Invoke-WebRequest -Uri "https://github.com/jetbrains-infra/packer-builder-vsphere/releases/download/v2.3/packer-builder-vsphere-iso.exe" -OutFile packer-builder-vsphere-iso.exe -UseBasicParsing

This will download the plugin that we will need, there are several ways to install the plugin, but for simplicity of this demo, we will store the plugin next to the Packer.exe file. Packer will then automatically find the plugin:

Now we are ready to start building a VMware template.
Building a Basic Template in VMware
There are two ways we can build a template from, an OS ISO or an existing VM. We are going to start from scratch and build a VM from a Windows Server 2016 ISO. Packer will create the VM, install the OS, configure the OS and then convert the VM over to a template image to use for future deployments. We will need to create a packer configuration file. The packer configuration file is written in JSON format and will look like the following. In my example, the settings are configured for my VMware environment. To view the different options available for the VSphere-ISO plugin check out the Packer GitHub page. I will save the following configuration as a file called WindowsServer.Json. Make sure to edit the fields to match your own VCenter environment. Also, note that the passwords are all stated in clear text, this is not best practice and is only being done for demonstration purposes. In a production environment we would want to input them as variables, which we will show in the next post:
{
    "builders": [
      {
        "type": "vsphere-iso",

        "vcenter_server": "vcenter.lukelab.lcl",
        "insecure_connection": "true",
        "username": "[email protected]",
        "password": "VCenterP@ssw0rd",
        "cluster": "Luke-HA-DRS",
        "host": "esxi1.lukelab.lcl",

        "communicator": "winrm",
        "winrm_username": "Administrator",
        "winrm_password": "P@ssw0rd",

        "vm_name":  "packerimage",
        "convert_to_template": "true",
        "cpus": "2",
        "ram": "4096",
        "network": "VM Network",
        "network_card": "vmxnet3",
        "datastore": "ESXi1-Internal",
        "disk_controller_type":  "lsilogic-sas",
	"guest_os_type": "windows9Server64Guest",
      "disk_thin_provisioned": true,
        "disk_size": "32768",
	"iso_paths": [
        "[ESXi1-Internal] ISO/Windows/Windows_Server_2016.ISO",
        "[ESXi1-Internal] ISO/Windows/VMwareTools.iso"
      ],
      "floppy_files": [
        "setup/autounattend.xml",
        "setup/setup.ps1",
        "setup/vmtools.cmd"
      ]

      }
    ]
  }
Next, we will need to create three files. We will need an autounattend.xml file to automatically install our Windows Server ISO, a PowerShell script to enable winrm communication between the server and client, and a vmtools.cmd file to install VMware Tools during the installation of Windows. These files will be mounted on the floppy drive of the VM and then ran during the Windows installation phase. Fortunately, jetbrains has all three files on Github. Also note, you will want to modify the autounattend.xml file to match the same winrm credentials in the packer config file. So now I have my config file and a “Setup” folder with the three files in them for the Windows installation:

Now we need to download a VMware Tools ISO. You can grab it here, just match up the version of your VMware environment. Transfer it to a datastore. I placed it on my ESXi host at “[ESXi1-Internal] ISO/Windows/VMwareTools.iso”. Then we need a Windows Server 2016 ISO. Download one and save it to your datastore as well. I saved mine to “[ESXi1-Internal] ISO/Windows/Windows_Server_2016.ISO”. So now I have both my OS and VMware Tools ISO on my datastore and the location is referenced in my packer config file:

Whew! There is a lot of pre-setup going on but the benefits of automating template builds are worth it. Now, let’s verify that our json file has no errors in it. To do this, open a PowerShell console and change the directory to the location of WindowsServer.Json, then run the following syntax:
packer validate .\WindowsServer.Json
![]()
We can see our template has been validated, we are good to run our build. To do this type the following command:
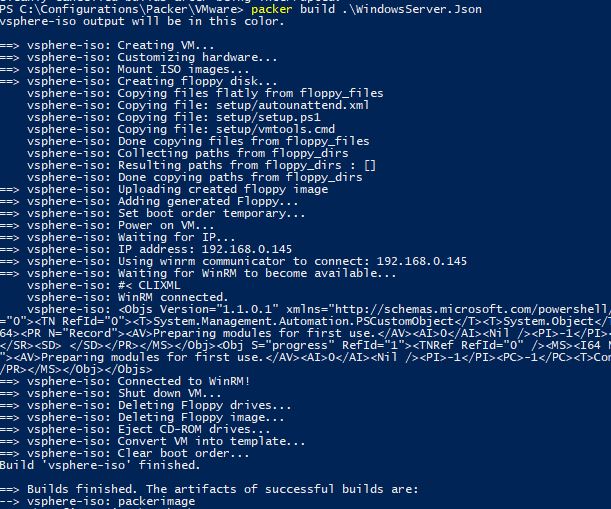
packer build .\WindowsServer.Json
It will take some time for Windows Server to install, then packer will install VMware tools and finally convert the VM to a template:

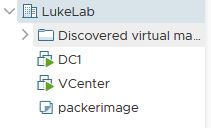
Once finished we can see the new template is available in vSphere:

You may be thinking “that’s a lot of work for just a vanilla install of windows”, however, this was just a basic example. Packer has “provisioners” which allow us to run PowerShell scripts, transfer files to the VM for installing applications, and even use Config Management tools like Puppet or Chef. Be sure to check out the next post where we will go over how to use provisioners as well as automating Windows Updates on our templates. Stay tuned!
As always please post any questions you may have in the comments section below!


Not a DOJO Member yet?
Join thousands of other IT pros and receive a weekly roundup email with the latest content & updates!


20 thoughts on "Getting Started with Packer for VMware"
This document is out of date
Hi Danie, this blog was published in 2019.
Since this is out of date, is there an updated version for new users or to show what has changed? If not, can this post be updated to help new users? Thank you
Hey Sam, it’s been added to the pipe of articles to update so watch this space 🙂