Save to My DOJO
Table of contents
Starting with vSphere 6.5, it is now possible to customize ESXi ISO images for deployment using Auto Deploy or any other provisioning method. Consider the case where you need to deploy ESXi to 10 new servers. The ideal course of action is to take your existing ESXi 6.5 ISO image and add to it the latest patches, updates, and drivers released to date. The alternative is to install the basic ESXi and update each host individually at a later stage using Update Manager or manually.
We like to do things the easy way, so in today’s post, I’ll show how to use the Image Builder tool to customize your ESXi image. Since I mentioned Auto Deploy, do have a look at the Testing ESXi Auto Deploy in a nested environment post if you’re interested in learning how to test this feature.
What you’ll need
The Image Builder component is part of vCenter Server 6.5. The tool is accessed via the vSphere Web client. You’ll also be needing an ESXi 6.5 ISO image and this conversion tool, the use of which I’ll explain later in the post.
Enabling Image Builder
To start using Image Builder, and Auto Deploy for that matter, we need to enable the Auto Deploy and ImageBuilder services. Using the vSphere Web client, select Administration (2) from the Home (1) menu. Click on System Configuration and then select Services. Select both services (4), one at a time, and click on the play button (5) to start them.
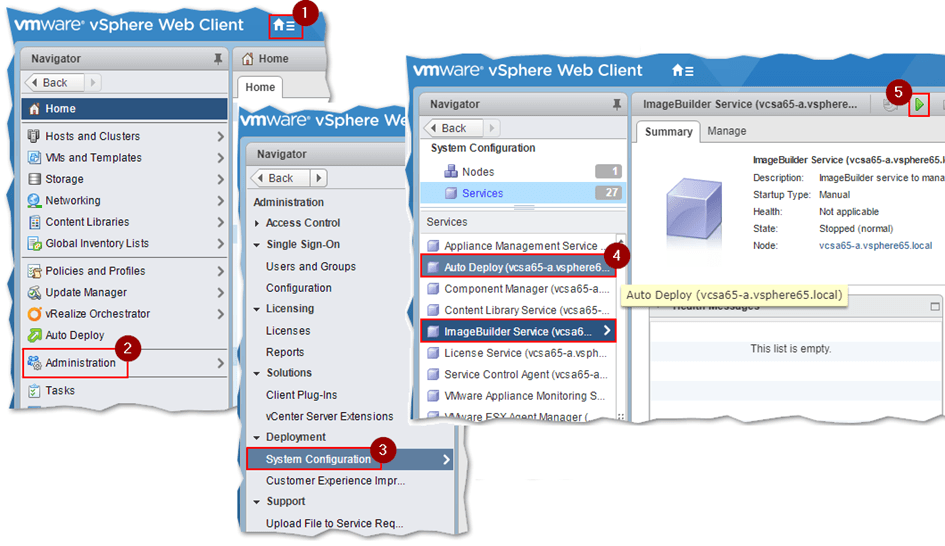
Starting the Auto Deploy and ImageBuilder services in vSphere Web Client
Once you make sure that both services are running, log off and log in back again using the vSphere client. You should now see the Auto Deploy icon displayed on the Home screen.
Using VMware Image Builder
Before moving, let me go over the various components we will be working with while using Image Builder.
- VIB – this is the software packaging format used by VMware and 3rd party providers that write software for ESXi.
- Image Profile – a logical container representing an ESXi image ultimately consisting of a base and other VIBs.
- Software Depot – A collection of image profiles and VIBs which are accessible offline as a ZIP archive or online via an HTTP URL.
Note: Have a look at How to create persistent firewall rules on ESXi to learn how to create your own VIBs.
I’ll be working with all three components as per the following steps. The reiterate, the goal here is to create a customized ESXi ISO image containing the latest patches and a custom firewall rule that is required by the Altaro Backup software.
Using vSphere Web client, go to the Home screen and click on the Auto Deploy icon.
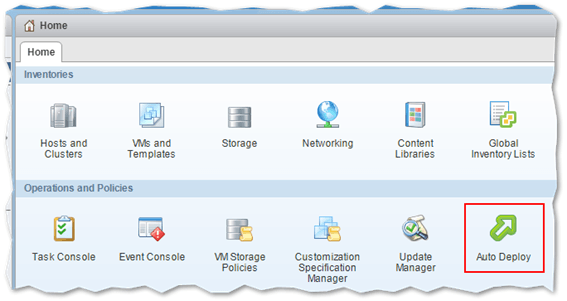
The Auto Deploy icon becomes visible once you start the required services and log in back in vSphere Web client
Step 1 – Create a custom depot
Switch to the Software Depots tab and click on the Add Software Depot button.
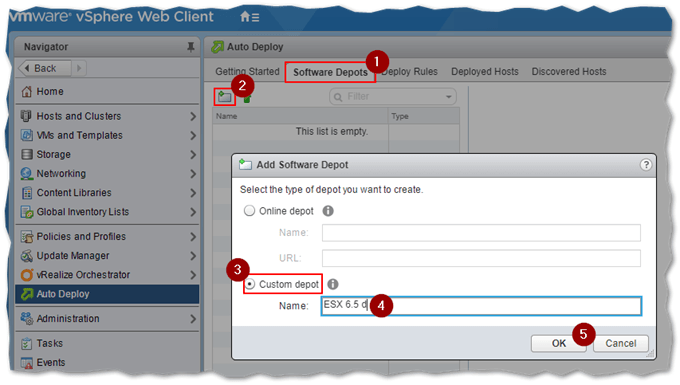
Creating a custom software depot in image builder
Step 2 – Upload an ESXi image to the custom depot
For this post, I downloaded the ESXi 6.5 U1 Express Patch 4 which contains the full ESXi hypervisor image once extracted.
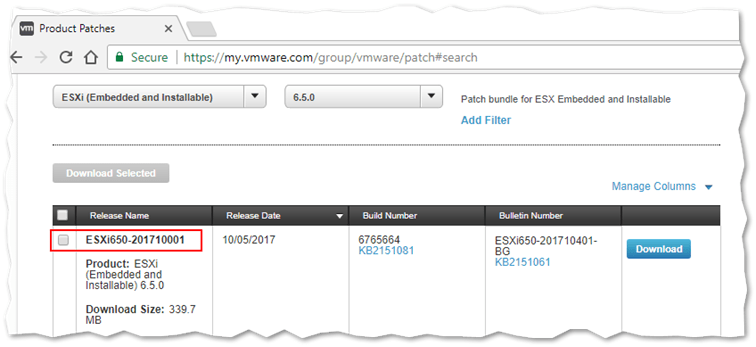
Downloading an ESXi patch from my.vmware.com
To upload the ESXi image (patch in this case) to the custom depot, click on the Import Software Depot icon (1) and navigate to the folder containing the image (2). Press Upload to write the image to the depot.

Uploading an ESXi image / patch to a custom software depot in Image Builder
Wait for the upload process to complete.
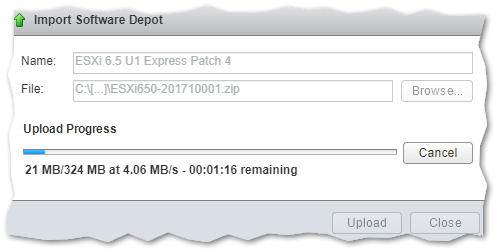
Image / patch upload progress in Image Builder
Step 3 – Preparing custom VIBs and drivers
I want to add the custom firewall rule I covered in the How to create persistent firewall rules on ESXi post. The issue you’ll be faced with is that you cannot upload VIBs directly to Image Builder without first converting them to a purposely crafted ZIP file. A quick Google search led me to the VIB2ZIP utility which you can download here.
Extract the downloaded utility. Use an administrative command shell to run vib2zip.cmd. Browse to the VIB’s location and select it as source (1). Select the location where the zip file (offline bundle) is created. Metadata, where applicable, is pulled from the VIB by clicking on Load from VIB. This is used to populate the remaining fields. I had to add Altaro to the Vendor Code field, this being a mandatory value. Once you do this, press Run to generate the zip file.
Further instructions and examples are available on the author’s website.
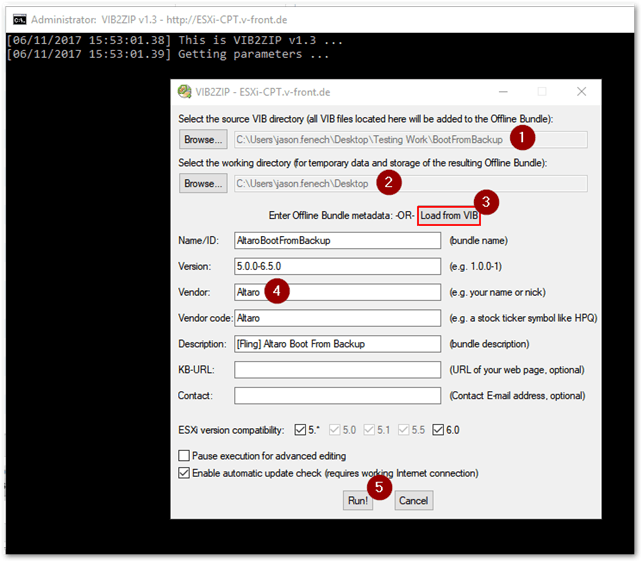
The vib2zip utility is used to convert VIBs to the appropriate ZIP format for use with Image Builder
In general, vendor drivers are readily bundled in the correct zip format meaning you can immediately upload them to a software depot. This renders the conversion step optional in most cases but is nevertheless worth mentioning. Here’s an example of a bundled Dell driver for ESXi.
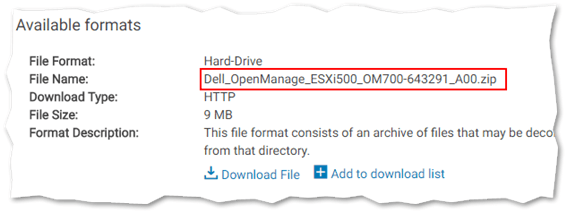
ESXi driver offline bundle
Step 4 – Upload the image and VIBs / drivers to the depot
Click on the Import Software Depot icon (1) to upload drivers / VIBs you wish to include in the customized ESXi image. Navigate to the folder (2) where the zip file is located using the Browse button, Type in a name (3) for it and press Upload (4). As per the next screenshot, I’m uploading the firewall rule VIB which I converted to a zip archive in the previous step.
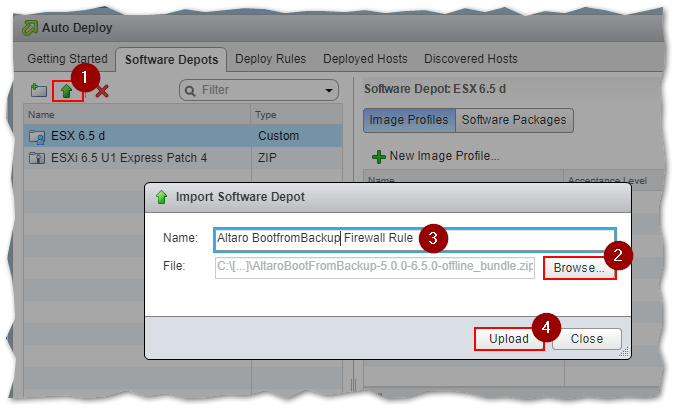
Uploading a custom VIB / driver in Image Builder
Step 5 – Building the custom ESXi image
At this point, we have everything we need to put together the custom ESXi image. We continue by selecting the custom software depot created in Step 1 and adding an image profile to it. The image profile is extracted from the ESXi 6.5 U1 Express Update 4 patch uploaded by way of step 2.
Switch to the Image Profiles tab and click on the New Image Profile button.
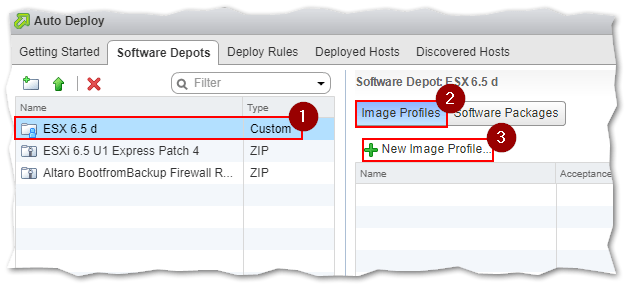
Adding an image profile to a custom depot
The fields on the next screen are self-explanatory and mandatory save for Description. It is important that you select the correct custom depot from the drop-down box where you want the image profile created. This applies only when you have multiple custom depots created. Press Next.
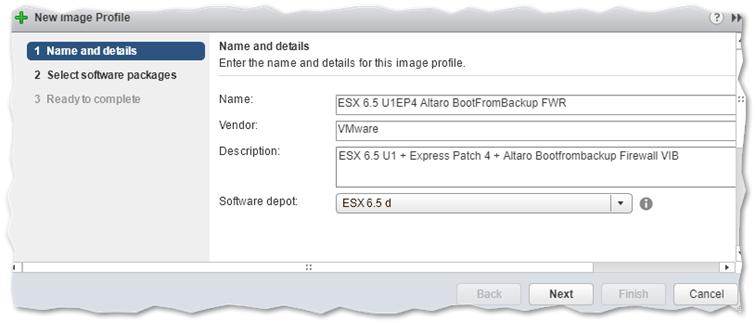
Setting the details for the image profile
We next define what we want included, or excluded, from the custom ESXi image.
Setting the Software Depot value to All Depot (1) ensures that any uploaded software packages are visible to the user. In the next screenshot, you can see the Altaro firewall rule displayed alongside the VIBs comprising ESXi. Tick the box next to each software package (2) you want included in the custom ESXi image. There’s no select all option, so you must tick every single one you want included. Bummer, I know! Press Next.
Note: The Acceptance Level (3) value should match the least privileged setting displayed for a software package, Community Supported in this case. From the testing I carried out, setting it to any other value will generally result in errors or failed ISO exports.
Ideally, you should have any custom VIB signed to the correct level. You can force the acceptance level on ESXi via the esxcli software command but be aware that this will put ESXi in an inconsistent state and not eligible for VMware support.
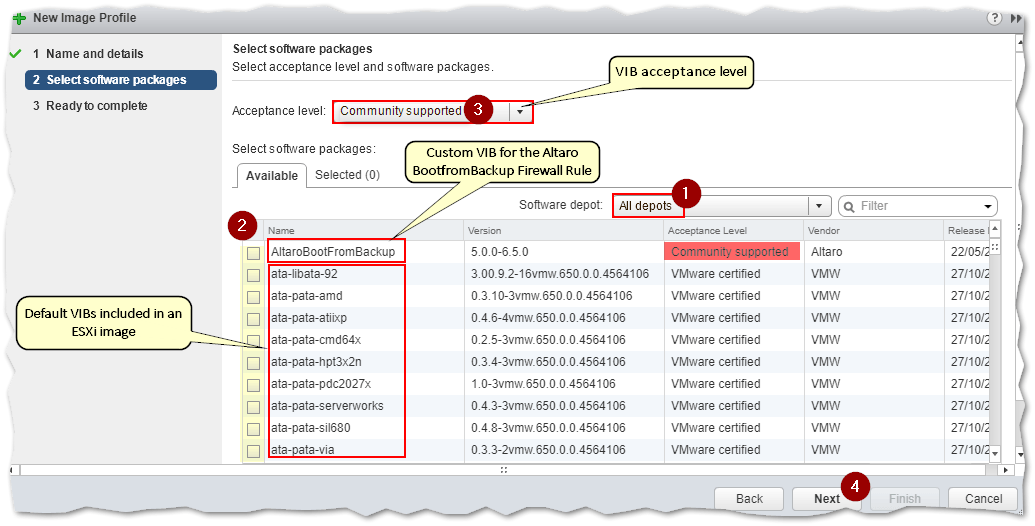
Selecting the software packages to include in the image profile
Press Finish to complete the image profile creation process.
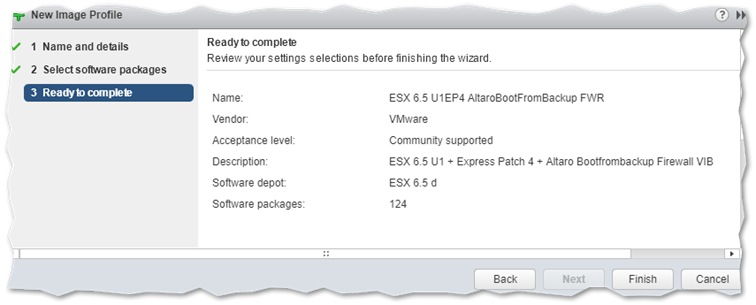
Completing the image profile creation process
Once the image profile has been created, you have several options to choose from amongst which to export the image profile as a bootable ISO or zip file, which is what we’re after.
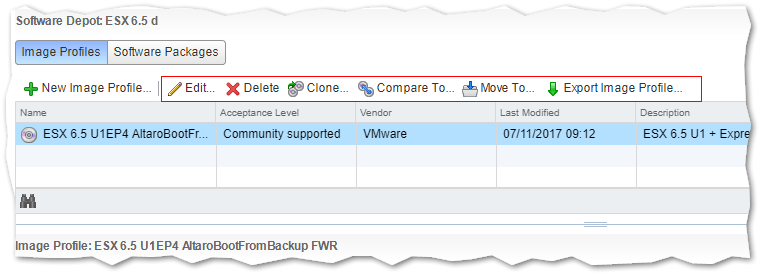
Tasks that can be performed on a image profile
Step 6 – Creating a bootable ESXi ISO image
Click on the custom software depot (1) created in step 1 and select the Image Profiles tab (2). Highlight the image profile (3) you wish to export and click on the Export Image Profile button (4). In the dialog box presented , select the type of format you want the profile exported to.
In our case, we select the ISO option (5) and click on the Generate Image (6) button. This will create the customized and bootable ESXi ISO image for us.
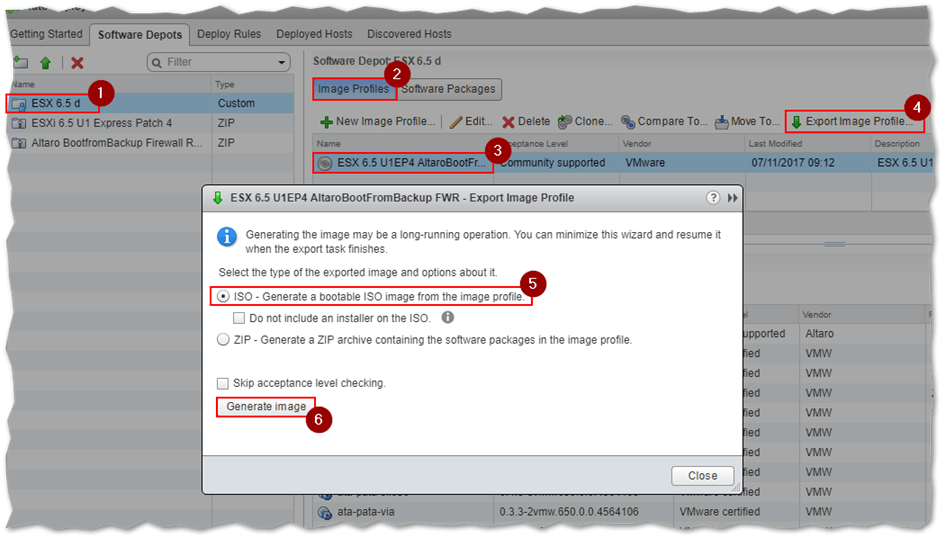
Generating a bootable ESXi ISO image from an image profile
If the export fails, tick on the Skip acceptance level checking option.
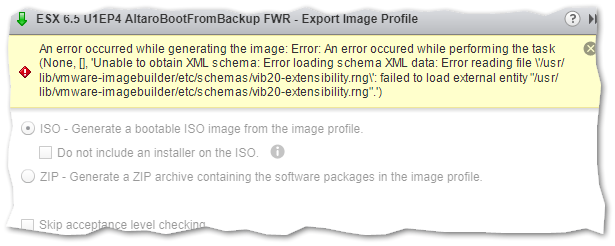
An error is generated if the acceptance level on a package is not correctly set
If the export is successful, use the link provided to download the customized ESXi ISO image.
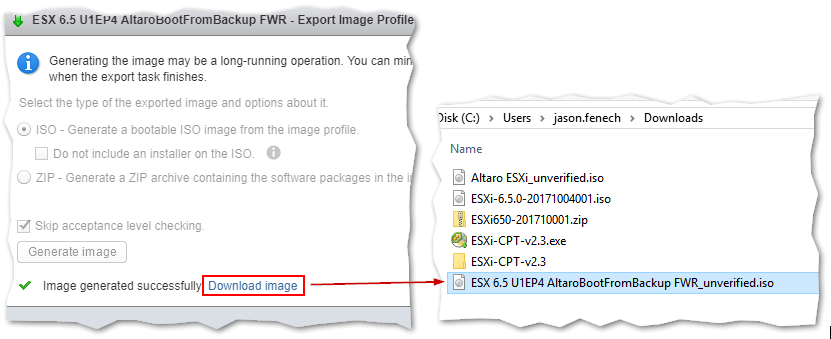
Download the customized ESXi ISO image to a local folder
Testing it
I’m going to installed ESXi as a VM on Workstation Pro to verify that the ISO is valid. The things I’ll be looking for, apart from being able to boot from the ISO, are the build version and the inclusion of the firewall rule.
The image boots fine. Notice how the ESXi installer is modified to reflect the image profile used to create the ISO image.
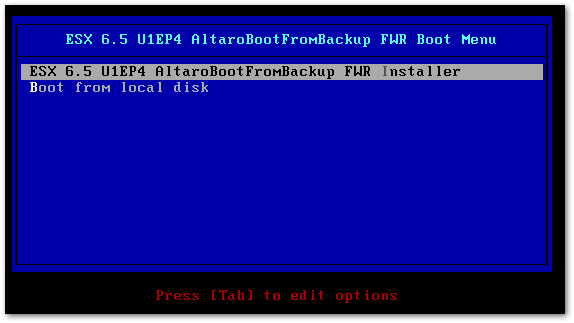
Booting ESXi using the customized image
The build number 6765664 is also correct as it corresponds to ESXi 6.5 U1 Express Patch 4, something you can verify here.
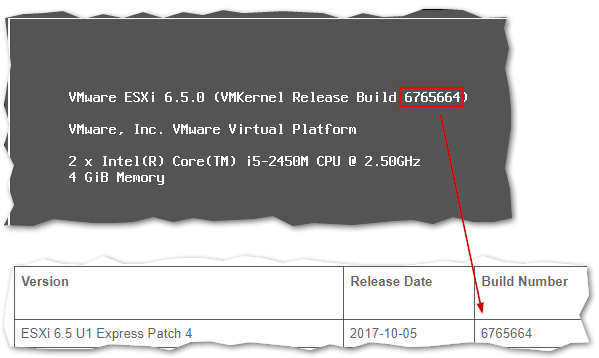
Checking an ESXi’s host build number
Lastly, I’ll check if the firewall rule has indeed been added to the list and enabled.
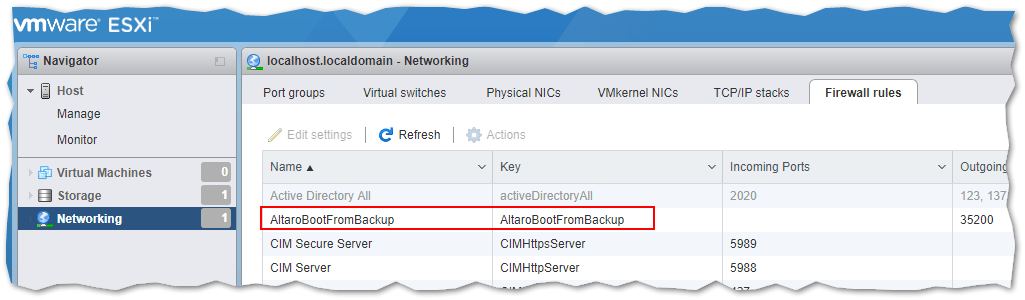
An ESXi firewall rule included in a custom ESXi image is correctly loaded and enabled
Conclusion
Being in a position to customize ESXi images is important for a number of reasons. These range from ensuring that patches and updates persist after a stateless ESXi host is rebooted to being able to install ESXi on hardware for which no vendor-modified image exists. If you want to learn about the various ESXi 6.5 provisioning methods, do have a look at Deploying vSphere ESXi 6.5.


Not a DOJO Member yet?
Join thousands of other IT pros and receive a weekly roundup email with the latest content & updates!
More in this category


About the Author
Jason Fenech


4 thoughts on "How to Customize an ESXi image using VMware Image Builder"
Awesome article! Super useful! They should hang whoever decided against a “select all” button though… that took forever!