Save to My DOJO
Table of contents
If branding is your thing, one of the things you can do is customize the vCenter SSO sign-on page. For instance, you could add your company’s logo along with a catchphrase or some other custom text. In today’s post, I’ll show you how to customize the login page on both vCSA and vCenter Server for Windows. If you deployed an external Platform Services Controller (PSC), the procedure must be carried out on the PSC since it will be the one serving the SSO login page.
The procedure outlined in this post was tested on vSphere 6.5 but will also work on vSphere 6.0 U2. I also need to stress that this is not supported by VMware.
Branding the vCenter SSO login page
Before you begin
You’ll be needing putty and WinSCP.
If want to add a logo or any other image, make sure that you use the PNG format although GIF is apparently supported as well. You should also appropriately size images unless you want them to overlap other components on the page. For the example given below, I’ve used a 200×200 PNG file.
Adding a custom logo and text
Step 1 – Using putty, log in as root on vCSA, and run the following two commands.
shell
chsh -s /bin/bash root
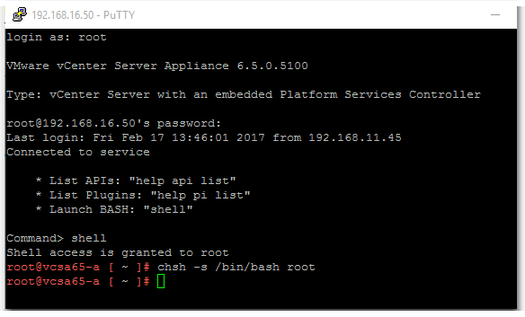
Changing the default shell to BASH on vCSA
Step 2 – Using WinSCP, connect to vCSA and copy the logo (PNG file) to the following path;
/usr/lib/vmware-sso/vmware-sts/webapps/websso/resources/img
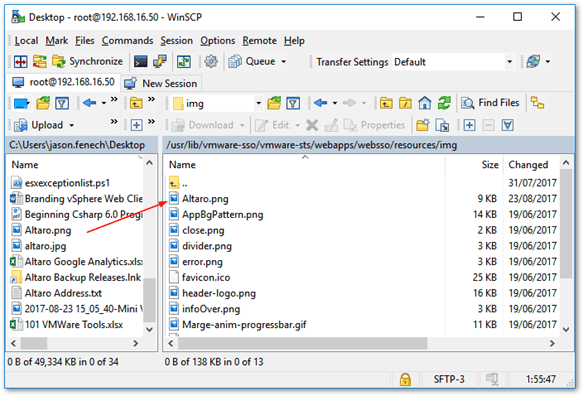
Using WinSCP to copy files to vCSA
Step 3 – Switch back to the putty window and run the following commands.
chsh -s /bin/appliancesh root
cd /usr/lib/vmware-sso/vmware-sts/webapps/websso/WEB-INF/views
cp unpentry.jsp unpentry.jsp.org
The first command resets the appliance back to using the default shell. We then switch to the directory of the file controlling the logon page and take a backup of it.
Step 4 – Using the vi editor, we’ll go ahead and edit unpentry.jsp. This allows us to add a custom company logo and text.
vi unpentry.jsp
Type /.png and press Enter. This takes you to the section in the file which governs what images get displayed on the login page. In this example, I replaced the default vmwareLogoBigger.png logo with that of our company’s (Altaro.png).
TIP: When using vi, press the Insert key to enter editing mode. Use the arrow keys to move around the text. When you’re done editing, press the : key and type wq to save the changes and exit. If you want to discard all the changes made, type q! to exit without saving.
In the following screenshot, I’ve replaced the default vmwareLogoBigger.png graphic with Altaro’s company logo.

Replacing the default VMware logo with a custom one
To add customized HTML text to the login page, scroll down to the section starting <div id=”productName”>. Add the text you want to be displayed as shown in the next screenshot. You can include HTML tags such as header size for further effect. Save the file (wq) and exit.

The end result is shown in the next screenshot. You can also change the color scheme, background image, and other elements by modifying the style sheet controlling the login page (see section further down).
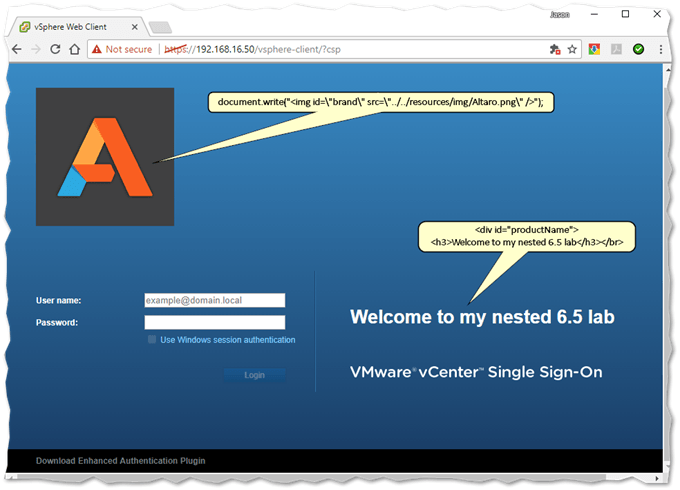
vCenter Server for Windows
The above procedure equally applies to vCenter Server for Windows, with the process being intrinsically easier to carry out. The only significant differences are paths to the images folder, login (JSP) file, and CSS.
- C:\ProgramData\VMware\vCenterServer\runtime\VMwareSTSService\webapps\websso\WEB-INF\views\unpentry.jsp
- C:\ProgramData\VMware\vCenterServer\runtime\VMwareSTSService\webapps\websso\resources\img\<your_graphic>.png
- C:\ProgramData\VMware\vCenterServer\runtime\VMwareSTSService\webapps\websso\resources\css\login.css
Just copy the logo or graphics you want included to the images folder and use something like notepad to edit unpentry.jsp applying the same changes as outlined earlier. There’s no need to restart any service. Just refresh your browser to view any changes made.
The Login Page CSS
As already hinted, you can play around with login.css style sheet to further tweak the login page. The style sheet can be found under;
- C:\ProgramData\VMware\vCenterServer\runtime\VMwareSTSService\webapps\websso\resources\css\login.css
- /usr/lib/vmware-sso/vmware-sts/webapps/websso/resources/css/login.css
As a second example, I added a background image to the login page using a free 1920×1280 wallpaper image picked up randomly from a google search. Just copy it over to the img folder on and edit the CSS file as shown.
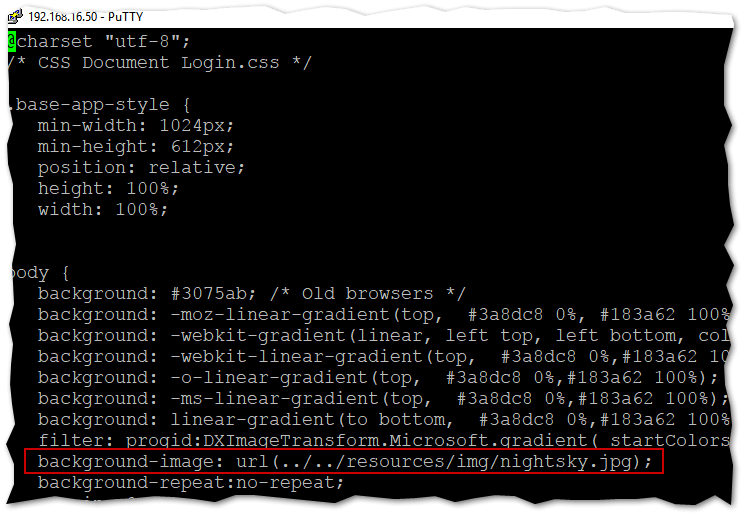
Adding a background image to the vCenter SSO login page
And here’s the finished result.
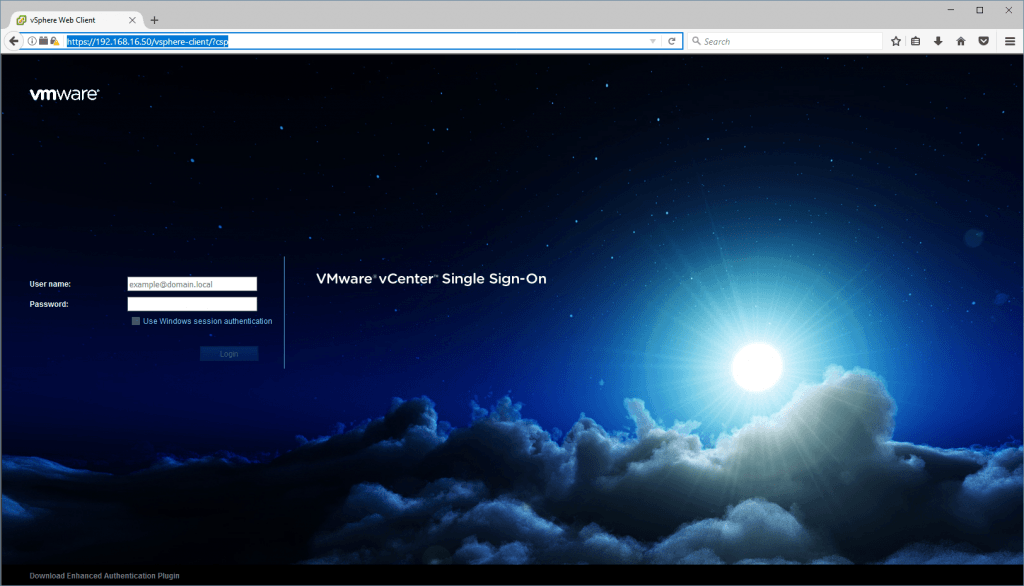
vCenter SSO login page with a custom background image
Have a look at this link for some other great examples of what can be achieved.
Wrap Up
Today we’ve seen how you can customize or brand the vCenter SSO landing page. This is easily achieved by editing one or two lines of code in the corresponding jsp files and style sheets. The process also involves creating your own logos and any other custom images you might want to be included.
One of the cool things about this is that the branded sign-on page is also served to other VMware products using the PSC for authentication. So, in actual fact, it as if you’re branding multiple VMware products in one go.
If you found this post useful, do have a look at the other VMware posts on the blog. As always, be sociable and share it if you liked it.
Update: I found out the hard way that any changes made will not persist if you’re using vSphere 6.5 U1. Thankfully, there’s a fix as explained here. Tried and tested!
[the_ad id=”4738″][the_ad id=”4796″]


Not a DOJO Member yet?
Join thousands of other IT pros and receive a weekly roundup email with the latest content & updates!


