Save to My DOJO
Table of contents
Cloning virtual machines from template is commonplace when managing a significantly sized vSphere environment. If you’re new to vSphere templates, do have a look at my 4-part guide on the blog titled vSphere VM Templates, a Complete Guide. Particularly relevant to today’s subject matter is Part 2 since it covers the process of creating Linux templates, a must read if this is all new to you. Today, we tackle one issue you might possibly face when cloning Linux virtual machines from template. I’m referring to the dreaded missing network card instance where Linux basically fails to recognize the network card or fails to activate it if it does. This post tackles the issue of adding (or activating) network cards on Linux virtual machines cloned from template.
Where’s my missing network card?
By default, the first network interface on a Linux box is labeled eth0. This, however, depends on the Linux distro in use and the configuration abuse it’s been subjected to. Regardless, one frequent error message you’ll come across is Device eth0 does not seem to be present, delaying initialization. This error pops up when a primary interface fails to initialize when issuing something like ifup eth0 or during the OS booting up process.
So, why is my interface missing? Well, in general, it’s not really missing. The problem is that when you clone a VM from template, the network card on the resulting VM is given a new MAC address. In truth, this is exactly what we want. Duplicate MAC addresses on a network are synonymous with trouble! We do, however, have a problem when looking it at it from the guest OS perspective. This is because the VM’s network configuration still includes the old MAC address, the one assigned to the template’s network interface.
So, what you end up with is a failed network interface due to a mismatch between the MAC address specified in guest OS network configuration and the physical MAC assigned to the VM.
Replicating the issue
To replicate the issue, I converted an existing Centos VM to a template. I then created a new Centos VM using this template via the New VM from This Template option. For illustrative purposes, I recorded the template’s MAC address as shown in the next screenshot.
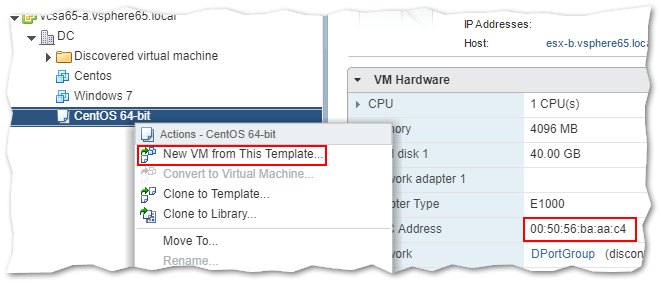
Figure 1 – Cloning a Linux VM from template. Note the highlighted MAC address bottom right
In this example, the Centos VM happens to be running with an interface called ens33 instead of the standard eth0. In Linux, each network interface has a corresponding configuration file called ifcfg-<interface name>.
In our case, the config file is called ifcfg-ens33 which is found in the default location /etc/sysconfig/network-scripts. Don’t worry too much about naming conventions and such as these might vary according to the Linux distro in question.
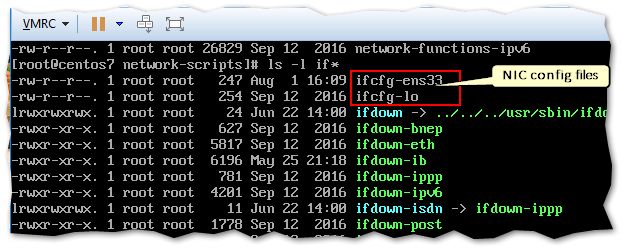
Figure 2 – Listing the contents of /etc/sysconfig/network-scripts on a Centos VM
On closer inspection, you should see an entry called HWADDR=XX:XX:XX:XX:XX:XX which is the network card’s MAC address in HEX notation. You’ll see that this matches the MAC address highlighted in Fig.1 which is precisely our problem.
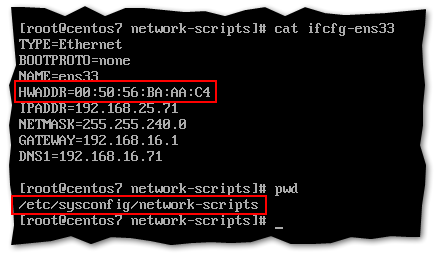
Figure 3 – Inspecting an interface’s configuration file
The ifconfig -a output tells us that ens33 has no associated IPv4 information hence no network connectivity.
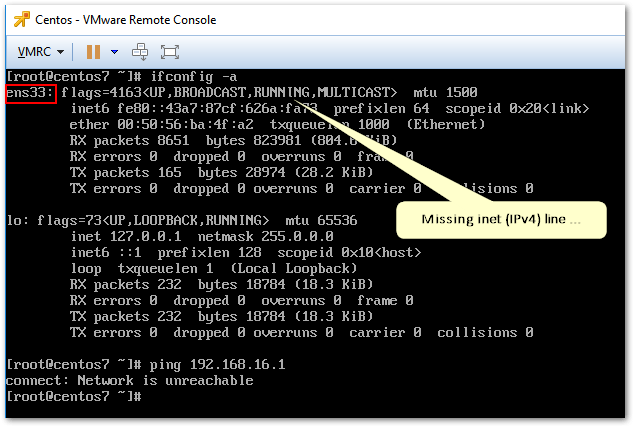
Figure 4 – Checking the interface configuration
In order to fix this, we need to change the value of HWADDR to reflect the MAC address assigned to the VM.
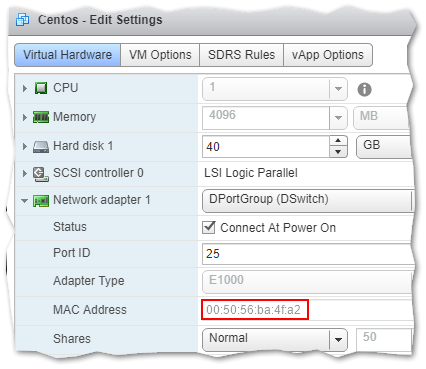
Figure 5 – Determining the MAC address assigned to a VM’s network interface using the vSphere client
How to fix it!
Fixing the problem is easy.
Note: The following steps apply to Centos and Redhat but the idea is basically the same for different distros even though the commands used and file paths will differ. This KB article covers SUSE Linux as well.
Step 1 – Determine the name of the failing interface. Use any of the following commands ip a, ifconfig or nmcli device show. I’ve used the nmcli command, the output of which shows that network card ens33 is failing to connect.
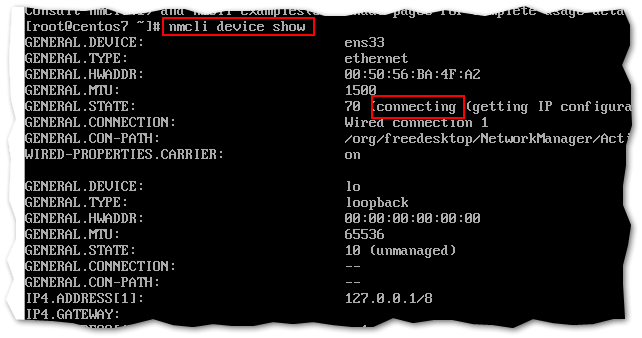
Step 2 – Edit the configuration file for the network interface using the vi editor and replace the HWADDR value with the correct one. Copy the MAC address from the VM’s network interface settings.
vi /etc/sysconfig/network-scripts/ifcfg-ens33
Just in case you’re new to using vi:
- Use the arrow keys to move to the end of the line starting HWADDR.
- Press the Insert key on your keyboard.
- Use the Backspace key to delete the MAC address. Replace it with the correct one.
- Press ESC.
- Type wq and press Enter to save the changes.
Step 3 – Run the following command. This deletes the MAC address to interface name association at startup.
rm -f /etc/udev/rules.d/70-persistent-net.rules
At this point, running service network restart should bring up the interface and establish network connectivity to the VM.
Step 4 – Type reboot to restart the VM. This allows you to verify that the network changes persist after reboots.
The following video takes you through these 4 steps. Keep in mind that there are different variations to this issue. In some instances, it’s only the loopback interface that’s listed, in which case I suggest using the nmtui tool to fix the problem.
Conclusion
Deploying a VM from a poorly prepared Linux template can result in virtual machines with missing or inactive network interfaces. In today’s post, we saw just how to fix this issue. There are a few more things you could do to prevent the issue from reoccurring. The easiest is to remove the HWADDR line from the template ifcfg-<interface> configuration file. It’s best to test this fix first if you’re using the Linux box as a load balancer and similar. This solution also looks promising though I have yet to have a go at it. If I do, I’ll update the post accordingly.
Regardless, fixing network card issues on Linux VMs is easy when you know where to look. As always, prevention is better than cure, so one should always clone from well-prepared templates.
If you liked this post, have a look at the remaining list of VMware posts or drop us a comment if you have any questions.
[the_ad id=”4738″][the_ad id=”4796″]


Not a DOJO Member yet?
Join thousands of other IT pros and receive a weekly roundup email with the latest content & updates!


