Save to My DOJO
Table of contents
If you find yourself managing large environments, locating a particular VM or folder may just turn out to be a nightmare.
Let me introduce you to tagging which, simply put, allows you to add metadata to vSphere objects. Doing so, helps you categorize similar vSphere objects by logically grouping them together under a single label or tag. For instance, you could apply a tag called Windows machines to help you distinguish VMs running Windows from the rest. Tags can then be used as a filter to search queries to retrieve, say, a list of virtual machines running a specific flavor of OS. What’s more, tagging data is conveniently replicated to other vCenter Server instances set up in Enhanced Linked Mode.
Tags were first introduced with vSphere 5.1. Prior to that, you would add object metadata via Custom Attributes which can now be migrated to tags. That said, tags differ from custom attributes in that that latter is used to assign object-specific metadata whereas tags do not provide this facility. This difference is highlighted in this post by William Lam.
Creating Categories and Tags
A tag cannot exist on its own and must be assigned to a unique Tag Category. In fact, you cannot create a tag unless you first create a category. When creating categories, one must also set the Cardinality and object association. These are defined as follows:
Cardinality
- One tag per object: Allow only one tag from a category to be applied to an object at any one time. For example, a category called Operating Systems containing tags Windows, Linux and Mac OS, should be set to allow only one tag per object. The object in this case is a virtual machine and it naturally follows that a VM can only have one Guest OS installed at any point in time.
- Many tags per object: Allow multiple tags from a category to be applied to an object at any one time. An example would be a category called Departments containing a number of different tags each mapping to a department name such as Finance, Engineering and Development. An object could be “owned” by multiple departments hence tagged as such.
Quoting from VMware “After you have set the cardinality of a category, you can change the cardinality from One tag per object to Many tags per object, but not from Many tags per object to One tag per object.”
Associable Object Type
This field allows you to attach tags contained in the category to one or more objects.
Quoting from VMware “After you have set the associable object types for a category, you can change a category that is associable with a single object type to be associable with all object types, but you cannot restrict a category that is associable to all object types to being associable to a single object type”.
Note: Before you start tagging, make a list of what you would like tagged and reasons why. How will this make your life simpler? Tagging is useful in large environments but not so much in smaller ones, say, those with less than a hundred VMs. Make sure to choose meaningful but brief names for your tags and categories. Apply tagging only to those objects you consider important. Do not get into the habit of tagging everything just for the sake of it as it will quickly dawn on you that tagging is just another administrative burden, one that detracts from the intended benefit; a better organized vSphere inventory. Make it also a priority to document any tags and categories you create, perhaps by keeping tabs in a spreadsheet.
The easiest way to set up tagging is from the vSphere Web Client although using other means, such as PowerCLI, is perfectly possible as we will see later on.
As per the example given by Fig. 1, I created a category called Operating Systems containing 3 tags I went to create at a later stage. The cardinality is set to One tag per object for reasons previously explained. I’ve restricted object association to virtual machines though I could easily include other object such as folders if required.
- Select Tags & Custom Attributes from the Home menu
-
Categories
- Click on the Categories tab.
- Click on the New Category icon.
- Fill in the details, specify the cardinality and associate the category with one or more object types.
-
Tags
- Click on the Tags tab.
- Click on the New Tag icon.
-
Fill in the details for the tag and assign it to an existing category from the drop down menu.
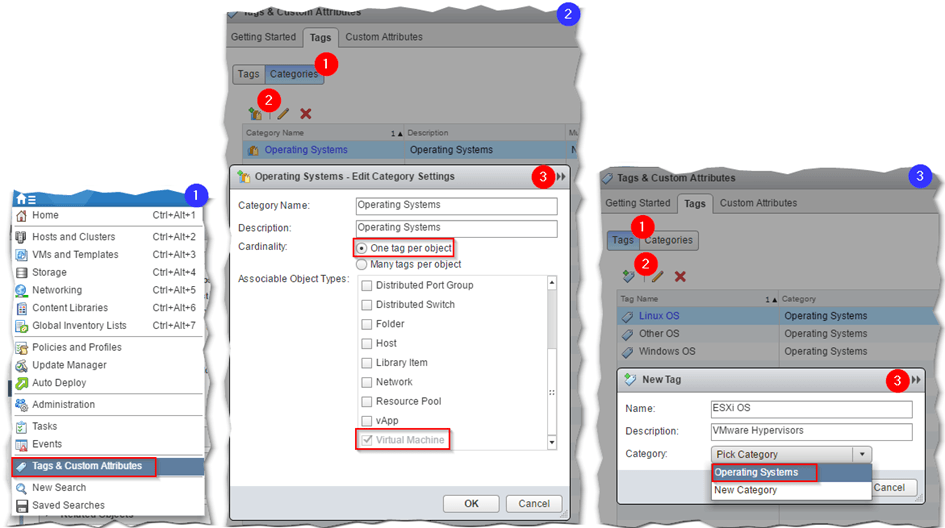
Figure 1 – Creating categories and tags in vSphere Web Client
Assigning tags to objects
Once again, the easiest way to assign tags is via the vSphere Web Client. In the next example, I’ve applied a Windows OS tag to all my Windows VMs. To begin with, change the view to either Hosts and Clusters or VMs and Templates and select the Virtual Machines tab.
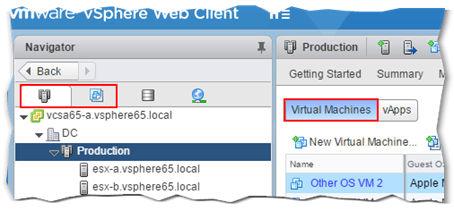
Figure 2 – Changing views in vSphere Web Client
Next, select and right-click on one or more virtual machines, selecting Tags & Custom Attributes -> Assign Tag from the VM context menu. Choose a category from the Categories drop-down list followed by the tag you want applied. Press the Assign button as shown in Figure 3 to apply the tag. A notification is displayed if you’re about to tag multiple objects.
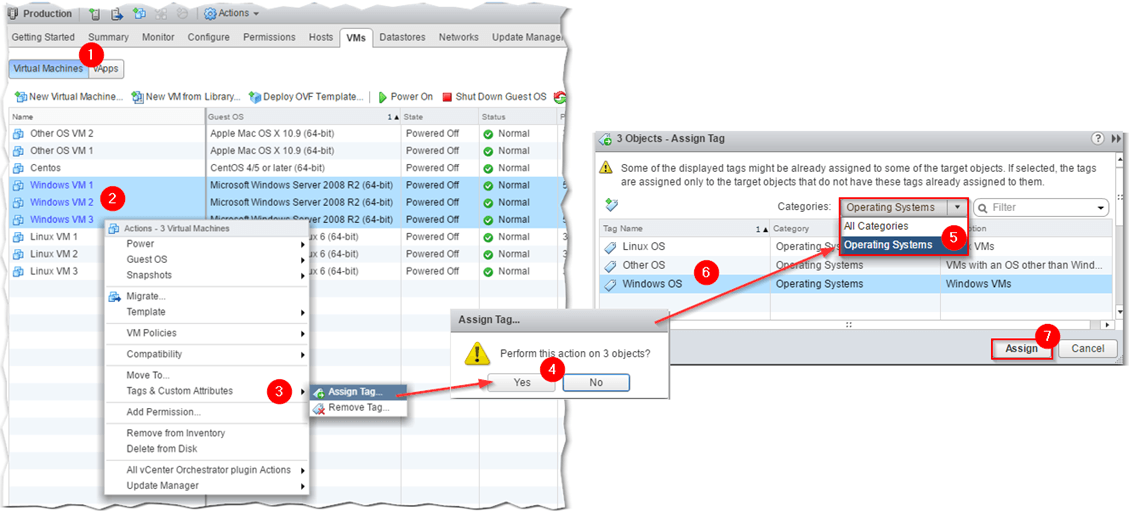
Figure 3 – Tagging multiple VMs in vSphere Web Client
To remove tags, repeat the same process but choose Remove Tag instead.
Searching using Tags
There are a number of ways you could use to search for and display tagged objects.
Using Quick Filters
One easy way of doing this is to use the Quick Filters feature in vSphere. This is labelled 1 in Fig.4.
This method works in both views.
- Click on the Quick filter button. This brings the filter web component into view.
- Click on the More Options button […]. This should load a tag selection window.
- Select a tag from the list and press OK (4).
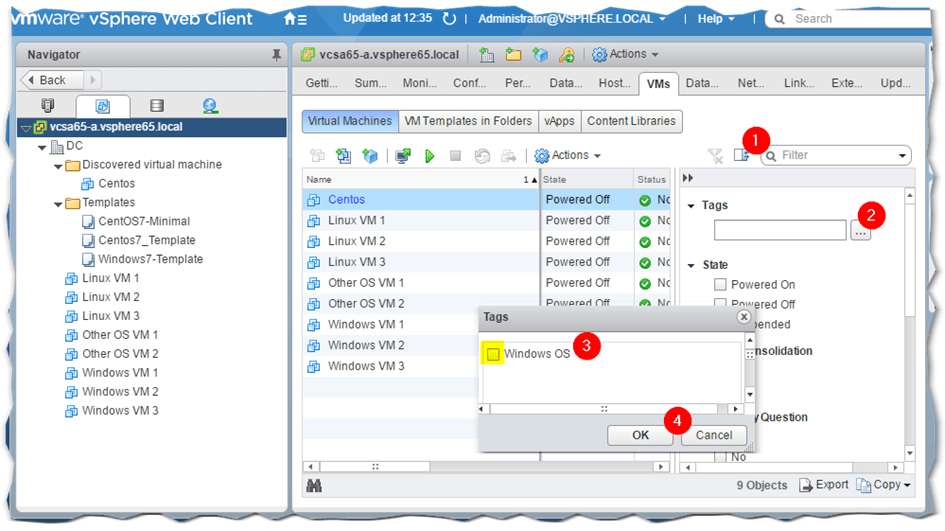
Figure 4 – Using tags with Quick Filter
Once the filter is applied, only the VMs bearing the selected tag will be displayed. The filtering tag name is displayed just under the Tags filter field. As a side-note, you can type in the tag name instead of using the More Options button. To remove the applied filter, just click on the Clear All Filters icon or on the cross displayed next to the filtering tag name when highlighted.
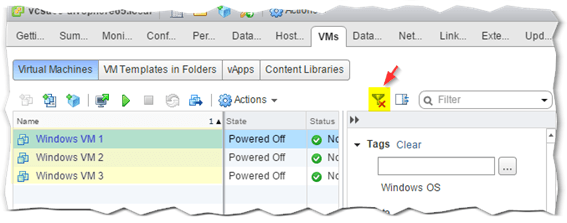
Figure 5 – Clearing applied search filters
Using the Tags and Custom Attributes page
Once tagging has been applied, you can draw up lists of objects by clicking on an individual tag from the Tags & Custom Attributes page.
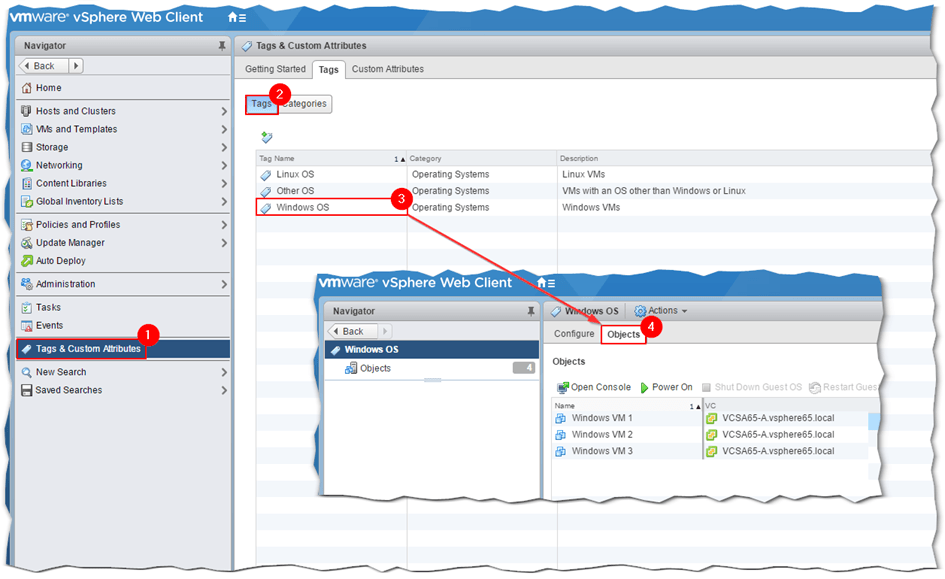
Figure 6 – Listing tagged objects on the Tags and Custom Attributes page
Something worth mentioning is that lists, in vSphere client, can be either copied to the clipboard or exported as a CSV report. Both options, when available, are generally found at the bottom, rightmost corner of the screen.
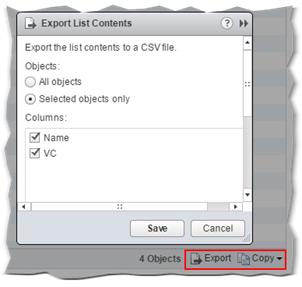
Figure 7 – Exporting object lists to clipboard or to a CSV file
PowerCLI
As is often the case, PowerCLI lends itself beautifully to replicating pretty much any task you can accomplish with the vSphere client and more. Tagging is no exception.
If I wanted to list all the VMs tagged as Windows OS or Linux OS, I’d simply use the get-vm cmdlet with the tag parameter which can take a number of comma-delimited values each corresponding to a tag I’m interested in.
get-vm -tag "Windows OS","Linux OS"
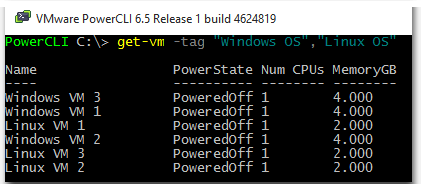
Figure 8 – Listing tag-specific VMs with PowerCLI
Without tags, the alternative to listing the same would be something like this:
get-vm | where {$_.ExtensionData.Summary.config.GuestFullName -like 'Microsoft*'}

Figure 9 – One way of listing VMs when tagging is not applied
The Get-TagAssignment cmdlet is also useful when generating lists of objects. One way the cmdlet can be used is as follows with the output being a list of all the VMs that have a tag applied.
get-VM | Get-TagAssignment | ft Entity,Tag
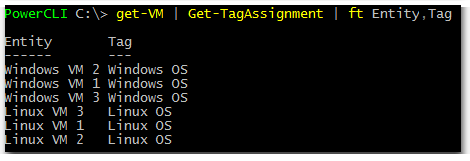
Figure 10 – Listing VMs with an applied tag
Intuitively, it follows that we should be able to create and add tags as well, which is in fact the case. To create new tag, use the New-Tag cmdlet. If you’re unsure on which parameters are compulsory, just type the cmdlet name and hit Enter. You’ll be promoted to type in the required values as shown in Figure 11.

Figure 11 – Creating a new tag using PowerCLI
Once the tag is created, you can assign it by piping one or more VM object into the New-TagAssignment cmdlet. This is an important cmdlet to keep in mind for automation purposes as it allows for the dynamic allocation of tags. One way of doing this would be to schedule a script to perform the task.
Here’s an example showing how I would tag all the VMs running a Microsoft guest OS.
get-vm | where {$_.ExtensionData.Summary.config.GuestFullName -like 'Microsoft*'} | New-TagAssignment -Tag "Windows OS"

Figure 12 – Tagging multiple VMs running the same operating system
To list all the tag related PowerCLI cmdlets, just run Get-VICommand -name *tag*. This should, more or less, list all the related commands. If in doubt, refer to the online PowerCLI documentation.

Figure 13 – How to retrieve a list of tagging related cmdlets
Conclusion
Tagging is a great way to organize your vSphere inventory. It will help you categorize and logically group vSphere resources helping you facilitate sorting and search processes while aptly lending itself to automating administrative and management tasks using PowerCLI and similar.
[the_ad id=”4738″][the_ad id=”4796″]


Not a DOJO Member yet?
Join thousands of other IT pros and receive a weekly roundup email with the latest content & updates!


4 thoughts on "A better way to manage your vSphere inventory"
I really enjoy the blog article.Really looking forward to read more. Fantastic.