Save to My DOJO
Table of contents
Let’s say your task for today is to configure a dozen or so recently deployed ESXi hosts. The plan is to have the whole lot reside under the same cluster. Additionally, they will share the same datastores and an almost identical iSCSI and network configuration. Wouldn’t it be great if somehow you could roll out the same configuration to all hosts in one fell swoop? Well, you’re in luck, because this is what Host Profiles are used for.
A host profile is pretty much a configuration template. It is a representation of the configuration of a so called Reference Host captured as a managed object. The host profile, once created, may be applied to any other host you want identically configured. Even better, a host profile can be applied to a cluster so all the member hosts can inherit the same configuration. If you have experience managing Active Directory, think of host profiles as a GPO of sorts for ESXi.
Host profiles also ensure that your hosts are compliant in terms of any configuration policy you might have in place. They can also be used in tandem with an ESXi automated deployment mechanism, such as Auto Deploy, if you choose to fully automate the provisioning process.
Creating a Host Profile
Strangely enough, there is no straight forward way to create a virgin host profile, so to speak, or if you prefer a blank one. Instead, a host profile is extracted from a reference host to act as a baseline for subsequent hosts earmarked to share the same host configuration.
In the example shown in Fig. 1, the reference host is called esx-a.vsphere65.local. I should mention that the ESXi hosts shown are nested but the same principle equally applies to using host profiles with physical ESXi hosts.
The process is deceitfully simple.
- Install and configure the reference host.
- Extract a host profile from the reference host.
- Install one or more additional ESXi hosts
-
Attach the host profile to an individual host or to a cluster.
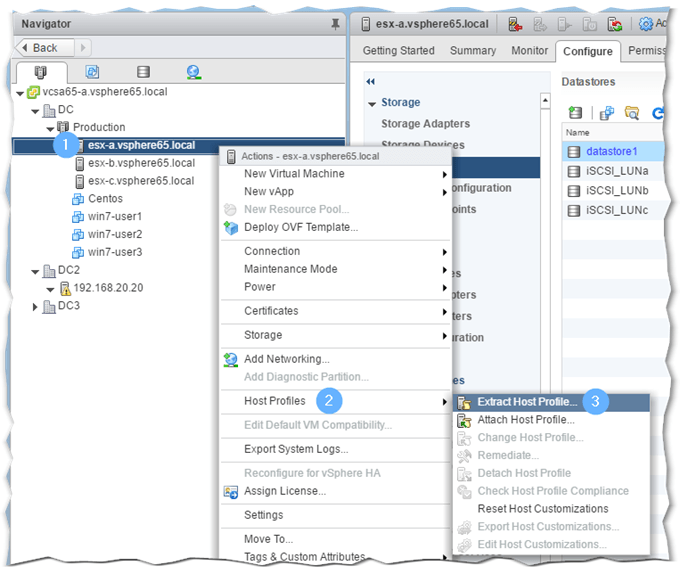
Figure 1 – Extracting a host profile from a reference host
Note: If you’re using a version of vSphere other than 6.x, do know that the reference host must be online when performing specific tasks such as editing and importing host profiles. This means you’ll be needing a spare ESXi host specifically dedicated to performing this role. I know, this is a waste of resources, hence one more compelling reason to upgrade to 6.0 or 6.5
There’s one more step I left out, one that caters for host-specific settings such as IP addresses. Host profiles, as we shall see later on, are editable hence in part the term managed object. This simply means that their properties or settings can be changed, enabled or disabled.
With host profiles comes Host customization, a means allowing users to type in host-specific settings after a host profile has been applied. By default, vCenter Server abides by a policy whereby all host-specific settings are flagged as requiring user intervention. There’s a section dedicated to this further down.
This white paper, while a bit dated, still makes for a good read if you wish to learn more about the technicalities of host profiles.
As is generally the case, the same tasks carried out in vSphere client can be replicated using PowerCLI. In this case, we only need to grab the reference ESXi host as an object and pass it on to the New-VMHostProfile cmdlet to extract the corresponding host profile.
$refESXi = Get-VMHost esx-a.vsphere65.local
New-VMhostprofile -ReferenceHost $refESXi -name "ESXi65-standard-config"

Figure 2 – Extracting a host profile using PowerCLI
Attaching to a Host Profile
To attach a cluster or ESXi host to a host profile, right-click on the resource and select Attach Host Profile from the Host Profiles menu. You are also presented with the option to customize the host (default setting) or skip it altogether.
Modifying a Host Profile
Once extracted, settings in the host profile may be modified as required. Imagine, say, that for some insane reason you want to allow any incoming network traffic straight through the ESXi firewall. One neat way of doing this would indeed be to use host profiles. This is how I would go about it.
- From the Home tab in vSphere Web Client, click on Host Profiles icon under the Operations and Policies section.
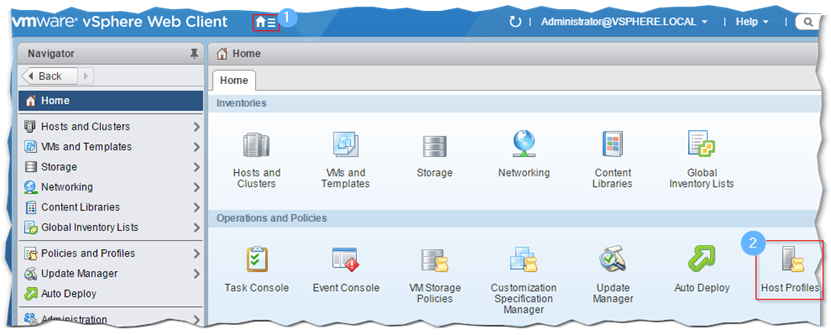
Figure 4 – Selecting host profiles from the Home screen in vSphere web client
- Next, select the host profile you wish to modify from the host profiles list and hit the Edit Host Profile button to proceed.
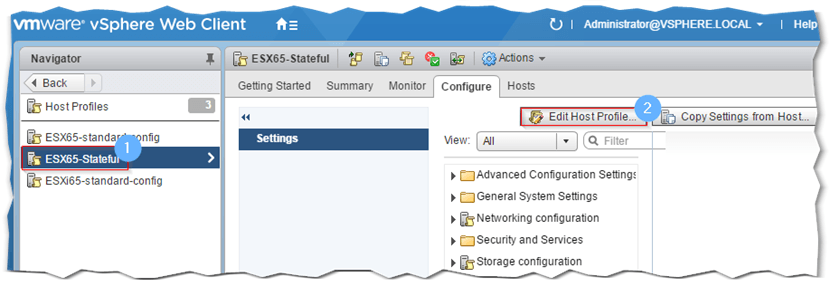
Figure 5 – Editing a host profile
- On the first screen you can set a name and description for the profile. On the second screen, you’ll see a number of ESXi settings grouped under 5 generic sections or sub-profiles these being General, Advanced, Networking, Security and Storage. The firewall settings live under Security as shown in Figure 6. I only want to change firewall settings so I deselect any other checkbox save for the Firewall configuration bit. Pressing Finish commits the changes.
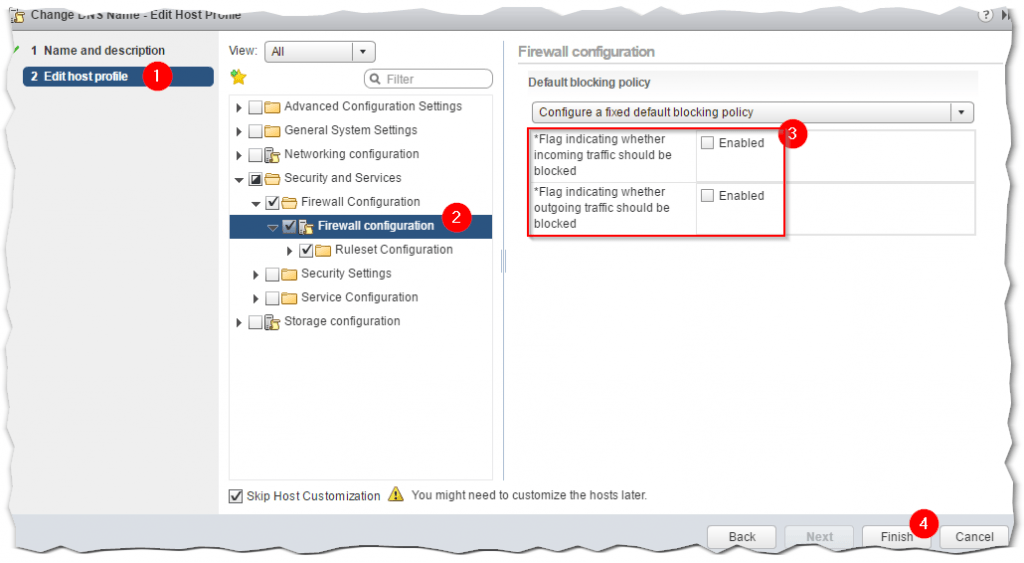
Figure 6 – Changing the ESXi firewall behavior using a host profile
Host Compliance and Remediation
The configuration from a host profile is not applied automatically when attached to a host. Instead, we first need to run a compliance check to compare the current configuration of the host with that defined in the profile. One way of doing this, is to right-click on the host and select Host Profiles -> Check Host Profile Compliance.

Figure 7 – Seeing if an ESXi host complies with the host profile it is attached to
The same check can be performed from the Host Profiles page in vSphere Web Client by clicking on the icon referenced in the following screenshot.
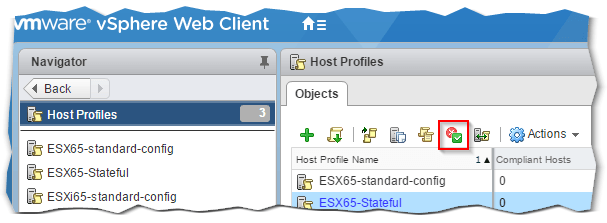
Figure 8 – An alternative way to check if an ESXi host complies with the host profile it is attached to
A warning is displayed whenever a host is found to be non-compliant. Any non-conforming settings are listed in the Host Profile Compliance window under the Summary page. To apply the host profile settings, click on Remediate Host as shown in Fig. 9 bottom-right.
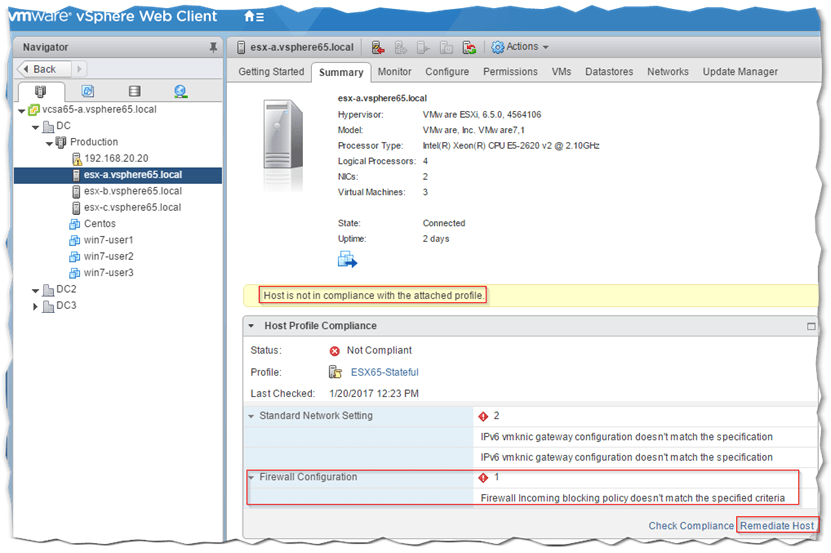
Figure 9 – A host profile compliance summary and links to re-check and remediate the host
Returning back to the firewall settings example, I’ve applied the corresponding host profile on a nested host in my lab. Before I remediate, I fired up an SSH session to quickly check the firewall status with the esxcli command.
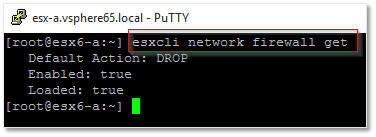
Figure 10 – Checking the ESXi firewall default behavior from an SSH session
Before running the remediation task, you can optionally stage the process to see how the host will be affected. ESXi can be set to reboot automatically if the settings applied demand it. Note that when a host is part of a fully-automated DRS enabled cluster, it is automatically put in maintenance mode upon remediation. Given any other setups, it’s up to the user to make sure that the host is in maintenance mode before remediating. As soon as all the checks are done and “Ready to remediate” is displayed, go ahead and press Finish.
I confirmed that the firewall settings have indeed been applied by running the esxcli network firewall get command from SSH once more and as expected, the default firewall action was set to Pass as shown in Fig. 12.
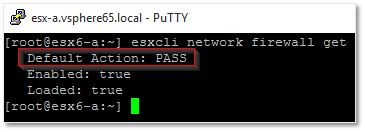
Figure 12 – Re-checking the ESXi firewall default behavior from an SSH session
Host Customization
Earlier, I mentioned how some settings are host-specific and necessitate user intervention. The vSphere 6.5 page on Host Customization gives a list but I am not sure whether this list is exhaustive or not. I found the information provided a bit hazy so from here onward, I’ll be relying on what I gathered from playing around with the feature. Just make sure to thoroughly test any changes before introducing them in a production or live environment.
What follows is an example of how a host profile is used to solicit user input when changing the hostname on ESXi.
-
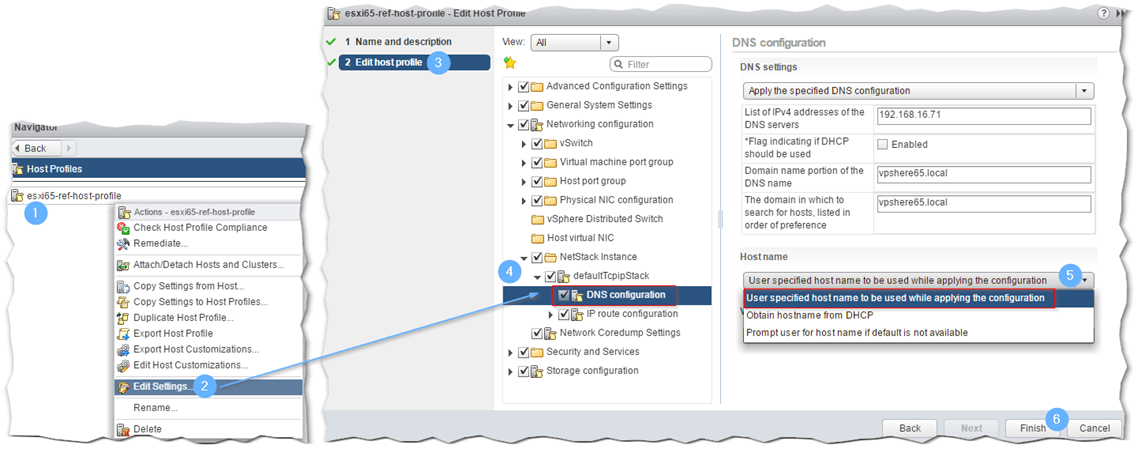
Using the vSphere Web Client, select Host Profiles from the Home screen.
-
Highlight the target host profile, right-click on it and choose Edit Settings. Press Next on the Name and Description screen to skip to the settings screen.
-
The DNS configuration is located under the Networking Configuration > NetStack Instance > defaultTcpipSTack > DNS configuration. From the Host Name drop down box, select the “User specified host name to be used …” option.
- Deselect all the other options and press Finish.
- Once you’re done modifying the profile, attach it to the host (or cluster) on which you want the hostname changed. Right-click on the host and select Host Profiles -> Attach Host Profile from the menu. Next, select the host profile from the list and click Next. This takes you to the host customization screen where you can type in the new hostname as shown in Figure 14.
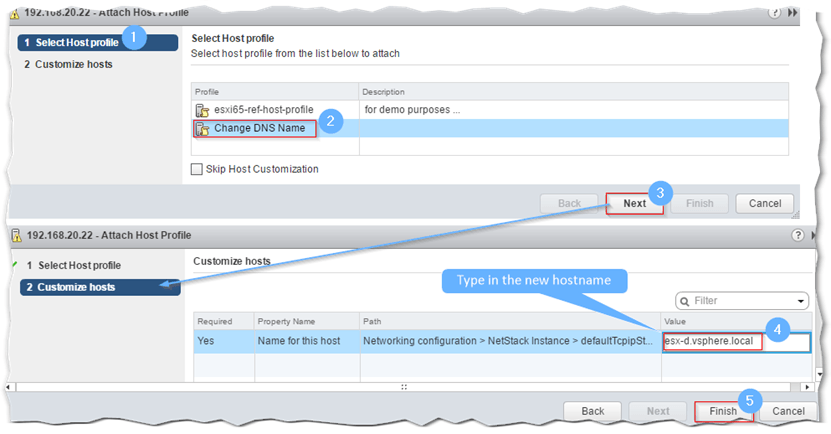
Figure 14 – Attaching an ESXi host to a host profile and manually changing the hostname
- At this point, the name change has not been applied because we still have to remediate. To do so, right-click on the ESXi host and select Remediate from the Host Profiles menu. Click on the Pre-check Remediation button. In this case, a change in hostname can only take place once the host is in maintenance mode. You’ll be alerted to this as shown in Fig. 15.

Figure 15 – Some remediation tasks require a host to be in maintenance mode
- Put the host in maintenance mode and try to remediate once more. You should now get the green light. Press Finish to apply. The host should pick up the changes made. A reboot may also be required depending on type of settings applied.

Figure 16 – Remediation good to go
- Back to the SSH window, I can see that the name change has indeed been applied.

Figure 17 – Verifying that the ESXi hostname change took place
If at a later stage, say, the hostname is changed – this applies to any other settings for that matter – the host customization settings can be updated to reflect the changes made to the ESXi host by selecting the Reset Host Customizations option. Host customizations can also be modified via the Edit Host Customizations and exported to a CSV file via the Export Host Customizations option (see Fig. 18).

Figure 18 – Resetting and exporting host customizations
Host customizations are particularly useful when used together with the Auto Deploy feature. The method is used to deploy ESXi over a network from an image stored in a repository on vCenter Server. The image is transferred via TFTP and requires properly configured DHCP and PXE services. I’ll be writing up a post on auto deploy as soon as I finish this one, so watch this space for more details.
Working with profiles
If you go back to Host Profiles under Home, you’ll notice a number of host profile related actions as per the context menu shown in Fig. 19.
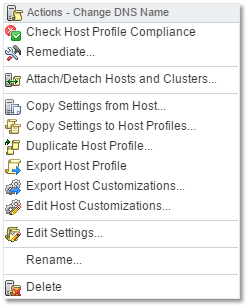
Figure 19 – Host profiles context menu
Most of the options I already covered, so here’s a summary of the salient ones:
- Export / Import Host Profile – Any profile can be exported and imported using an XML file. The file extension in this case is VPF.
- Copy Settings from Host – This option allows you to update the selected host profile to match the current configuration of the selected ESXi host.
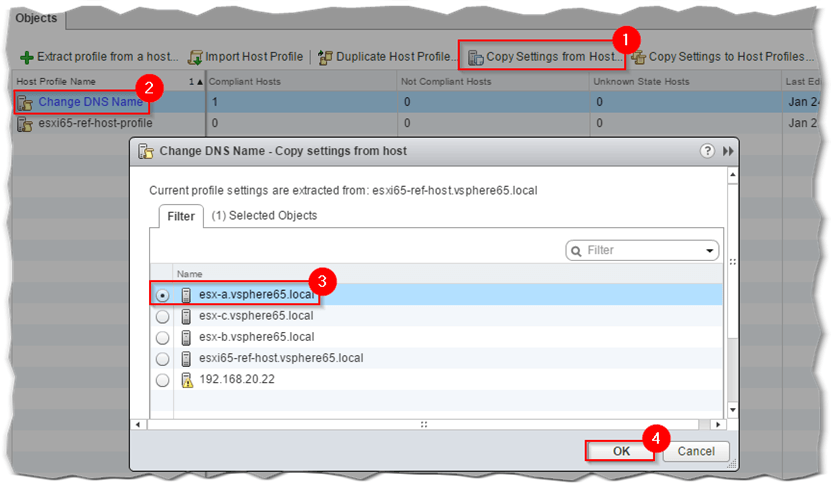
Figure 20 – Updating a host profile to match the configuration of an ESXi host
- Copy Settings to Host Profiles – Allows you to copy the settings from one host profile to another.
You can also run concurrent compliance and remediation tasks on any number of hosts. Fig. 21 shows how I attached a cluster of 4 ESXi hosts to host profile “Change DNS Name“.

Figure 21 – Running multiple compliance and remediation tasks
Conclusion
I believe that this post gives a fair idea of what host profiles are used for and what they can do for you. I must also stress that a great deal of experimentation is required to get to grips with the concept especially where host customizations are involved.
In the next post I’ll discuss auto deploy and how host profiles are used in conjunction to automatically provision and configure ESXi, so make sure to visit regularly.
[the_ad id=”4738″][the_ad id=”4796″]


Not a DOJO Member yet?
Join thousands of other IT pros and receive a weekly roundup email with the latest content & updates!


