Save to My DOJO
For Managed Service Providers, automation is essential for customer satisfaction. Each customer has their own needs that need to be attended to, and they all want theirs taken care of as quick as possible. Luckily, the clever use of PowerShell allows us to live up to the exceptions and SLA’s we’ve established with our customers. There are many PowerShell cmdlets that have been created that allow us to manage various devices and software in IT. However, sometimes we need to provide a custom solution where there isn’t a PowerShell cmdlet available. That’s where COM objects come into play, they can be used to manage applications instead of using a cmdlet.
What is COM?
COM stands for Microsoft’s Component Object Model which is a platform standard that is designed to allow applications to reuse code between multiple applications, hosts, and platforms. PowerShell can use these COM’s to manipulate applications and perform specific tasks that would otherwise be impossible due to lack of cmdlets. I’m going to demonstrate how to use COM objects in PowerShell to input data directly into an excel spreadsheet and save it.
Creating the Excel COM Object With PowerShell
First, let’s create our COM object instance within Windows Powershell by using the New-Object cmdlet with the -ComObject parameter specifying the excel.application class. You can find the various classes to turn into COM objects by searching in the HKEY_CLASSES_ROOT\Excel.Application registry location:

You can also use this PowerShell one-liner from PowerShellMagazine.com to list all available COM objects:
Get-ChildItem HKLM:\Software\Classes -ErrorAction SilentlyContinue | Where-Object {
   $_.PSChildName -match '^\w+\.\w+$' -and (Test-Path -Path "$($_.PSPath)\CLSID")
} | Select-Object -ExpandProperty PSChildName

We’ll also set it as a variable so that we can use the COM object to interface with Excel and allow us to manipulate the application.
$Excel = New-Object -ComObject excel.application
When we pipe our $Excel variable to Get-Member, we can see all the various properties that can be set as well as the various Methods that we can use to manage Excel:
$Excel | Get-Member

Creating A New Excel WorkSheet
Now that we have our COM object for Excel set up, we can now start performing administrative tasks such as creating a new worksheet and naming it. I want to get the running processes on my computer and input them into an excel worksheet and then finally save it. We’ll start by creating a new workbook by using the Add() method of the workbooks property and we’ll want to capture it as a variable so we can then rename the worksheet. The syntax looks like this:
$WorkBook = $Excel.workbooks.add()
Now, to rename the worksheet from “sheet1” to “CPU Information we will capture the default Sheet1 as a workbook sheet object and then modify the name property:
$Sheet = $workbook.sheets("sheet1")
$sheet.name = "CPU Information"
To see our work, we can make the excel worksheet visible by the following syntax:
$excel.visible = $true

Importing Data from PowerShell into Excel
Now let’s turn up the complexity, I want to import some of the data from Get-Process into my excel spreadsheet and save it. We can input data into each cell in Excel by using the .range() method of our Sheet object that we previously created. Since I want to create Headers for the information I’ll be inputting I’ll fill row 1 with the header information. The syntax will look like the following:
$Sheet.range("A1:A1").cells="Process Name"
$Sheet.range("B1:B1").cells="CPU"
$Sheet.range("C1:C1").cells="Memory(MB)"
$Sheet.range("D1:D1").cells="Description"
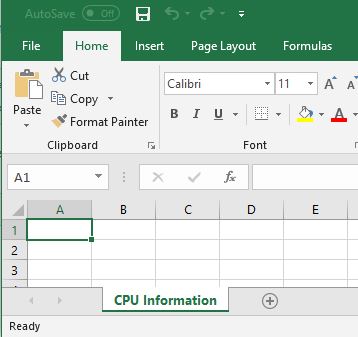
Now when we look at the Excel Spreadsheet, we can see our new headers:

Next step is to create the logic for filling each column with their respective data from Get-Process. We’ll capture our data from Get-Process to a variable. Then use a ForEach loop to add a row into excel for each process that we collect. I’ve created a counter $n that represents the row number for each process, it will increment by 1 for each process. Because we already have headers and don’t want to fill in that row, I’ve made the counter start at 1 before the ForEach loop. The syntax looks like this:
$processes = Get-process -name * | Where-object {$_.CPU -gt 0} | Sort-Object CPU -Descending

$n = 1

Foreach ($process in $processes)
{
$n +=1

$Sheet.range("A$n" + ":" + "A$n").cells= $process.name
$Sheet.range("B$n" + ":" + "B$n").cells= ($process.cpu).tostring()
$Sheet.range("C$n" + ":" + "C$n").cells= ($process.ws/1mb).tostring()
$Sheet.range("D$n" + ":" + "D$n").cells= $process.description

}
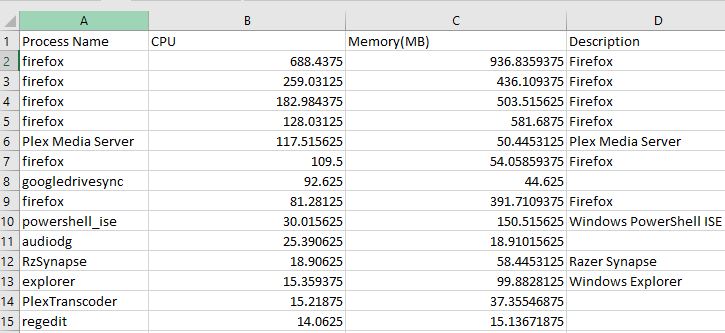
When we take a peek at our Excel spreadsheet we can see the data has been populated in each column:

Now let’s save our data by using our sheet object’s SaveAs method:
$sheet.saveas("c:\temp\cpu.xlsx")
Conclusion
By creating an Excel COM object in PowerShell, we were able to create an Excel Workbook, collect and import data into our spreadsheet, and then finally save it. You can see now how powerful manipulating COM objects can be. We could use this process to create scripts for Excel that clients can use to increase their efficiency. Also, outlook and word can be manipulated in the same fashion. So think about the use cases where clients need to have their outlook profile recreated to fix an email issue; or for doing a migration to Office 365. Instead of sending someone onsite to run from workstation to workstation and set up user’s emails, a script can be created to set up the new office 365 outlook profile and sent out to each user to run on their own time. What are some other ways that you’ve used or plan on using COM objects with PowerShell? Let me know in the comments below!
Want to learn more about how PowerShell can help you? Read on
Building PowerShell Tools for MSPs series
- Using Try and Catch
- Automating KeePass
- PowerShell Universal Dashboard
- Automating Windows Updates
- Getting Started with Source Control Part 1
- HTML Tables for Reporting
- Using SFTP
- Working with REST APIs
- Advanced Functions
- 3 PowerShell Modules for Ticketing
Further PowerShell reading
- How to Create Intelligent PowerShell Scripts with Azure AI
- Everything MSPs Need to Know About PowerShell Core 6.0
- How to Encrypt Passwords in PowerShell
- 3 Reasons Why MSPs Should Get Serious About Automation


Not a DOJO Member yet?
Join thousands of other IT pros and receive a weekly roundup email with the latest content & updates!


