Save to My DOJO
Table of contents
In this post, we’re going to focus on a basic, initial installation of Kubernetes (a container orchestrator).
How to Install MiniKube on Windows Server
It’s a question that has been coming up more and more in search results. How do you install Kubernetes? It’s difficult to answer too because there are so many ways to “install kubernetes”. Not only can the technology itself be manually deployed, many vendors in the industry and building their own deployment mechanisms for it as well. As this series assumes that you’re new to Kubernetes, we’re going to install what is called MiniKube as opposed to full deployment. Whereas a full-blown deployment is a clustered approach fit for production workloads, MiniKube is a local single-node deployment perfect in test/dev situations, and good for training. This is currently the fastest way of getting a functional test/dev Kubernetes deployment running on top of Windows Server.
Let’s take a look at the requirements first.
Requirements
- Windows Server 2019 OS (Instructions below done with WS2019 but should work on both Windows 10 and Windows Server 2016 as well)
- Hyper-V Role Installed
- Nested Virtualization Enabled (if setting up MiniKube inside of a VM)
- MAC Address Spoofing Enabled (if setting up MiniKube inside of a VM)
- A Configured External vSwitch
- Chocolatey Package Manager
- Kubectl
Installing Chocolatey
First off, this article assumes you’ve taken care of all the above minus the installation of Chocolatey and Kubectl.
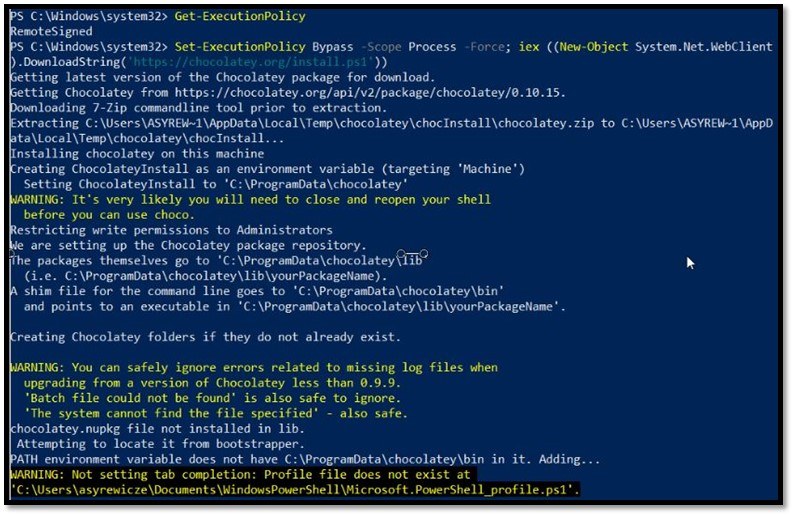
For the bulk of the installation work, we’re actually going to use a package management utility for Windows called Chocolatey. Chocolatey is a simple-syntax CLI based tool, that makes installation of MiniKube quick and easy. To install Chocolatey do the below in an elevated PowerShell prompt:
Get-ExecutionPolicy
If you get “Restricted” as the output, then you’ll need to use Set-Execution Policy to change the value to AllSigned or RemoteSigned.
NOTE: If you work in a regulated environment, check with your security team/person before continuing as use of Chocolatey may not be allowed.
Once the execution policy is dealt with, then run the below to actually conduct the installation:
Set-ExecutionPolicy Bypass -Scope Process -Force; iex ((New-Object System.Net.WebClient).DownloadString('https://chocolatey.org/install.ps1'))

NOTE: Afterwards, restart your elevated shell, otherwise Chocolatey may throw some errors
Installing Kubectl
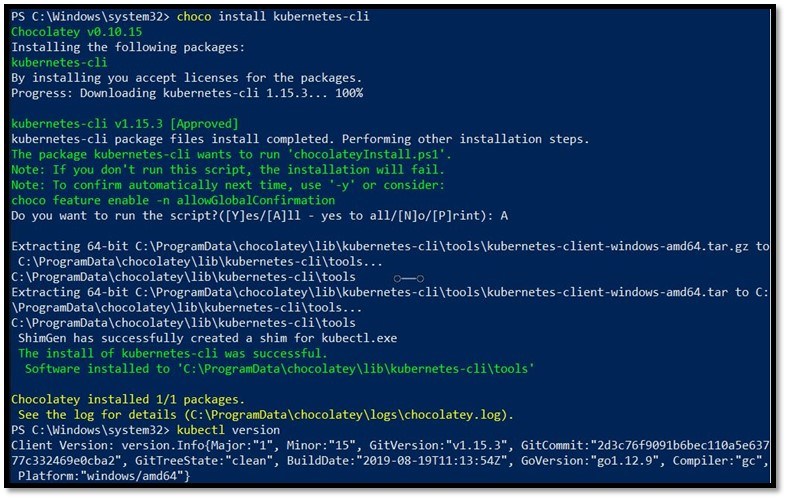
Next, it’s time to install Kubectl using Chocolatey. While Kubernetes has some nice web-based dashboards, we won’t be setting those up as part of this article (that will come later). Kubectl is the base command-line utility used to manage Kubernetes and MiniKube and must be installed separately. You can install Kubectl using Chocolatey as shown below:
choco install Kubernetes-cli
Once installed you can verify the version by running:
kubectl version

Installing MiniKube
Now that the prerequisites out of the way, it’s time to actually install MiniKube. Run the below:
choco install minikube
Once downloaded restarted your elevated PowerShell prompt one more time and we’re now ready to deploy our single-node Kubernetes cluster! MiniKube assumes that there is some sort of virtualization option available on the system, and by default looks for VirtualBox. This is Windows! We don’t need VirtualBox because we’ve got Hyper-V! However, in order to get MiniKube working with Hyper-V we need to pass an additional parameter, –vm-driver. On top of that, when using Hyper-V we also have to tell MiniKube what vSwitch to use for connectivity, so we must also pass the –hyperv-virtual-switch parameter. Failure to include either of these will make the below command fail.
Start Kubernetes with the below:
NOTE: Remember to replace the vswitchname below with your own vSwitch name!
minikube start --vm-driver=hyperv --hyperv-virtual-switch=vswitchname
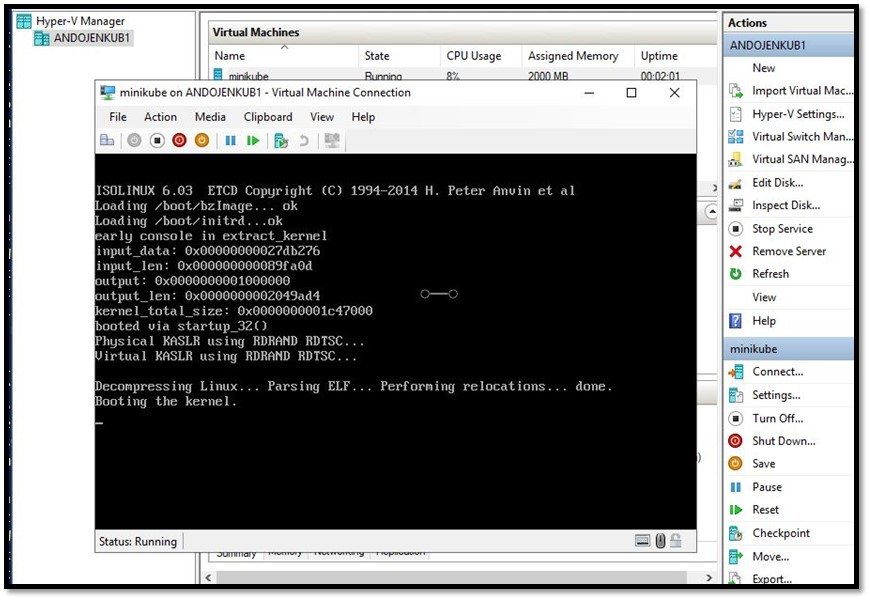
This will take some time. As the deployment tool is downloading the needed images and building a Hyper-V VM in the background for Kubernetes to run from.

You can even open Hyper-V Manager if you want to see the VM Booting!

Starting a Container with Kubectl
The PowerShell prompt will let you know once the single-node cluster is ready to go. At which point, you’ll be able to use kubectl to interact with and control the cluster. While the management of Kubernetes via kubectl could consist of several blogs posts, let’s at least use kubectl to run a container (Kubernetes refers to them as pods), and see it’s running status before we call it a day on this segment.
Kubectl run is the equivalent of the “docker run” syntax we’ve been using throughout this series. We also have the option of specifying a URL for the image source. Here I’m just using one of the official Microsoft Hello World images from the Docker hub by running the following command:
kubectl run hello-world --image=mcr.microsoft.com/mcr/hello-world
I then check the status of the running Pods (containers) by running:
kubectl get pod

Currently, you can see that the hello-world container is still in the creation phase, but it will soon move to Running status.
Now you may be wondering, “ok the container started but I can’t see anything”. That’s correct. Remember that Kubernetes is an orchestrator. It will run and manage containers en masse, connecting to them and consuming them is a matter for the next series in this blog post as the options are quite vast.
Before we wrap up you can stop minikube by running the below:
minikube stop
When you want to start things again, simply run the minikube start command we used earlier above!
Wrap-Up
That wraps up our segment today. If you intend to continue following along with this series, you’ll likely want to keep your MiniKube installation around as we’ll continue to use this deployment for future segments and further testing. It may not look like much right now, but once we start digging further into Kubernetes you’ll see the value become very apparent once full-scale application rollouts and updates are happening seamlessly and easily.
Have you missed any previous articles in this series? Here is a list of all the current containers content on the MSP Dojo!
The Definitive Guide to Containers for MSPs
Part 1 – What are Containers?
Part 2 – Platforms for Running Containerized Workloads
Part 3 – Introduction to Docker
Part 4 – 4 Pro Tips for Working with Docker
Part 5 – How to Run Linux Containers on Windows Server 2019
Part 6 – How to Create Persistent Docker Containers
Part 7 – Docker Container Networking – Part 1
Part 8 – How to Set up a Linux Container Host
Part 9 – How to Run a Container in Azure with Azure Container Instances
Part 10 – 4 Considerations for Pricing Container Services
Part 11 – Docker Container Networking Part 2
Part 12 – Containers vs. Serverless Architecture – Which Should Your MSP Use?
Part 13 – Docker Community Edition vs. Enterprise Edition
Part 14 – What is a Container Orchestrator
What about you? Did you find this guide helpful? Have you tried installing Kubernetes before and run into issues? Let us know in the comments section below!


Not a DOJO Member yet?
Join thousands of other IT pros and receive a weekly roundup email with the latest content & updates!


