Save to My DOJO

Hello again all! I’m happy to be bringing you part 11, of our ongoing series on container services for MSPs!
We’ve covered A LOT of material thus far. From supported platforms, to container pricing, and networking basics. In this segment, we’ll be building on those networking basics a bit. In part 1 of the container networking discussion we talked about different options for connectivity, and how to expose a container to the physical network using a Windows Server 2019 container host’s networking stack. In Part 2, we’re going to take that a step further. Mainly, how to get the container to appear as its own entity on the network and obtain and use an IP address of its own.
Before we get too far into that though, let’s see where we’ve been thus far in this series
The Definitive Guide to Containers for MSPs
Part 1 – What are Containers?
Part 2 – Platforms for Running Containerized Workloads
Part 3 – Introduction to Docker
Part 4 – 4 Pro Tips for Working with Docker
Part 5 – How to Run Linux Containers on Windows Server 2019
Part 6 – How to Create Persistent Docker Containers
Part 7 – Docker Container Networking – Part 1
Part 8 – How to Setup a Linux Container Host
Part 9 – How to Run a Container in Azure with Azure Container Instances
Part 10 – 4 Considerations for Pricing Container Services
Container Networking in Windows Server 2019
As with most of the posts in this series, we’ll be using Windows Server 2019 as the container host for this segment. The container host is a fresh build with the March cumulative hotfixes installed, and Docker installed from the DockerMSFTProvider PowerShell provider.
All container networking in Windows Server is done via a Hyper-V vSwitch (As shown in figure 1 below). By default, in Windows Server the first time the Docker Engine runs it creates a NAT network, which is attached to an Internal vSwitch. New Containers are attached to this network automatically and get an IP address associated with that NAT network (usually something in the 172.16.0.0/16 network). This is great for simple containers, but what if you have a more persistent workload? What if you have something running in a container that is important enough to warrant its own static IP, or at least pulls something from the network’s DHCP server? This is the use case we’re addressing in today’s segment.
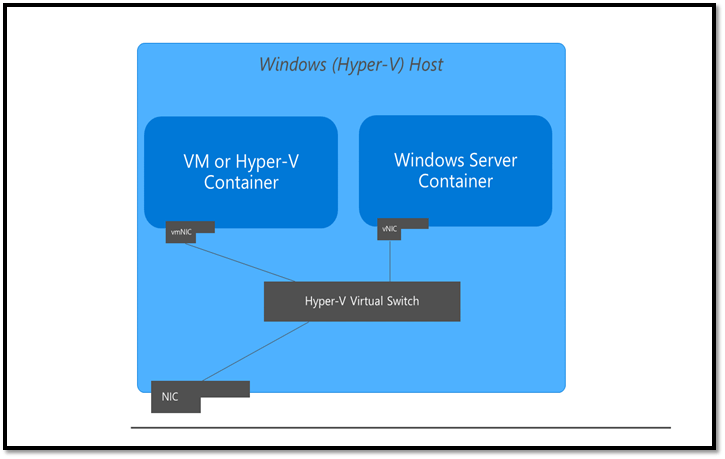
Figure 1: Logical Layout of Container Networking on Windows Server 2019 – Image from docs.microsoft.com
How to
DHCP Address to a Docker Container on Windows Server 2019
Once Docker is installed you can get a list of the current networks by issuing the below command:
docker network ls
Which, if this is a new container host, should return the following as shown in figure 2:

Figure 2: Default List of Docker Networks on a 2019 Windows Server Container Host
We need to first create a new docker network that will use the “transparent” driver type. This tells Docker that we’re creating a new Docker network that will utilize an external vSwitch for connectivity more akin to a traditional VM. We do so by issuing the below command with the -d parameter followed by the name we want to use for this network. In our case we’ll call it ContainerExternal
docker network create -d transparent ContainerExternal.
Then run the below to make sure the network was successfully created
docker network ls
Then for kicks, execute:
Get-VMSwitch
You can see based in figure 3 below that a new Docker network has been created as well as a new Hyper-V External vSwitch that is associated with it.
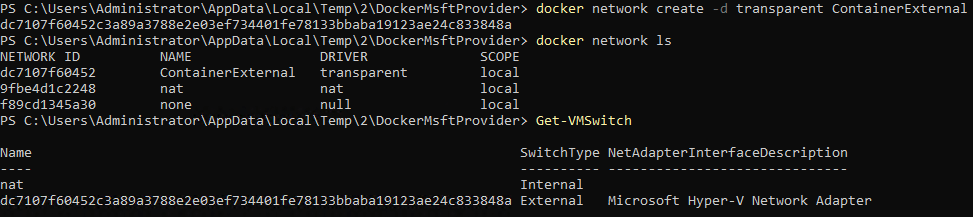
Figure 3: Docker Transparent Network and Associated Hyper-V vSwitch
So, our network (and vSwitch) are ready, let’s provision a new container that will utilize this network and receive a DHCP address from the physical network. For this example, we’ll deploy a simple Nano Server image as a Hyper-V Container.
NOTE: In this particular example I’m running the nano server image as a Hyper-V container (the –isolation parameter). Currently, if you try to run the stock nano server image as a Windows Container on Windows Server 2019 you’ll get a version mismatch error. Running the container with Hyper-V isolation works around the issue.
To attach the new container to the new network we configured, we simply use the –network parameter as shown in the command below
docker run -it --isolation=hyperv --network ContainerExternal --name ExtConnectionTest microsoft/nanoserver
There is a lot going on with this command. So, covering each parameter in order:
- The -it tells Docker to run the container in interactive mode (so we can simply issue and ipconfig to verify it has the correct IP).
- –isolation=hyperv tells Docker to run the container as a Hyper-V container
- –network attaches the new container to the network configured with the transparent driver named ContainerExternal that was defied earlier.
- –name names the container, so we can easily spot it when using commands like “docker container ls”
- Then at the end, we’re telling docker to use the Microsoft/nanoserver container image to create the container.
Once started we’ll be logged into the console of the nano server container, and we can see by issuing the hostname command, the container has been given a random name. Additional we can also see by running ipconfig that we’ve achieved our goal of having the container retrieve an IP from the network’s DHCP Server. Figure 4 Below has the proof!
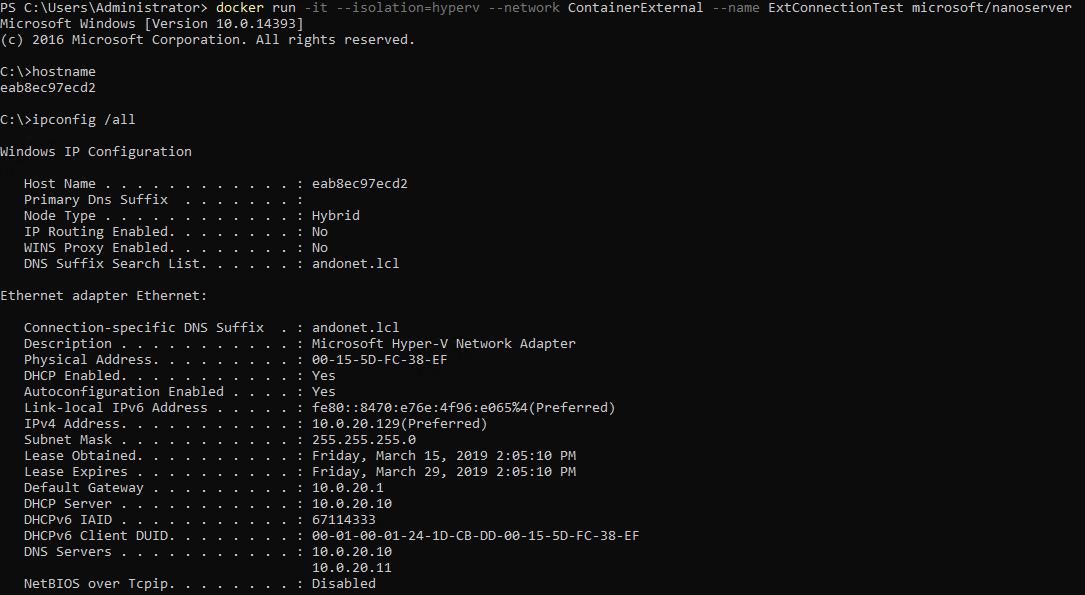
Figure 4: Running a container attached to a transparent type docker network allows the container to retrieve a DHCP address
How to Assign a Static IP Address to a Docker Container on Windows Server 2019
Now, what about a situation where you’d like to assign a static IP address to a container? The process is very similar, but with a few differences. For one, an additional –subnet parameter must be added when creating the new docker network. With this parameter, you have to define the subnet in CIDR format for the range of IPs that you would like to use. For example:
docker network create -d transparent --subnet=10.20.200.0/24 --gateway=10.20.200.1 ContainerExternalStatic
Then when starting the container, you select the new network and define the IP you’d like the container to use as shown below
docker run -it --isolation=hyperv --network ContainerExternalStatic --ip=10.20.200.15 --name ExtConnectionTest microsoft/nanoserver
If you check the IP of the running container, it should be configured with the IP defined!
NOTE: I have to mention that the above 2 commands for static addresses worked only some of the time for me. There were a few times where the gateway address was configured, but for some reason, the IP was still pulled from DHCP. This looks to be a potential bug with static IPs and Hyper-V Isolation as laid out here. However, the issue is closed with no resolution. So, while the above should work with no issues for Windows Containers, there looks to be a potential issue with Hyper-V Containers right now. I’ll be following up on this and reporting back.
Wrap-Up
That wraps it up for today! Hopefully, with this new information, you’ll be equipped to provide more flexible networking services for the containers you manage. How about you? Is this something you would find useful? Are you planning on using this for some or all the containers you manage? Let us know in the comments section below!
Thanks for reading!


Not a DOJO Member yet?
Join thousands of other IT pros and receive a weekly roundup email with the latest content & updates!
More in this category


About the Author
Andy Syrewicze


2 thoughts on "Docker Container Networking for MSPs – Part 2"
The `transparent` network driver plugin is not available on Windows 10 Enterprise 64 bit. What Windows configuration do you have Andy?
Hi Vlad!
I’ve since rebuilt my test machine, but I believe I was using Windows 10 Pro X64. Much has changed with containers on Windows 10 since this article was posted. I’ll be during a future update on this series and I’ll be sure to address this. Thank you!