Save to My DOJO
Table of contents
- Virtual Adapters Do Not Change Ethernet and TCP/IP Behavior
- Two Types of Hyper-V Virtual Network Adapters
- Use PowerShell to Create a Virtual Network Adapter for a Guest Operating System
- Use PowerShell to Display Virtual Machines’ Virtual Adapters
- Use PowerShell to Remove a Virtual Machine’s Virtual Network Adapter
- Use PowerShell to (Dis)Connect a Virtual Network Adapter To/From a Virtual Switch
- Use PowerShell to Add a Virtual Network Adapter to the Management Operating System
- Use PowerShell to Remove a Virtual Network Adapter from the Management Operating System
- Use PowerShell to Modify a Virtual Adapter
- Use PowerShell to Set a Virtual Network Adapter’s VLAN
- Use PowerShell to Rename a Virtual Network Adapter
- Use Hyper-V Manager/Failover Cluster Manager to Add a Virtual Network Adapter
- Use Hyper-V Manager/Failover Cluster Manager to Modify or Remove a Virtual Network Adapter
Hyper-V’s Virtual network adapters are the windows that your virtual machines — and sometimes your management operating system — use to communicate with the rest of the world. You can perform basic adapter manipulation for virtual machines using the GUI. Advanced functionality, and anything to do with virtual adapters in the management operating system, require PowerShell.
Virtual Adapters Do Not Change Ethernet and TCP/IP Behavior
Before I get into the how-to, I want to take a very brief detour to address probably 80% or more of the questions that I see involving virtual network adapters. Hyper-V’s virtual network adapters exhibit the same logical behavior as a physical network adapter. Guest operating systems treat them no differently than physical adapters. If you’re about to post a comment or question claiming that Hyper-V is stopping your PING or blocking your web traffic, don’t. You need to understand the Hyper-V virtual switch. You need to understand Ethernet and TCP/IP.
Remember that guest operating systems come with firewalls. Remember that virtual network adapters can be assigned, or not be assigned, to VLANs. The management operating system’s firewall does not impact anything happening on any physical adapter hosting a Hyper-V virtual switch nor does it impact any virtual network adapter except those assigned to the management operating system. If that doesn’t make sense to you, then you do not understand the Hyper-V virtual switch.
Two Types of Hyper-V Virtual Network Adapters
Hyper-V provides two types of virtual network adapters.
- Legacy Network Adapter: The legacy network adapter is only available for generation 1 virtual machines. It is an emulated device, meaning that Hyper-V creates a complete digital reconstruction of a common, basic physical network adapter. This adapter type exists for those situations in which there is no way for a particular guest to load the standard Hyper-V network adapter. In most cases, this is for PXE booting Generation 1 virtual machines. Any other cases would involve unsupported operating systems that have no driver for the standard virtual adapter. This adapter is locked at about 100Mbps speed and requires a comparatively high amount of CPU processing, so avoid using it in situations that do not strictly require it.
- [Synthetic] Network Adapter: Usually only named as a “Network Adapter”, Hyper-V’s synthetic network adapter is a connection between Hyper-V’s VMBus or an IOV Virtual Function and the virtual machine or management operating system. It is substantially faster than the legacy network adapter.
Use PowerShell to Create a Virtual Network Adapter for a Guest Operating System
Use Add-VMNetworkAdapter to create a virtual network adapter. I do not know why this cmdlet does not use the New verb. In 2012 R2 and earlier, the virtual machine must be Off to add a new virtual adapter.
Add-VMNetworkAdapter -VMName svtest
The above will create a virtual network adapter named “Virtual Adapter”, attach it to the virtual machine named “svtest”, and leave it disconnected.
During adapter creation, you have the option to name the adapter, set a static MAC address, specify that it is the legacy type, connect it to a virtual switch, and assign it to a resource pool. The following example shows some of these options:
Add-VMNetworkAdapter -VMName svtest -IsLegacy $true -Name 'LegacyInVLAN40' -SwitchName vSwitch
Even though I gave the adapter a name that includes a VLAN, it’s just a name. You cannot use Add-VMNetworkAdapter to specify a VLAN. That’s a different cmdlet, which I will show later in this post.
Tip: When adding a virtual adapter to a system that already has a virtual adapter, override the Name. This makes it much easier to work with the adapter later.
You can add a virtual adapter to many virtual machines at once:
Add-VMNetworkAdapter -VMName vm1, vm2, vm3 -Name BulkAddedAdapter
Use PowerShell to Display Virtual Machines’ Virtual Adapters
Use Get-VMNetworkAdapter to view virtual adapters. This cmdlet always has some required parameters, so it cannot be used alone.
To retrieve the adapter(s) for a specific virtual machine:
Get-VMNetworkAdapter -VMName svtest
When run against the virtual machine that I used the previous examples on, this is the output:
Name            IsManagementOs VMName SwitchName MacAddress   Status IPAddresses
----            -------------- ------ ---------- ----------   ------ -----------
Network Adapter False          svtest vSwitch    00155D197706        {}
Network Adapter False          svtest            000000000000        {}
LegacyInVLAN40  False          svtest vSwitch    000000000000        {}
If the virtual machine were on, the MacAddress fields would be populated. If the virtual machine were on and the guest KVP exchange service is running/functional, the IPAddresses would be populated. What you don’t see is that the last adapter is a legacy adapter. You can use -IsLegacy to filter for synthetic adapters (with $false) or legacy adapters (with $true):
Get-VMNetworkAdapter -VMName svtest -IsLegacy $true
You can also use formatting to see all/other properties. Our introductory article on PowerShell includes a section on formatting.
View all virtual adapters on all virtual machines:
Get-VMNetworkAdapter -VMName *
You can also use a partial match in the VMName field, ex “svweb*”.
View all virtual adapters on the host, including those for the management operating system:
Get-VMNetworkAdapter -All
Everything that we’ve shown you to this point displays the virtual network adapter(s) on the screen. The output of Get-VMNetworkAdapter is a true object. It can be passed via the pipeline to other cmdlets, such as Remove-VMNetworkAdapter. Our introductory PowerShell article discusses the pipeline.
Use PowerShell to Remove a Virtual Machine’s Virtual Network Adapter
Not surprisingly, Remove-VMNetworkAdapter is the cmdlet to remove a virtual adapter. Be aware that this permanently deletes the virtual adapter! Even if you later recreate it with the same settings, it will have a different hardware signature than the one that you removed. If you just want to unplug an adapter from a virtual switch, see the section on Disconnect-VMNetworkAdapter below. The virtual machine must be Off to remove a virtual network adapter.
Remove an adapter from a virtual machine by name:
Remove-VMNetworkAdapter -VMName svtest -Name LegacyInVLAN40
We have a little problem on the virtual machine named “svtest” from our previous operations: two virtual network adapters with the same name. The best way to deal with this problem is to use Get-VMNetworkAdapter to find something different about the adapters. From there, use the pipeline to remove the unwanted adapter. I have two options in this case. First, the unwanted adapter is not connected to a virtual switch. Second, the unwanted adapter doesn’t have a MAC address. If neither of those clues are helpful, I could turn the virtual machine on and wait for the IPAddresses field to populate. I could then determine the MAC address of the adapter to remove and use that.
To remove all virtual adapters from a virtual machine that aren’t connected to a switch:
Get-VMNetworkAdapter -VMName svtest | ? SwitchName -eq $null | Remove-VMNetworkAdapter
The “?” is an alias for Where-Object. That was also explained in our introductory article, but the simple explanation is that we are retrieving all virtual adapters on that particular virtual machine and then filtering to only the adapters that don’t have a virtual switch.
Tip: The Remove-VMNetworkAdapter cmdlet has a -SwitchName parameter that allows you to easily remove adapters connected to a particular virtual switch. That parameter cannot be null or empty, so the above is the only way to remove disconnected virtual adapters.
To remove a virtual adapter from a virtual machine by MAC address:
Get-VMNetworkAdapter -VMName svtest | ? MacAddress -eq '000000000000' | Remove-VMNetworkAdapter
Remove all virtual network adapters from a virtual machine:
Remove-VMNetworkAdapter -VMName svtest
Use PowerShell to (Dis)Connect a Virtual Network Adapter To/From a Virtual Switch
The Connect-VMNetworkAdapter and Disconnect-VMNetworkAdapter cmdlets can be used to connect and disconnect virtual machines’ virtual network adapters to/from virtual switches. The virtual machine can be On or Off when using these cmdlets.
The most common way to use both of these cmdlets is by virtual machine name, since most virtual machines use only a single adapter. To connect all of the adapters on a specific virtual machine to a specific virtual switch:
Connect-VMNetworkAdapter -VMName svtest -SwitchName vSwitch
To disconnect them again:
Disconnect-VMNetworkAdapter -VMName svtest
You can use the pipeline for more granular control:
Get-VMNetworkAdapter -VMName svtest | ? MacAddress -eq '00155D197706' | Disconnect-VMNetworkAdapter
Use PowerShell to Add a Virtual Network Adapter to the Management Operating System
Use Add-VMNetworkAdapter to create a virtual network adapter for the management operating system, much like you do for virtual machines.
Add-VMNetworkAdapter -ManagementOS
The above will add a virtual adapter to the management operating system on the first virtual switch that it finds. The newly created adapter will have the same name as the virtual switch when using the *-VMNetworkAdapter cmdlets. In all other locations and tools, it will be called vEthernet (<name_of_the_virtual_switch>).
To create a virtual network adapter in the management operating system with a more descriptive name:
Add-VMNetworkAdapter -ManagementOS -Name DemoAdapter -SwitchName vSwitch
Tip: Virtual adapters in the management operating system must always be connected to a virtual switch, and they must remain connected to the same virtual switch from cradle to grave. There is no way to disconnect them or reconnect them to a different virtual switch.
Use PowerShell to Remove a Virtual Network Adapter from the Management Operating System
Remove-VMNetworkAdapter is also used to remove a virtual adapter from the management operating system. Just as it does with a virtual machine, this cmdlet permanently deletes the virtual adapter
Remove-VMNetworkAdapter -ManagementOs -Name DemoAdapter
Use PowerShell to Modify a Virtual Adapter
Set-VMNetworkAdapter can control the following settings for virtual adapters connected to either a virtual machine or the management operating system:
- DHCP Guard: When set to on, this virtual network adapter will never receive any Discover or Request frames in a DHCP DORA conversation. That way, if the guest operating system is running a DHCP server, it will never issue IP addresses. This is mostly useful in hosting environments, but can be put into action anywhere that the Hyper-V administrator doesn’t really trust the administrator of the guest operating system.
- Dynamic/Static MAC Address: Instructs the network adapter to use a MAC address generated by its host or one specified by you. Windows guests should be fine with a dynamic MAC address, but Linux guests will require a static MAC address if they will ever be Live Migrated.
- Maximum IPSec Offload Associations: If you’re using IPSec and you want to prevent a virtual adapter from offloading too many IPSec associations, this cmdlet has you covered.
- Enable or disable 802.1p tagging: This feature is mostly useful in hosted or other cases when you may not be able to trust the administrator of the guest operating system. In order to have any effect, your physical network must be processing 802.1p tags. If 802.1p tagging is enabled, then the guest operating system can transmit tags with an 802.1p priority set. If tagging is disabled, Hyper-V will reset the 802.1p section of all Ethernet frames leaving this adapter to 0.
- SR-IOV settings. If your virtual switch and hardware is IOV-enabled, use this cmdlet to control the moderation method and weight of an individual virtual network adapter. If you want to prevent a virtual adapter from ever using a Virtual Function, you can set its -IovWeight parameter to 0.
- MAC addressing spoofing: If disabled, then the guest operating system administrator will not be able to use in-guest tools to override the MAC address of the adapter. You’ll want this off if the guest operating system is employing network load balancing.
- Hyper-V QoS Settings: this cmdlet controls all of the Hyper-V QoS settings for virtual adapters.
- Cluster monitoring: By default, the cluster will Live Migrate the virtual machine if it detects that one of its adapters has lost network connectivity. You can disable this protection with this cmdlet.
- Port mirroring: You can set Hyper-V to mirror the traffic of one virtual network adapter to another. I’ve heard complaints that this feature does not actually work, but I’ve never tested it myself.
- Router guard: When enabled, the virtual adapter will not be able to send out Router Advertisement or Redirection packets. This will generally prevent the guest operating system from establishing itself as a rogue router. Packets directed specifically to its MAC address for routing will still pass, however.
- Storm protection: limits the per-second outbound flow rate of an adapter.
- VMQ weighting: You can establish the hierarchy of this virtual adapter when registering for a queue, or you can set VmqWeight to 0 to prevent it from receiving a queue at all.
- Teaming: If you’d like to team virtual network adapters within the guest, you’ll need to enable the feature at the virtual adapter level first. This cmdlet can do that.
The above list isn’t quite exhaustive, but hits the most common and some of the less common items. I linked the help page for the cmdlet at the very top of this section so that you can discover many of these parameters easily. I’m not going to show you everything possible. I’ll demonstrate a few items.
Setting Hyper-V Virtual Adapter Quality of Service
Both the GUI and PowerShell are a bit clumsy for setting network quality of service, but overall, PowerShell is better. It’s also the only way to set QoS for virtual adapters in the management operating system.
If you’ve gotten this far, then you should already know how to select a virtual network adapter by -VMName or -ManagementOs and by -Name. You should also know how to use pipelining to select a virtual adapter by other criteria, such as its MAC address. I will only be showing such things incidentally in this section.
First, you need to know what QoS mode your virtual switch is in:
Get-VMSwitch -Name vSwitch | select BandwidthReservationMode
If it is Weight, then you can set the -MinimumBandwidthWeight parameter on its virtual adapters. If it is Absolute, then you can set the -MinimumBandwidthAbsolute parameter instead.
The weight mode is a percentage. To set a virtual adapter so that it can reserve up to 20% of available bandwidth:
Set-VMNetworkAdapter -ManagementOS -Name LiveMigration -MinimumBandwidthWeight 20
If you use Absolute, specify -MinimumBandwidthAbsolute as a numeric value with the minimum number of bits per second. According to the documentation, the number that you supply will be rounded to the nearest multiple of 8 and should be greater than 100Mbps.
For either mode, the upper QoS limit is specified in bits. You cannot set a percentage limit. I would recommend using the PowerShell multipliers. To restrict all adapters on a virtual machine to 250Mbps (separately):
Set-VMNetworkAdapter -VMName svtest -MaximumBandwidth 250Mb
Statically Assigning an Automatically Generated MAC Address to a Virtual Network Adapter
This is a little trick I use with my Linux virtual machines. I first turn them on so that they are automatically assigned a MAC address by the host. Then, I shut them off and run the following:
Get-VMNetworkAdapter -VMName svtest | % { Set-VMNetworkAdapter -VMNetworkAdapter $_ -StaticMacAddress $_.MacAddress }
Whatever MAC was dynamically assigned is now the permanently assigned static MAC address.
Use PowerShell to Set a Virtual Network Adapter’s VLAN
Use Set-VMNetworkAdapterVlan to control the VLAN for a virtual network adapter. I’m again going to assume that you read the above and know how to select a virtual network adapter with -ManagementOs and -Name or by -VMName and, if necessary, pipelining and ?/where.
Assign a virtual network adapter to a specific VLAN:
Set-VMNetworkAdapterVlan -VMName svtest -Access -VlanId 42
Remove a virtual adapter from all VLANs:
Set-VMNetworkAdapterVlan -ManagementOS -VMNetworkAdapterName Management -Untagged
Warning: Never assign a VLAN ID of 0. If the cmdlet were better designed, it would generate an error when you try, because the only valid VLAN IDs are from 1-4096. VLAN ID 0 is undefined — an all-zero VLAN tag is only used across trunk ports and is treated as the native or default VLAN on devices that support it. Hyper-V does not know how to handle a virtual network adapter with a 0 VLAN ID and traffic will not flow.
I’m not going to demonstrate the Promiscuous, Isolated, and Community mode settings, mostly because I think that 99% of the people that try to use them don’t understand what they do and don’t actually have a use case for their true purposes. A Hyper-V network adapter in promiscuous mode does not capture frames headed to other network adapters. These modes are used in extended VLANs only. If you understand what those are and have a need for them, run Get-Help Set-VMNetworkAdapterVlan -Examples to see how to use the related parameters.
Use PowerShell to Rename a Virtual Network Adapter
Only PowerShell can be used to rename a virtual network adapter, but the selected name will show up in most GUI tools that can see the adapter. As with the previous two sections, I’m not going to reiterate how to select the adapter that you want to change.
Rename-VMNetworkAdapter -ManagementOs -Name Cluster -NewName ClusterCommunications
Use Hyper-V Manager/Failover Cluster Manager to Add a Virtual Network Adapter
These GUI tools can only be used to add adapters to a virtual machine. You must use PowerShell to add a virtual network adapter to the management operating system. The guest must be Off to add an adapter.
- In either tool, right-click a virtual machine and click Settings. You must use Failover Cluster Manager for clustered virtual machines.
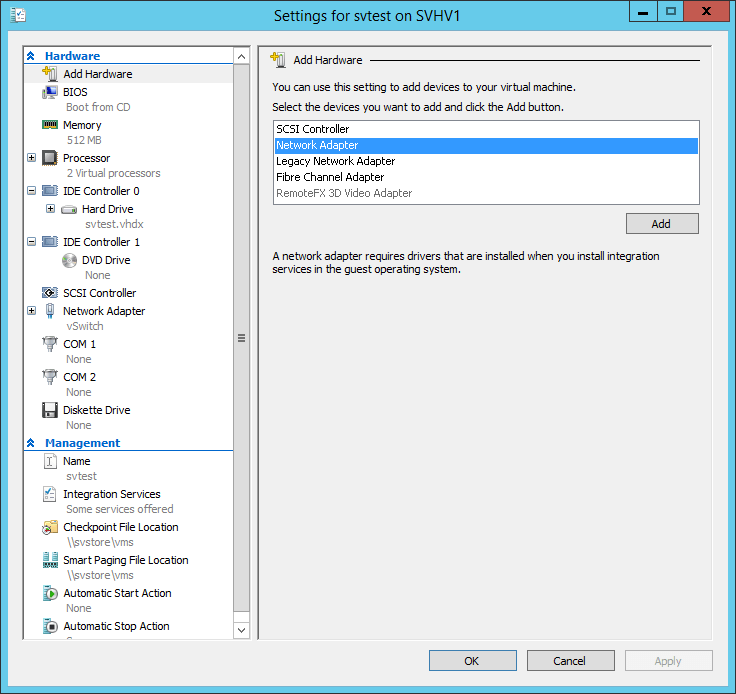
- The first screen that opens should always be the Add Hardware tab. Select that tab on the left if necessary.
- Highlight Network Adapter or Legacy Network Adapter (generation 1 VMs only). Click Add.
- You will be viewing the property page for your new adapter. It will not actually be created until you click OK or Apply. Click Remove or Cancel if you don’t want to add it.
Use Hyper-V Manager/Failover Cluster Manager to Modify or Remove a Virtual Network Adapter
- In either tool, right-click a virtual machine and click Settings. You must use Failover Cluster Manager for clustered virtual machines.
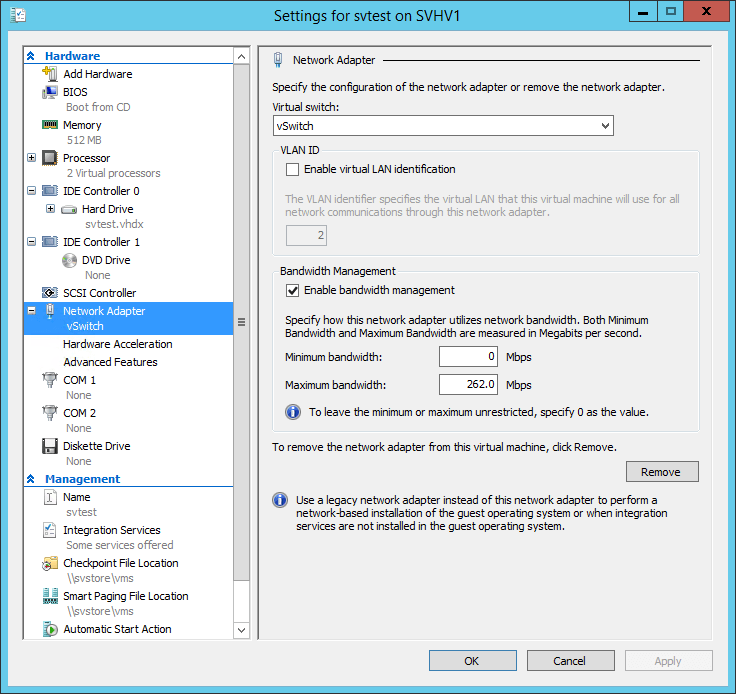
- On the left, you’ll see the virtual network adapter(s). By default, they’re all named “Network Adapter” or “Legacy Network Adapter”, although they might have been renamed. Look for the icon.
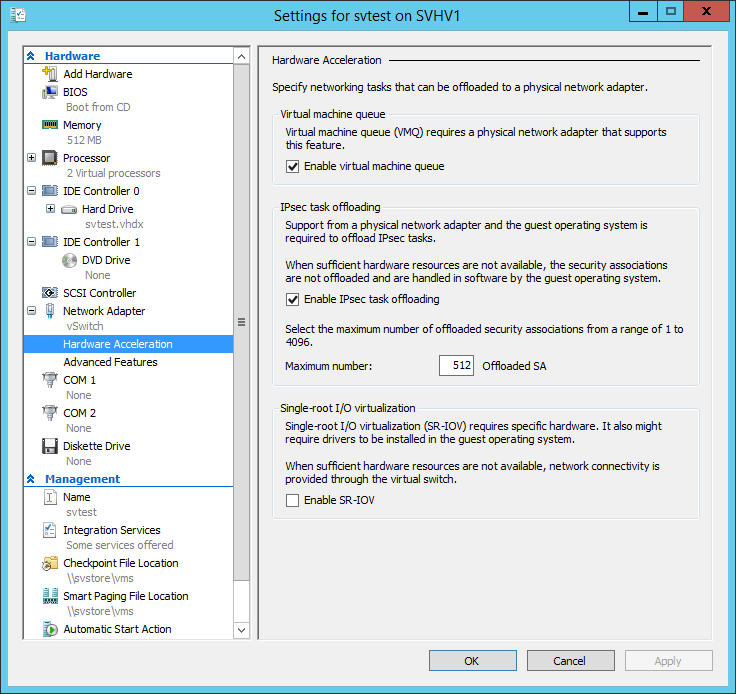
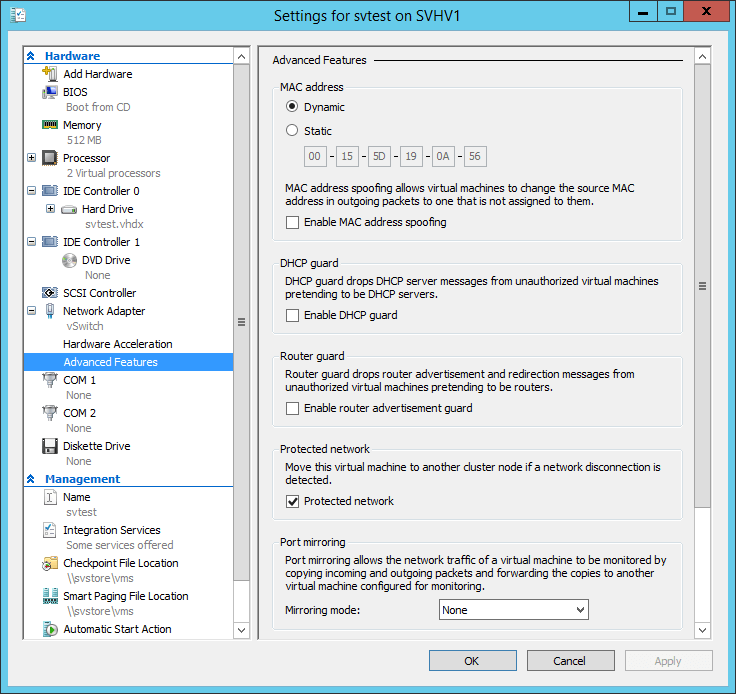
- The primary settings are on the first page that you land on. If you wish to delete the adapter, click Remove. Upon clicking OK or Apply, this removal is permanent! Other settings can be reached by expanding the item by click the small + icon next to the adapter on the left. All screens are shown below.
Most of these settings are very well-described in the dialogs. You can also refer to the PowerShell entries above, as these are graphical equivalents of those settings (a handful of items can only be set in PowerShell).
If your virtual switch is in Weight QoS mode, I recommend only using PowerShell to make adjustments. The dialog is worded only for Absolute mode and you will typically be unable to use it to set the minimum. I more strongly recommend avoiding setting QoS on individual VM network adapters at all. It’s rarely necessary.
If you don’t like PowerShell much but need to do bulk settings, you can use the GUI to configure a model adapter and then, with a little tinkering, use PowerShell’s pipeline to massively distribute those settings to other adapters. I’ll leave that for your exploration (there’s really no one-size-fits all method or I’d show it).


Not a DOJO Member yet?
Join thousands of other IT pros and receive a weekly roundup email with the latest content & updates!


40 thoughts on "How to Work with Hyper-V Virtual Network Adapters"
nice article! We use one big NIC-Team (2x10Gb) on each Host. all 1GB NICs are disabled or for iSCSI.
what is the difference between the method a)
Add-VMNetworkAdapter -VMName vm1 and
b) just go to settings in Vm1 and add Hardware->Network adapter?
thanks.
Two ways to do the same thing.
If working with Hyper-V Altaro Backup or Veeam and Target storage is also and SMB Server, then Backup goes over Management VLAN, right? No need for dedicated Backup VLan.
Qualified yes. The host chooses the optimal route to the backup server by its resolved IP.
I made a NLB with two Web Frontend Servers VMS. On the VM settings I activated MAC spoofing as recommendet. All worked fine. Now I activated IOV on the 10GB NIC from HPE (Team 2×10 Hyper-V Switch).
Since then eventLog says: VMx has MAC address spoofing enabled. This is not supported on the associated switchx 7because IOV is enabled. Traffic with a spoofed MAC address will not function properly.
What’s her the solution?
I’m not certain that there is a solution. You certainly can’t spoof the MAC using the Hyper-V tools for an IOV NIC.
You could try setting the MAC inside the guest OS. The properties for the NIC might have a “Hardware Address” field. You might need to change the vNIC’s properties in the host to enable teaming.
Whe you use Windows 2016 Enterprise Hyper-V Hosts only, is there a way to make all VLAN stuff in a way of ‘software defined network’ or is still a must to set Tags on Switch Level.¨
thanks.
https://docs.microsoft.com/en-us/windows-server/networking/sdn/software-defined-networking
Hi!
Thanks for the post, it’s very useful for me!
If I added more than one VM Network Adapter via GUI, all adapters are added with same name- “Network Adapter”. If I try to rename one of them, using Rename-VMNetworkAdapter -VMName “MyVM” -Name “Network Adapter” -NewName “Adapter1” then all adapters with name “Netwotk Adapter” are renamed to the newly typed name.
Is there any way to select exactly which adapter from a list of adapters with same name, I want to rename?
Thanks!
The article contains multiple examples of using Get-VMNetWorkAdapter to select exactly the item that you want. Pipe its output to Rename-VMNetworkAdapter.
When working with Teams, what is the difference between adding VMNetworkAdapters to a vSwitch in PS vrs using the Configure Team GUI to create Team Interfaces to the Team and using the Team adapter in a vSwitch?
It’s not supported to mix multiple team adapters with a virtual switch. It can work, but the QoS and VLAN behavior gets really confused and behaves unpredictably. A team with a vSwitch should have only the default team adapter. Use vNICs for anything else.
Hi, I don’t think he was asking what you addressed.
In response to what was asked, I think there is no difference if you use the ps cmdlets to create a like for like switch as you would in the GUI, i.e. smae Teaming mode and Load balancing mode.
Hi,
When I enable MAC Address Spoofing in HyperV Manager (vNIC settings tab), VMQ is no more active on the Virtual Adapter. Is it expected behavior?
I had not noticed that before, but yes, it does seem logical to me. VMQ is a hardware offload and MAC spoofing is a software intercept, so the queue would get confused on how to deliver frames.