Save to My DOJO
Table of contents
- What is Windows Subsystem for Linux?
- How to Install Windows Subsystem for Linux
- How to Install Linux Distributions from the Microsoft Store
- How to Install Linux Distributions for WSL Without Using the Store
- Additional Reading for WSL Installation
- Running WSL for the First Time
- First Steps with WSL
- Transferring Files Between Windows and WSL
- Notes on Using WSL
- Striking Out on Your Own
Microsoft continues to impress with its expanding support for Linux. The Windows Subsystem for Linux (WSL) debuted unexpectedly and with little fanfare in the Windows 10 Anniversary Update. It had severely limited capabilities and could only operate the Ubuntu distribution. Microsoft has worked steadily to strengthen the product with additional features and an expanding distribution library. Take it for a spin and see how Microsoft has changed the Windows/Linux equation from an either/or to a both/and.
What is Windows Subsystem for Linux?
The Windows Subsystem for Linux allows the Windows kernel to process system calls intended for the Linux kernel. WSL runs natively as a component of Windows — no virtualization or emulation layer necessary. That confused me at first, as most of the Microsoft employee names that I saw attached to this project also have at least some connection to the Hyper-V team. Although I don’t know how all that worked out behind the scenes, WSL does not require Hyper-V.
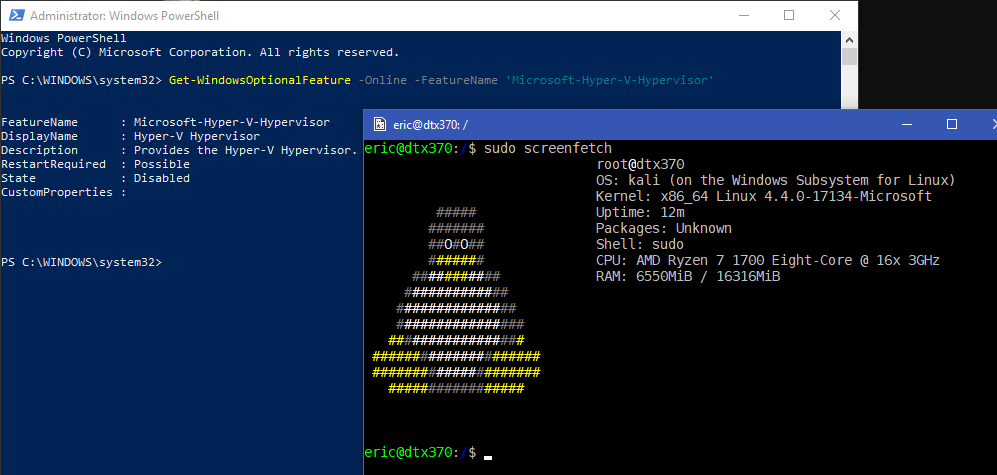
That picture shows WSL running natively without Hyper-V. Take note of the output from screenfetch. Look at the value for OS and kernel.
Keep in mind that the word “subsystem” has a specific meaning. WSL provides only the capability of running programs compiled for a Linux environment — it does not provide a Linux environment or anything related to a distribution. In the same way that the print subsystem still requires you to buy a printer and the disk subsystem still requires you to attach storage, you need to bring a Linux distribution for WSL to use.
How to Install Windows Subsystem for Linux
In an elevated command prompt on any platform that includes WSL (DISM feature names are case-sensitive):
dism /Online /Enable-Feature /FeatureName:Microsoft-Windows-Subsystem-Linux
Alternatively, use the following line of PowerShell:
Enable-WindowsOptionalFeature -Online -FeatureName 'Microsoft-Windows-Subsystem-Linux'
For Windows Server 2019 or a current version of Windows Server Semi-Annual Channel, you can also use this PowerShell:
Install-WindowsFeature -Name Microsoft-Windows-Subsystem-Linux
You will need to restart your computer before you can use WSL.
How to Install Linux Distributions from the Microsoft Store
You won’t get much out of WSL without a distribution!
On systems that have access to the Microsoft Store, start off by searching for the keyword “Linux”:

You will find a whole page of distributions (maybe more than in the screenshot by the time you read this):
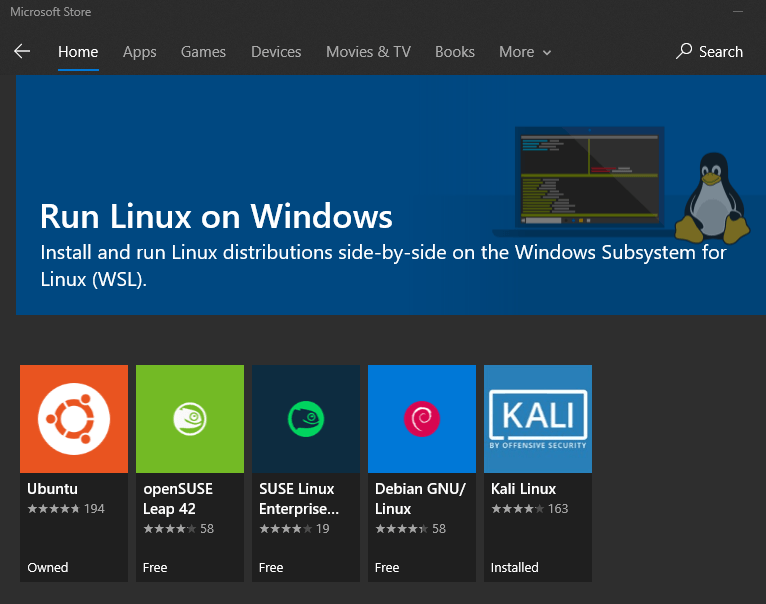
Pick the one(s) that you like. They install like any other store application. They’ll get icons and show up in the Start menu.
How to Install Linux Distributions for WSL Without Using the Store
Not all Windows systems can access the Microsoft Store, and you might have reasons to avoid the Store on systems that can.
First, you need to select and download your distribution(s) of choice. You can find the list and instructions on Microsoft’s docs site. You can save these to a portable location for use on systems that you don’t want to access the Internet.
Once you have a distribution, you’ll need to unzip it. I’m sure you know how to do that in the GUI. In PowerShell, use Expand-Archive: Expand-Archive -Path c:pathdownload.zip -DestinationPath C:existingoutputfolder
Check the contents of your extracted folder for an .exe or an .appx. If you have an .exe, you can use it on any system that runs WSL. If you have an .appx, you can only use it on systems that provide the full desktop experience (i.e., not Windows Server SAC).
For .exe distributions, run the .exe that you found: C:existingoutputfoldernewdistro.exe
For .appx distributions, install the package from PowerShell: Install-AppxPackage -Path C:existingoutputfolderdistroname_ext.appx. Your new distribution will have icons in the Start menu and function like a normal application.
Additional Reading for WSL Installation
I have provided only a partial-page-length crash course on WSL installation. Microsoft has more detailed instructions spread across various pages. You might find them a bit terse, but functional.
- WSL Introduction Page. You will find a number of other pages here covering several topics beyond what I intend to talk about.
- Installing WSL on Windows 10
- Installing WSL on Windows Server (no Microsoft Store)
- Install a Linux distribution not packaged for WSL
I have not yet attempted to install anything except distributions provided through Microsoft’s links. Last time I tried, Kali only shipped in appx which prevented me from using it on Windows Server SAC. Someday I would like to try the directions in the last link to repackage it. If you have already done so, I’d like to hear from you.
Running WSL for the First Time
As soon as you initiate a newly-installed distribution, it will complete installation inside the environment:

Once it starts, you’ll provide a username and password combination:
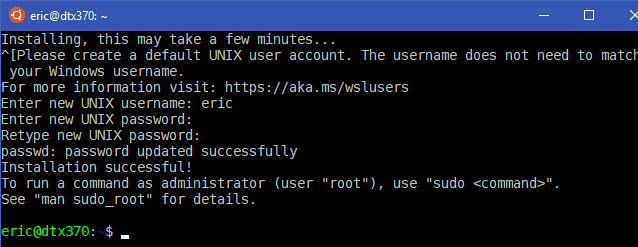
It will take you to a prompt with your new username @ the name of the owning Windows system. From now on, when you start this distribution, it will take you to that prompt.
First Steps with WSL
From here, you have your selected distribution running in WSL. Hopefully, you know how to use Linux or you won’t enjoy this experience.
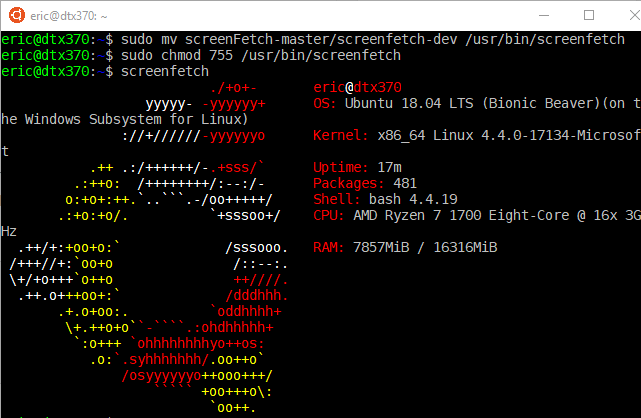
First, let’s have a bit of “fun”. All of the demonstrations I’ve seen for WSL include a shot from screenfetch. I never knew how to use screenfetch and they never demo that part. The distributions that I’ve used will download screenfetch from their repositories, but it never works for me. Try these commands, substituting the package manager call (apt-get here) for whatever works on your system as necessary (borrowed from a Tecmint article, but improved to work):
sudo apt-get install unzip
wget https://github.com/KittyKatt/screenFetch/archive/master.zip
unzip master.zip
sudo mv screenFetch-master/screenfetch-dev /usr/bin/screenfetch
sudo chmod 755 /usr/bin/screenfetch
From now on, anytime you run screenfetch, you get a little colorized ASCII art showing off your distribution in WSL:
Transferring Files Between Windows and WSL
WSL lives in your account’s AppData folder. If you dig, you’ll find it. Do not modify anything that you find there! The filesystems that Linux use have much different rules than Microsoft’s. In order to keep everything flowing, WSL does all the work necessary to make the distribution see the file system that it expects. If you make changes from the Windows side, you have no guarantee that the distribution will continue to function.
Instead, operate from within WSL. It mounts your Windows partitions from the root level so that you can move files in and out easily.
View your filesystems with df:
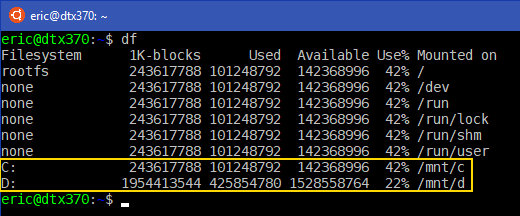
The traditional directory and file manipulation tools work just fine, although I’d stray from doing things like running chmod against files on the Windows side. Also, WSL cannot work with files or directories unavailable to the user account it runs under.

Copy files in and out of WSL as necessary, but avoid unnecessary cleverness.
Notes on Using WSL
A few additional notes on WSL:
- WSL was designed for developer use. It does not replace a proper production Linux system.
- You will not find a lot of support. You can look up and report issues on the WSL Github page. The Github page exists only for reporting and aggregating other links. Microsoft did not open source WSL.
- You can use X servers with varying levels of success. I recommend starting on the Awesome WSL page for more information.
- Do not forget the “Subsystem” in WSL. You get the alternative shell and the ability to run executables intended for the Linux kernel. However, your operating system is still Windows. You will not have luck with deeper things, such as daemons.
- Microsoft continues work on WSL, so all things may change. They might even get those daemons to operate.
- Multiple WSL instances have simply died on me. I do not have any idea why. I would not consider WSL a completely finished, stable product. If you need a “real” Linux environment, use a full virtual machine.
- Uninstalling a distribution wipes it out. If you need to save anything, do that in advance.
Striking Out on Your Own
Microsoft has no set purpose for WSL. Like many other ideas of its kind, the community tends to find uses that never occurred to the developers. I have found a handful of my own uses, some of which I intend to share in future articles. I look forward to hearing what you do with yours.
If you want to take your Windows Subsystem for Linux learning to the next level, why not post a question on the Hyper-V Dojo Forum?
[thrive_leads id=’17165′]


Not a DOJO Member yet?
Join thousands of other IT pros and receive a weekly roundup email with the latest content & updates!


2 thoughts on "Windows Subsystem for Linux: Getting Started"
This article explains what WSL pretty clearly. Much appreciated. As a 50/50 Linux/Win admin, this sort of, kind of, looks analogous to Wine, where the Linux subsystem includes things which allow you to run Windows apps in Linux without virtualization. MS’s answer to Wine, perhaps?