Save to My DOJO
Virtual-to-Physical conversion is a very rare procedure, but the need does sometimes arise. This guide will help you if you find yourself in need.
The Scope of this Article
This article is presented to you as a tool for performing virtual-to-physical conversions because it is universally applicable to any target hardware environment. However, because it is target-neutral, the steps presented here could very easily be adapted to other situations. For instance:
- Virtual-to-virtual conversions for which there is no applicable tool
- Physical-to-virtual conversions
- VHDX-to-physical conversions
Why Would I Perform a Virtual-to-Physical Conversion?
While none of these events are common, there are quite a few reasons that you’d want to revert from a virtual environment to a physical one:
- You have a virtual hard disk file (VHDX) that you’d like to convert to a physical drive
- The deployment is not suited for a virtual environment
- Your vendor kicked you off of support because they are still ignoring Hyper-V
Virtual-to-Physical Conversions are Not Ideal
My first recommendation is: find another way. Even though V2P is possible, it has a fairly high chance of being unsuccessful even with your best effort. A preferred approach would be migration. Install the desired operating system on the new hardware and migrate settings and applications. Most software vendors have a documented method for performing this. You are almost guaranteed to prefer the process and results over a V2P.
If you’re using Hyper-V Server and you’re converting a VM running a recent version of Windows, you could install the OS on the physical hardware and then mount the VHDXs directly inside the new operating system and transfer files via copy, xcopy, robocopy, Windows Explorer, etc..
Next, consider looking into third-party conversion applications. They won’t come without a cost, but their price tag may be well worth your time and sanity.
Getting Started
The very first thing you must do is take a complete backup of the machine to be converted. You are going to absolutely rework this machine from bottom to top, things are almost definitely going to go wrong, and your sole saving grace will be a good backup.
Next, make certain you know the user name and password of a local administrator. It may or may not have network connectivity when you first boot it up and cached credentials may or may not work.
Hardware Neutralization
The biggest challenge in V2P is hardware drivers. Driver issues, such as mismatches of loaded drivers to present hardware, are the things that very, very nasty blue screen errors are made of. So, to try to reduce those as much as possible, we’re going to try to get the hardware in as generic of a condition as possible. The restriction in this process is that, depending on your exact approach, you may not be able to move drives on the virtual SCSI chain because the contents of those drives are only available when an enlightened operating system is booted. This article will use a current version of Clonezilla, which does not have this restriction. If you’re not so lucky, you may not be completely out of luck. If you have room, just move the drives to the virtual IDE chain for the duration of this process. Once you have the new system set up, you can mount any VHDs you had to leave behind and transfer contents that way.
Remember, you must match BIOS-mode hardware to Generation 1 virtual machines and UEFI-mode hardware to Generation 2 virtual machines! You cannot transfer across these boundaries!
Complete neutralization may not be strictly required, especially if you are using a recent operating system. However, with an ounce of prevention being worth what it is, and the fact that it certainly won’t hurt anything, it’s a good idea. Every step that you skip in this process increases the likelihood that your conversion won’t work.
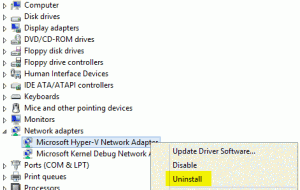
First, remove all static IP information from any virtual adapters. They won’t travel to the destination machine’s adapters anyway so getting them out of the way is best. Just set them to DHCP. Then, if it’s a Windows machine, go into Device Manager and uninstall the adapter.
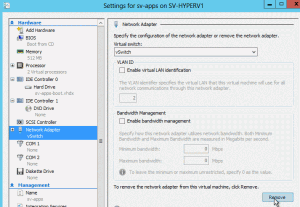
Shut the VM down (don’t reboot). Remove the virtual adapter using Hyper-V Manager (you can also use Remove-VMNetworkAdapter in PowerShell).
Start the VM up again. For older operating systems (pre-2008/Vista), remove Hyper-V Integration Services. If they’re removable, they’ll show up as a regular uninstallable program. The Integration Services are part of the default installation for 2008 R2 and later and cannot be removed — they will be automatically handled so don’t worry about them. For non-Hyper-V hypervisors, check with your vendor for identification of their “enlightments” removal process. If you removed them, reboot. If the guest OS is XP (and possibly 2003 as well), at least give this KB article a read-through.
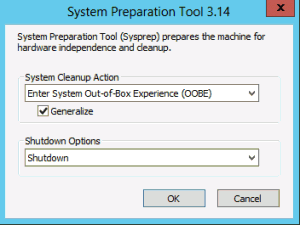
Run SYSPREP: At an elevated command prompt or the Run menu, execute C:WindowsSystem32SysprepSysprep.exe. Sysprep is a little different across the various iterations but the unifying goal is to generalize the installation for a new install and then shut the virtual machine down.
Now you have a virtual machine that is about as hardware-neutral as possible.
Convert To and Transfer an Image
Your virtual machine should be off before proceeding. You’ve got a clean virtual machine, but what you need is a clean image. The easiest way to proceed from here will be to use some form of imaging software. There is any number of solutions available, but these directions will use Clonezilla Live. If you have some other product, the process should be similar.
There are two basic methods to perform a clone. One is over the network, the other is is by hard drive transfer. I’ll show you the basic setup operations for each method, and then in the next section, I’ll go through running Clonezilla with appropriate branches to fit your method.
Network Transfer
With Clonezilla, there are a couple of ways to perform an over-the-network transfer. One is to use a DRBL server. I’m not very good at that so I’ll just say, read the manual. If this isn’t the sort of thing you’re going to do very often, DRBL is overkill anyway. The second method is to plant an image file on a share point. The third way is to have the source system ship the bits directly to a target system.
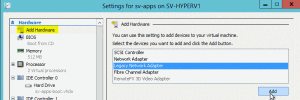
To use network transfer, you’ll have to add an adapter to your virtual machine. For any untested cloning application or if you plan to use PXE, this must be a legacy adapter. If you’re going to use Clonezilla, you can install a standard virtual adapter. Either way, since you followed all the steps in the previous section precisely and to the letter and your virtual machine no longer has an adapter, add the adapter of your choice:
Don’t forget to set the VLAN, if one is necessary. Why did I have you remove the adapter just to put it back? Because as of now, the guest operating system doesn’t know about the adapter, so when it arrives at the destination it won’t panic about its adapter having gone missing.
Disk Transfer
In the disk transfer method, you’ll attach a VHD to the virtual machine and have Clonezilla save an image on it. You will not want to perform a disk-to-disk transfer, as that won’t result in any different than what you have now. This method is most useful if you have an external hard drive that you can attach to the target physical system, otherwise, you’ll have a hard time getting the data to the target.
The VHD[X] you attach must be at least a little bit larger than the combined sizes of the actual data size of the existing disk files. If you don’t have any idea how much space is actually on those disks, just go big and use a dynamic disk. This won’t be a permanent drive anyway. Make sure that you don’t boot to the installed OS while that disk is attached, though, or it will be cranky when it wakes up at the destination and the disk isn’t there.
The VHD you use must be formatted. Just attach it to another system (the hypervisor itself is fine), format it, and then detach it.
Performing a Clonezilla Transfer
Download the Clonezilla Live CD image, attach it to the virtual machine, and boot to it. Don’t worry about any error messages you see, everything is going to be fine.
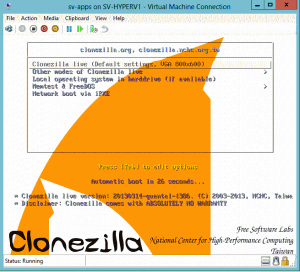
On the welcome screen, just accept the default of “Clonezilla Live” or wait out the timeout.
The first screen after the welcome is for language, arrow up or down to yours and press [Enter]. You’ll probably want to accept the default keymap setting and press [Enter]. Press [Enter] on Start_Clonezilla. Here, we reach our first point of divergence. You will use “device-image” if you are going to create an image file on a locally attached disk or if you are going to transfer it to a network share point. You will select “device-device” if you will set this system as a server and have the target connect to it.
Device-Image
After choosing device-image, you’ll be greeted with the following screen:
I’ll first show you how to transfer to a Windows network share as that’s really the easiest. The section after will show how to transfer to a local disk. If you have them, you can also send the image to an SSH server or an NFS server (not explained in this article). For Windows or a *nix target running Samba, select “samba-server”.
Device-Image to Network Share
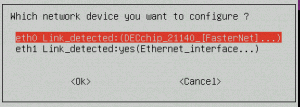
Next, you’ll be asked to select the network adapter to use. Since you have followed all previous directions precisely, you have only one option. Since I’m writing this article, I have two (solely for demo purposes, of course). The first is a legacy adapter and the second is a synthetic adapter:
Upon selecting the adapter, you’ll next need to choose whether to place the adapter in DHCP or static-assigned mode (or PPPoE, which I won’t cover). If a DHCP server is available, that will probably be the best option for when you’re targeting a network share, since you don’t really care what the IP is. If you’re going to have the physical target connect to this system, you may want to go with static IP so you don’t have to hunt around for it later. The DHCP selection is very easy so we’ll talk about the static screens.
After selecting static, you first have to enter an IP address. In case it’s not obvious, it has to be a valid and unused IP on your network. If the VM was using a static IP, go ahead and use that here. It won’t miss it. The next screen asks for the network mask, then the gateway, and finally for a nameserver (DNS).
After configuring the network, it will ask you for the IP or the FQDN of the server hosting the share point. You’ll then need to provide the domain; this will be applied to the account used to access the share point, so what you put here will depend on the share point’s security settings. You can leave it blank if you want to use local security Next it will ask for an account; this will be combined with the previous field so you only need to use the account name, not “domainaccount” or anything like that. Next, it will ask for the target folder; for a Windows Server, this is the actual name of the share point. The leading “/” is required. Finally, you’ll need to provide a password. If all is well, you’ll see a screen showing you all the data points that Clonezilla can see (a lot of them are on the CD image, so don’t worry if they don’t make much sense). Press [Enter], and you’ll proceed to the actual cloning window. Skip ahead to the “Making the Image” section.
Device-Image to Local Disk
At the”Mount Clonezilla image directory” screen, choose “local_dev” and press [Enter] and then [Enter] again on the USB detection.
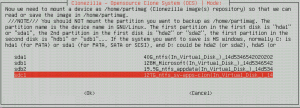
You need to be very cautious on this screen. What you pick here is the destination drive that the image is going to land on. If you pick the wrong one, the world won’t end, but a disk you wanted to copy is going to get the image (assuming it will fit), it won’t be copied, and the disk you wanted the image to be on is going to be empty. Fortunately, this one can see the volume names if you assigned any. I made a dynamically expanding disk with the default size (127 GB) for my demonstration, so it’s pretty easy for me to know which is which:
The next screen wants to know where in the folder structure to place the image. Since this is a dedicated drive just for this purpose, it’s OK to use the topmost directory. But, I suppose if you’re going to do this a lot, you might build up a VHDX just for this and have a full folder structure on it. I’m just going to push [Enter]. If all is well, you get to see the file structure. Don’t worry about it. Just hit [Enter].
Making the Image
Choose “Beginner” (if you’re not a beginner, why are you here?)
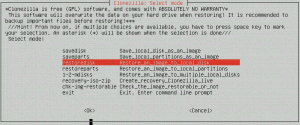
Choose “savedisk”. “saveparts” means “save partitions”, which means that you’d be in for a lot of headaches unless you know what you’re doing.
Next, enter a name to save the image. I’d suggest something including the computer name for easy identification later.
On the next screen, it can get interesting. You have to pick the disks you want to clone. The contents of this screen are probably downright cryptic. Hopefully, selection by size will work for you. One saving grace is that if you’re copying to a local disk, it won’t be an option here. To select or unselect a volume, arrow to it and press the spacebar. An asterisk in the brackets indicates that the item is selected.
Don’t check the drive for errors (just hit [Enter]). If you want Clonezilla to validate the image at the destination, that’s up to you. It will add some time to the operation. Upon pressing [Enter] on this screen, Clonezilla will show you the command it’s going to run. So, if you’re going to do something crazy like this again, you can keep track of those commands and next time choose to use the Clonezilla shell and save all those screens. Press [Enter] again and watch the information scroll by. Once it’s confirmed everything is ready for launch, it will give you one last chance to come to your senses. If this is really what you want to do, press [Y] and [Enter] and wait…
When it’s all done, you can simply power the VM off, or you can press [Enter] and then [0], and after the count-down [Enter] again.
Restoring the Image
If you used the local disk method, the first thing you need to do is get the image to a location that the target computer can access. Attach the VHD to the hypervisor or copy it to another physical system and attach it there. Plug in a portable USB drive with enough capacity to hold the image. Copy the image file to the portable USB drive.
Performing the restoration is extremely simple. You just follow the exact same steps that you did to create the image in the first place. However, when it connects to the image storage location, it will detect the image file and give you a different menu:
Pick “restoredisk” and press [Enter]. Choose the image file (Clonezilla will have appended a timestamp and the saved disks) and press [Enter].
Next, you’re going to choose the target disks to restore to. I can see instances where this might be tricky if you don’t have a good match of the source to destination disks. In my case, I’m using a VM to restore back to so I had pretty good control over the way the machine looked. Your mileage may vary. If you’re having issues here, all I can say is, “Told you so”. Sorry.
Once you’ve selected your target disks, press [Enter] to confirm, and again once it’s shown you the command. Then press [Y] to start, and again at the sanity checkpoint. It will go through the process of restoring, which will look remarkably like the process of saving. When it’s done, you’ll wrap up the same way, although you may want to choose [1] for reboot instead of shutting down at the end.
Skip to the last section of this article, “Clean Up”.
Device-Device
With this method, you’re going to transfer to the target machine without an intermediary storage location. This method does have a couple of drawbacks. First, you can only move one disk at a time. You have to rerun the entire process for each disk. Second, and fortunately much more minor, you have to enter in a few lines at the command prompt. Don’t panic: they’re very simple and you’re shown very nearly exactly what to type. However, if it makes you skittish, you might want to follow the device-image options above.
Select the beginner method and press [Enter].
Select “disk_to_remote_disk” and press [Enter].
The next few screens will have you enter the IP addressing information for the local adapter. These screens should be fairly straightforward. They were discussed in a bit more detail in the Device-Image section above.
Pick the source disk to send on this transfer and press [Enter] and then [Y] to start waiting.
On the target machine, boot it up to the Clonezilla CD. Accept defaults all the way through to the “Start Clonezilla” menu. Instead of picking “Start Clonezilla” as before, now you’re going to pick “Enter_shell”. Then pick [2] to get to a command line.
If you have more than one disk in the target system, I recommend that you first run “fdisk -l” (that’s a little L, as in “list”) so you can see what they are called (it will show them as “/dev/sda” but all you care about is what’s after “/dev/”: sda, sdb, etc.) Now, check the source machine. It will show you exactly what to type in yellow text.
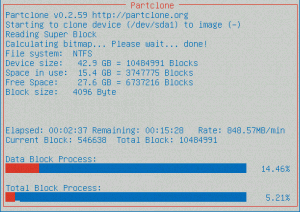
Each of these is one line. So, first type “sudo su -” and [Enter], then “ocs-live-netcfg” and [Enter]. This will detect the network adapter and let you enter IP information for it or set it to DHCP. You’ll be returned to the command line. Type in “ocs-onthefly -s whatever.IP.it.says -t sda“. When you hit [Enter], it will show you the metrics of the selected volume and force you to type in [Y] two times before it does anything. If it’s a bootable drive, you’ll have to hit [Y] at least two more times. Finally, you’ll be left at the transfer screen (see examples above).
You’ll have to repeat all of this section if there are other drives to be moved to the target.
Finishing the Job
And now we have reached the moment of truth. Remove the Clonezilla CD from your target system and fire it up. Hopefully, you’ll be able to log in. I would expect a fairly intensive rash of hardware detection and driver loading. You will probably have to load manufacturer drivers for the hardware in the target system. Make sure you have at least one completely clean reboot (where all you did was tell it to reboot, with no pending changes). Test the system very thoroughly to be sure that absolutely everything works.
Go back and delete the source virtual machine. You have a backup (or, you were supposed to, anyway), so you can restore it if it turns out your testing missed something. You don’t want someone or something accidentally turning that VM on and causing collisions with your successful V2P. It’s been traumatic enough. Now go have a beer. Or two.


Not a DOJO Member yet?
Join thousands of other IT pros and receive a weekly roundup email with the latest content & updates!






89 thoughts on "How to Perform Virtual-to-Physical Conversions (V2P)"
V2P is probably something we don’t do in our normal days but thanks for your detailed post. It’s certainly a great article to read and practice now either for the fun of it or to prepare yourself for that special V2P day to come.
Thanks again Eric.
Sincerely,
Jay
We installed new build server under hyper-v 2016 and it performs very bad no matter how i try to enhance it. With old buid machine that is physical server build goes in 15 minutes.. with new VM under hyper-v 2016 build takes 25 to 30 mins. This is why i need to transfer VM into a physical server as hyper-v doesnt perform well enough. I don’t really need to do the conversion but for my own endless noisyness i have to try it. If it fails ill just install the box from scratch but like this there are certain times when you do need V2P 🙂
Cant ever see the need for a v2p – Unless of course you want a faster system in which case why not upgrade the vm server and allocate more resources or if a vendor didnt support installing a particular app on a vm.
I doubt it would ever be practical for an Exchange server or mission critical system but it would be fun to try!!!
Thanks Eric
Interesting As Ever Keep Em Coming!!!
Your CommAwesome article and a detailed one too. I have been thinking abt doing it and here it is. Will come handy should the need arise. Nice to go the opposite way…ie..V2P and not P2V.
Thanks you so much Eric. ents
I have the need for a V2P conversion. I am trying to install a linux distro which needs an internet connection. The installation process is unable to access internet and I was wondering if i could install it into a VM and convert it into a physical. Thnaks for the post but i wonder if it works for linux as well.
As for the transfer process, there’s nothing special about the guest operating system. Whether or not Linux will survive such a transition is something you won’t know until you try.
Excellent article! I have been searching for a V2P solution for a long time. Tried it (Win2012 on VMWare 5.1) and works fine!
My question is, as I am not a Linux expert, how can Clonezilla restore on a RAID controller?
Is there a way to load the controller driver into the Linux kernel or somewhere for Clonezilla to find and load?
Unfortunately, I’m not a Linux expert either. I did some searching for “clonezilla raid driver” and got a lot of hits. If you’ve got a specific controller in mind, try searching for that and seeing if anyone already has the answer.
Do you know if this will cause the license issue when you change certain hardware items in Windows 8.1 to happen? Since you’re sysprepping the VM before imaging, I was just curious.
Thanks!
To which license issue are you referring? It will start looking to activate shortly after being brought online, if that’s what you mean. If it’s the rearm, then yes, it decrements the counter because I didn’t go through the business of using an unattend file with SkipRearm. But on Win8 I don’t usually worry about that.
Hi Eric;
I dont want to use clonezilla, I want to use everything with command on script. So, can I am gonna use “imagex” to do this, I mean that making V2P ? I know how to write bash scripting on Linux, but I am new on windows, I wanna learn scripting on Windows also, can you suggest me some links to do this ?
thank you,
Best regards,
Sibel
Hi Sibel,
Unfortunately, I do not know anything about imagex so I can’t help you there.
As for scripting Windows, you can start with this article: https://www.altaro.com/hyper-v/hyper-v-powershell-part-1/. There is a “Primer” section with links to resources that are of great help.
Thanks for this post.
Thank you Eric for the article.
I do possibly have a need to perform a V2P as some of my VMs run well but they do freeze every certain amount of time then continue as nothing happened. I cannot locate the reason for this and the same does happen on other systems that I look after.
I do welcome any suggestions of where the cause of the interval freezing of the VM to try to resolve before I migrate back to physical units.
thanks.
How long do they freeze? I would start a performance monitor trace on the host, specifically looking at disk metrics. Watch queue depth and IOPS. You might be saturating your storage I/O. If it’s so bad that they freeze, you might find clues in the host’s system event log.
Hi Eric, it’s been long time since you wrote this post but for 2018 it is still useful (despite of the fact I’m a proficient Linux user so I know Clonezilla) your Post was very very detailed so Thank you so much. I would like to add something that might be useful for anyone seeking to perform this on a Raid setup, I needed to do V2P but the server which was going to be the new host had an HP 410 Raid controller and as you may guess I got a huge blue screen after performing all the steps here but my logic told me it was ’cause of the missing Raid Drivers so I did a little research on how to “inject” the drivers from the recovery console (given that I was able to boot into the recovery console of the OS, that means no media was required to boot in this mode), and I found a really nice suggestion, I used the dism tool as follows:
1. Started the server and as it has already failed to boot up it will give you the option (as default) to boot up into the recovery environment (for this you are going to need a local admin account and password you should know).
2. Once in the recovery environment, used the command prompt to execute the following:
2.1 diskpart (to manage the disk/volumes inside the disk)
2.2 Once in diskpart I typed: list volume (Did this to know exactly what drive letter was assigned to the main OS volume)
2.3 Exit (to exit diskpart)
3. Then as I already have the info with the drive letter of the OS I executed the following command:
dism /Image:D: /Add-Driver /Driver:F:HP410 /Recurse
Note about dism:
/Image means where is the image you want to inject the drivers to
I’ve used an USB to store the extracted drivers and put them on a folder called HP410 so that’s why the command shows that route.
After executing the command I received the successful message I was waiting to receive.
4. I powered off the server, disconnected any USB disk attached to the server, prayed a little bit, powered on the server again and… Yeah! The server started and everything went as smooth as expected.
I love getting notes like these! Thank you for improving the article, and glad that your story ended well!
This worked perfectly! Still amazing in May 2019!
Thank you very much!
I needed to convert a VM that process video in an IPTV lab environment. But physical works so much better for video.
A person absolutely does more than visitors’ targets. Thanks a lot pertaining to making these valuable, trustworthy, edifying as well as neat ideas on the niche to help Kate.
Should I be worried about possible residual files from the VM image? For example, I do not want to have any unnecessary files from when the image was created on VMWare Workstation?
Will this new physical image be identical to a “never been a VM image” image?