Save to My DOJO
Microsoft’s Hyper-V hypervisor is an extremely powerful enterprise-ready hypervisor that has grown and matured in recent Windows Server versions. Hyper-V contains relative feature parity with other hypervisors on the market and allows businesses to maintain alignment with current Windows Server technologies they are already using on-premises and in the cloud.
One of the powerful features offered by Hyper-V is management with PowerShell. PowerShell is a relatively straightforward scripting language built on top of .NET. Utilizing .NET framework provides a fully object-oriented underlay that makes the language extremely robust. Combining Hyper-V and PowerShell features allows IT administrators to have the features and capabilities needed to configure, manage, and administer their Hyper-V environment. This post will feature the top 10 PowerShell commands for Hyper-V, why they are useful, and how to use them.
What is PowerShell?
For those who have not heard of or used Microsoft PowerShell, it is an object-oriented scripting language built on top of .NET framework. In the case of PowerShell Core, .NET Core is the underlying object-oriented language. PowerShell provides a very “human-readable” verb-noun construct that is relatively intuitive and easy to learn, even for beginners.
Even outside the Microsoft ecosystem, most solutions today provide PowerShell integration to provide easy automation and configuration. PowerShell’s command-line capabilities provide quick and easy ways to accomplish many tasks and actions in a much more efficient and effortless way than using the GUI-based counterparts.
Why Use PowerShell with Hyper-V?
Managing, configuring, and administering Windows Server Hyper-V on a day-to-day basis includes performing many different tasks. Like other hypervisors, Hyper-V provides the ability to carry out needed tasks in GUI tools that can be used with Hyper-V. What are the GUI tools that administrators typically make use of with Hyper-V? These include:
- Hyper-V Manager – Managing individual Hyper-V hosts, creating virtual switches
- Failover Cluster Administrator – The Failover Cluster Administrator tool is used to manage Windows Server Failover Clusters with the Hyper-V clustered role
- System Center Virtual Machine Manager (SCVMM) – Built on top of Microsoft System Center, SCVMM provides the “Cadillac” of features for managing Hyper-V clusters using GUI tools.
- Windows Admin Center – The newest GUI tool on the block. It provides robust GUI management of Hyper-V and Windows Failover Clusters. Certain management capabilities are not yet available in Windows Admin Center.
Outside of the GUI tools mentioned above, Microsoft has provided Hyper-V PowerShell cmdlets that allow interacting with Hyper-V hosts, clusters, and virtual machines with ease. PowerShell provides a quick and easy way to do many common tasks and activities from the command line instead of using GUI tools for the same purpose. Also, PowerShell provides a powerful way to automate your Hyper-V configurations. Using PowerShell, configurations and settings changes can be made consistently and accurately across many Hyper-V hosts simultaneously. You can perform management operations on multiple Hyper-V virtual machines and enforce configuration management to ensure the environment’s desired state.
While the Hyper-V GUI tools are valuable and useful for one-off management activities, effective and proficient Hyper-V administrators should be familiar with PowerShell commands for Hyper-V. These take managing and configuring Hyper-V environments to the next level of consistency and efficiency.
Installing Hyper-V PowerShell Cmdlets
How do you take advantage of Microsoft Hyper-V PowerShell commands? As with most PowerShell functionality, these are available by way of a PowerShell module. When you install the Windows Server Hyper-V Role, you want to make sure to also enable the Remote Server Administration Tools > Role Administration Tools > Hyper-V Management Tools.
As part of the Hyper-V Management tools that include Hyper-V Manager, you also get the Hyper-V PowerShell module installed to interact with your Hyper-V environment by using PowerShell. If you use Server Manager to install the Hyper-V Role, the Hyper-V Management Tools are found under the Features installation in the path mentioned above.
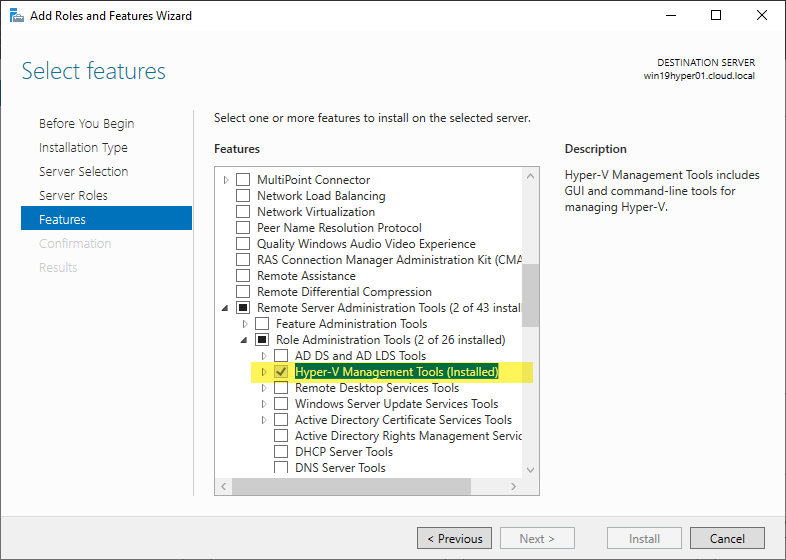
Installing the Hyper-V Management Tools including the PowerShell module
If you install the Windows Server Hyper-V Role using PowerShell, you will want to use the following cmdlet to install both the Role as well as the Management Tools.
Install-WindowsFeature -Name Hyper-V -ComputerName <computer_name> -IncludeManagementTools -Restart
If you are installing on the Hyper-V server itself, you can omit the -Computername parameter:
Install-WindowsFeature -Name Hyper-V -IncludeManagementTools -Restart
How do I run a PowerShell command?
Now that you have Hyper-V installed on a host and have the Hyper-V Management Tools installed, how do you run a PowerShell command? Microsoft has made this easy in recent versions of Microsoft Windows with easy access to the PowerShell command prompt. Windows PowerShell has been included natively in Windows versions since Windows 7 and Windows Server 2008.
The Windows PowerShell prompt is easily accessible in modern variants of Windows. Below is Windows Server 2019. When you right-click on the Windows button, you get the option for Windows PowerShell and Windows PowerShell (Admin). Launching either of these options will launch the PowerShell environment for interacting with Hyper-V PowerShell cmdlets.
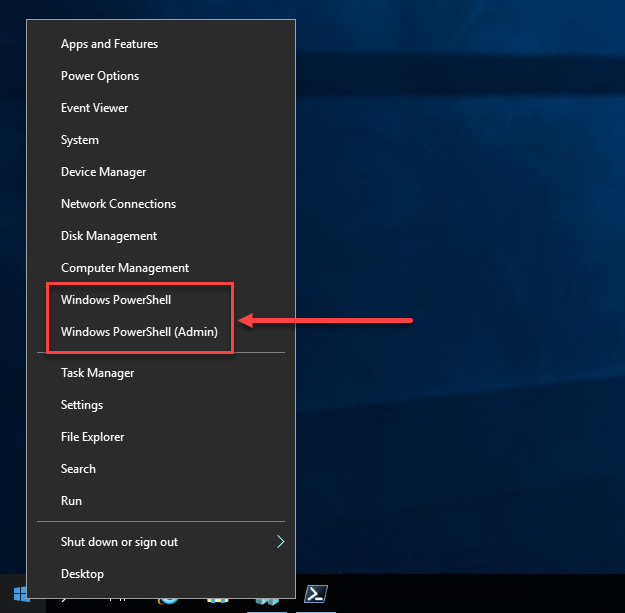
Windows PowerShell in Windows Server 2019
There is another option for running PowerShell and interacting with Hyper-V cmdlets. PowerShell Core is the newest version of PowerShell. It is not embedded by default in Windows operating systems like Windows PowerShell and is a cross-platform variant that can also run on Linux and macOS. It will provide the newest functionality and capabilities moving forward.
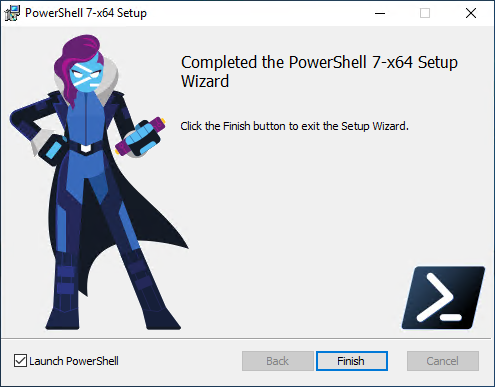
Installing PowerShell Core
You can use either platform to interact with Hyper-V PowerShell modules. Below is an example of running the same Hyper-V Get-VM cmdlet using either Windows PowerShell or PowerShell Core on the same server returns the same results. The PowerShell Core prompt has a black background and displays PowerShell 7.1.1. Windows PowerShell has a blue background.
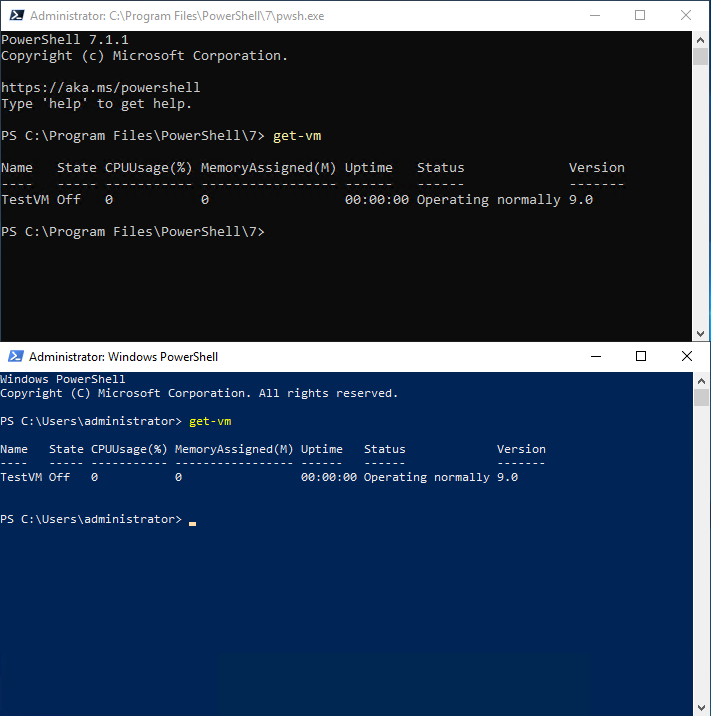
Comparing PowerShell Core with Windows PowerShell
Top 10 PowerShell commands for Hyper-V
PowerShell provides a tremendously powerful way to manage, configure, and automate Hyper-V environments. Using PowerShell for Hyper-V need not be intimidating or complicated. Often, it starts by merely learning a few PowerShell commands in the form of Hyper-V cmdlets that allow performing actions in the Hyper-V environment. Let’s start with the top 10 PowerShell commands for Hyper-V to begin forming the knowledge required to interact with Microsoft Hyper-V using PowerShell.
The top 10 PowerShell commands for Hyper-V include:
- Get-Help
- Get-VM
- Get-VMHost
- New-VM
- Start-VM
- Stop-VM
- Checkpoint-VM
- Measure-VM
- Export-VM
- New-VHD
We will look at each of the above PowerShell commands for Hyper-V to see what they are used for, how they are used, and other details regarding the cmdlets.
1. Get-Help
The Get-Help PowerShell cmdlet is not a specific Hyper-V PowerShell cmdlet. However, it is one that you need to be familiar with when working with Hyper-V or any other solution by way of PowerShell. The Get-Help cmdlet intuitively provides “help” to allow you to understand what a particular PowerShell cmdlet does, its syntax, and examples of how to use it. If you forget what a certain Hyper-V cmdlet does, you can use the Get-Help cmdlet to gather information about the cmdlet in question.
When you first run Get-Help on a server in a PowerShell session, it will ask you to run the Update-Help cmdlet.

Running Update-Help to ensure the most current version of get-help is installed
Below is some of the output of the Get-Help cmdlet as displayed in the PowerShell environment.
GET-HELP
The Get-Help cmdlet displays help at the command line from content in help files on your computer. Without help files, Get-Help displays basic help about cmdlets and functions. You can also use Get-Help to display online help for cmdlets and functions.
To get help for a cmdlet, type:
Get-Help <cmdlet-name>
To get online help, type:
Get-Help <cmdlet-name> -Online
The titles of conceptual topics begin with “About_”.
To get help for a concept or language element, type:
Get-Help About_<topic-name>
To search for a word or phrase in all help files, type:
Get-Help <search-term>
For more information about the Get-Help cmdlet, type:
Get-Help Get-Help -Online
EXAMPLES:
Get-Help Get-Process: Displays help about the Get-Process cmdlet.
Get-Help Get-Process -Online: Opens online help for the Get-Process cmdlet.
Help Get-Process: Displays help about Get-Process one page at a time.
Get-Process -? : Displays help about the Get-Process cmdlet.
Get-Help About_Modules: Displays help about Windows PowerShell modules.
Get-Help remoting: Searches the help topics for the word “remoting.”
2. Get-VM
One of the most basic and needed Hyper-V cmdlets that Hyper-V administrators will use daily as a top PowerShell command for Hyper-V is the Get-VM cmdlet. The Hyper-V hypervisor runs virtual machines. You use virtual machines in the environment to run workloads that house services, applications, and APIs. Getting information about your Hyper-V virtual machines in PowerShell allows working with the virtual machines on your Hyper-V hosts. The Get-VM PowerShell cmdlet does just that.
Below, running the Get-VM cmdlet returns the VM running on a Hyper-V host. You see information such as:
- Name, State, CPU Usage, Memory Assigned, Uptime, Status, and Version
- Using the | fl pipe, you see a bit more information, including the Memory Demand, Memory Status, VM generation, and Replication State.
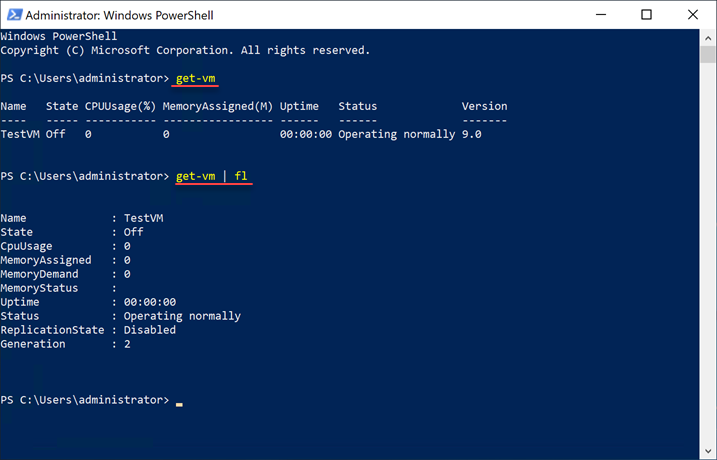
Output from running the Get-Help command on Get-VM shows the following.
NAME
Get-VM
SYNOPSIS
Gets the virtual machines from one or more Hyper-V hosts.
SYNTAX
Get-VM [[-Name] <String[]>] [-CimSession <CimSession[]>] [-ComputerName <String[]>] [-Credential <PSCredential[]>][<CommonParameters>]
Get-VM [[-Id] <Guid>] [-CimSession <CimSession[]>] [-ComputerName <String[]>] [-Credential <PSCredential[]>][<CommonParameters>]
Get-VM [-ClusterObject] <PSObject> [<CommonParameters>]
DESCRIPTION
The Get-VM cmdlet gets the virtual machines from one or more Hyper-V hosts
3. Get-VMHost
One of the basic requirements of managing a Hyper-V environment is getting information about your Hyper-V host. The Get-VMHost cmdlet is useful to get high-level information regarding the hardware and other features of your Hyper-V host. Just running the Get-VMHost cmdlet will return minimal information.

Get-VMHost cmdlet general information about the Hyper-V host
Below, using the Format-List or | fl pipe with the Get-VMHost cmdlet provides much more information returned regarding the Hyper-V host.
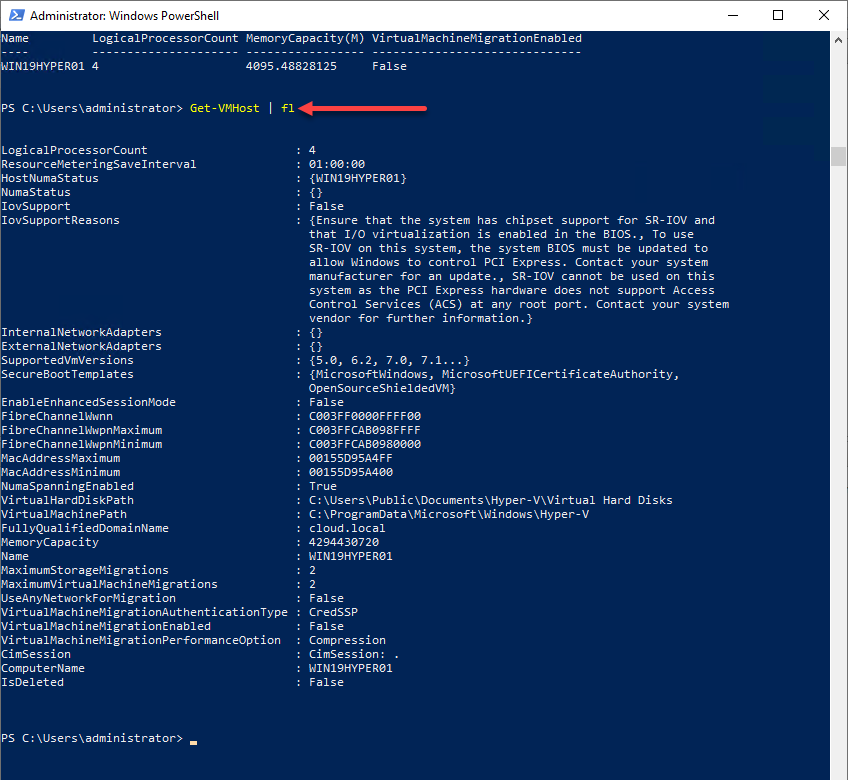
Get-VMHost with the Format-list pipe
NAME
Get-VMHost
SYNOPSIS
Gets a Hyper-V host.
SYNTAX
Get-VMHost [-CimSession] <CimSession[]> [<CommonParameters>]
Get-VMHost [[-ComputerName] <String[]>] [[-Credential] <PSCredential[]>] [<CommonParameters>]
DESCRIPTION
The Get-VMHost cmdlet gets a Hyper-V host.
4. New-VM
When working with Hyper-V, one of the tasks that administrators will be tasked with is created new Hyper-V virtual machines. It can be accomplished through the GUI tools mentioned earlier. However, a simple and straightforward way to create new virtual machines is to use the New-VM PowerShell cmdlet.

New-VM cmdlet creating a new Hyper-V virtual machine
With the New-VM cmdlet, you can create a new Hyper-V virtual machine and customize many aspects of the virtual machine in the process of creating it. Below is the output of the Get-Help New-VM cmdlet.
NAME
New-VM
SYNOPSIS
Creates a new virtual machine.
SYNTAX
New-VM [[-Name] <String>] [[-MemoryStartupBytes] <Int64>] [[-Generation] {1 | 2}] [-AsJob][-BootDevice {Floppy | CD | IDE | LegacyNetworkAdapter | NetworkAdapter | VHD}] [-CimSession <CimSession[]>] [-ComputerName <String[]>] [-Confirm] [-Credential <PSCredential[]>] [-Experimental][-Force] -NewVHDPath <String> -NewVHDSizeBytes <UInt64> [-Path <String>] [-Prerelease] [-SwitchName <String>] [-Version <Version>] [-WhatIf] [<CommonParameters>]
New-VM [[-Name] <String>] [[-MemoryStartupBytes] <Int64>] [[-Generation] {1 | 2}] [-AsJob][-BootDevice {Floppy | CD | IDE | LegacyNetworkAdapter | NetworkAdapter | VHD}] [-CimSession <CimSession[]>] [-ComputerName <String[]>] [-Confirm] [-Credential <PSCredential[]>] [-Experimental][-Force] [-NoVHD] [-Path <String>] [-Prerelease] [-SwitchName <String>] [-Version <Version>][-WhatIf] [<CommonParameters>]
New-VM [[-Name] <String>] [[-MemoryStartupBytes] <Int64>] [[-Generation] {1 | 2}] [-AsJob][-BootDevice {Floppy | CD | IDE | LegacyNetworkAdapter | NetworkAdapter | VHD}] [-CimSession <CimSession[]>] [-ComputerName <String[]>] [-Confirm] [-Credential <PSCredential[]>] [-Experimental][-Force] [-Path <String>] [-Prerelease] [-SwitchName <String>] -VHDPath <String> [-Version <Version>][-WhatIf] [<CommonParameters>]
5. Start-VM
Performing power operations on Hyper-V virtual machines is a crucial task involved with day-to-day Hyper-V administration activities. It includes powering on virtual machines either through a scripting process or using ad-hoc operations. The Start-VM cmdlet is the Hyper-V PowerShell command used to power on a Hyper-V virtual machine and allows it to boot.
Examples of the Start-VM cmdlet:
- Start-VM -Name TestVM3 – Starts the specific VM “TestVM3”
- Start-VM -Name Win* – This cmdlet syntax starts all VMs that start “Win”
NAME
Start-VM
SYNOPSIS
Starts a virtual machine.
SYNTAX
Start-VM [-Name] <String[]> [-AsJob] [-CimSession <CimSession[]>] [-ComputerName <String[]>][-Confirm] [-Credential <PSCredential[]>] [-Passthru] [-WhatIf] [<CommonParameters>]
Start-VM [-VM] <VirtualMachine[]> [-AsJob] [-Confirm] [-Passthru] [-WhatIf] [<CommonParameters>]
DESCRIPTION
The Start-VM cmdlet starts a virtual machine.
6. Stop-VM
As we have discussed above, the Start-VM cmdlet allows starting a Hyper-V virtual machine. The counterpart to starting or booting up a Hyper-V virtual machine is stopping the VM. To do this, you use the Stop-VM Hyper-V cmdlet. An important point to note is that the Stop-VM cmdlet has a few parameters that control whether the operating system’s shutdown is graceful or is not graceful. An ungraceful shutdown is similar to pulling the power plug on a physical server. Using the Stop-VM cmdlet covers a wide range of scenarios that provides granular control over how VMs are powered down.
With the Stop-VM cmdlet, graceful operating system shutdown depends on Hyper-V Integration Services being installed in the guest operating system. Hyper-V Integration Services provide enhancements and integration between Hyper-V and the guest operating system. It is required for actions such as graceful operating system shutdown signalling.
There are three examples to note with the Stop-VM cmdlet covering the range of virtual machine shutdown scenarios.
- Stop-VM -Name TestVM – When using the Stop-VM cmdlet with the name of the VM
- Stop-VM -Name VM1 -Force – Using the Force parameter invokes the five minute grace period to allow the operating system to save application data before shutdown gracefully. After the five minutes have elapsed, the VM is forcefully shutdown.
- Stop-VM -Name TestVM -TurnOff – This performs an ungraceful shutdown of the virtual machine similar to pulling the “power cable.”

Stop-VM and message regarding Integration Services
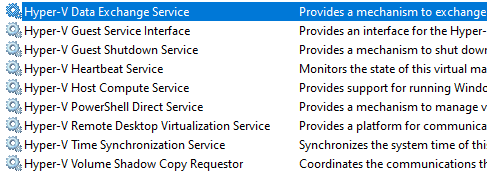
Integration services installed in Windows 10
NAME
Stop-VM
SYNOPSIS
Shuts down, turns off, or saves a virtual machine.
SYNTAX
Stop-VM [-Name] <String[]> [-AsJob] [-CimSession <CimSession[]>] [-ComputerName <String[]>]
[-Confirm] [-Credential <PSCredential[]>] [-Force] [-Passthru] [-Save] [-TurnOff] [-WhatIf]
[<CommonParameters>]
Stop-VM [-VM] <VirtualMachine[]> [-AsJob] [-Confirm] [-Force] [-Passthru] [-Save] [-TurnOff] [-WhatIf] [<CommonParameters>]
DESCRIPTION
The Stop-VM cmdlet shuts down, turns off, or saves a virtual machine.
7. Checkpoint-VM
One of the Hyper-V virtual machine features that has provided a paradigm shift in IT administrators’ capabilities is the Checkpoint mechanism. What is a checkpoint? In the early days of Hyper-V before Windows Server 2012 R2, checkpoints were called snapshots. Microsoft transitioned from the term snapshots to using the term checkpoints at that time. You can think of a Hyper-V checkpoint as a “picture” of the operating system and data at a particular point in time. Checkpoints allow creating an ad-hoc point in time “snapshot” of a server used for quick, short-term rollbacks. A prevalent use case for Checkpoints is for creating a rollback before installing software, driver updates, Windows Updates, or any other change made to the server that may introduce issues.
Microsoft Hyper-V has two types of checkpoints available for creation. These include the standard and production checkpoint. What is the difference?
- Standard – Standard checkpoints capture data, memory state, and hardware configuration settings for the Hyper-V virtual machine. Microsoft recommends this checkpoint type for test and development scenarios that need recreating. This type of checkpoint restores the server exactly when the checkpoint was created, including the memory state.
- Production – Production checkpoints are images of the production server. Microsoft supports these types of checkpoints for production use as they use VSS backup technology inside the guest to create the checkpoint and not the saved state method used in the standard checkpoint.
Examples of the CheckPoint-VM cmdlet:
- Checkpoint-VM -Name TestVM -SnapshotName BeforeUpdates
- Get-VM Test-VM Hyper1 | Checkpoint-VM
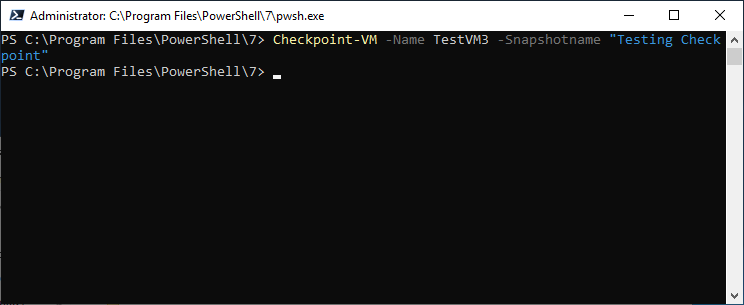
Creating a Checkpoint on a Hyper-V VM named TestVM3
The output of the Get-Help Checkpoint-VM cmdlet:
NAME
Checkpoint-VM
SYNOPSIS
Creates a checkpoint of a virtual machine.
SYNTAX
Checkpoint-VM [-Name] <String[]> [[-SnapshotName] <String>] [-AsJob] [-CimSession <CimSession[]>][-ComputerName <String[]>] [-Confirm] [-Credential <PSCredential[]>] [-Passthru] [-WhatIf][<CommonParameters>]
Checkpoint-VM [-VM] <VirtualMachine[]> [[-SnapshotName] <String>] [-AsJob] [-Confirm] [-Passthru][-WhatIf] [<CommonParameters>]
DESCRIPTION
The Checkpoint-VM cmdlet creates a checkpoint of a virtual machine. Note: In Windows Server 2012 R2, virtual machine snapshots were renamed to virtual machine checkpoints. For clarity, this document will refer to virtual machine snapshots as checkpoints.
8. Measure-VM
Collecting performance and other vitals from production virtual machines running on top of a hypervisor help provide key performance metrics for the applications, services, and other resources housed inside the VM. The Measure-VM Hyper-V cmdlet includes information on processor usage, memory usage, network traffic, and disk capacity running in Hyper-V.
It is essential to note the Measure-VM cmdlet relies on enabling resource metering for the Hyper-V virtual machine. You can allow Measure-VM resource metering using the Enable-VMResourceMetering.
NAME
Measure-VM
SYNOPSIS
Reports resource utilization data for one or more virtual machines.
SYNTAX
Measure-VM [-Name] <String[]> [-CimSession <CimSession[]>] [-ComputerName <String[]>] [-Credential <PSCredential[]>] [<CommonParameters>]
Measure-VM [-VM] <VirtualMachine[]> [<CommonParameters>]
DESCRIPTION
The Measure-VM cmdlet reports data on processor usage, memory usage, network traffic, and disk capacity for one or more virtual machines.
Note: Data is available for reporting through the Measure-VM cmdlet only after resource metering is enabled for a virtual machine.
The report has the following fields:
— ComputerName: The name of the virtual machine host.
— VMId: The unique identifier of the virtual machine.
— VMName: The friendly name of the virtual machine.
— HardDiskMetrics: Information about the performance and throughput of the storage subsystem.
— MeteringDuration: The duration over which resource utilization data is being reported.
— AverageProcessorUsage: The average processor usage, in megahertz, of the virtual machine over the period reported in the MeteringDuration field.
— AverageMemoryUsage: The average memory usage, in megabytes, of the virtual machine over the period reported in the MeteringDuration field.
— MaximumMemoryUsage: The maximum memory usage, in megabytes, of the virtual machine over the period reported in the MeteringDuration field.
— MinimumMemoryUsage: The minimum memory usage, in megabytes, of the virtual machine over the time period reported in the MeteringDuration field.
— TotalDiskAllocation: The maximum disk capacity, in megabytes, allocated to the virtual machine over the time period reported in the MeteringDuration field. For more information, see the ‘Notes’ following the field descriptions.
— NetworkMeteredTrafficReport: An array whose elements report the traffic through each NetworkAdapterAcl on the virtual machine or machines over the time period reported in the MeteringDuration field. Each array element has the following properties:
— NetworkAdapter: The virtual machine network adapter object on which the NetworkAdapterAcl has been configured.
— LocalAddress: for an inbound packet, the destination IP address in the packet header; for an outbound packet, the source IP address in the packet header.
— RemoteAddress: for an inbound packet, the source IP address in the packet header; for an outbound packet, the destination IP address in the packet header.
— Direction: the direction of the network traffic to which the ACL applies. Allowed values are Inbound, Outbound, or Both.
— TotalTraffic: the amount of network traffic, in megabytes, through the NetworkAdapterAcl.
Notes:
— The disk capacity allocated to the virtual machine is reported as the sum of two totals – the total storage capacity of all attached virtual hard disks, and the total amount of physical storage consumed by the virtual machine’s snapshots.
— If the virtual machine has more than one virtual hard disk, then the TotalDiskAllocation property displays the sum of disk capacity allocated to all virtual hard disks.
— Resource utilization is not reported for disks attached through a virtual Fiber Channel connection or network adapters configured to use single-root I/O virtualization (SR-IOV).
— If the virtual machine is configured with static memory rather than Dynamic Memory, then AverageMemoryUsage, MinimumMemoryUsage, and MaxiumumMemoryUsage metrics equals the memory amount configured for the virtual machine.
The default display of a resource pool resource utilization report includes the following columns:
— VMName: The name of the virtual machine.
— AvgCPU(Mhz): The average processor usage, in megahertz, of the virtual machine.
— TotalDisk(M): The average disk usage, in megabytes, of the virtual machine. For more information, see the ‘Notes’ following the field descriptions.
— NetworkInbound(M): Total incoming network traffic, in megabytes, to the virtual machine.
— NetworkOutbound(M): Total outgoing network traffic, in megabytes, from the virtual machine.
9. Export-VM
There will always be the need to export a Hyper-V VM to move the files to another environment or for other reasons. The Export-VM cmdlet allows a Hyper-V administrator to export a virtual machine to disk, including the virtual machine’s configuration, virtual disks, and checkpoints. The process will create three subfolders under the parent export folder housing the exported virtual machine’s various elements.
Examples of running the Export-VM cmdlet include
- Export-VM -Name TestVM -Path D:VMexports
- Get-VM TestVM | Export-VM -Path D: VMexports
- Export-VM -Name TestVM -Path D:VMexports -AsJob – The “AsJob” parameter will allow the export to run as a non-interactive job which is helpful since the export
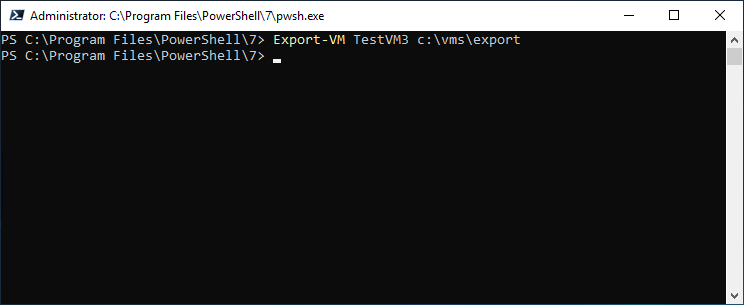 Using Export-VM for a VM to a specific folder
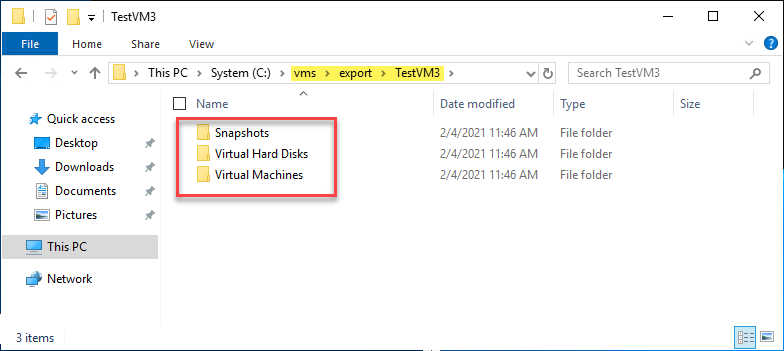
Navigating to the exported VM folder and various subfolders
The output from Get-Help Export-VM includes:
NAME
Export-VM
SYNOPSIS
Exports a virtual machine to disk.
SYNTAX
Export-VM [-Name] <String[]> [-Path] <String> [-AsJob] [-CaptureLiveState {CaptureCrashConsistentState | CaptureSavedState | CaptureDataConsistentState}] [-CimSession <CimSession[]>] [-ComputerName <String[]>][-Confirm] [-Credential <PSCredential[]>] [-Passthru] [-WhatIf] [<CommonParameters>]
Export-VM [-VM] <VirtualMachine[]> [-Path] <String> [-AsJob] [-CaptureLiveState {CaptureCrashConsistentState | CaptureSavedState | CaptureDataConsistentState}] [-Confirm] [-Passthru] [-WhatIf] [<CommonParameters>]
DESCRIPTION
The Export-VM cmdlet exports a virtual machine to disk. This cmdlet creates a folder at a specified location having three subfolders: Snapshots, Virtual Hard Disks, and Virtual Machines. The Snapshots and Virtual Hard Disks folders contain the snapshots of and virtual hard disks of the specified virtual machine respectively. The Virtual Machines folder contains the configuration XML of the specified virtual machine.
10. New-VHD
The final entry on the top 10 PowerShell commands for Hyper-V relates to creating virtual disks for Hyper-V virtual machines. When creating a Hyper-V virtual machine using Hyper-V Manager as an example does not give any options to customize the creation of the Hyper-V virtual machine hard disk type. By default, Hyper-V creates new virtual machine disks as dynamically expanding or thin-provisioned disks. If you want to create a VM with a fixed disk format or thick-provisioned, you have to use the new disk creation wizard in Hyper-V Manager, which is cumbersome.
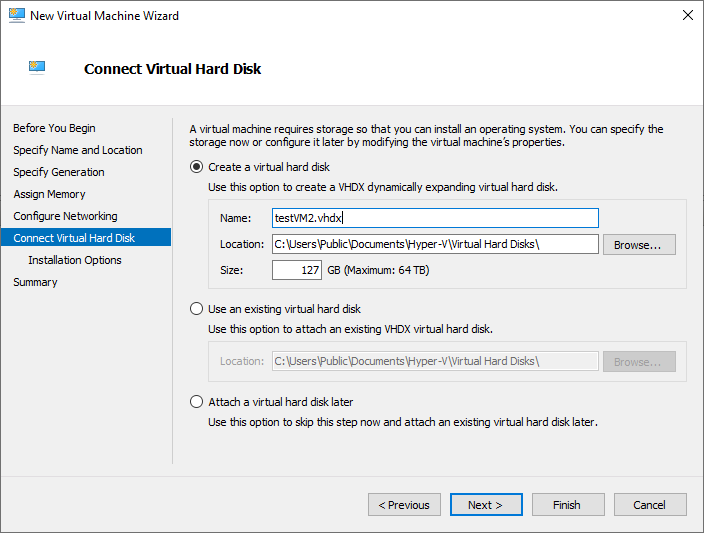
Disk options when creating a new Hyper-V virtual machine in Hyper-V Manager
The New-VHD Hyper-V PowerShell cmdlet provides the ability to create Hyper-V virtual disks with the desired options easily. It can create one or more new virtual hard disks in either the VHD or newer VHDX format and can create disks as Fixed Disk size.
Examples of using the NewVHD cmdlet include:
- New-VHD -Path c:win2019.vhdx -SizeBytes 80GB – This is an example of a dynamic hard disk created as a VHDX type disk.
- New-VHD -ParentPath c:win10.vhdx -Path c:Diff.vhdx -Differencing – An example of creating a differencing hard disk with the parent disk path
- New-VHD -Path C:fixeddisk.vhd -Fixed -SourceDisk 3 -SizeBytes 1TB – A fixed VHD disk populated with the disk identified by the number 3
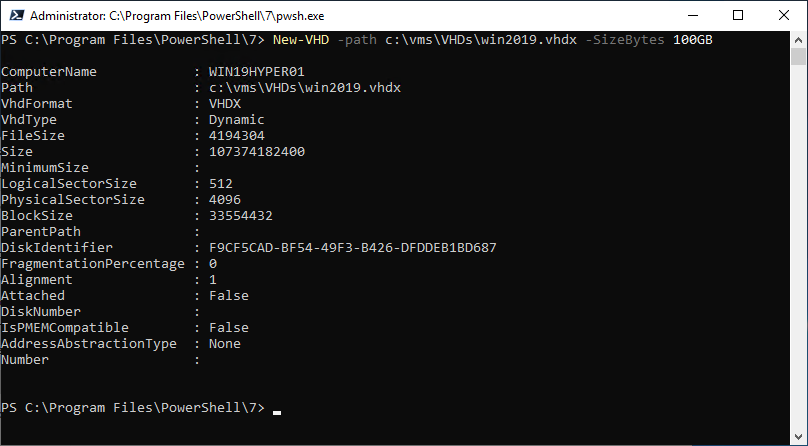
Creating a new VHDX file in a directory using New-VHD
The output from Get-Help New-VHD:
NAME
New-VHD
SYNOPSIS
Creates one or more new virtual hard disks.
SYNTAX
New-VHD [-Path] <String[]> [-ParentPath] <String> [[-SizeBytes] <UInt64>] [-AsJob] [-BlockSizeBytes <UInt32>]
[-CimSession <CimSession[]>] [-ComputerName <String[]>] [-Confirm] [-Credential <PSCredential[]>]
[-Differencing] [-PhysicalSectorSizeBytes {512 | 4096}] [-WhatIf] [<CommonParameters>]
New-VHD [-Path] <String[]> [-SizeBytes] <UInt64> [-AsJob] [-BlockSizeBytes <UInt32>] [-CimSession
<CimSession[]>] [-ComputerName <String[]>] [-Confirm] [-Credential <PSCredential[]>] [-Dynamic]
[-LogicalSectorSizeBytes {512 | 4096}] [-PhysicalSectorSizeBytes {512 | 4096}] [-WhatIf] [<CommonParameters>]
New-VHD [-Path] <String[]> [-AsJob] [-BlockSizeBytes <UInt32>] [-CimSession <CimSession[]>] [-ComputerName
<String[]>] [-Confirm] [-Credential <PSCredential[]>] -Dynamic -SourceDisk <UInt32> [-WhatIf] [<CommonParameters>]
New-VHD [-Path] <String[]> [-SizeBytes] <UInt64> [-AsJob] [-BlockSizeBytes <UInt32>] [-CimSession <CimSession[]>] [-ComputerName <String[]>] [-Confirm] [-Credential <PSCredential[]>] -Fixed [-LogicalSectorSizeBytes {512 | 4096}] [-PhysicalSectorSizeBytes {512 | 4096}] [-WhatIf] [<CommonParameters>]
New-VHD [-Path] <String[]> [-AsJob] [-BlockSizeBytes <UInt32>] [-CimSession <CimSession[]>] [-ComputerName
<String[]>] [-Confirm] [-Credential <PSCredential[]>] -Fixed -SourceDisk <UInt32> [-WhatIf] [<CommonParameters>]
DESCRIPTION
The New-VHD cmdlet creates one or more new virtual hard disks in either VHD format or the newer VHDX format. The file name extension you specify determines the format.
Wrapping Up
PowerShell provides an extremely robust and easy to understand scripting language that provides organizations with powerful cmdlets to interact with Microsoft Windows Server Hyper-V environments. PowerShell commands for Hyper-V are easy to consume. These are installed with the management tools with Hyper-V and are instantly accessible from the Windows PowerShell prompt.
PowerShell Core is the newer PowerShell version built on top of .NET Core and is a cross-platform solution that can be used in Windows, Linux, and macOS. PowerShell Core is the newer PowerShell version moving forward, however, it is not installed in Windows by default. It is a free download from the official PowerShell Core GitHub site and can be installed and used to interact with Hyper-V cmdlets the same as Windows PowerShell.
The top 10 PowerShell commands for Hyper-V include cmdlets covering a wide range of administrative tasks and capabilities that allow Hyper-V administrators to streamline configuration, management, and other duties. While not all-inclusive, they represent many of the command management tasks needed from day-to-day. These also allow effectively automating Hyper-V environments by way of PowerShell scripts that can be scheduled or triggered by certain actions. PowerShell scripts can also be used for configuration management and remediating configuration drift in the Hyper-V environment.


Not a DOJO Member yet?
Join thousands of other IT pros and receive a weekly roundup email with the latest content & updates!


