Save to My DOJO
In the first part of the PowerShell Cmdlets guide, we had a detailed look at what a PowerShell cmdlet is, how to use cmdlets, built-in cmdlets, and useful cmdlets. If you want to give that one a look, head here. As we get into the second part of this guide, we will begin by looking at how to write your own PowerShell cmdlet. We will then have a discussion on modules and what they are used for, after which we will have a look at PowerShell, PowerShell Core and their differences. Let’s dig in!
Writing your own PowerShell cmdlet
While many PowerShell cmdlets are built into Windows 10 and they’ll most likely perform the task you are looking to accomplish, there may still be a need to write your own PowerShell cmdlet to harness the power of its capabilities. Microsoft does a good job describing the process of writing your own PowerShell cmdlet in six steps, so let’s have a look at them:
- Use the Cmdlet attribute to declare the class as a cmdlet. This attribute identifies the verb and noun for the cmdlet name.
- Identify the name of the class
- Specify whether or not the cmdlet comes from either of the following classes:
- System.Management.Automation.Cmdlet
- System.Management.Automation.PSCmdlet
- Use the Parameter attribute to define the parameters for the cmdlet
- Override the input processing method that processes the input
- Use the method System.Management.Automation.Cmdlet.WriteObject
Now that we have covered the basics, let’s take a practical example and have a walkthrough of creating the PowerShell Send-Greeting cmdlet, documented here. We are using Visual Studio 2017 to create a new project, import the code and all dependencies, build the .dll file and import it into PowerShell Core (Note: We will discuss the differences between PowerShell and PowerShell Core in the following section.)
Create a new Class Library (.NET Core).

Create a new ClassLibrary (.NET Core) project in Visual Studio
In the Solution Explorer, right-click the Dependencies and select Manage NuGet Packages.
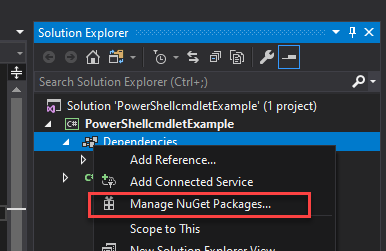
Managing dependencies
Click the “green plus” sign to add a new package source. We will define a PowerShell Core source.
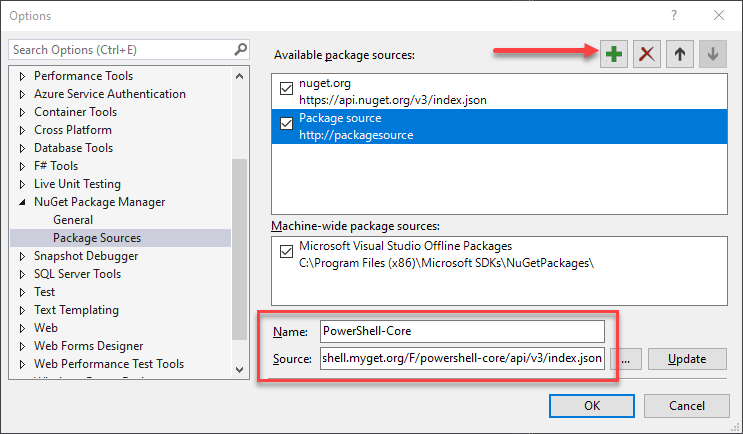
Add a PowerShell package source
Click Browse on the Nuget Package Manager and type system.management.automation. Then click the “down arrow” next to the version. This will install the package.
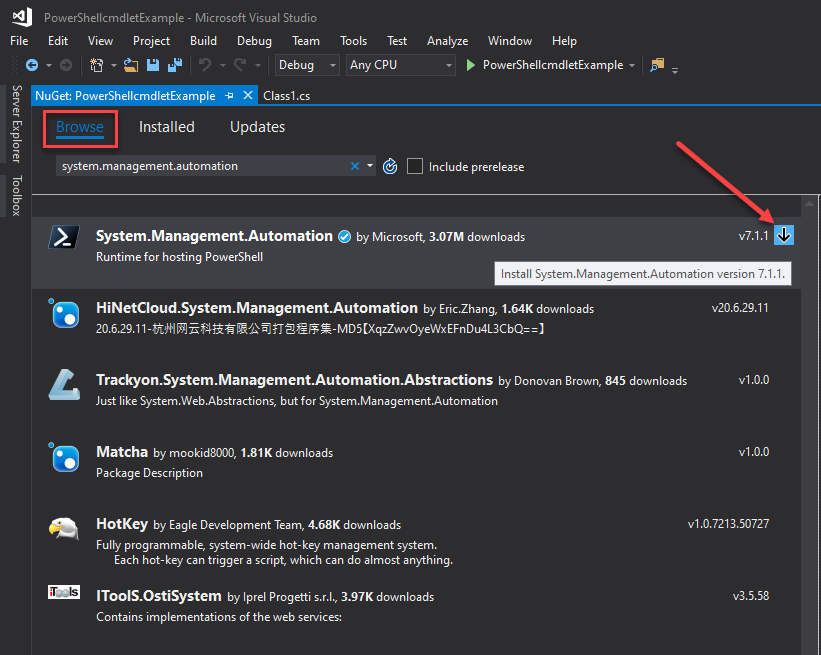
Add System.Management.Automation
Next, click the Class1.cs tab and paste the Microsoft-provided code for the example cmdlet.
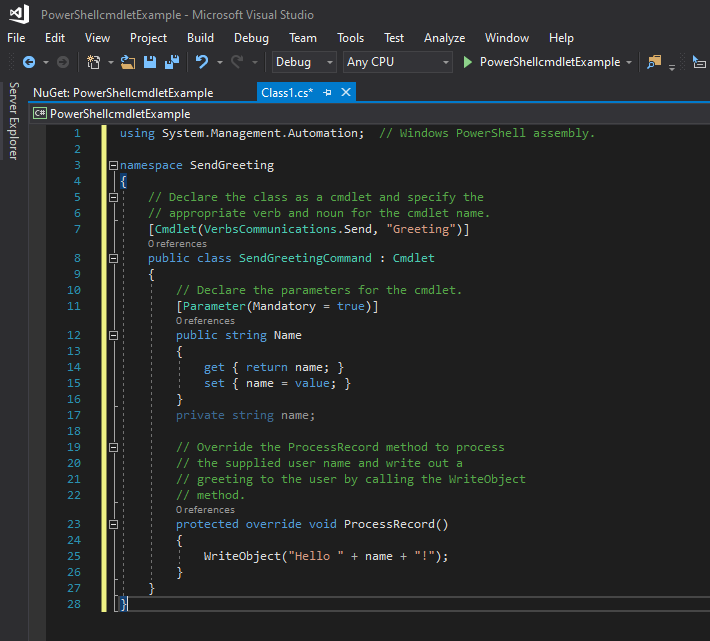
Paste the Microsoft example PowerShell cmdlet code into Visual Studio
Hit F6 or use the Build menu to build the project. Note below after you build the project, you will see the path to the resulting .dll file.
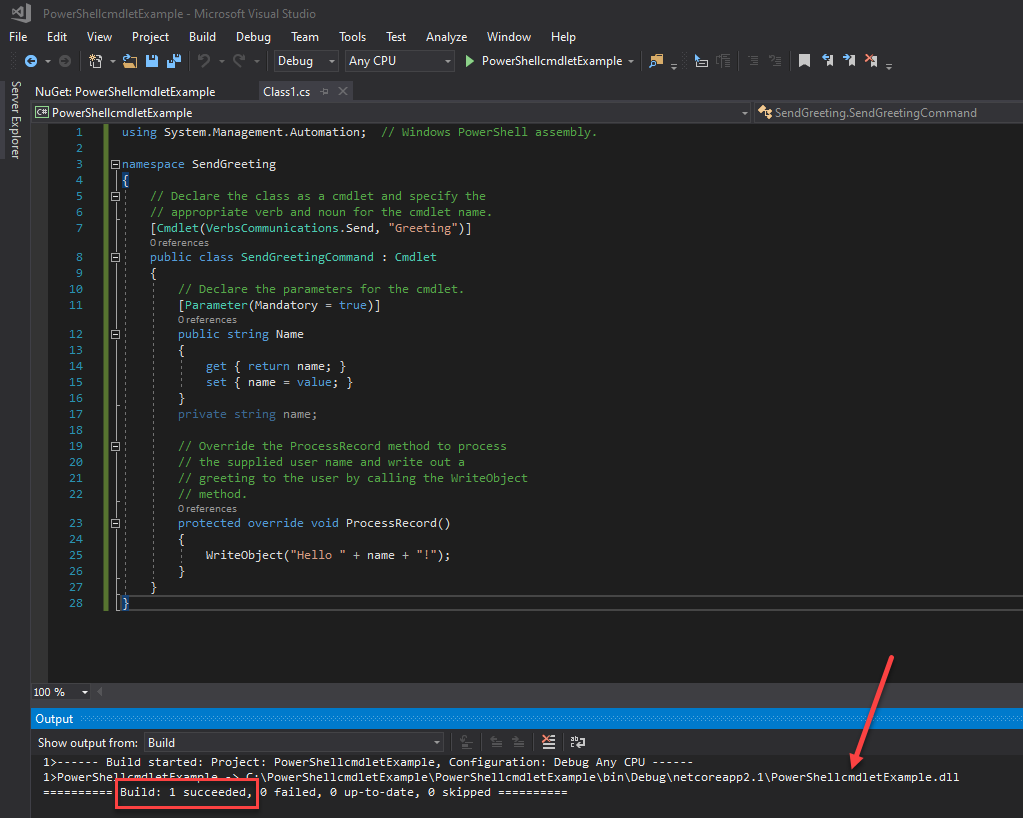
Build the .dll file for the PowerShell cmdlet
All that is left to do is import the .dll file into PowerShell and the cmdlet will be available. Here we are testing the new Send-greeting cmdlet. It works as expected.
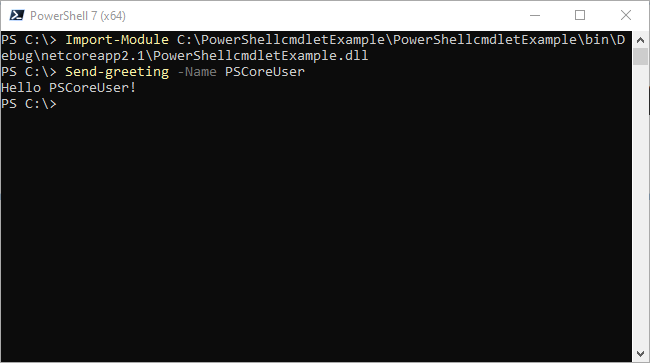
Import the module and run the new cmdlet
Modules
After getting the hang of writing your own cmdlet, you will probably want to write more cmdlets that may be related. For those of you who write cmdlets, it’s useful to know that you can use PowerShell modules to share these with others. A module is simply a package of PowerShell cmdlets and providers. Interestingly, all cmdlets and providers in your PowerShell session are added by way of modules or snap-ins and are stored this way.
Snap-ins are the older way of importing cmdlets into PowerShell and have limitations such as having to be available as an Assembly and Windows registry requirements. Modules do not have many of the limitations of snap-ins and are not reliant on being registered in the Windows registry.
There are a wide variety of readily available modules by way of PowerShell Package Providers. These provide a unified way to install various modules available for PowerShell outside of what is included by default in Windows. Later versions of PowerShell introduced cmdlets to interact with, import, install and remove various Powershell Package Providers. These cmdlets include:
- Get-PackageProvider
- Get-PackageSource
- Register-PackageSource
- Set-PackageSource
- Unregister-PackageSource
- Get-Package
- Find-Package
- Install-Package
- Save-Package
- Uninstall-Package
You can learn more about Package Management in Powershell in the official Microsoft documentation for Package Management.
Installing Modules
As mentioned earlier, Windows 10 includes many different PowerShell cmdlets that can be used by default. However, you can add additional PowerShell cmdlets to your PowerShell capabilities by installing Windows features. A classic example of how easy this is to do is adding the Hyper-V Module for Windows PowerShell. If you want to use a Windows 10 management workstation, adding the Hyper-V Powershell cmdlets allows you to easily interact with a Hyper-V environment and perform tasks in an automated way from the command line.
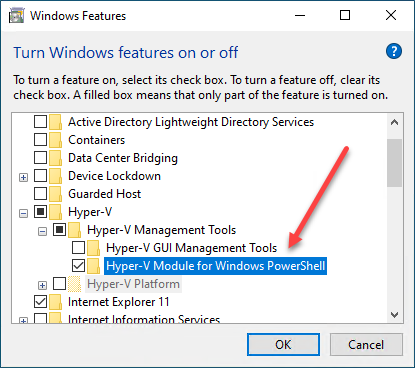
Adding Hyper-V PowerShell Module using Windows Features
You can also use PowerShell to add the Hyper-V PowerShell Module for Hyper-V. You can do this by using the following PowerShell cmdlet:
- Enable-WindowsOptionalFeature -Online -FeatureName Microsoft-Hyper-V-Management-PowerShell
There are many other Microsoft products and solutions that provide an easy way to interact with PowerShell. You will find PowerShell modules for the likes of:
- Microsoft Exchange Server
- Microsoft SharePoint
- Microsoft System Center (SCCM Powershell cmdlets)
- Microsoft Azure
Aside from enabling Windows 10 features along with PowerShell cmdlets as shown with installing Hyper-V and its management tools, PowerShell also allows easily installing module from online resources. The PowerShell Gallery is one such online resource. What is the PowerShell Gallery?
- The PowerShell Gallery is a repository of PowerShell modules and content. You can find myriads of useful PowerShell modules and Desired State Configuration (DSC) resources. Scripts are also available directly from Microsoft, as well as those in the community.
The Microsoft Azure module can be installed using the PowerShell Gallery. The Microsoft Azure PowerShell module allows easy interaction with Azure from an on-premises management workstation. Microsoft has provided a script that allows installing the Azure PowerShell Module in Windows 10.
if ($PSVersionTable.PSEdition -eq ‘Desktop’ -and (Get-Module -Name AzureRM -ListAvailable)) {
Write-Warning -Message (‘Az module not installed. Having both the AzureRM and ‘ +
‘Az modules installed at the same time is not supported.’)
} else {
Install-Module -Name Az -AllowClobber -Scope CurrentUser
}
By default, the PowerShell gallery is not a trusted repository for PowerShellGet.
- PowerShellGet is a module that is used for all tasks related to finding, installing, updating PowerShell modules, among other PowerShell artifacts.
The first time you use the PSGallery, you see the following prompt:
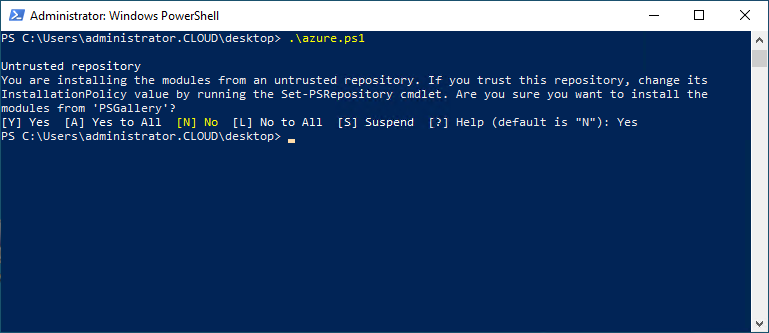
Trusting the PowerShell gallery during the installation of the Azure PowerShell Module
Interacting with Microsoft Azure using the Azure PowerShell cmdlets provides a far superior experience when performing automated tasks or operations at scale.
Using Find-Module and Install-Module cmdlets
You can easily find PowerShell modules from the gallery by using the Find-Module cmdlet. By using the Find-Module cmdlet, you can search for a particular PowerShell module to install. There are thousands of modules to pull from using the online PowerShell gallery.
Note below. You can use the “| more” pipeline to see the results a section at a time.
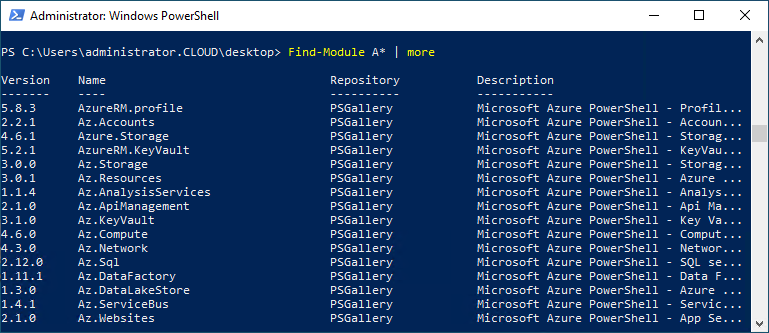
Using the Find-Module cmdlet to find specific modules in the PowerShell gallery
When you find a specific module that you would like to install, you can use the Install-Module cmdlet to install the PowerShell module. As an example, the PSWindowsUpdate PowerShell module allows you to use PowerShell to install Windows Updates in an automated fashion, which is extremely powerful.
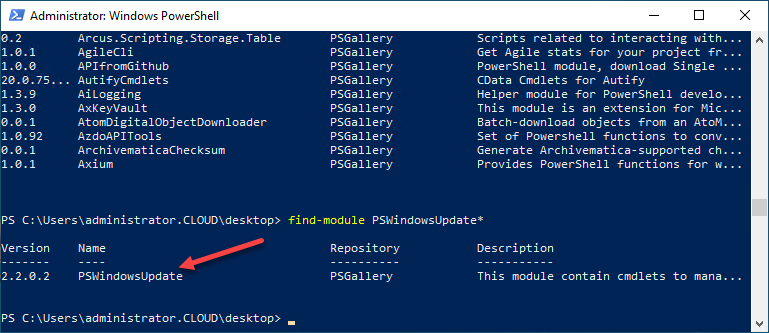
Finding the PSWindowsUpdate Powershell module from the PowerShell Gallery
To install the module, use the Install-Module cmdlet to install the module.
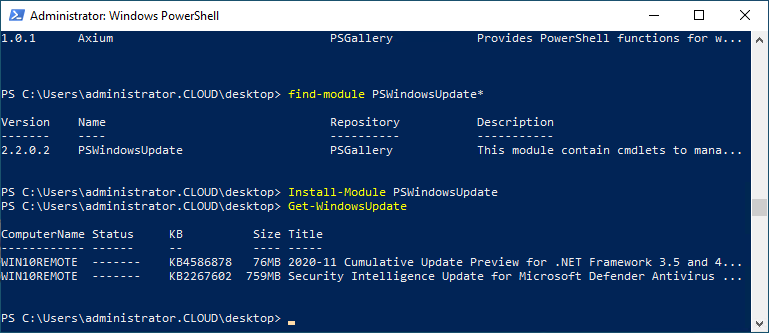
Using the PSWindowsUpdate module to query and install Windows Updates in Windows 10
Powershell vs. PowerShell Core
Before beginning to interact with PowerShell and before creating your own PowerShell cmdlets, it will come in handy to understand the differences between PowerShell and PowerShell Core as choosing to use either will have implications on the capabilities and functionality of PowerShell.
If you start looking at PowerShell today, you will undoubtedly notice two different PowerShell environments referenced – PowerShell and PowerShell Core. What are the differences between the two? When should you use PowerShell Core?
Understanding differences between PowerShell and PowerShell Core
You certainly want to understand the differences between the two as you start getting into using PowerShell in your environment. PowerShell Core (version 6.x and higher) is the newer technology of the two. PowerShell Core receives its name from .NET Core as this is its underlying .NET architecture, and it is the way of PowerShell moving forward. Microsoft is shifting its focus to .NET Core and PowerShell Core as the newer architecture that will see new capabilities and features in future updates.
Legacy PowerShell 5.x will continue to receive enhancements and security updates. Still, the focus will be shifting applications and scripts to use PowerShell Core in most environments unless there is a current incompatibility between a specific application and the newer PowerShell Core platform. One of the significant features of PowerShell Core, being built on .NET Core, is that it is a cross-platform architecture. In other words, with PowerShell Core, you can now have PowerShell on Windows, Mac, and Linux!
Another nice feature with PowerShell Core is that it can be installed side-by-side with PowerShell 5.x in Windows. It means you can use both products on a Windows installation, which is a great way to transition scripts over to using PowerShell Core as this is the way forward. As a side note, the executable for Powershell Core is pwsh.exe to support the side-by-side execution of both PowerShell platforms. Legacy PowerShell retains the powershell.exe name.
Installing PowerShell Core
One of the differences that you will notice from the start with PowerShell Core is the installation. While Powershell 5.x comes with modern Windows versions, PowerShell Core is readily available from the official Github page. It helps to underscore the fact that it is a truly openly available platform. While it is openly available to anyone, it is an officially sanctioned release maintained by Microsoft.
After downloading the official release from the Github page, it is as simple as running the installation of PowerShell Core. The installation is a straightforward “next, next, finish” process.
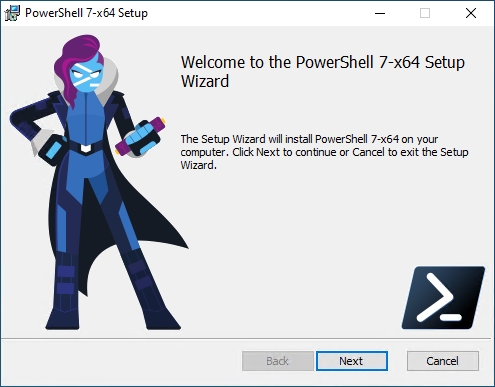
Installing the latest version of PowerShell Core
There are several options available to configure when installing PowerShell Core. Below, the default settings are listed. As you can see, you can configure PowerShell remoting and other optional features during the installation.
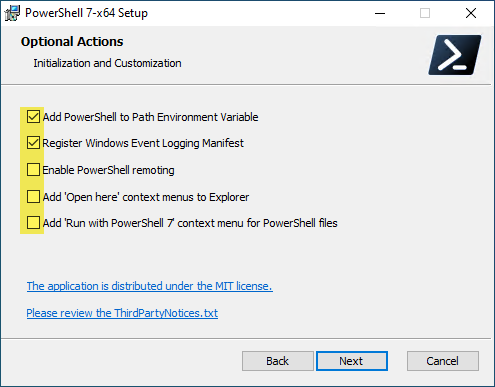
Optional Actions when installing PowerShell Core
After installing, you can launch PowerShell Core along with the legacy version of PowerShell 5.x, all from the same Windows 10 machine. You will note a difference between the two PowerShell windows. The new PowerShell Core prompt has a black background by default, while the standard PowerShell has a blue background.
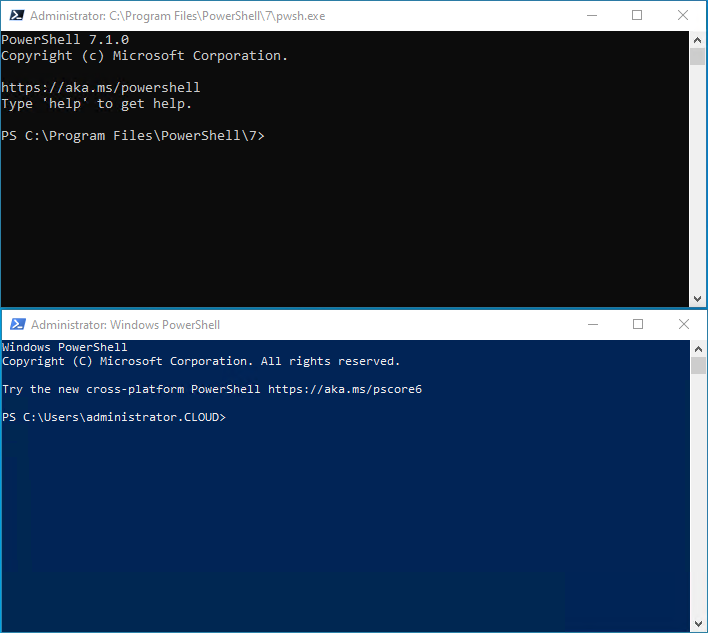
Comparing PowerShell Core and legacy PowerShell environments
Of interest on PowerShell cmdlets, with the newest version of PowerShell Core, PowerShell Core 7.x, Microsoft has improved backwards compatibility with legacy Window PowerShell modules. It makes use of .NET Core 3.1 and allows PowerShell users to make use of many of the modules on Windows that require GUI functionality like Out-GridView and Show-Command.
A new PowerShell Core switch parameter has been added to the Import-Module cmdlet, called UseWindowsPowerShell. This new parameter is a proxy module in PowerShell Core that uses the local Windows PowerShell process to run cmdlets written for legacy PowerShell. It dramatically improves the experience of natively using the PowerShell Core interface.
Are PowerShell cmdlets worth using?
Spoiler alert, yes they are! PowerShell and, by extension, PowerShell cmdlets provide a powerful way to automate and interact with modern infrastructure. You can use PowerShell effectively on-premises or in the cloud. PowerShell cmdlets offer an easy and intuitive way to write object-oriented code, with little coding experience in other languages. The verb-noun syntax is easily understood and “makes sense” to most. IT administrators across many different disciplines have embraced PowerShell and using PowerShell cmdlets for writing scripts to manage and automate their environments. Most modern software and hardware vendors are providing PowerShell modules for interacting with and automating their respective platforms.
Windows PowerShell contains hundreds of built-in PowerShell cmdlets out of the box. You can extend Windows PowerShell features by adding components in Windows features containing PowerShell management modules. Hyper-V PowerShell Windows Management Module is one such feature. Additionally, you can add new PowerShell cmdlets by way of installing new PowerShell modules. You can easily use the Find-Module and Install-Module cmdlets to search for new cmdlets needed and install these in your PowerShell environment. The easily accessible PowerShell Gallery contains thousands of modules, cmdlets, DSC configurations, and even PowerShell scripts that administrators can easily take advantage of in their environments.
PowerShell comes in two different versions today. These include legacy PowerShell 5.x that is included in current Windows versions as well as PowerShell Core. PowerShell Core is the newest release of PowerShell that will see continued development and new features added. The PowerShell Core platform will be the platform receiving major new features and capabilities, so keep that in mind for the future.
I hope you found this guide useful, and if you have started writing your own PowerShell Cmdlets by now, congratulations! Be sure to share them in the comments and let me know if you have any questions.


Not a DOJO Member yet?
Join thousands of other IT pros and receive a weekly roundup email with the latest content & updates!


