Save to My DOJO
Authors commonly struggle with the blank, empty starting page of a new work. So, if you’ve just installed Hyper-V and don’t know what to do with that empty space, you’re in good company. Let’s take a quick tour of the steps from setup to production-ready.
1. Make a Virtual Machine
It might seem like jumping ahead, but go ahead and create a virtual machine now. It doesn’t matter what you name it. It doesn’t matter how you configure it. It won’t be ready to use and you might get something wrong — maybe a lot of somethings — but go ahead. You get three things out of this exercise:
- It’s what we authors do when we aren’t certain how to get started with writing. Just do something. It doesn’t matter what. Just break up that empty white space.
- You learn that none of it is permanent. Make a mistake? Oh well. Change it.
- You have a focused goal. You know that the VM won’t function without some more work. Instead of some nebulous “get things going” problem, you have a specific virtual machine to fix up.
If you start here, then you’ll have no network for the virtual machine and you may wind up with it sitting on the C: drive. That’s OK.
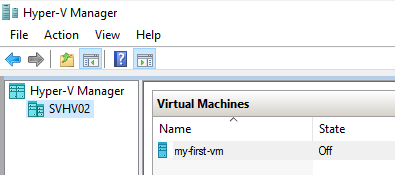
If you want to know the basic steps for how to create a virtual machine in Hyper-V Manager, start with this article.
2. Install Updates and Configure the System
I try to get the dull, unpleasant things out of the way before I do anything with Hyper-V. In no set order:
- Join the host to the domain, if you have one
- Go through the driver and Windows Updates
- Disable SMB 1. Make sure to remove the feature and use the PowerShell disable command
- If you’ll be needing it, configure constrained delegation
- If you’re using Hyper-V Server or a Core installation of Windows Server, you’ll need to configure a remote installation
3. Configure Hyper-V Networking
For Hyper-V configuration, I always start with my networking stack. You will likely spend a lot of time on this, especially if you’re still new to Hyper-V.
For a server deployment, I recommend that you start with my overview article. It will help you to conceptualize and create a diagram of your configuration design before you build anything. At the end, the article contains further useful links to how-to and in-depth articles: https://www.altaro.com/hyper-v/simple-guide-hyper-v-networking/
For a Windows 10 deployment using a current release build, you’ll automatically get a “Default Switch”. If you connect your virtual machines to it, they’ll get an IP, DNS, and NAT functionality without any further effort on your part. You can read more about that (and some other nifty Windows 10 Hyper-V features) in Sarah Cooley’s article: https://blogs.technet.microsoft.com/virtualization/2017/11/13/whats-new-in-hyper-v-for-windows-10-fall-creators-update/
4. Prepare Storage for Virtual Machines
Storage often needs a lot of time to configure correctly as well.
First, you need to set up the basic parts of storage, such as SAN LUNs and volume. I’d like to give you a 100% thorough walk-through on it (perhaps at a later date), but I couldn’t possibly cover more than a few options. However, I’ve covered a few common methods in this article: https://www.altaro.com/hyper-v/storage-and-hyper-v-part-6-how-to-connect/. I didn’t cover fiber channel because no two vendors are similar enough to write a good generic article. I didn’t cover Storage Spaces Direct because it didn’t exist yet and I still don’t have an S2D cluster of my own to instruct from.
Whatever you choose to use for storage, you need at least one NTFS or ReFS location to hold your VMs. I’m not even going to entertain any discussion about pass-through disks because, seriously, join this decade and stop with that nonsense already. I’m still recommending NTFS because I’m not quite sold on ReFS for Hyper-V yet, but ReFS will work. One other thing to note about ReFS, is to make sure your backup/recovery vendor supports it.
5. Configure Hyper-V Host Settings
You probably won’t want to continue using Hyper-V’s defaults for long. Storage, especially, will probably not be what you want. Let’s modify some defaults. Right-click your host in Hyper-V Manager and click Hyper-V Settings.
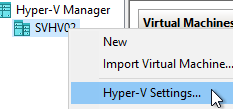
This window has many settings, far more than I want to cover in a quick start article. I’ll show you a few things, though.
Let’s start with the two storage tabs:
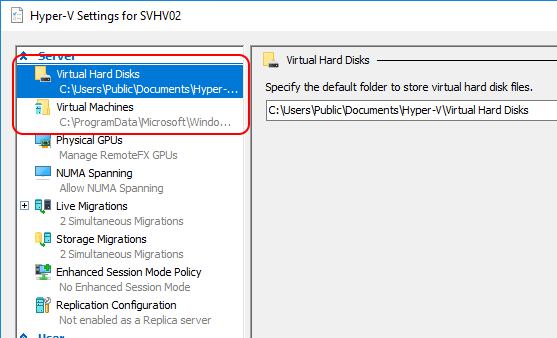
You can rehome these anywhere that you like. Note:
- For the Virtual Hard Disks setting, all new disks created using default settings will appear directly in that folder
- For the Virtual Machines setting, all non-disk VM files will be created in special subfolders
In my case, my host will own local and clustered VMs. I’ll set my defaults to a local folder, but one that’s not as deep as what Hyper-V starts with.
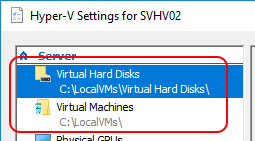
Go explore a bit. Look at the rest of the default settings. Google what they mean, if you need. If you’ll be doing Shared Nothing Live Migrations, I recommend that you enable migrations on the Live Migrations tab.
6. Fix Up Your VM’s Settings
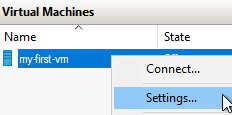
Remember that VM that I told you to create back in step one? I hope you did that because now you get to practice working with real settings on a real virtual machine. In this step, we’ll focus on the simple, direct settings. Right-click on your virtual machine and click Settings.
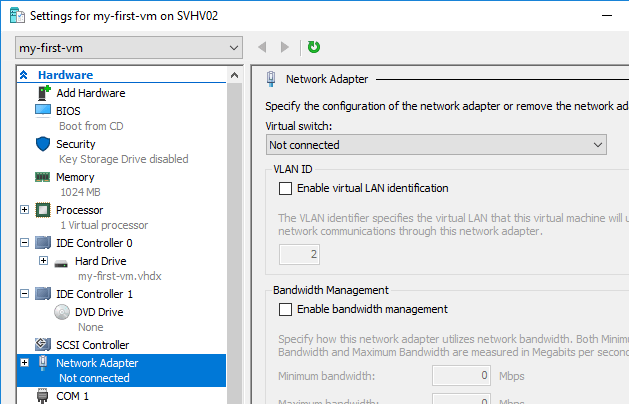
If you followed right through, then the VM’s virtual network adapter can’t communicate because it has no switch connection. So, jump down to the Network Adapter tab. In the Virtual Switch setting, where it says, Not connected, change it to that switch that you created in step 3.
Again, poke through and learn about the settings for your virtual machine. You’ll have a lot more to look at than you did for the host. Take special notice of:
- Memory. Each VM defaults to 1GB of dynamic memory. You can only change a few settings during creation. You can change many more now.
- Processor: Each VM defaults to a single virtual CPU. You’ll probably want to bump that up to at least 2. We have a little guidance on that, but the short version: don’t stress out about it too much.
- Automatic start and stop actions: These only work for VMs that won’t be clustered.
Check out the rest of it. Look up anything that seems interesting.
7. Practice with Advanced Activities and Settings
If you followed both step one and the storage location bit of step five, then that virtual machine might not be in the location that you desire. Not a problem at all. Right-click it and choose Move. On the relevant wizard page, select Move the virtual machine’s storage:
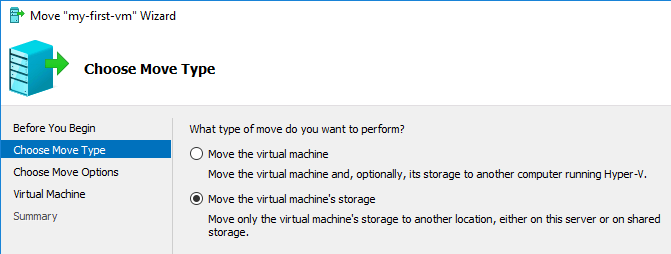
Proceed through the wizard. If you want more instruction, follow our article.
Not everything has a predefined setting, unfortunately. You’ll occasionally need to do some more manual work. I encourage you to look into PowerShell, if you haven’t already.
Changing a Virtual Machine’s VHDX Name
Let’s say that you decided that you didn’t like the name of the virtual machine that you created in step one. Or, that you were just fine with the name, but you didn’t like the name of its VHDX. You can change the virtual machine’s name very simply: just highlight it and press [F2] or right-click it and select Rename. Hyper-V stores virtual machine’s names as properties in their xml/vmcx files, so you don’t need to change those. If you put the VM in a specially-named folder, then you can use the instructions above to move it to a new one. The VHDX doesn’t change so easily, though.
Let’s rename a virtual machine’s virtual hard disk file:
- The virtual machine must be off. Sorry.
- On the virtual hard disk’s tab in the virtual machine’s settings, click Remove:
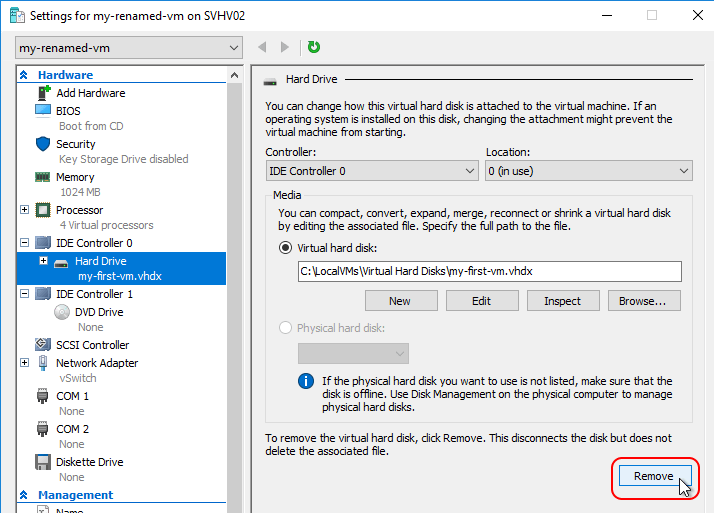
- Click Apply. That will remove the disk but leave the window open. We’ll be coming back momentarily.
- Use whatever method you like to rename the VHDX file.

- Back in the Hyper-V virtual machine’s settings, you should have been left on the controller tab for the disk that you removed, with Hard Drive selected. Click Add:

- Browse to the renamed file:
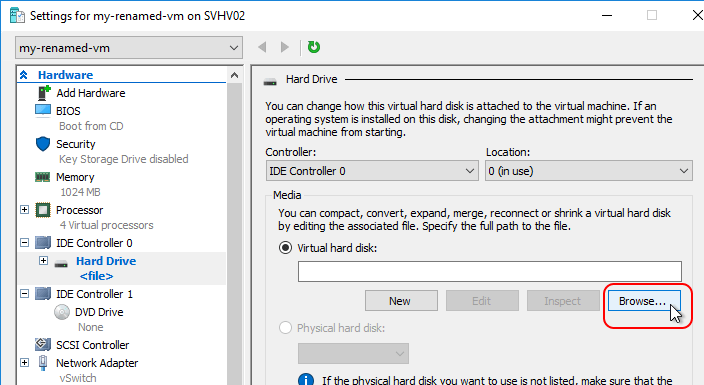
- Click OK.
Your virtual machine can now be started with its newly renamed hard disk.
Tip: If you feel brave, you can try to rename the file in the browse dialog, thereby skipping the need to drop out to the operating system in step 4. I have had mixed results with this due to permissions and other environmental factors.
Tip: If you want to perform a storage migration and rename a VHDX, you can wait to perform the storage migration until you have detached the virtual hard disk. The remaining files will transfer instantly and you won’t have a copy of the VHDX. After you have performed the storage migration, you can manually move the VHDX to its new home. If the same volume hosts the destination location, the move will occur almost instantly. From there, you can proceed with the rename and attach operations. You can save substantial amounts of time that way.
Bonus round: All of these things can be scripted.
Moving Forward
In just a few simple steps, you learned the most important things about Hyper-V. What’s next? Installing a guest operating system, of course. Treat that virtual machine like a physical machine, and you’ll figure it out in no time.
Need any Help?
If you’re experiencing serious technical difficulties you should contact the Microsoft support team but for general pointers and advice, I’d love to help you out! Write to me using the comment section below and I’ll get back to you ASAP!


Not a DOJO Member yet?
Join thousands of other IT pros and receive a weekly roundup email with the latest content & updates!


5 thoughts on "The ABC of Hyper-V – 7 Steps to Get Started"
Very good document. Really helped me.
Thank you!
Thanks a lot, sir! you’re a legend!