Save to My DOJO
Virtual hard disks (VHD or VHDX) are usually created along with their owning virtual machines or, when a new disk is needed for an existing virtual machine, directly from the VM’s property sheet. There are times when you’ll want to connect an existing virtual disk, though. For instance:
- A virtual machine’s definition files are damaged but the VHDX is intact, perhaps due to antivirus
- Transferring duplicates of virtual disks to one or more test virtual machines
- Using a virtual hard disk to move files between virtual machines or between a host and guest
Attach a VHDX Using Hyper-V Manager
To attach an existing virtual disk to a virtual machine using Hyper-V Manager, follow these steps:
- In Hyper-V Manager’s center pane, locate the virtual machine that you wish to attach the disk to and click Settings.

Access VM Settings
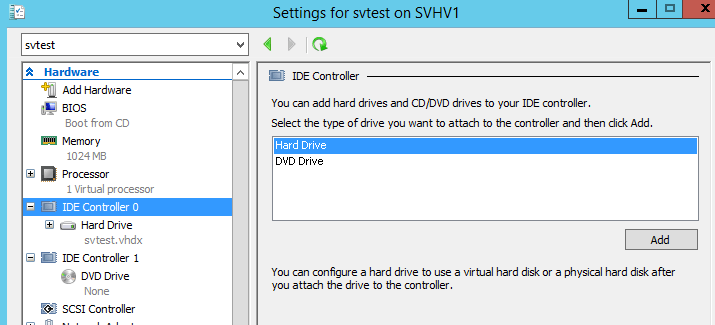
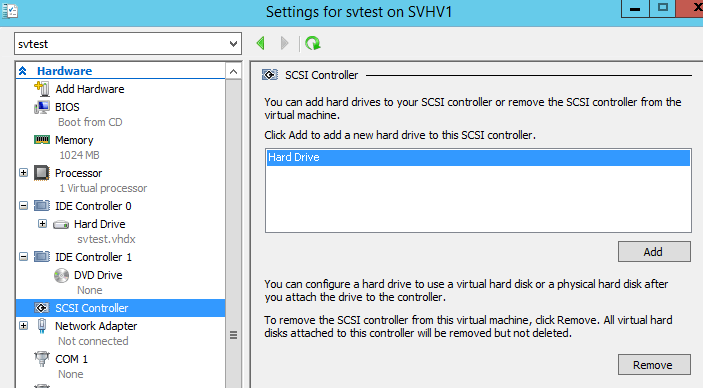
- In the dialog, click on any virtual disk controller (IDE or SCSI). As a matter of course, it’s preferable to choose the controller that you intend to attach the disk to, but it actually doesn’t matter. The screens are different whether or not you choose an IDE or a SCSI controller, but on either one you highlight Hard Drive and click Add:

IDE Options

SCSI Options
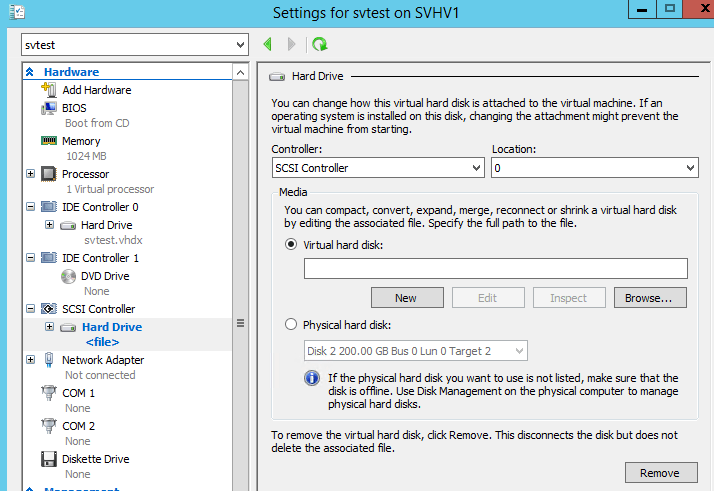
- The following screen will appear:

New Disk Attachment
This screen is identical to the page for an existing disk, with a couple of exceptions:
- If you look in the left pane, you’ll see, in blue, the placeholder for the new hard drive. The controller that it appears under will be the one that you selected in step 2.
- None of the fields that indicate the identity of the disk, whether virtual or physical, are filled in.
- From the drop-down, choose the Controller that you wish to attach the new disk to. The controller that you selected in step 2 will automatically be selected, but you can choose any that the virtual machine possesses. If you need to add a new SCSI controller, you’ll need to do that separately (it’s on the Add Hardware tab).
- From the Location drop-down, pick the controller location to attach the disk to. Any location that already has a disk will be marked as In Use. IDE controllers will only accept a maximum of 2 disks; SCSI will accept up to 64. Remember that a Generation 1 VM will boot from the hard disk in Location 0 on the first IDE controller and a Generation 2 VM will boot from the hard disk in Location 0 on the first SCSI controller.
- The last major step is to find the disk file that you wish to attach. Click the Browse button to find it (or if you’ve got the path handy, you can just enter it into the text box).
- In the main Settings dialog, click either Apply or OK (the only difference between the two is that OK will close the dialog after the work is finished whereas Apply does not).
Attaching a VHDX Using PowerShell
Use the Add-VMHardDiskDrive cmdlet.
Example:
Add-VMHardDiskDrive -VMName svtest -ControllerType IDE -ControllerNumber 1 -ControllerLocation 1 -Path 'C:LocalVMsVirtual Hard Disksdisk2.vhdx'
The -ControllerType parameter works with tab completion and will automatically cycle between IDE and SCSI (and Floppy).
You can validate the in-use bus locations in advance:
Get-VMIdeController -VMName svtest
Get-VMScsiController -VMName svtest
Removing a VHDX File from a Virtual Machine with Hyper-V Manager
On the virtual disk property screen in Hyper-V Manager (shown in Step 3 above), there is a Remove button. Clicking this and then Apply or OK will detach the VHDX from the virtual machine. The VHDX file is not damaged. The only change made is that the virtual machine’s GUID is no longer given NTFS permissions on the file.
Removing a VHDX File from a Virtual Machine with PowerShell
To remove a VHDX with PowerShell:
Remove-VMHardDiskDrive -VMName svtest -ControllerType IDE -ControllerNumber 1 -ControllerLocation 1
Use the Get-VMIdeController and Get-VMScsiController cmdlets as shown at the end of the section on connecting a VHDX in PowerShell to locate the VHDX to remove.
Notes About Attaching VHDX Files to Virtual Machines
This is a fairly straightforward process with little to add. There are a few points to be mindful of:
- While not mentioned in this article, you could easily follow these directions and choose a physical disk instead of a virtual disk in step 6.
- You cannot add a disk to an IDE controller while the virtual machine is in any state other than Off. This is due more to Microsoft’s adherence to the IDE specification than a true limitation of Hyper-V. Disks can be added to and removed from a SCSI controller at any time.
- Adding a disk to a virtual machine requires it to have exclusive access, so it cannot be in use by another virtual machine. There is an exception with shared VHDX, but that is an advanced topic not covered here.
- Hyper-V will automatically adjust the security of the virtual disk file as necessary. This involves adding the GUI of the new owning virtual machine to the disk’s access control list (ACL) directly. If any security-related problem arises with a virtual machine and its VHDX files, you can use this technique to quickly and easily correct the issue.


Not a DOJO Member yet?
Join thousands of other IT pros and receive a weekly roundup email with the latest content & updates!


