Save to My DOJO
Hyper-V Checkpoints (formerly known as snapshots) are something like an “undo” button for a Hyper-V virtual machine. As the name suggests, you set a marker at a particular point in time for the virtual machine. If you decide that you don’t like what’s happened to the virtual machine at any point after that, you can go back (revert) to that checkpoint. As we, and a great many others, have gone to great lengths to emphasize, checkpoints are in no way a replacement for backup; like an actual “undo” button, all of the changes made after the checkpoint are lost if you revert. There is something like a “redo” button; you are given the opportunity to take another checkpoint when you revert to an earlier one. However, no copies of the virtual machine are ever made. Only changes are tracked. Do not attempt to use this feature as a backup tool.
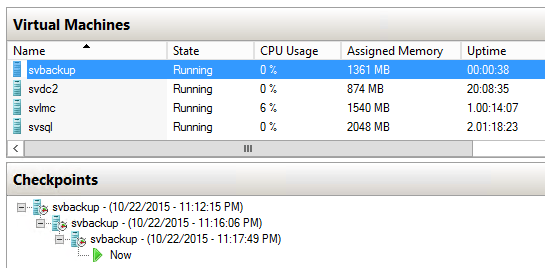
The purpose of this post is to give you a clear understanding of how to revert to a Hyper-V virtual machine checkpoint in Hyper-V and what happens when you do so to prevent you from having any scary moments of uncertainty when dealing with your own. The following virtual machine with the indicated snapshots will be the example that we’ll use in this post:

Sample VM with Checkpoint
I didn’t rename these (it’s an option when you right-click) because I’m guessing that a lot of people will think to themselves, “I’ll remember what this is for,” even though they often don’t, and will leave them with their default time-stamped name. Although not shown here, you can click on any one of the checkpoints and in the bottom pane, a thumbnail of the screen as it was when the checkpoint was taken will appear. Unfortunately, it’s so small that unless you put a gigantic flag or something onscreen, it probably won’t be very useful. Double-clicking the thumbnail opens up VMConnect.exe to the current instance of the VM, so that’s not helpful either.
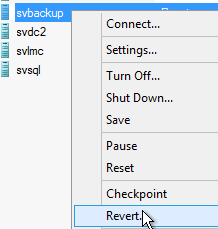
What these are intended to represent is various points along a path, such as application of patches in a sequence. For the sake of this discussion, let’s say that the very last patch turned into a nightmare and you just want to give up and go back. Your first option in that choice is to right-click on the virtual machine itself and choose Revert:

Checkpoint Revert
To apply checkpoint Hyper-V, and revert to the changes contained therein, you’ll be given a prompt (unless you chose to repress it) and then the very latest checkpoint virtual machine is applied. You are not asked to create a checkpoint of the current state first. Any changes made between the previous checkpoint and the current state will be irrevocably lost if you perform this action, and the text in the pop-up dialog does not tell you that. Unless you are absolutely certain that’s what you want to do, I would counsel you to stay away from this option.
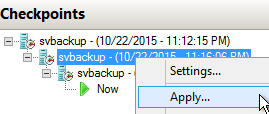
Instead, use the apply technique. Let’s say that, even though we suspect that the very latest patch is what broke our Hyper-V virtual machine, we want to go back to a time before the patch before that was applied and see if perhaps there was a particular setting that we forgot to change. But, we’re not absolutely certain that’s what the problem is, either. We can handle that with apply. Right-click on the checkpoint that represents the time before that patch and click Apply:

Checkpoint: Apply Two Back
The following prompt will be shown:

Checkpoint: Apply Confirmation
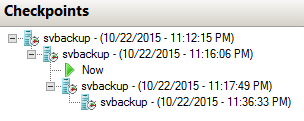
TIP: I recommend never selecting the option to suppress this prompt because I’m not sure which option it takes as the default and I have a hard time believing that anyone will know in advance that they’ll make the same choice for 100% of all checkpoints. In this case, because we’re not entirely certain whether or not we want to lose this state, we are going to click Create Checkpoint and Apply. Since we’re jumping back in time and we are keeping the current state, this operation will proceed differently than a normal checkpoint. The very first thing that will happen is that the virtual machine will be placed in a saved state. Then a checkpoint of the current status will be taken. This is mainly just to get it into the view; unlike a normal checkpoint, this one won’t change anymore. Then the indicated checkpoint will be restored. Now, our tree looks like this:

Checkpoint: Middle of the Tree
What’s going on now is that the current state is a differential starting from the checkpoint state immediately above it. The other two below it are dormant. If something happens to their files, you won’t be able to recover those snapshots but the virtual machine will be able to continue running and the current state could be merged back to the root. Any further checkpoints will exist under the new parallel branch. What’s most important to understand here is that the currently running virtual machine does not contain any of the changes that were made in the two snapshots underneath the Now state. Since, in our fictional story, we said that each one of those represents a patch that was installed, neither of those patches exist in the running virtual machine.
A few things to be aware of, some worth repeating, when applying a snapshot:
- Taking a checkpoint is a downtime-free operation, which, unfortunately, sometimes creates the expectation that a reversion is also downtime-free. The virtual machine is stopped while a snapshot is being applied. It is a very similar operation to restoring a virtual machine from a saved state. The amount of time that it takes depends upon the size of the virtual machine and the capability of your hardware, particularly the storage subsystem.
- Even if you take a new checkpoint before applying an old one, the virtual machine that you are running when you apply a checkpoint has lost everything that happened after the fact. It might safely be in the differencing virtual disk of the other checkpoint, but you can’t get to it.
- Data is never duplicated with the checkpoint mechanism, no matter how you layer your tree. Don’t try to use this as a backup. Do not allow checkpoints to have a long lifespan. Perform your troubleshooting, and delete all the checkpoints as quickly as you can.
- When you have the virtual machine in the desired condition, just delete all the checkpoints. The only checkpoint-related activities that will modify the current running state of a virtual machine are the Revert and Apply actions.
- In Hyper-V versions after 2008 R2, any apply or revert actions that cause a merge will do so while the guest is online. The only downtime is while the earlier state is made active.
- The checkpoint system will detect the existence of a checkpoint even if some of the files have been removed or damaged. They must exist in the virtual machine’s current Snapshot folder in order for them to be applied correctly.
- If the Time Synchronization guest service is not enabled for the VM, its clock will be left at the time that the checkpoint was taken. Be aware that it may be too far skewed from its time source to automatically update correctly. You may need to manually set the time.
- Hyper-V Manager will show the progress of a checkpoint operation in the Status column:

Checkpoint Progress
Hyper-V Checkpoint errors and resolutions
While errors and problems with creating and managing Hyper-V checkpoints are somewhat rare, there are a few issues that can happen when creating, deleting, and managing Hyper-V checkpoints. Note the following and the relevant Microsoft documentation regarding the errors:
- Hyper-V checkpoint operation failed – Hyper-V Error Creating Checkpoint – Microsoft Q&A
- Hyper-V cannot delete checkpoint – Cannot Delete Checkpoint (microsoft.com)
- Hyper-V could not initiate a checkpoint operation – Unable to take CheckPoint in Hyper-V – Microsoft Q&A
- An error occurred while attempting to checkpoint the selected virtual machine – An error Occurred while attempting to checkpoint the selected Virtual machine(s). (microsoft.com)
Hyper-V Checkpoint Best Practices
Hyper-V checkpoints, like all solutions and technology tools, should be used in a way that aligns with best practices. What Hyper-V checkpoint best practices should organizations take note of when leveraging the checkpoint technology?
- Checkpoints are not backups – Regardless of the introduction of production checkpoints, these are still not true backups of your Hyper-V virtual machine. The reason for this is simple. The checkpoint is contained on the same infrastructure as the virtual machine itself and it relies on the chain of checkpoints related to the parent disk to be valid. Any corruption or deletion of checkpoints in the chain can lead to data loss. True enterprise backups reside on totally separate infrastructure and storage as your production workloads. Backups do not depend on the production workloads in any way to recreate the data in a disaster recovery scenario.
- Do not leave checkpoints on a VM for extended periods of time – Hyper-V Checkpoints should be created for a specific purpose in mind. It could include creating a checkpoint before installing software, updating a driver, or changing application settings. Once the changes are made and are validated, the checkpoint should be removed.
- Understand the impact of checkpoints on performance – Checkpoints are created in a “chain,” allowing the checkpoint to serve the purpose of creating the point-in-time state of a Hyper-V virtual machine. Hyper-V checkpoints can decrease the performance of a virtual machine. So, this is another reason why they should not be kept long term.
- Don’t use a Hyper-V checkpoint on domain controllers – While production checkpoints are supposed to be safe for replicated data since they don’t contain memory state information, even the production checkpoint should be used with caution when dealing with domain controllers. Domain controllers in general do not “play nicely” with checkpoints or other point-in-time copies of Active Directory domain data. Using checkpoints improperly, especially leveraging “standard” checkpoints can result in a domain controller condition known as a USN rollback that leads to severe issues with Active Directory replication.
- Do understand the difference between production and standard checkpoints – It is important to understand the difference between standard and production Hyper-V checkpoints. Both serve different purposes and contain different types of data. The standard checkpoint does contain the memory state, whereas the production checkpoint does not. The production checkpoint is supported for use in production since it leverages the Volume Shadow Copy service to correctly write data to disk and flush pending I/Os, etc.
To properly protect your Hyper-V virtual machines, use Altaro VM Backup to securely backup and replicate your virtual machines. We work hard perpetually to give our customers confidence in their Hyper-V backup strategy.
To keep up to date with the latest Hyper-V best practices, become a member of the Altaro DOJO | Hyper-V now (it’s free).
Conclusion
The Hyper-V checkpoint is a powerful capability found in Hyper-V that allows IT admins to create a point-in-time marker that can be used “roll-back” a virtual machine to a known good state. Hyper-V now includes two types of checkpoints, including a production checkpoint and a standard checkpoint. The production checkpoint provides the added benefit of leveraging the Volume Shadow Copy service to ensure data consistency on disk. It does not capture the memory state of a virtual machine. The standard checkpoint is useful when you need to capture the running state of the virtual machine.
Checkpoints are a tool with a purpose and should be used in line with best practices such as not viewing them as a backup solution, removing them when no longer needed, and considering potential performance implications. Also, be cautious of very “state and data-sensitive” technologies that do not work well with rolling back to a specific point-in-time, such as domain controllers. Remember that “snapshots” are the legacy term for Hyper-V checkpoints and are much more closely associated with VMware virtualization technologies.
Hyper-V checkpoints are a powerful capability found in Hyper-V virtualization that can support many modern use cases that are simply not possible with traditional bare-metal workloads.


Not a DOJO Member yet?
Join thousands of other IT pros and receive a weekly roundup email with the latest content & updates!


19 thoughts on "How To Apply Virtual Machine Checkpoints in Hyper-V"
Is there anyway to disable the “revert” button at the top of the console? I thought I was refreshing my IE window and I hit the revert button. I did not get prompted with a “are your sure?” Now I’ve got a big mess on my hands.
No, you cannot disable the Revert action. But you can turn the warning box back on with the “Reset Check Boxes” function on the host’s settings dialog box.
I have a W2012 R2 VM which is showing as having a checkpoint but the files no longer seem to exist. I have no option to delete the checkpoint. The VM operates ok and allows further checkpoints. What file might be storing this rogue checkpoint so I can get rid of it from the list?
Thanks,
Mark.
I haven’t actually dug in deeply enough to know the precise mechanism by which checkpoints are tracked. It’s either in the XML or in the WMI object — maybe both. Wherever it is, something is damaged and operating on the existing construct would require you to inflict further damage.
I think your best option is to export the virtual machine, delete it, and then import it again. To make that go quickly, detach the VHDX(s), place those files somewhere safe, perform the export/delete/import on the diskless VM, then re-attach your VHDX(s). Make sure your backups are in order before you do anything.
I have a W2012 R2 VM which is showing as having a checkpoint but the files no longer seem to exist. I have no option to delete the checkpoint. The VM operates ok and allows further checkpoints. What file might be storing this rogue checkpoint so I can get rid of it from the list?
Thanks,
Mark.