Installing Hyper-V is fairly easy, as major infrastructure components go. Where you start to run into trouble is in the management area. If you install Hyper-V as a component of a complete GUI-based installation of Windows, then all the tools are local and work without any issues. If you want to control Hyper-V remotely, as it was intended, things get tougher and you’ll need Hyper-V manager. This article will help you get connected.
Understanding Connection Options for Hyper-V Management
The easiest option was mentioned in the introductory paragraph: work locally with the management tools. Since, like any server, the best practice is to avoid working directly from the physical console, you’ll most likely carry this out using a Remote Desktop session. That’s fine if you’ve only got one Hyper-V host and it isn’t doing much. It quickly becomes tiring when there are multiple hosts. Also, any active session requires resources, and the only place to take them from is the guests. To make it even less desirable, remote desktop sessions are something of a security risk as they are easier to hijack than a system that’s being managed by PowerShell Remoting or traditional RPC-based tools such as Hyper-V Manager.
A better option is to install the management tools on a remote system and allow them to connect to and manage the Hyper-V host(s). It’s a little more trouble to set up, but the pain is manageable. If all the systems are in the same domain or domains with a properly configured trust relationship, it’s all relatively simple.
It is possible to leave the host in workgroup mode and connect to it remotely. This is not a recommended configuration. Despite common and persistent myths, a domain-joined Hyper-V host can start even if it can’t reach a domain controller and leaving your Hyper-V host in a workgroup configuration is much less secure than joining it to a domain. Compromising the local security accounts are much easier than breaking a domain account.
Any time you connect remotely using local credentials, they must be transmitted across the network, which opens them up to interception and compromise. Domain credentials never traverse the network. You must also bypass host-to-host authentication or work through the fairly complicated process of certificate sharing for a workgroup environment. Isolation techniques will be revisited in a later article on networking, but for now, the best choice in almost all circumstances is to connect the host to the domain.
How to Enable Remote Management of Hyper-V
For Hyper-V hosts within the same or trusting domains, there is very little to configure within Windows, although you may have hardware firewalls that need to be configured. All these same steps will need to be followed if you’re going to leave the host in workgroup mode.
Firewall Ports
If you’re only using the built-in Windows Firewall, there’s nothing else to do for domain-joined computers. In 2012 R2, Server Manager and all the management tools can automatically traverse the firewall of other domain-joined servers without further interruption. For workgroup-joined machines, your best option is to locate the firewall rules in the Windows Firewall with Advanced Security tool that match the remote management tool(s) you wish to use and selectively open them to the necessary remote IP addresses. If you’re using hardware firewalls, Microsoft does not publish all necessary ports to be opened. These are typically within the first few ports in the dynamic range (49152 and higher), but they do change.
The most critical ports to open are 135 (RPC endpoint mapper) and 5985 (WSMan). If you’ll be taking the extra step of sending WSMan traffic through an encrypted connection, that will move across port 5986. Be aware that this provides little extra security. The only portion of standard WSMan traffic that is not encrypted is initial negotiation.
Microsoft provides detailed information on configuring the firewall here.
Use PowerShell Remoting to Manage Hyper-V
Many features are only accessible via PowerShell, many automation routines require it, and many common tasks are more easily performed with it. In order for PowerShell to operate against remote systems, the easiest approach is to issue the following at an elevated PowerShell prompt:
Enable-PSRemoting –Force
This will modify all necessary settings to allow remote PowerShell sessions to connect in and out of the machine that you run it on. This means that it must be run on all involved computers. One of the things that it does is build create an unencrypted endpoint for PowerShell sessions to work with that utilizes standard HTTP. As mentioned above, the WSMan communication itself is encrypted, but the negotiation is not. It is possible to set it to use an encrypted HTTPS channel for extra protection, although you’ll need a certificate in order to enable it. That won’t be discussed in this book, as it is rather advanced and somewhat unnecessary: all WSMan traffic is encrypted, even when transmitted on HTTP. If you’d like to add certificate-based encryption, see this article for guidance on configuring WSMan to utilize HTTPS.
PowerShell Remoting involves user validation and computer validation, which can make things tricky when you’re in a workgroup situation. Your choices are to employ SSL certificates or to bypass computer authentication entirely by adding entries to the “TrustedHosts” list on both the source and the target computers. Certificates are, by far, the most reliable method. The TrustedHosts list is an “on your honor” system that accepts any computer that presents a name on the list. The upcoming section on Cross-Machine Operations will revisit the topic of SSL Certificates.
PowerShell Remoting is a large topic that belongs more in the silo of general Windows administration than to Hyper-V in particular, so a full discussion about it does not fit well here. Please refer to our article series on PowerShell Remoting for a more thorough treatment.
Using MMC Consoles to Manage Hyper-V
There are a number of MMC consoles that you can use to connect and control Hyper-V and the management operating system remotely. How you’ll enable them and the capabilities they’ll expose depend on the operating system that you’re using.
Assuming that the target system is 2012 R2:
- Windows 8 Professional or Enterprise will be able to view and control the features that were available in 2012. The Hyper-V console and basic computer management consoles are built-in. All other consoles, such as Failover Cluster Manager, are part of the downloadable Remote Server Administration Tools (RSAT) package.
- Windows Server 2012 will be able to view and control the features that were available in 2012. All of the consoles are built-in.
- Windows 8.1 Professional or Enterprise will be able to view and control all features. The Hyper-V console and basic computer management consoles are built-in. All other consoles, such as Failover Cluster Manager, are part of the separate RSAT package.
- Windows Server 2012 R2 will be able to view and control all features. All of the consoles are built-in.
- The Windows 10 product series should be able to view and control all features of 2012 R2. As of this writing, its Remote Server Administration Tools and PowerShell modules still do not work correctly.
How to Download the Remote Consoles for Desktop Operating Systems
If you want more management consoles on your desktop than just Hyper-V, you’ll need to download them. To locate the tool set for desktop versions of Windows, access www.microsoft.com/downloads and search for “Remote Server Administration Tools”. Find the package for your desktop version. Exact links are provided in the References section at the end of this article. Once the download completes, run it. The installer does not provide any details; it proceeds like a hotfix installation. Once it is complete, new Windows components will be available.
How to Enable the Remote Consoles on Desktop Operating Systems
There are several ways to access the necessary location to enable the consoles. The quickest way is to access the Start menu and type “Turn Windows features on or off”. As you type, Windows should look for suggestions and will likely make the shortcut available to you before you enter the entire phrase. You can also find this link if you access the “Programs and Features” node of the Control Panel.
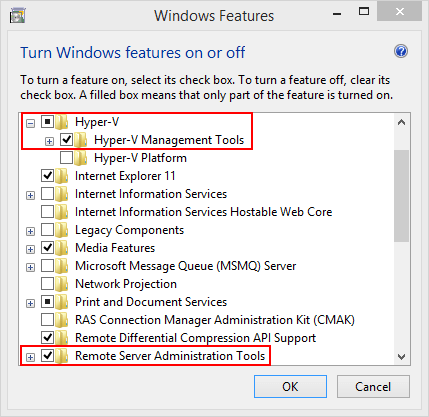
Once in the screen, expand the Hyper-V node and check the box for Hyper-V Management Tools. If you downloaded RSAT, there will be a tree node for Remote Server Administration Tools. Expand that and enable any consoles you need. The following screenshot was taken from Windows 8.1; Windows 10 looks very similar.

How to Enable the Remote Consoles on Server Operating Systems
In the server operating systems, Windows features are handled inside Server Manager instead of from within Control Panel. Start Server Manager. From its primary screen, you can click “Add Roles and Features”. In the menu bar at the top right, there is an “Add Roles and Features” item in the “Manage” drop-down that will take you to the same place.
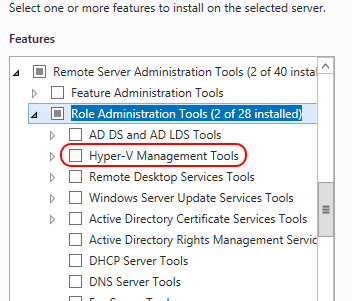
This place is the “Add Roles and Features” wizard. Click “Next” on the first two screens and you’ll arrive at the “Selection destination server” page. Highlight the server(s) that you want to add the features to and continue past the “Server Roles” page to the “Features” page. Unlike the desktop operating systems, everything that you want for remote management is underneath the Remote Server Administration Tools node. Specifically, the Hyper-V Management Tools are found under the Role Administration Tools node:

Check that option along with any others you’d like to have on the system. Continue through the wizard to complete installation.
How to Access the MMC Consoles after Installation
Once the consoles are installed, they’ll appear under the Administrative Tools section in your Start Menu and in the Control Panel. Of course, you can also access them by name at the Start screen (Windows 8.1) or Start Menu (Windows 10). Just click the Start button and start typing. For example, start typing “Hyper-V” and it will suggest “Hyper-V Manager”. For the sake of convenience, you can pin this console to the primary Start menu or to the taskbar just like any other application.
How to Control Remote Computers with MMC Consoles within a Domain
If you’re working in a domain and both the source and destination computers are in the same domain, then there’s little else to do. You only need to ensure that you’re running the consoles using the credentials of an account that has administrative privileges on the target system.
How to Control Remote Computers with MMC Consoles within a Workgroup
If you’ve got workgroup-joined systems anywhere in the mix, that makes things quite a bit harder. Your first, best option is almost always to join all systems to the same or trusting domains. Kerberos provides a level of security and convenience that is impossible to match with workgroup mode.
If you must use workgroup mode for whatever reason, there are a number of settings you must make. Be aware that even after making all of these changes, some people are still unable to remotely control their Hyper-V systems.
- Match administrative accounts. The account that you run the console with on the remote system must exactly match an administrative account on the target system. This means that both the user name and the password must be identical in both locations, and if you ever change one, you must also change the other. If you are working with multiple systems, these matching accounts must be maintained on each system. Be aware that when using any tools under this account, the credentials are passed over the network and can be intercepted, although they are encrypted.
- Enable WinRM. On all involved systems, run the following at an elevated command prompt:
winrm /qc
-
Enable the ANONYMOUS LOGON account to perform remote management. On the remote system (the one where you will be running the console):
- Click Start and type dcomcnfg.exe and, when the executable is located by search, press [Enter].
- Expand Component Services.
- Expand Computers.
- Right-click My Computer and click Properties.
- Switch to the COM Security tab and click the Edit Limits button in the Access Permissions section.
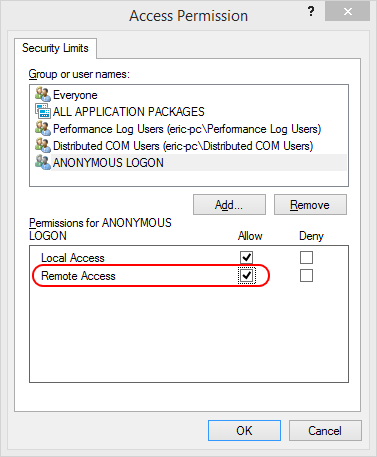
- Highlight the ANONYMOUS LOGON entry. Check Allow in the Remote Access row:

- Click OK twice and Yes to the warning. Close the Component Services applet.
This is sufficient to allow Hyper-V Manager and a few other consoles. For others, you must modify firewall rules. There are plenty of guides available on manipulating the Windows Firewall. You can search the Internet for specific entries or you can refer to the References section at the end of this article for more generic entries.
Use Third-Party Tools and Scripts to Manage Hyper-V
Hyper-V has a rich and growing ecosphere with a number of commercial entities and independent enthusiasts constantly producing new material. A number of these tools are linked from the following list of free Hyper-V management and monitoring tools.
Multi-Machine Operations
So far, what you’ve seen involves connecting from a single source machine to a single target machine. Some operations require a so-called “double hop”, in which you remotely instruct one machine to send instructions to a third machine. This is intrinsically an insecure operation, so it’s blocked by default, even within a domain. Sometimes its usage is just a matter of convenience; for instance, using one remote PowerShell session to jump to another computer. Other times, it’s almost unavoidable; an example is Shared Nothing Live Migration.
CredSSP
CredSSP is short for “Credential Security Support Provider”. What this fancy term means is that there is a provider available to pass encrypted credentials from one computer to another. This is mostly used with PowerShell, but some console functions make use of it when the systems are domain-joined. CredSSP has a very major downside, and that is that the credentials are stored on the first-hop remote machine and are passed using a method that can be intercepted. The second issue with CredSSP is that it only works once; the recipient computer cannot pass those credentials to a third system. In contrast, Kerberos can continue passing tokens indefinitely.
To enable CredSSP on the final endpoint system (the computer that will accept saved credentials from another computer), run the following at an elevated PowerShell prompt:
Enable-WSManCredSSP –Role Server
On the system that will store the credentials and forward them to the previous system, run the following at an elevated PowerShell prompt:
Enable-WSManCedSSP –Role Client –DelegateComputer mgmtstation.domain.local
This will allow the specified named computer to connect in and then pass credentials to a third computer. You could use an asterisk to allow all domain members, although this is an even greater security risk.
When using PowerShell to connect to a CredSSP-enabled system, ensure that you use the –Authentication parameter and supply credentials:
Enter-PSSession -ComputerName hypervhost.domain.local -Authentication Credssp -Credential (Get-Credential)
You’ll have to do the same thing when connecting to the third computer.
While it is technically possible to enable CredSSP for workgroup-joined systems, it requires access to the local group policy. That can be a challenge on a workgroup-joined Hyper-V system. It’s also not supported for functions such as Shared Nothing Live Migration. A link to a TechNet blog on the subject is included in the References section at the end of this article.
SSL Certificates
A few host-to-host operations, such as Hyper-V Replica, are made easier through the usage of SSL certificates. In most cases, it is not supported to use self-signed certificates (certificates that a non-certificate authority issues to itself) because these cannot be validated. It is supported to use your own certificates generated by a certificate authority under your control, such as one built on a Windows Server 2012 R2 running Microsoft Certificate Services.
If you haven’t got such a system (called a Public Key Infrastructure or PKI), configuring one is not overly difficult. It doesn’t require a domain to function, so if you’re in workgroup-mode, you can use it in a few instances to get around limitations that would otherwise require a domain. Microsoft provides a primer with links to detailed coverage here.
You also have the option to use certificates from an external commercial provider, such as VeriSign or InCommon. Unless you intend to make your Hyper-V hosts available to external customers, this is usually an unnecessary expenditure.
For the inexperienced administrator, installing certificates can be a somewhat daunting task. Start with this TechNet reference. A more thorough procedure is included in the book Hyper-V Security, written by Eric Siron and Andrew Syrewicze. Many SSL providers also have instructions on installing these certificates that work just as well no matter where the certificates came from.
How to Use SSL with WSMan and PowerShell
Configuring WSMan to use SSL certificates is a fairly involved task and, as mentioned earlier in this chapter, doesn’t add much to security. If you’d like to use it anyway, Microsoft has published one of the few, yet also one of the best, guides on doing so.
Windows Server Backup
If you run or manage virtual environments that have one or more physical machines or legacy servers that have not been virtualised you can now use Altaro Physical Server Backup to protect these physical machines and keep them safe. Altaro Physical Server Backup is a windoes server backup freeware solution created to satisfy this need, with the added bonus that it’s free. Back up the physical servers on your network through this P2V solution and benefit from a fast and easy recovery should they be impacted by a disaster. Download Altaro Physical Server Backup


