Installing Hyper-V is not a difficult undertaking. Exploring the various options for installation in advance is worth your time, however, as switching later is not so simple. There are two generic operational modes for the server edition of Hyper-V:
- The free Hyper-V Server
- As a role in Windows Server
In practical terms, the major difference between these editions is that Hyper-V Server does not include the standard Windows graphical user interface (GUI) at all, whereas Windows Server gives you the option between the GUI or Core mode at install time. Also unlike Hyper-V Server, you can opt to enable or disable the GUI at a later time in Windows Server.
This article is devoted to both of the non-graphical installation choices and will begin by explaining the reasons that you might choose to use one of those modes instead of a GUI installation. However, the biggest decision to make is not regarding the graphical interface, but whether or not to use the free edition.
Before continuing, if you are managing important business operations, you should ensure your physical servers are properly secure with Altaro Physical Server Backup. Download our physical server backup free today!
Why Choose Hyper-V Server or Hyper-V in Windows Server Core Mode?
Many long-time Windows administrators choose to use Windows Server instead of the free Hyper-V Server product simply because of the familiarity of using a graphical environment. Before defaulting to that route, consider the following benefits of the graphics-free mode:
1. Reduced Resource Demand
One of Hyper-V’s central purposes is sharing physical resources across multiple virtual instances. The fewer resources that are in use, the more resources that are available to share. The difference is not dramatic in some cases, but every bit counts in a high-density environment.
2. Reduced Patching Burden
The more components that are enabled on a system, the more patches will be required. The more patches that are required, the higher the odds of downtime-inducing host reboots. While clustering can alleviate the downtime concern, even the act of patching consumes system resources. This can be problematic for organizations that run operations around the clock on densely packed hosts.
3. Reduced Attack Surface
With fewer active components, there are fewer entry points for an attack. The most common operating system component for assault is the Explorer graphical engine, which is not present in Hyper-V Server and not enabled in Windows Server’s Core mode. Working without a GUI does provide a meaningful improvement in system security.
4. Discourages Tinkering and Bad Behavior
Some administrators are just too curious for their own good. Sometimes, even good administrators will undertake an expedient action that causes unnecessary problems or introduces needless risk. When confronted by a system that has no GUI, most administrators that are just simply poking around will typically find something else to poke at. Not having a web browser available can prevent accidental exposure to attacks from casual browsing. Since a Hyper-V host is responsible for multiple environments, it can be every bit as fruitful to defend it from “friendly fire” as it is to protect it from malicious assault.
5. Manage GUI-less Hyper-V from a GUI on another System
All of Hyper-V can be managed by a remote system. It might be more convenient to build a management server or desktop and control all of your Hyper-V systems from that one console rather than connect to each of them individually. If you’re not going to be working on the local server, the lack of a GUI is likely to be a non-issue.
Hyper-V Server or Windows Server in Core Mode?
Once you’ve made the decision to forgo the GUI, you can turn your attention to the more impacting choice between the free Hyper-V Server and the licensed Windows Server installation methods. Assessing the needs of your environment will allow you to make an informed decision.
Licensing
The license for Hyper-V Server is free and the product does not need to be activated. This makes it ideal for isolated hosts that can’t reach the Internet and saves you from the hassle of activation by telephone. Despite some persistent myths, there are no licensing advantages to be gained from installing Windows Server.
However, Automatic Virtual Machine Activation (AVMA), a feature introduced in Windows Server 2012 R2, introduces a substantial technological difference. With AVMA, guest installations of Windows Server 2012 R2 using a particular key will be automatically activated by the management operating system if, and only if, that management operating system is Windows Server 2012 R2 Datacenter Edition. However, despite another persistent myth, you do not need to install that management operating system to have access to its virtualization rights. You only need to install it for access to this technology.
One very nice aspect of Hyper-V Server is that you’re always allowed to upgrade it to the current version without needing to secure new licenses. Windows Server does not grant this flexibility.
If you’ll be using your Hyper-V environment to host exclusively Linux guests or a virtual desktop infrastructure (VDI), choosing Hyper-V Server can save you a little bit on licensing. The guest virtualization rights granted by licensing a Windows Server management operating system would be wasted without any Windows Server guests, as they cannot be assigned to Linux or Windows desktop guests. Linux guest operating systems must be licensed in accordance with the distribution’s requirements. There are multiple methods for licensing Windows desktop guests; consult your licensing reseller for details.
If you’d like to delve deeper into the world of licensing for Microsoft virtualization, you can also download this Altaro eBook and consult these articles on the blog:
- Virtual Machine Guest Licensing and Hyper-V (2012 & 2012 R2)
- Microsoft Server Licensing in a Virtual Environment Revisited
Security
Windows Server has many more components available than Hyper-V Server. This makes it marginally more vulnerable than Hyper-V Server, although the best defense is simply not activating those features in the first place.
GUI Availability
While the earlier discussion covered the benefits of going GUI-free, you may later discover a compelling reason to enable a graphical environment. Windows Server in Core mode allows you to make this change very easily. With Hyper-V Server, you’ll be permanently locked into the command-line mode.
If you prefer going down the GUI-route in the first place, have a look at another article in this series: How to Install Hyper-V 2012 R2 in Windows Server
Local Disk Deduplication
If you will be storing your virtual machines on local storage and want to take advantage of built-in deduplication, you’ll need Windows Server as Hyper-V Server does not include this feature. If your virtual machines are on remote storage, this feature is not relevant. Be aware that Microsoft only supports using this feature to store virtual machines running desktop operating systems, not server operating systems.
Support
Obviously, Microsoft supports Hyper-V Server and Windows Server equally. The vendors of the applications you’ll be running might not. They likely won’t consider there to be any difference from a hypervisor perspective. But, you may need to install something directly into the management operating system, such as a backup agent. These might not support Hyper-V Server.
Making the Choice between Hyper-V Server and Windows Server Core
Unfortunately, there isn’t any single right answer. The choice between Hyper-V Server and Windows Server isn’t intended to leave you at an impasse; it’s meant to give you options. Take some time to go through the information above and make the decision that best suits your organization. If you later decide that you made the wrong decision, virtual machines will migrate freely between Hyper-V Server and Windows Server that are the same version. Virtual machines on hosts that are 2012 version can be migrated while online to a host that is running a later version of Hyper-V Server or a Windows Server (but they cannot migrate back).
How to Install Hyper-V Server or Windows Server 2012 R2 in Core Mode with Hyper-V
The installation of Hyper-V Server is nearly identical to that of Windows Server in Core mode. These steps will intertwine both, noting any steps that are unique to either product.
1. Download the software
Hyper-V Server 2012 R2 is freely downloadable from TechNet at this URL: http://www.microsoft.com/en-us/evalcenter/evaluate-hyper-v-server-2012-r2
Windows Server 2012 R2 is a purchased product, but it is available as a 180-day evaluation:
http://www.microsoft.com/en-us/evalcenter/evaluate-windows-server-2012-r2
2. Set your hardware options to support Hyper-V
As explained in the introductory article on Hyper-V, there are a few items you need to configure in your system’s BIOS or UEFI settings in order for Hyper-V to operate. These items are:
- Data execution prevention
- Hardware-assisted virtualization
- Disable C-States
There are a couple of optional hardware settings that you may choose to set.
- NUMA
- Hyperthreading.
For more detail on the how and why of these settings, you can get more info here: What is Hyper-V
3. If necessary, convert the software to a bootable image
If you downloaded your copy of Hyper-V Server or Windows Server, you’ll need to make it bootable. Your options will vary based on your hardware’s capabilities. Some can directly mount ISO images by the usage of so-called “virtual media”. For others, you may need to “burn” the image to writable DVD media. One free tool that allows this is ImgBurn.
4. Boot to the installation media and install the management operating system
Warning: This operation will replace any existing operating system.
Each physical system has its own process for booting to removable media. Most will prompt if they discover a bootable DVD drive or other image type. Consult with your hardware manufacturer’s documentation or support team if you need assistance.
Because the installation routines for Hyper-V Server and Windows Server are so similar, both systems are shown in the same steps below, with any differences noted along the way.
The very first screen that you’ll see will ask you to choose your operating system country and language. After that, you’ll be taken to a basic splash screen with the product name:
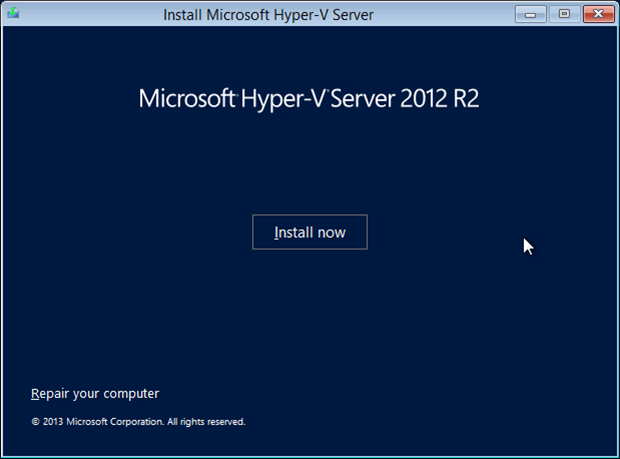
Clicking Install Now will take you to one of two screens. If your installation disk is for a fully licensed copy of Windows Server, then you’ll be prompted to enter your license key:
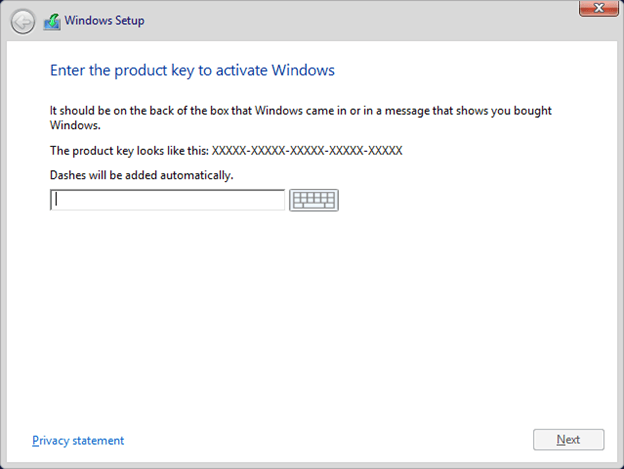
For all other installation media (Windows Server or Hyper-V Server), the above screen will not be shown. For all Windows Server media, the next screen is to select which operating system to install. If you are using fully licensed media, then your options will be limited to those available to the license key that you entered. For evaluation media, you’ll be allowed to choose from all editions that are on the image, as shown in the following screenshot:
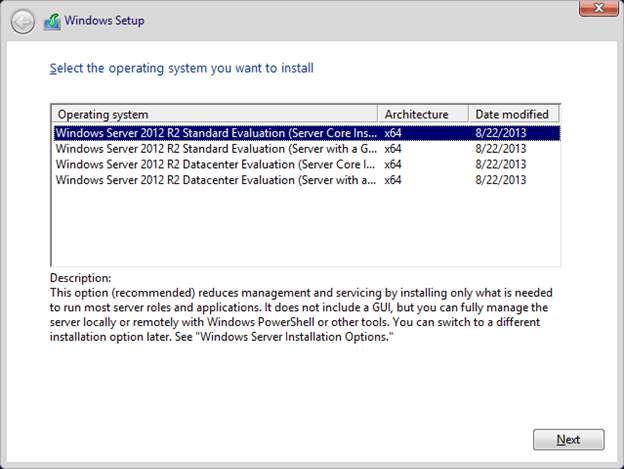
For the purposes of this article, the top version will be chosen. That choice is the Standard Edition of Windows Server in Core mode. You could also opt for the Datacenter Edition. The only difference would be that it would grant access to the Automatic Virtual Machine Activation feature. If you’re using Hyper-V Server, this screen will not have appeared as there are no operating environment choices to make.
Whichever product you are installing, the next screen is the license agreement:
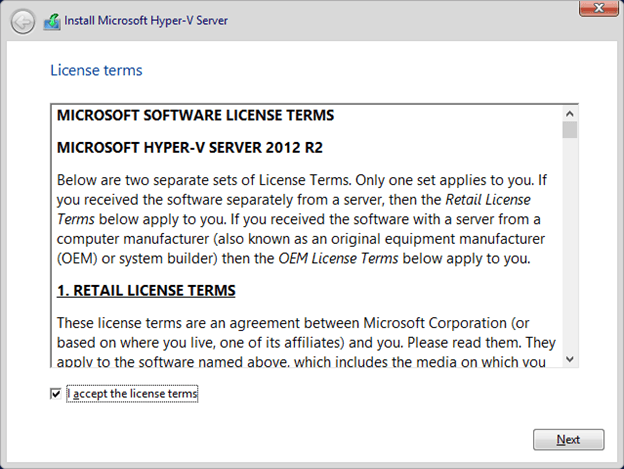
After that, you’ll have to pick whether or not you want to upgrade or install new. An upgrade installation isn’t covered here, but you can upgrade from the version immediately prior (2012 in this case) as long as it is the same product and edition. You can’t upgrade from 2008 R2 to 2012 R2 and you can’t upgrade Hyper-V Server 2012 to Windows Server 2012 R2. These steps choose “Custom” to install a fresh copy:
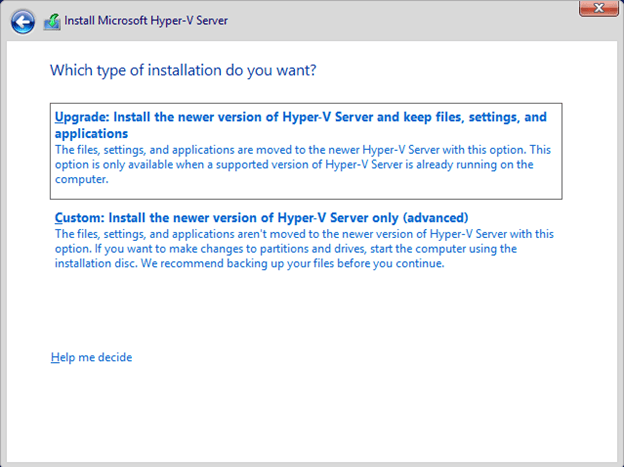
Next, we pick where we want to install the management operating system. Hopefully, you have at least one destination here as shown in the following image:
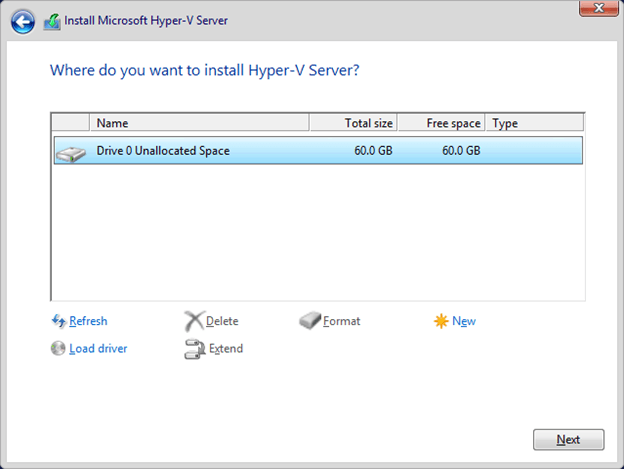
If you don’t, then you can click on the “Load driver” text link. This will show the following screen:
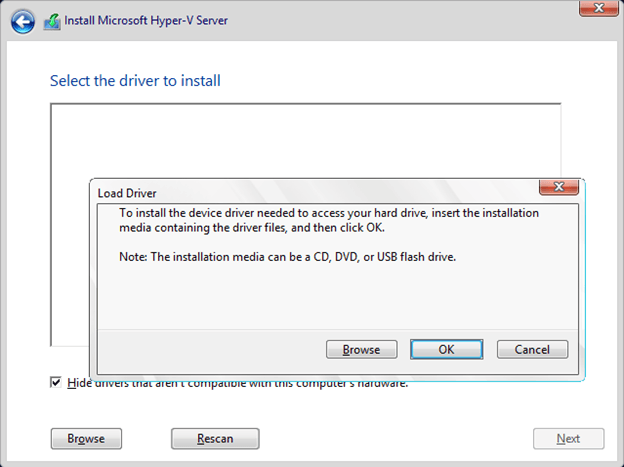
As the dialog indicates, you can load a driver from most any type of media. If you got here by accident, you can click on Cancel on that dialog, then the white arrow in the blue circle at the top left of the main window to return to the previous screen.
The system used in this demonstration has a very small disk area set up just to run Hyper-V. If you have a larger storage area that you’d like to break into pieces, use the New text button to create at least the installation location. The management operating system’s partition must be at least 32 GB in size to meet Microsoft’s minimum recommendations, but this is usually much too small in practice due to patching and other activities. A safer minimum size would be 60 GB.
After that, the only remaining screen is the file copy, expansion, and installation meters:
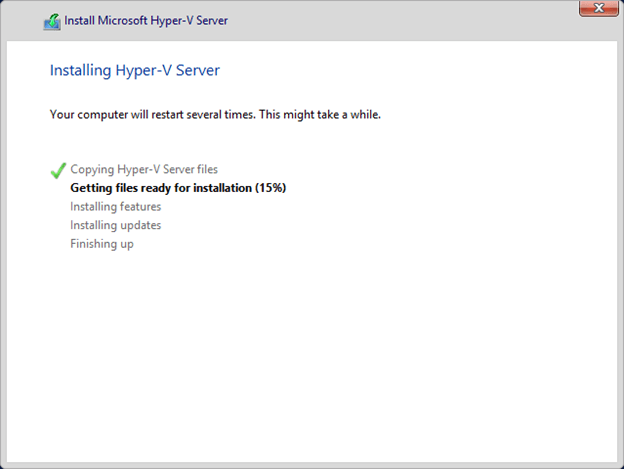
Once all these processes complete, your system will reboot. Congratulations! You’ve successfully installed Windows or Hyper-V Server!
5. Perform initial configuration
Once the system gets started, the best thing to do is perform basic housekeeping tasks to bring it up-to-speed as a full-fledged operating system.
We’ll start with the very basics. Before you can even get started, you’ll be required to change your password. This will be the password for the local Administrator account:
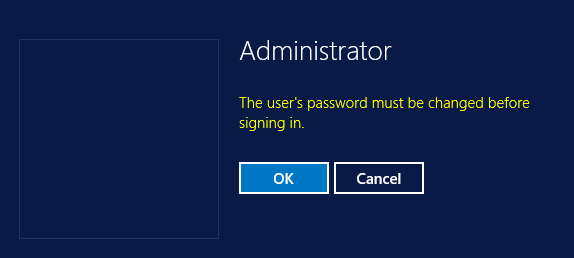
It will enforce a minimum complexity rule set.
6. Access the Server Configuration Menu
If you installed Windows Server in Core mode, then you’ll just be dumped to a black screen with a command prompt and a blinking cursor. Hyper-V Server’s welcome is a little bit friendlier, as it also has a window with the Server Configuration tool visible by default. Don’t fret if you’re using Windows Server; just type the following at the command prompt:
sconfig.cmd
You’ll see something like the following:
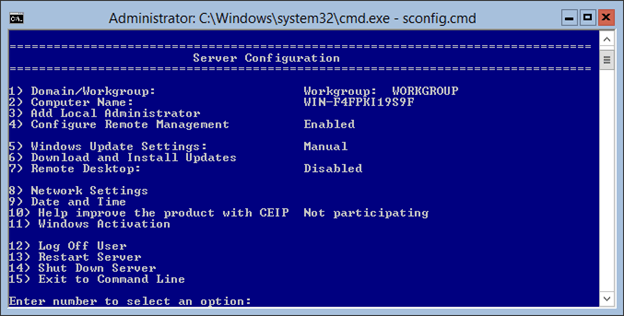
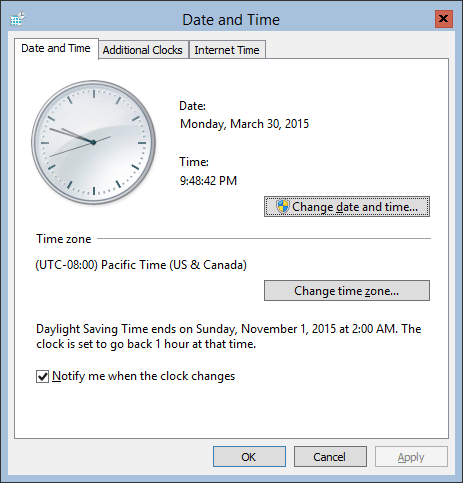
The organization of this screen leaves something to be desired, as you probably don’t want to go in order. Start by fixing the clock. Type 9 and press [Enter] to be greeted by the traditional clock and time-zone setting interface:
The best next step is to configure networking.
7. Initial networking configuration
Network configuration can be a challenge for Hyper-V systems, as they tend to have multiple physical network cards. The easiest thing to do at this time is to connect only the primary adapter to the physical switch. This will cause the others to be invisible inside Server Configurator, which will make initial configuration much easier. At this time, your primary goal is to get the management operating system onto the network, not necessarily to fully configure it. If you’re planning to combine this adapter into a teamed adapter later, the settings will transfer so there’s no harm using them now..
For now, use option 8 in the Server Configuration tool to begin setting up networking. You’ll be presented with a list of all adapters that are plugged in and enabled:
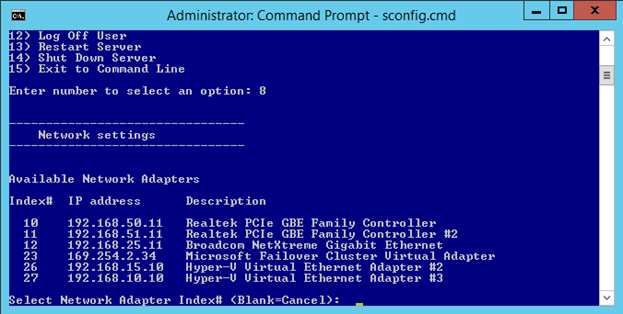
In the screenshot above, all the adapters have already been configured. In a new system, the only distinguishing feature will be the Description field, which is usually not very helpful. This is why it’s easiest to physically disconnect the adapters that you don’t want to configure.
Once you’ve settled on an adapter, type its index and press [Enter]. You’ll be shown the adapter’s current settings and options to adjust them:
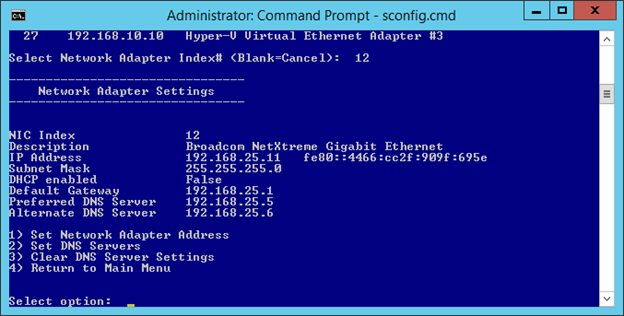
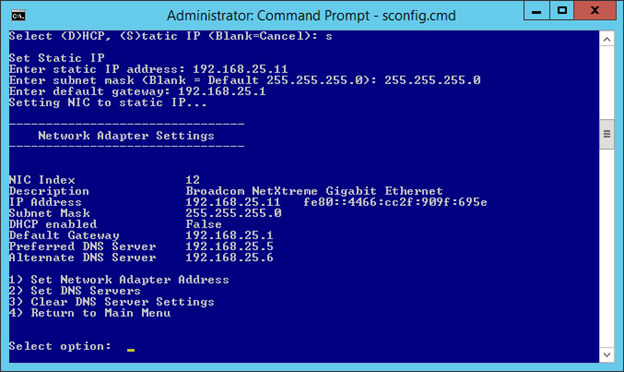
Enter the IP information first. Type the number 1 and press [Enter]. You’ll then be prompted with “Select (D)HCP, (S)tatic IP (Blank=Cancel):”. Hyper-V works best with static IP addresses, so hopefully you’ve got one in mind. Press S and [Enter]. After that, you’ll be prompted for the IP, subnet mask, and gateway to use for this connection. Upon entering them, you’ll be returned to the Network Adapter Settings screen:
Next, enter the DNS servers. Press 2 and [Enter]. You’ll be prompted for primary and secondary DNS servers with a confirmation dialog after each:
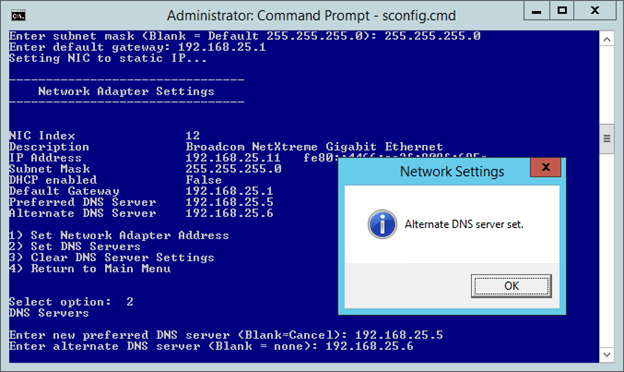
That’s it for networking (at least, for the management adapter). Press 4 to return to the Server Configuration screen.
8. Join the domain and rename the computer
If you need to pre-stage the computer account in Active Directory, access your AD management system and do that before proceeding.
In Server Configuration, type 1 and press [Enter]. You’ll be prompted to choose workgroup or domain mode. You’re already in workgroup mode, so type D and press [Enter]. You’ll be prompted first for the domain name. After providing that, you’ll be given a prompt for a username; it’s recommended that you enter it in DOMAIN\User format. After that, a new window will pop-up where you can enter your password without the characters being echoed to the screen.
After you’ve provided the credentials to join the domain, you’ll be given the opportunity to rename the computer. If you make use of that, you’ll have to go through the same process of providing domain-level credentials.
After all that is complete, you’ll get a pop-up window asking if it’s OK to restart the system:
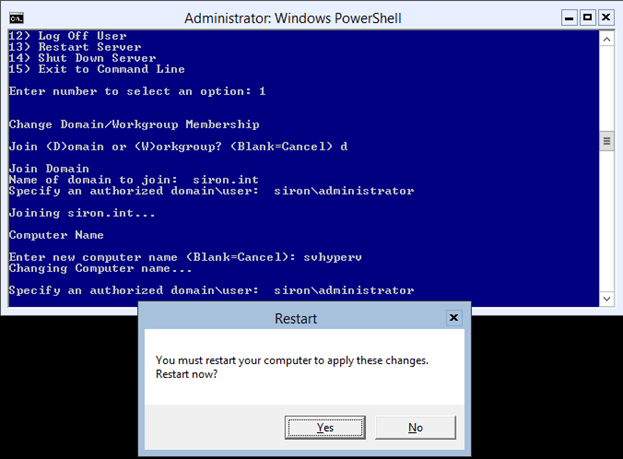
It’s recommended that you do so before proceeding.
Once the system has started up again, it will be a member of the domain. If you want to log on as the domain administrator (it is a best practice for administrators to have personal accounts with domain administrative rights), then you must use the format DOMAIN\Administrator. Just typing in Administrator for the user account will always use the local administrator account.
9. Install Windows Updates
Open the Server Configuration menu, if it’s not already open. Type 5 and [Enter]. Since you may have your own process for updates, follow the options to set Automatic or Manual as you desire. Once you return to the main menu, choose option 6 to install updates. Your only option here is to choose between all updates or only recommended updates. Again, follow your organization’s practices.
10. Enable Remote Management and Desktop
Hyper-V Server and Windows Server in Core mode are intended to run “headless”, which means that it’s expected that you’ll only use their consoles for a minimum amount of work – such as this initial configuration. For that to work easily, you’ll need to enable a few options.
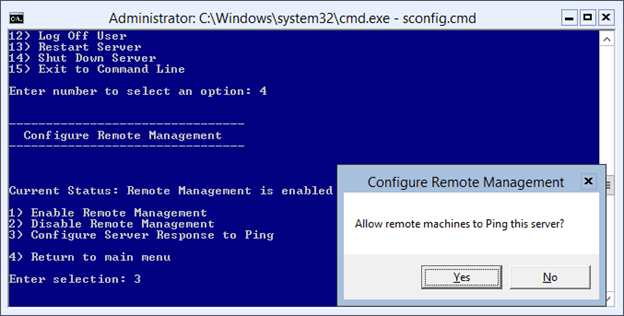
We’ll start with Server Configuration option 4, “Configure Remote Management”. This will show “Enabled” by default. The option to allow Ping requests is not enabled by default. If you wish to enable it, access this menu and press 3 and [Enter]. Choose to allow or disallow it from the dialog:
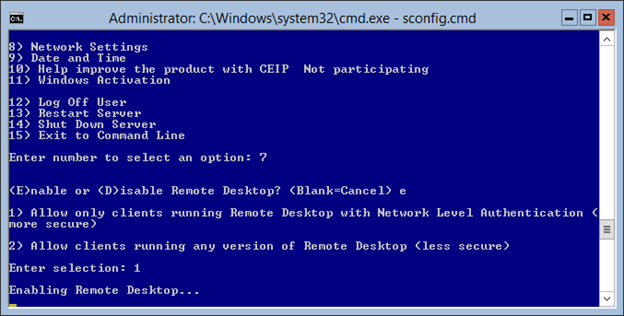
Inbound Remote Desktop connections are blocked by default. Choose number 7 from the main menu to access the option to change it. Type E and [Enter] to enable Remote Desktop. You’ll be asked if you want to allow only clients using Network Level Authentication technology or any RDP client. Modern Windows clients all use NLA, but some organizations allow access from devices running other implementations of Remote Desktop clients. Choose the option according to your needs:
11. Activation (Windows Server only)
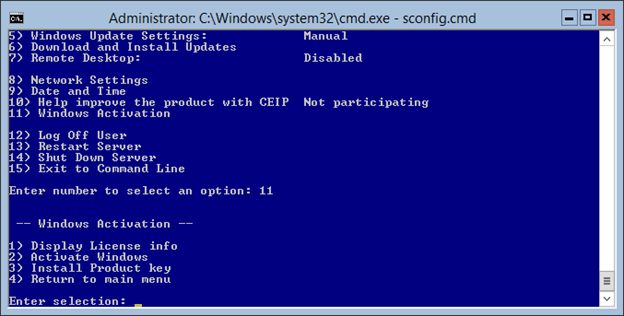
The last action to take in Server Configuration is to activate Windows using option 11. This choice does not appear in Hyper-V Server; that menu only has 14 items.
Server Configuration’s activation menu is a front-end for slmgr.vbs, which is a built-in script to manage licensing on Windows Server. As a side note, it’s also present on Hyper-V Server. Please do not attempt to use it on Hyper-V Server; it is not possible to activate that product, but some people have found ways to convince its licensing module that activation is required. This will permanently break your Hyper-V Server installation and necessitate a complete reload of the management operating system.
The following is a screen shot of the activation menu in Server Configuration:
A detailed walk-through of the licensing process is not provided here. It should be easy to follow the prompts. If you run into trouble, contact your licensing reseller or the Microsoft clearinghouse. Phone numbers for your region can be found at: http://www.microsoft.com/licensing. This number can also be obtained from a graphical system by typing “slui 4” and pressing [Enter] (just remember to Cancel from that prompt after writing down the phone number).
12. Install Hardware Drivers
Despite their lack of a GUI, Hyper-V Server and Windows Server in Core mode include all the necessary components to operate Windows Forms applications and Windows Installer modules (.msi, .msp, etc.). Any driver packages using these frameworks will work without issue unless their authors have specific coding blocks in place.
For driver packs that only include the basic files, you can use the built-in pnputil tool. Copy the files to a temporary location on the local drive and, at a command prompt, run the following:
pnputil –i –a DRIVERPACK.inf
You’ll receive a confirmation if driver installation was successful.
13. Enable Hyper-V Components
All that’s left now is to turn on the components that you need to operate Hyper-V. While the earlier DISM tool is still available and functional, it’s preferred to use PowerShell for this task. Start PowerShell by typing powershell and pressing [Enter].
Hyper-V Server already has the hypervisor enabled, but you’ll have to turn it on for Windows Server. Neither comes with the PowerShell module for Hyper-V enabled. Regardless of your management operating system, you can use the following cmdlet:
Add-WindowsFeature –Name Hyper-V -IncludeAllSubFeature -IncludeManagementTools
This is the equivalent of enabling the following named features:
- Hyper-V
- RSAT-Hyper-V-Tools
- Hyper-V-Tools
- Hyper-V-PowerShell
For Hyper-V Server, pressing [Enter] will install the missing components without a required restart. For Windows Server, the hypervisor will be enabled. This will cause the system to need a reboot, which you’ll need to initiate manually (directions are in the next section). Be aware that the system will reboot two times while enabling Hyper-V.
A Closing Tip
The lack of a Start menu or screen of any kind can be confusing for a time. Often, newcomers to this interface will, from force of habit, attempt to finish their session by closing the command window(s). Of course, this leaves the entire session active with nothing but a blank screen.
To properly end a session type the following:
logoff
To shut down the system:
shutdown /s /t 0
The “0” tells the system how many seconds to wait before shutting down.
To restart the system:
shutdown /r /t 0
There are also the Stop-Computer and Restart-Computer PowerShell cmdlets. The Server Configuration menu has matching options.
And, if you’ve shut all your command windows, it’s easy to get them back. If you are logged in at the physical console, press CTRL+ALT+DEL. If you are logged in through Remote Desktop, press CTRL+ALT+END. Choose Task Manager from the menu. When Task Manager appears, click More details if the menu bar does not appear. From the File menu, click Run new task. In the dialog that appears, type cmd
and click [OK] to start the standard command prompt or type powershell and click [OK] to access a PowerShell prompt.
Conclusion
That’s it for the preliminary installation and configuration of your management operating system. You’re mostly set and ready to run Hyper-V. There’s still the matter of the virtual switch. We’ll get to that soon enough. Before that, we need to talk about how to manage Hyper-V.


