Save to My DOJO
The first stage of getting your Hyper-V virtual machines onto the network requires a Hyper-V virtual switch. If you don’t have much knowledge of the virtual switch, I strongly recommend that you read through our earlier article that explains it. Newcomers, even those with experience in other hypervisors, often encounter many issues with the virtual switch until they understand how it operates. This article applies to Hyper-V versions 2012 and 2012 R2. Most will be applicable to Windows 8.1 and 10 although Client Hyper-V does not have quite as many switch options.
What is the Hyper-V Virtual Switch?
Hyper-V’s virtual switch is exactly that: a digital construct that provides the same functionality as a physical switch. One difference is that it does not have a fixed number of ports. Those ports are also not numbered. In fact, you, as a Hyper-V operator, really have no visibility into the ports themselves. We only operate on the switch and on the virtual network adapters. Virtual network adapters are used by both the management operating system and by virtual machines. We connect those adapters to the switch and then it is responsible for moving information. For the most thorough explanation, refer to the article linked in the first paragraph.
For this article, there are a few things that you need to know right up-front:
- The Hyper-V virtual switch can work with 802.1q VLANs. It does this automatically without any special configuration. It does not have a default or “native” VLAN. Unless otherwise specified, packets travel without a VLAN tag. While not technically correct, this is often called “VLAN 0”. You can read our article on VLANs if you do not already have comfortable knowledge of this technology.
- The network quality-of-service (QoS) mode for the Hyper-V virtual switch can only be set at creation time. The documentation for 2012 and 2012 R2 insists that the default mode is Weight. This is incorrect. The default mode is Absolute.
- The internal and private virtual switch types do not use a physical network adapter, therefore they can only transfer data between virtual network adapters.
- The external virtual switch uses a physical network adapter or team of physical network adapters. Once a virtual switch has been assigned to an adapter or team, it completely controls all traffic inbound and outbound. You cannot use it for any other purpose (although you can attach a virtual network adapter within the management operating system to the virtual switch). Do not attempt to manipulate the bindings and protocols on a physical adapter or team that has a virtual switch assigned. Along that path you will find only heartache.
- It is not recommended to have more than a single external virtual switch per host. It is usually needless overhead. Use convergence to your benefit.
- Private and internal virtual switches are for isolation, not performance. They cannot be used with clustered virtual machines (VMs attached to private/internal virtual switches will not migrate).
- The physical adapter or team for a virtual switch must not be configured with a VLAN. Perform all VLAN-related operations on the physical switch and individual virtual network adapters.
- If you use a physical adapter team, only the teaming mechanism provided natively by Windows/Hyper-V Server 2012 or later is supported. Do not use your adapter’s software.
- When you create a team of adapters using the native tools, it creates a single logical adapter to represent the team by default. This is what the Hyper-V virtual switch is attached to. The team has the ability to create other logical adapters, but it is not supported to use multiple logical team adapters alongside the Hyper-V virtual switch. It is functional, however. One issue that you might run into is that network QoS behavior is not defined in this configuration.
- The Hyper-V virtual switch can operate in Single-Root I/O Virtualization (SR-IOV) mode. This technology allows a virtual machine to communicate directly with the network adapter, almost entirely bypassing the Hyper-V virtual switch. This article is not about SR-IOV, so I’ll only give it a brief treatment here with these notes:
- SR-IOV does improve performance, but the difference is not major and is not even noticeable except under very heavy, and very unusual loads.
- SR-IOV must be supported by your network adapter(s). Your adapter will limit the number of SR-IOV virtual adapters that you can create. Look for its number of “Virtual Functions” in the manufacturer’s specifications.
- SR-IOV drivers for your management operating system must exist.
- SR-IOV must be supported by your host’s motherboard and it must be enabled in BIOS/UEFI.
- SR-IOV must be supported by the guest operating system. Versions of Windows Server 2012 and later qualify. For some systems, you may also need to install some software from the manufacturer inside the guest.
- SR-IOV virtual switches only work as expected if they are connected to a single virtual adapter, not a team.
- A Hyper-V virtual switch can only be enabled for SR-IOV at creation time.
- My Hyper-V knowledge is focused on the server side, so I know very little about attaching virtual switches to wireless adapters. I know that many of the people that try run into troubles. I can’t help you with those problems.
Creating the Hyper-V Virtual Switch
There are three ways using the freely-available tools to create a Hyper-V virtual switch:
- PowerShell
- Hyper-V Manager
- Add Roles Wizard (during Hyper-V installation)
Purchased and third-party tools, such as System Center Virtual Machine Manager, can also create switches for you.
Creating a Hyper-V Virtual Switch Using PowerShell
PowerShell is the fastest and preferred way to create a Hyper-V virtual switch. It is the only method by which you can set the Quality of Service (QoS) mode. We’ll go over most of the common settings here, but more thorough documentation about the New-VMSwitch cmdlet is available on TechNet. You can also use Get-Help Get-VMSwitch.
We’ll start with a private switch, because that’s the easiest:
New-VMSwitch -Name vsPrivate -SwitchType Private
An internal switch is created almost the same way:
New-VMSwitch -Name vsInternal -SwitchType Internal
The outcome is different. The above will create a switch and a virtual network adapter in the management operating system with the same name as the switch. If you used exactly what I typed, you could view that adapter with: Get-VMNetworkAdapter -ManagementOS -VMNetworkAdapterName vsInternal.
Remember that the presence or lack of a virtual adapter for the management operating system is what distinguishes the private from the internal virtual switch. If you remove all of the management OS adapters from an internal switch, it becomes private. If you add an adapter in the management operating system to a private switch, it becomes internal.
Next, we’ll create an external switch using most of the available options. But, there is one little catch. We have to know which physical adapter or adapter team to connect our virtual switch to. The nice thing about the PowerShell cmdlet is that, unlike any of the other methods, we can do this by the adapter’s name. The other tools require that you select from the adapter “Description” field, which is not very descriptive. If you don’t already know the name of the adapter that you wish to use:
Get-NetAdapter
That will retrieve a list of all of the network adapters on the system. You can then pick the name of the adapter that you want. If you’d rather, you can use the adapter’s description field, although it is usually truncated on the default view. This might help:
Get-NetAdapter | select Name, InterfaceDescription
Remember that copy/paste does work in PowerShell. Click to drag a selection box around what you want. You can then use [Enter] to paste. If the automatic copy/paste doesn’t work, right-click on the PowerShell window’s title bar and select Edit -> Mark to begin copy mode.
With the name or description in hand, you can now create an external virtual switch. Let’s create one with SR-IOV left off but with QoS mode set to Weight. This is the most commonly desired configuration. If the adapter that I wanted to use had a named of “NIC 1 Port 2”, this is what the cmdlet would look like:
New-VMSwitch -Name vSwitch -AllowManagementOS $false -NetAdapterName 'NIC 1 Port 2' -MinimumBandwidthMode Weight
If I had used $true for AllowManagementOS, a virtual adapter would have been created in the management operating system on the new switch with the same name as the switch. You can use Add-VMNetworkAdapter and Remove-VMNetworkAdapter at any point in the future, so your selection at creation time is not permanent.
Let’s create the same switch with SR-IOV enabled:
New-VMSwitch -Name vSwitch -AllowManagementOS $false -NetAdapterName 'NIC 1 Port 2' -MinimumBandwidthMode Weight -EnableIov $true
For both AllowManagementOS and EnableIov, you can use $true or $false or 0 or 1. For MinimumBandwidthMode, you can press [Tab] to cycle through your options, which are Weight, Absolute, Default, and None.
Remember that MinimumBandwidthMode and EnableIov are permanent! If you do not select the option that you want at creation time, you cannot change it! Your only option is to destroy and recreate the virtual switch.
Creating a Hyper-V Virtual Switch Using Hyper-V Manager
The second best option for creating a Hyper-V virtual switch is using Hyper-V Manager. It does have the ability to enable SR-IOV, but it cannot set the QoS mode.
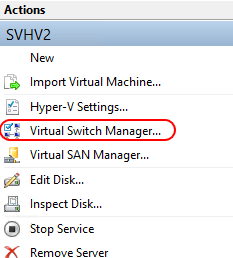
- Begin by opening Hyper-V Manager. On the right, in the Actions pane, click Virtual Switch Manager.

Open Virtual Switch Manager
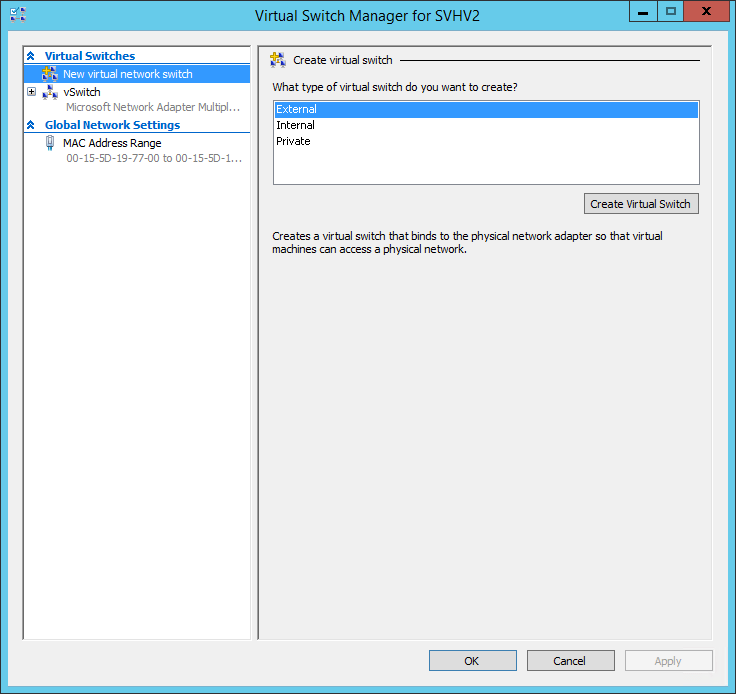
- The Virtual Switch Manager screen will open. On the left, it should have New virtual network switch highlighted. Click it otherwise to go to the Create virtual switch page as shown. It really doesn’t matter which of the three items that you pick here, as you’ll get another chance to select the type that you want. Click the Create Virtual Switch button.

New Virtual Switch Page
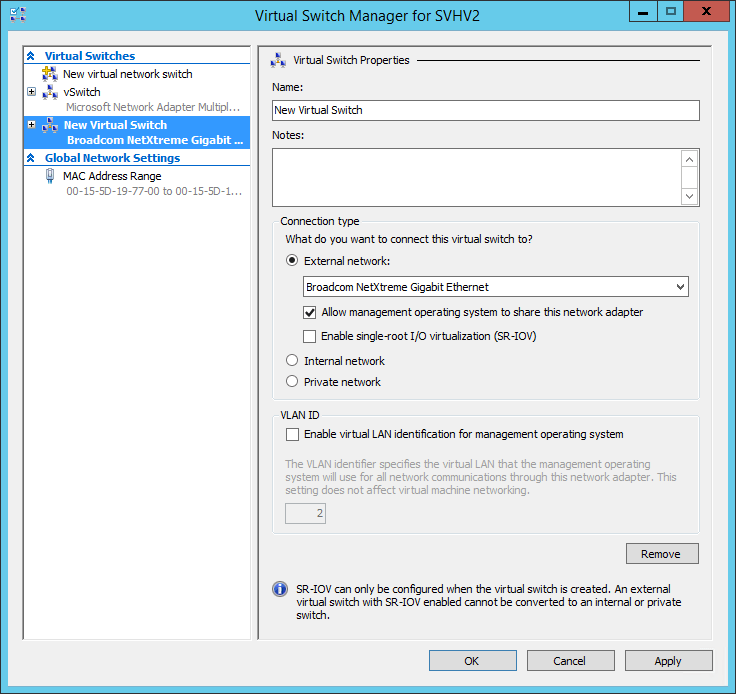
- The dialog is shown below. I’ll explain each of the options afterward. Make your selections and click OK to enact them and close the dialog immediately or click Apply to enact your changes but leave the dialog open. You can continue creating new virtual switches until you have all that you need and then click OK.

New Virtual Switch
These are the options from the above screen:
- Name: This is the name of the virtual switch that will be created. Remember that for Live Migrations, it needs to match on all nodes.
- External network: Selecting this option will create an external virtual switch (regardless of what option that you selected on the previous screen). If you select this option, you’ll also need to pick an adapter by its Description. You can match these up by their property sheets in Network Connections.
- Allow management network to share this network adapter: The wording of this label is horrible. There is no “sharing”. If checked, a virtual network adapter will be created for the management operating system on the new virtual switch. It will have the same name as the virtual switch.
- Enable single-root I/O virtualization (SR-IOV): If you check this, the virtual switch will be enabled for SR-IOV. You must still meet all the requirements as listed at the top of this article. Remember that this setting is permanent!
- Internal network/private network. Choosing either of these disables all the settings underneath External network and makes the switch internal or private, as desired.
- Enable virtual LAN identification for management operating system. This is another badly worded label. If you are creating either an external virtual switch with the Allow… box checked or an internal switch, this checkbox and its text box will be enabled. If you select it, you’ll need to enter a number in the text box. That will be the VLAN assignment for the virtual network adapter created for the management operating system. This setting does not assign any VLAN information to the virtual switch itself because that cannot be done in Hyper-V.
- Remove. If you made a mistake and don’t want the virtual switch, you can click this button. It will also remove an existing virtual switch.
Create a Virtual Switch with the Roles Wizard During Hyper-V Installation
My least favorite way of creating a virtual switch is using the roles wizard. It doesn’t give you any of the options that you saw in the previous methods.
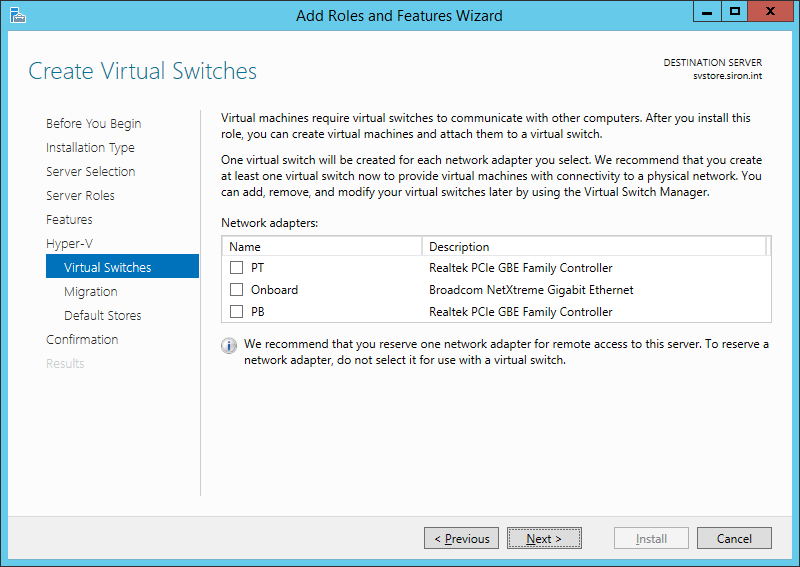
This post is only about creating the virtual switch, not installing Hyper-V. If you’re reading this section, I assume that you are in the process of installing Hyper-V and are wondering what to select on this screen. Therefore, I’m not going to show the entire wizard. The screen in question appears below:

Virtual Switch in Roles Wizard
My recommendation for the above is that you check nothing. Continue through to the end, allow it to perform all of its installation and reboots that it likes, then use one of the two methods shown above to create your virtual switch. The reason is that you cannot select whether or not to create a virtual adapter for the management operating system, which QoS mode to use, or to enable SR-IOV.
If you’re running a fairly small system, maybe neither of those matter to you. In all honesty, even a lot of medium-sized installations don’t really need to worry about them. But, I prefer setting things just the way that I like them and never worrying about it. If you really don’t care, all that you need to do is select one of the network adapters shown in the list. A virtual switch will be created along with a virtual network adapter for the management operating system. If you select multiple adapters, one switch will be created for each.
Post-Creation Notes
A newly created Hyper-V virtual switch is ready to use immediately — no reboots or fancy configurations are required. It will show up right away as an option to attach virtual network adapters to.
A few things:
- If you made a mistake a long time ago and don’t have the switch in the mode that you like, don’t panic! Before you do anything, honestly answer this question: Do you have a problem? By problem, I don’t just mean that it’s not in the configuration that you like. I seriously mean, is there a problem that can only be fixed by switching one of those modes? If the answer is “no”, then walk away and leave it be. Surely you have bigger things to worry about than a misconfiguration that’s not hurting anything.
- To create additional virtual network adapters for the management operating system, you must use Add-VMNetworkAdapter.
- If traffic isn’t working across your new switch, either the VLANs don’t match up between physical and virtual or something is wrong with TCP/IP. The virtual switch is such a simple construct that there really isn’t anything else that could be wrong (virtual switches on WiFi adapters are another matter and beyond this post).
- Just to reiterate, do not tinker with the bindings or protocols for the physical adapter or team adapter that hosts an external switch. No matter what is wrong, this sort of thing can only make it all worse. If you’re certain that your virtual switch is really broken, remove it and create a new one. If you can’t remove it for some reason, use Hyper-V Manager or Set-VMSwitch to convert it to an Internal or Private switch, then try to remove it.


Not a DOJO Member yet?
Join thousands of other IT pros and receive a weekly roundup email with the latest content & updates!


11 thoughts on "How to create a Hyper-V Virtual Switch"
Hi Eric,
Awesome article.
I was researching an issue and I came across your article.
Currently I have 1 VM running on Hyper-V, there is 1 Virtual Switch (External) with “Allow management operating system…” Ticked.
So the VM and Management operating system traffic runs over 1 Physical network adaptor.
I Want to split the 2. So that the VM uses 1 Physical network adaptor and the Management operating system uses another Physical network adaptor.
The reasoning is, the VM has a lot off traffic going to it and also the Management operating system witch I use for WSUS.
My question is, can I just configure another Physical network adaptor (static IP’s…) and un-tick “Allow management operating system…” under the VSwitch?
Regards,
Edd
Yes.
Hi Eric,
Awesome article.
I was researching an issue and I came across your article.
Currently I have 1 VM running on Hyper-V, there is 1 Virtual Switch (External) with “Allow management operating system…” Ticked.
So the VM and Management operating system traffic runs over 1 Physical network adaptor.
I Want to split the 2. So that the VM uses 1 Physical network adaptor and the Management operating system uses another Physical network adaptor.
The reasoning is, the VM has a lot off traffic going to it and also the Management operating system witch I use for WSUS.
My question is, can I just configure another Physical network adaptor (static IP’s…) and un-tick “Allow management operating system…” under the VSwitch?
Regards,
Edd