Save to My DOJO
Azure Virtual Machines make an already hugely flexible technology in virtualization even more adaptable through remote hosting.
Virtual machines are a part of Azure’s Infrastructure as a Service (IaaS) offering that allows you to have the flexibility of virtualization without having to invest in the underlying infrastructure. In simpler words, you are paying Microsoft to run a Virtual Machine of your choosing in their Azure environment while they provide you access to the VM.
One of the biggest misconceptions I see in the workplace is that managing Cloud Infrastructure is the same as or very similar to managing on-premise infrastructure. THIS IS NOT TRUE. Cloud Infrastructure is a whole new ball game. It can be a great tool in our back pockets for certain scenarios but only if used correctly. This blog series will explain how you can determine if a workload is suitable for an Azure VM and how to deploy it properly.
Why Use Azure Virtual Machines Over On-Premise Equipment?
One of the biggest features of the public cloud is its scalability. If you write an application and need to scale up the resources dramatically for a few days, you can create a VM in Azure, install your application, run it in there and turn it off when done. You only pay for what you use. If you haven’t already invested in your own physical environment this is a very attractive alternative. The agility this solution provides software developers is on a whole new level compared to before and enables companies to become more efficient at creating applications, and being able to scale when desired is huge.
Should I Choose IaaS or PaaS?
When deploying workloads in Azure, it is important to determine whether or not an application or service should be run using Platform as a Service (PaaS) or a Virtual Machine (IaaS). For example, let’s say you are porting an application into Azure that runs on SQL. Do we want to build a Virtual Machine and install SQL or do we want to just leverage Azure’s PaaS services and just use one of their SQL instances? There are many factors in deciding whether or not to use PaaS or IaaS but one of the biggest is, how much control do you require for your application to run effectively. Do you need to make a lot of changes to the registry and do you require many tweaks within the SQL install? If so, then the virtual machine route would seem a better fit.
How To Choose The Right Virtual Machine Type
In Azure, the Virtual Machine resource specifications are cookie cutter. You don’t get to customize down to the details of how much CPU and Memory you want. They come in an offering of different sizes and you have to make those resource templates work for your computing needs. Making sure the correct size of VM is selected is crucial in Azure, not only because of performance implications for your applications but also because of the pricing. You don’t want to be paying more for a VM that is too large for your workloads.
Make sure you do your homework to determine which size is right for your needs. Also, pay close attention to i/o requirements. Storage is almost always the most common performance killer, so do your due diligence and make sure you’re getting the VM with the proper IOPS (Input/Output Operations per Second) requirements. For Windows licensing, Microsoft covers the license and the Client Access License if you’re running a VM that needs CALs. For Linux VMs the licensing differs per the distribution.
Before we go and create a Virtual Machine inside Azure, let’s go over one of the gotchas that you might run into if you’re not aware. In Azure, since everything is “pay as you go”, if you’re not aware of the pricing at all times, you or your company may be getting a hefty bill from Microsoft. One of the common mistakes with VMs is that If you don’t completely remove your VM you can still get a charge. Simply just shutting down the VM will not stop the meter from running – you’re still reserving the hardware space from Microsoft so you’ll still be billed. Also when you delete the VM, you are going to have to delete the managed disk as well separately. The VM itself is not the only cost applied when running virtual machines.
Getting Started – Creating the Virtual Network
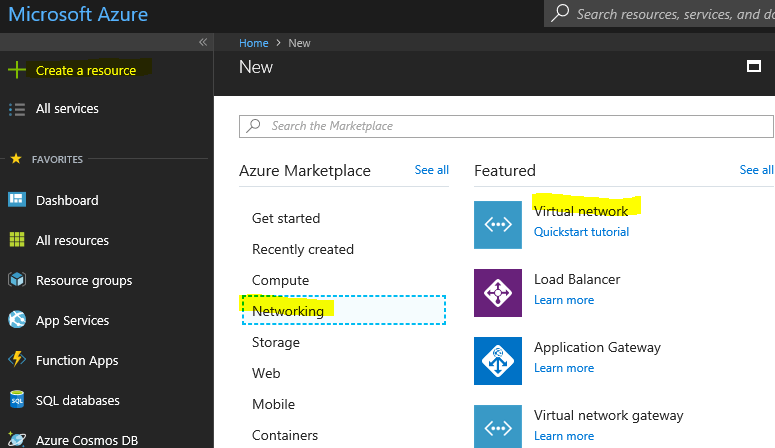
We will now demonstrate how to configure a Virtual Machine on Azure and getting connected to it. First, we will need to create the virtual networking so that the VM has some sort of network to talk out on. Afterward, we will create the Network Security Group which is like the “firewall” to the VM, and then finally we will create the VM itself. To create the Virtual Network, log into the Azure Portal and select “Create a Resource”. Then click on Networking > Virtual Network:

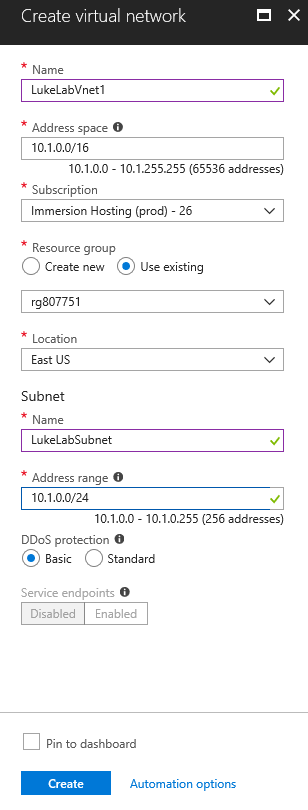
Now we can specify the settings for our Virtual Network. First, we’ll give it a name. I’ll call mine “LukeLabVnet1”. I’ll leave the address space default here but we could make it smaller if we chose too. Then we will select our subscription type. You can use multiple subscriptions for different purposes, like a Development subscription and a Production subscription. Resource groups are a way for you to manage and group together your Azure resources for billing, monitoring, and to access control purposes. We already have a resource group created for this VM and its components so I will go ahead and select that. If we wanted, we could create a new one on the fly here. Then, we fill in the time zone which is Eastern for me. Next, we’ll give the subnet a name because we can create multiple subnets on this virtual network later, I’ll call it “LukeLabSubnet”. I’ll leave the default Address space for the subnet out since we are just configuring one VM and setting up access to it. Once we are done we will hit “create:

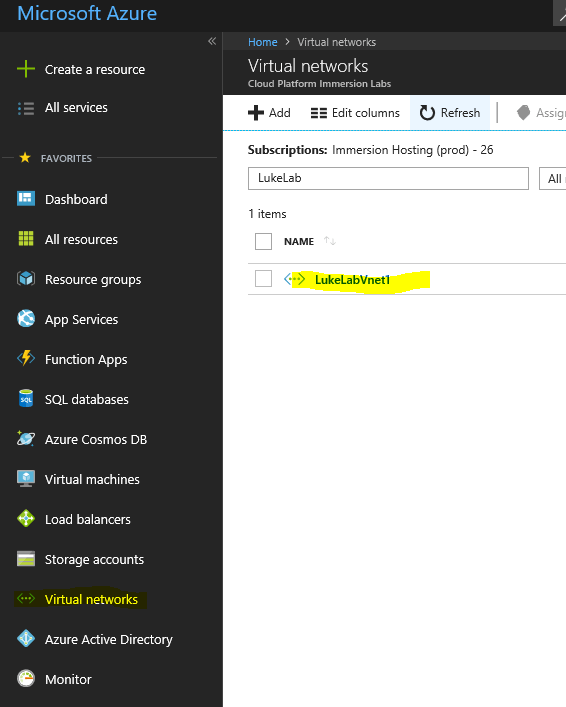
Now, to get to our newly created Virtual Network, on the left-hand side of the portal we select “Virtual Networks” and click on the one we just deployed:

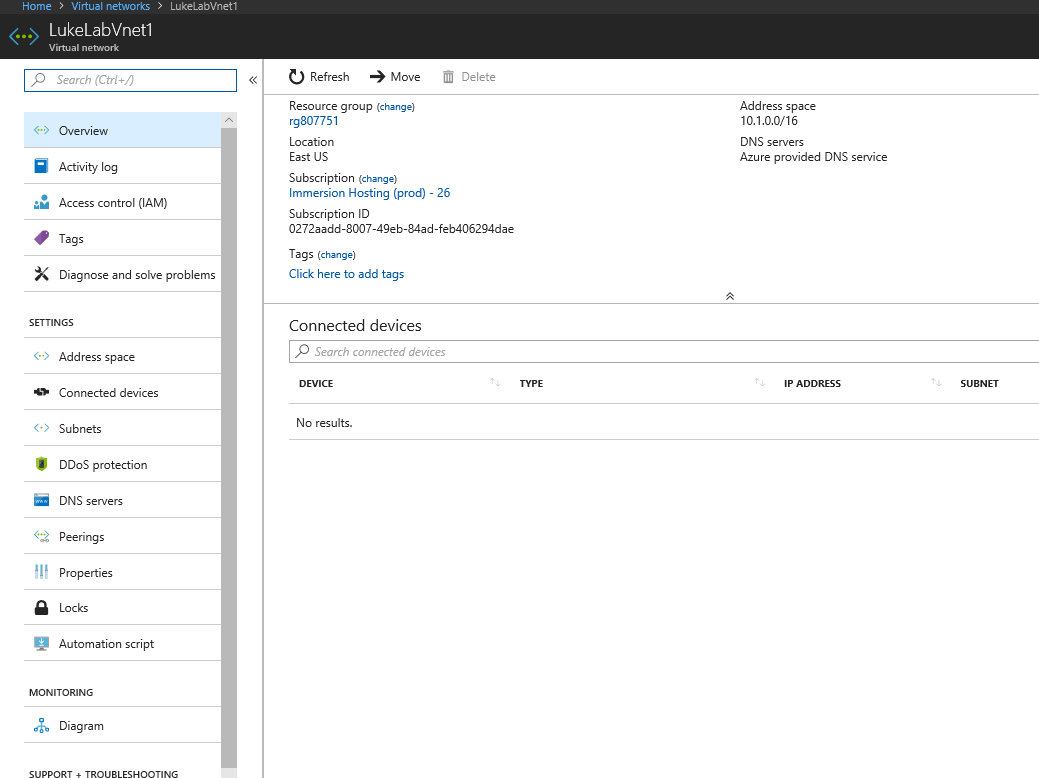
We can configure all of our settings for our Virtual Network here. However, for the simplicity of the demonstration we will leave everything how it is for now:

Now that we have our virtual network in place, we will need to create our Network Security Group and then finally deploy our VM which will we do in part 2 of this series. As you can see there are a lot of components to learn when deploying VMs in Azure.
Comments/Feedback?
If you’re unsure about anything stated here let me know in the comments below and I’ll try to explain it better.
Have you tried Azure Virtual Machines? Let us know your verdict!


Not a DOJO Member yet?
Join thousands of other IT pros and receive a weekly roundup email with the latest content & updates!


