Save to My DOJO
After you’ve installed Azure Stack ASDK and deployed the configuration script from Matt McSpirit (available on GitHub), there are some basic post-installation tasks that you should always walk through to double-check that the installation was properly finished and that you are able to jump over to the next step. The next step being, which of your individual use cases may fit Azure Stack. You can then start working with it to understand the different ways (portal or API) to get stuff done with it.
This article will explain what steps are important to check, and which configuration options are needed to make sure Azure Stack runs properly.
Before moving on, if you require more of a conceptual overview of Azure Stack before moving on? Read my Introduction to the Microsoft Hybrid Cloud Concept and Azure Stack first.
Ready to press on? Let’s do this.
1. Analyze the Azure Stack Deployment Logs
All scripts that ran during the deployment phase of Azure Stack ASDK are designed to generate log file information. Azure Stack ASDK Logs can be found here: C:CloudDeploymentLogs
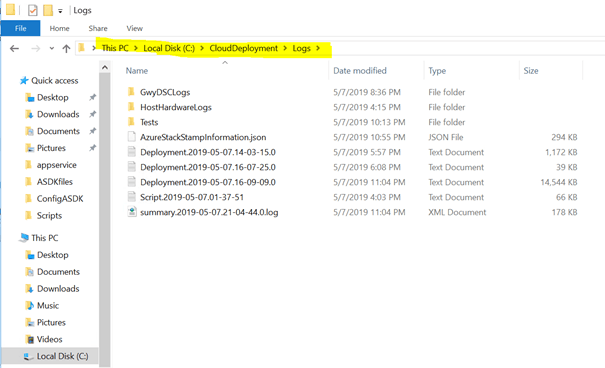
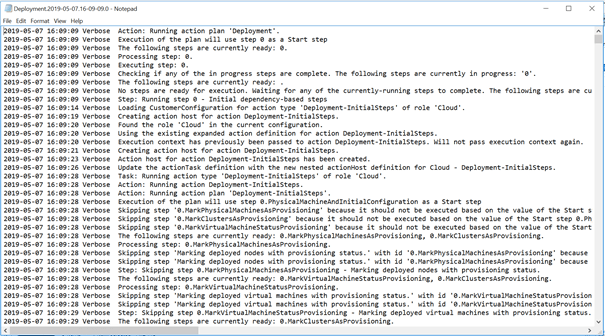
If we open the most recent logfile, we will see an overview of all deployment steps as you can see in the sample below.
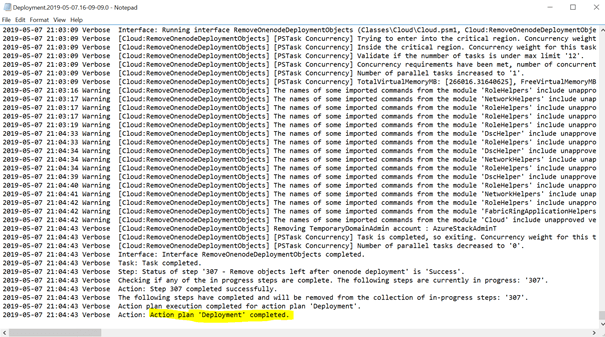
If we scroll down to the bottom and have a look at the last line, you should see text similar to the following.
If there are any error messages, the lines right before the error was mentioned should help to troubleshoot the issue.
There is another file called “AzureStackStampInformation.JSON” that will display the release version you have installed and some other important Azure Stack information.
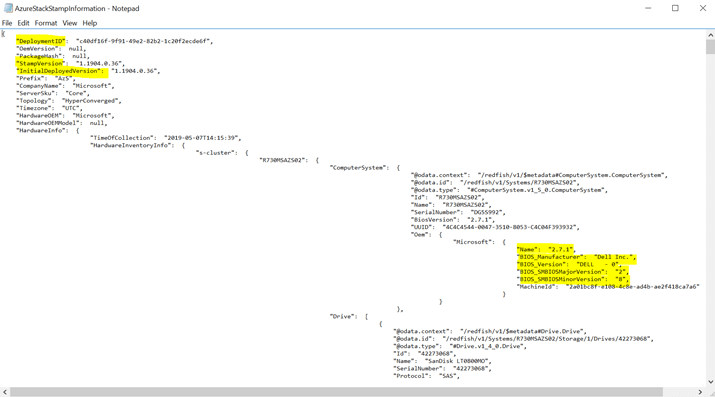
The above file in addition to the Host Hardware Log (shown below) gives you all required information to go into troubleshooting with Microsoft or even with whatever hardware OEM has been used for the deployment.

Finally, there is another log file folder that collects the watchdog logfiles for additional queries, located under the “Tests” folder within the Logs directory.

2. Understand Azure Stack Log Diagnostics
Azure Stack has a huge number of log files that can provide you great troubleshooting information. The following picture provides an overview of them.
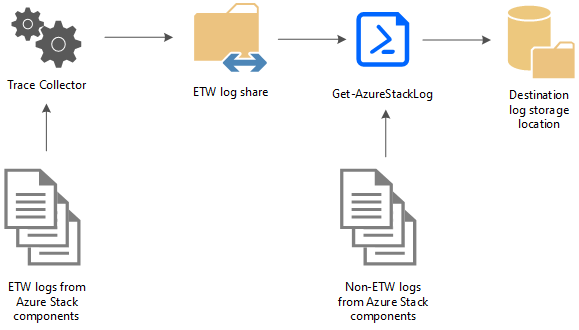
As you can see, the PowerShell command “GET-AZURESTACKLOG” is available to collect all these files in one single location. To be more specific, there are various Get-AzureStackLog parameters available to explicitly define the log files to be collected.
After using the Get-AzureStackLog Cmdlet, The log collection ZIP file should look somewhat like this.
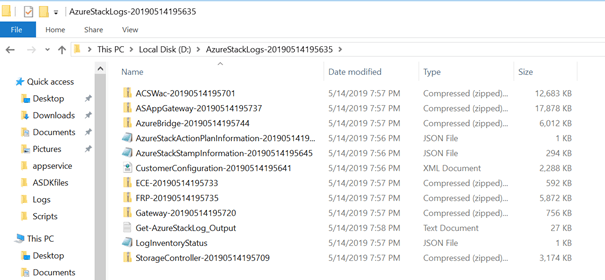
Mainly these files are good for getting in touch with Microsoft directly. As the ASDK support is forum and community-driven, these files are a good basis for support. If you are owning an Azure Stack Multiple Host environment, this cmdlet works the same way and is even more important when opening a support case.
3. Check Connectivity to Azure
If you have configured ASDK in connected mode, the Azure subscription registration (internally called “Azure Bridge”) has been configured properly. You can find these log files (yes I know, more logs) as follows:
Under C:MASLogsRegistration you’ll find a file that looks similar to the one found in the image below.

If you open up this file, you will see all the details around the Azure subscription registration.
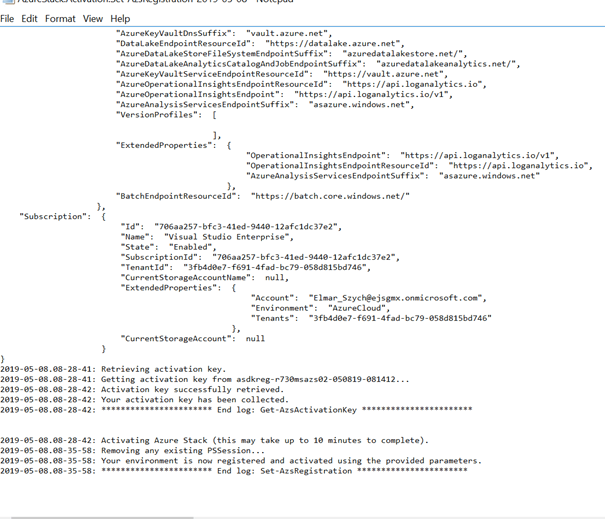
If there are errors, you will find all details near the corresponding line, if everything looks fine, the last line should look as described above, stating that the registration was successful.
4. Implement Backups of the Azure Stack Configuration
You can back up and restore configuration and service data using the Infrastructure Backup Service. Each Azure Stack installation contains an instance of the service. You can use backups created by the service for the redeployment of the Azure Stack Cloud to restore identity, security, and Azure Resource Manager data.
To enable the configuration backup feature, you will need to go on as described below using the Azure Stack Portal.
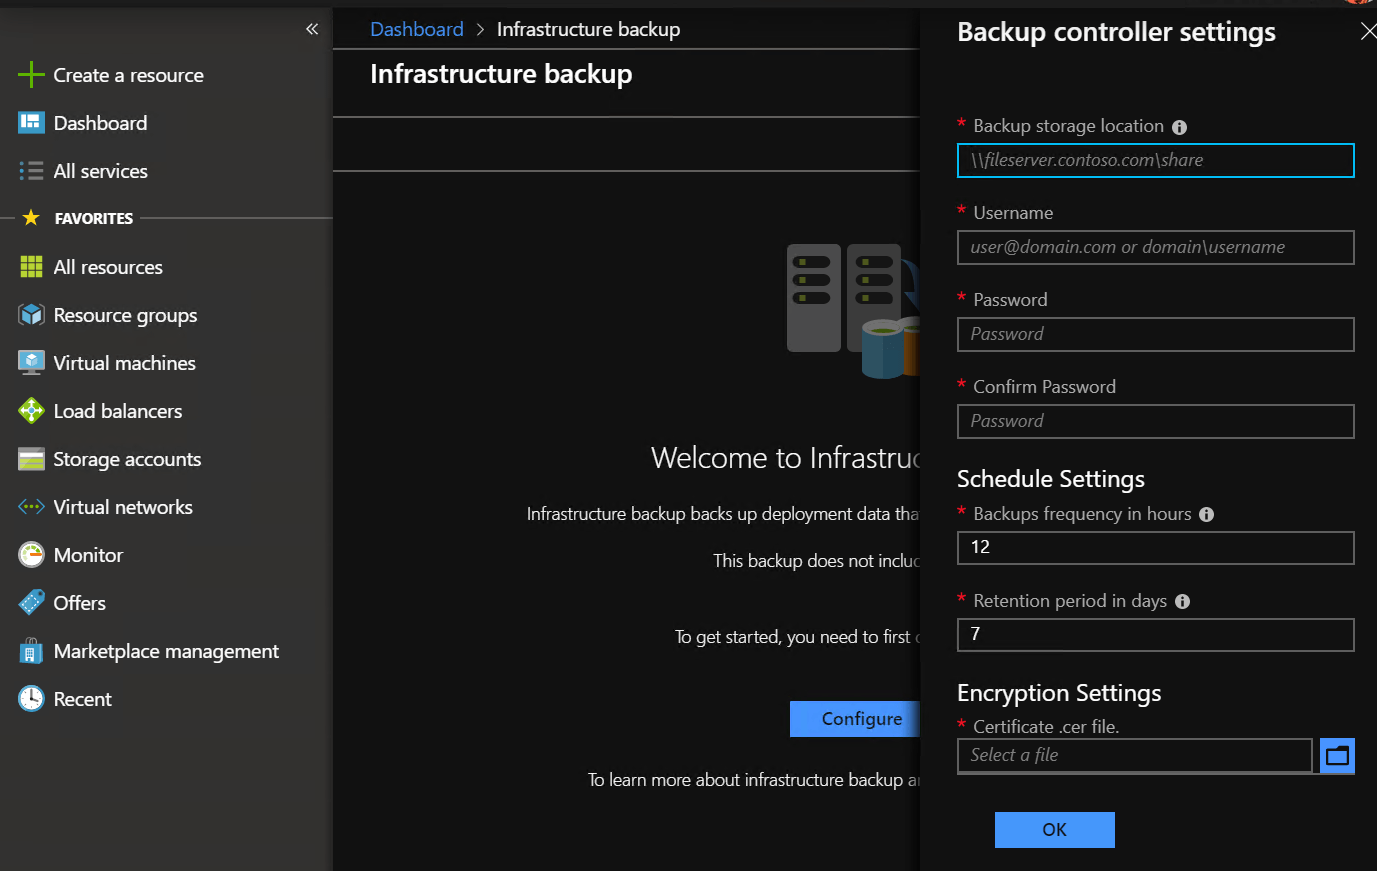
As you can see, under Dashboard > Infrastructure Backup, there are options to set the backup frequency in hours and the retention date. Additionally, there needs to be an encryption certificate available.
NOTE: Keep in mind, that this backup only includes the configuration data and does not include the Azure Stack Management VMs themselves.
5. Configure Identity Management
Azure Stack provides different layers of Identity Management as you can see below. When it comes to disconnected scenarios, the authentication provider is available locally in your network. If there is a connected scenario, Azure AD is the single point of authentication. This means that we will need to configure any additional accounts in Azure.
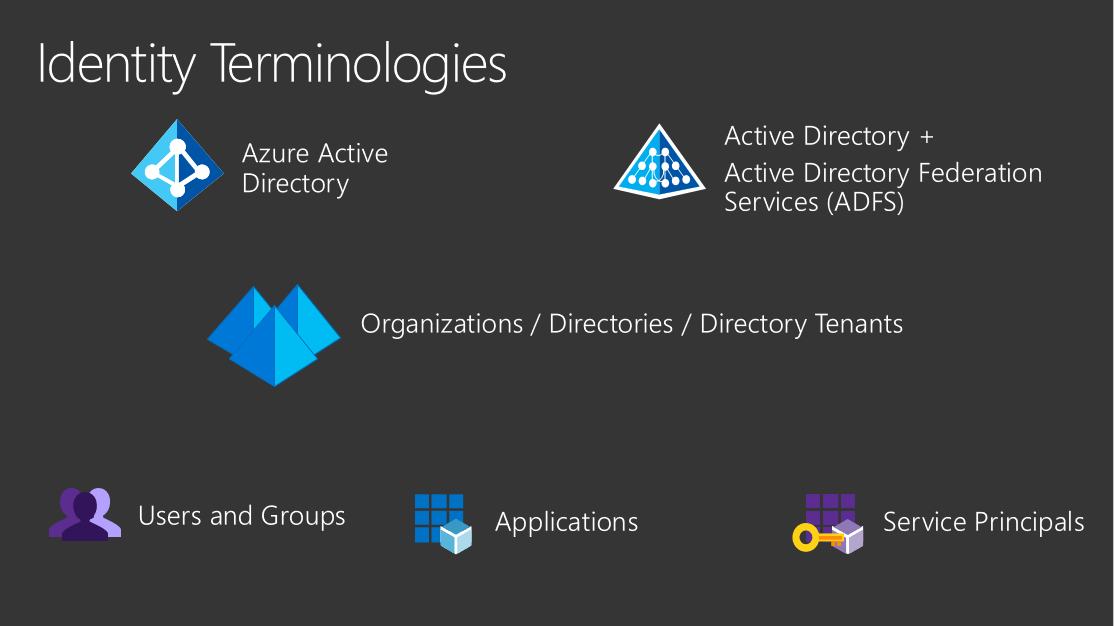
Any new accounts will need to join your instance Azure AD where the Azure Stack ASDK is a member. In the event the user is from a different instance of Azure AD, we will need to either enable guest access for the account or configure Azure B2B communication. Afterward, an administrative account in Azure Stack needs to set the appropriate permissions by setting the proper role for the account.
Azure Stack has three basic roles that you can apply to all resource types:
- Owner – can manage everything, including access to resources.
- Contributor – can manage everything except access to resources.
- Reader – can view everything but can’t make any changes.
Azure Stack has the following resource hierarchy:
- Each subscription belongs to one directory.
- Each resource group belongs to one subscription.
- Each resource belongs to one resource group.
Access that you grant at a parent scope is inherited at child scopes.
- You assign the Reader role to an Azure AD group at the subscription scope. The members of that group can view every resource group and resource in the subscription.
- You assign the Contributor role to an application at the resource group scope. The application can manage resources of all types in that resource group, but not other resource groups in the subscription.
Having this done in your Azure Stack installation, you now have different accounts that are able to access Azure Stack ASDK.
6. Connect ASDK to On-Prem Infrastructure (VPN)
As Azure Stack ASDK is deployed as a sandbox environment only. We will need to do some more steps to allow access from the customer lab environment, especially regarding networking configurations.
The easiest way to access Azure Stack ASDK is to RDP to the host VM and work from there. As this is not the smoothest experience for the customer’s employees (not to mention the issue of two concurrent RDP sessions), a VPN from the local network to the ASDK host needs to be enabled. This means that maybe some configuration changes in the existing LAN will need to be made to allow RDP to internal resources.
The following PowerShell scripts support the VPN connection and create the required configurations to Azure Stack ASDK on the PC the script is executed on.
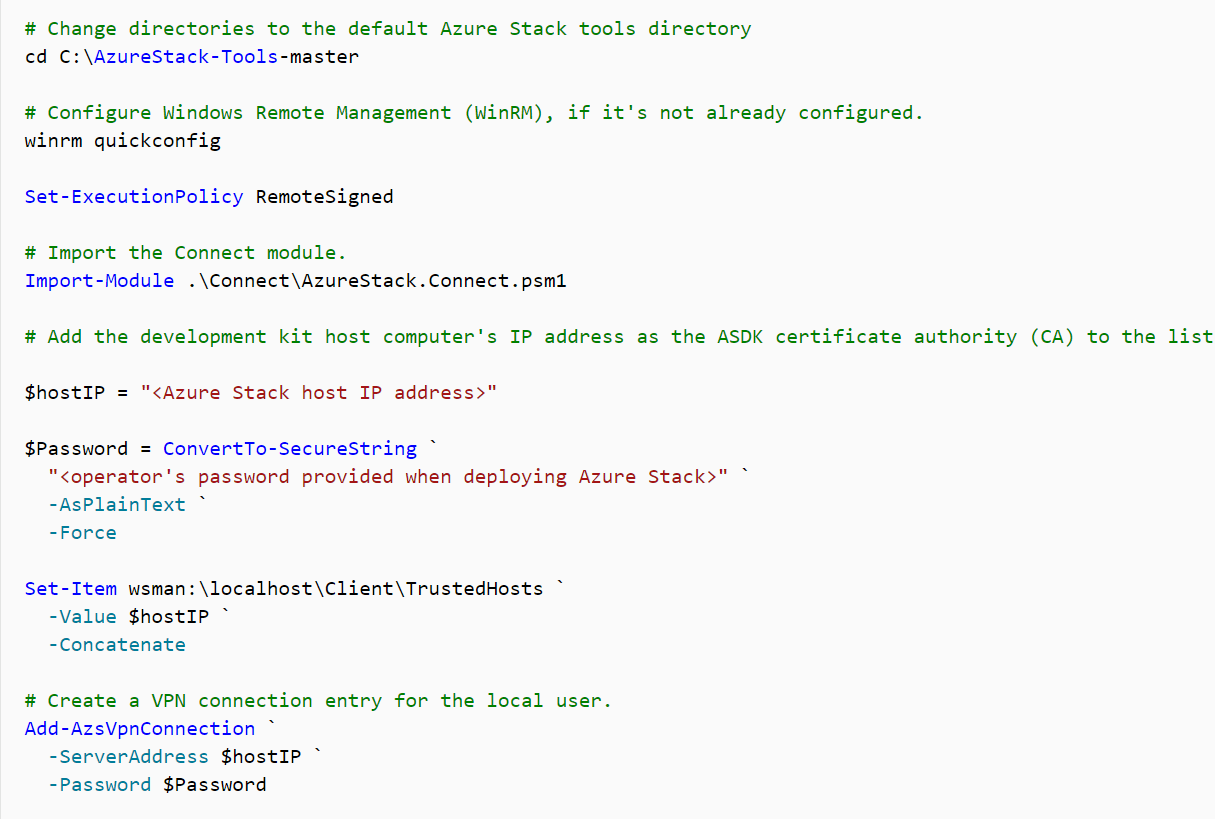
The script is available here: https://docs.microsoft.com/en-us/azure-stack/asdk/asdk-connect.
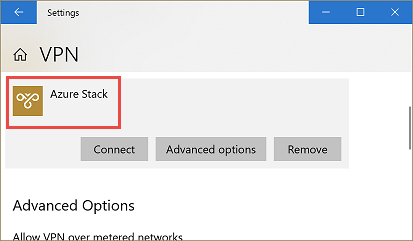
Now we can find the following VPN entry on the corresponding computer.
Next Steps
Now that everything should be “officially” up and running and you can now start the “proof of concept (PoC)” phase of Azure Stack in your environment. I would suggest testing the deployment of the required virtual machine templates and PaaS solutions before giving the testing team access to it. More on that in a future post! If you want to make sure you don’t miss out on that sign up for our newsletter to be notified as soon as that blog post is published!
Summary
As you have seen in this article, Azure Stack ASDK provides a great basis to start your Azure Stack experience and allows you to train easily and without buying an Azure Stack appliance in advance. Again, Azure Stack ASDK is a one host environment that provides all available solutions for Azure Stack (IaaS, PaaS, Containers, etc.) and in addition, is available to run for a maximum of 180 days to provide a long-term testing sequence within your company.
Thinking about Azure Stack means in general, that there should be a cloud awareness already present in your company, but there are reasons why it would not make much sense to deploy a specific service or main parts of it to Azure Stack. These services – also called use cases – need to be defined and afterward deployed to Azure Stack.
The Azure Stack Development Kit (ASDK) requires some physical resources but provides a cheap way to dive deeper into how Azure Stack works and how it can fit into your company’s service chain. Again, the deployment process of Azure Stack ASDK is straight forward (using scripts) provided by Microsoft or the community for deploying various solutions. Finally, there again needs to be some controlled steps and last configurations to enable access to your internal customers (as shown in this article).
Having that done, the final step is to give the Azure Stack testing group in your company access to the installed instance for the testing period. You can collect their feedback to get a high-level idea of how Azure Stack really “fits” inside of your organization.
What are your thoughts on Azure stack so far? Like it? Too complicated? Let us know in the comments section below!
Thanks for reading!


Not a DOJO Member yet?
Join thousands of other IT pros and receive a weekly roundup email with the latest content & updates!


