Save to My DOJO
In the dawn of computer system virtualization, its primary value proposition was a dramatic increase in efficiency of hardware utilization. As virtualization matured, the addition of new features increased its scope. Virtual machine portability continues to be one of the most popular and useful enhancement categories, especially technologies that enable rapid host-to-host movements. This article will examine the migration technologies provided by Hyper-V.
If you’re looking for an article that describes how to perform Hyper-V Live Migration in 2012 and 2012 R2 just follow the link, and we also have an article that discusses how you can troubleshoot Hyper-V Live Migration.
What is Live Migration?
When Hyper-V first debuted, its only migration technology was “Quick Migration”. This technology, which still exists and is still useful, is a nearly downtime-free method for moving a virtual machine from one host to another within a failover cluster. Quick Migration was followed by Live Migration, which is a downtime-free technique for performing the same function. Live Migration has since been expanded with a number of enticing features, including the ability to move between two hosts that do not use failover clustering.
Quick and Live Migration Requirements
All migrations in this article require that the source and destination systems be joined to the same domain or across trusting domains, with the lone exception being a Storage Live Migration from one location on a system to another location on the same system. Quick Migration and Live Migration require the source and destination hosts to be members of the same failover cluster.
Live Migration within a cluster requires at least one cluster network to be enabled for Live Migration. Right-click on the Networks node in Failover Cluster Manager and click Live Migration Settings. The dialog seen in the following screenshot will appear. Use it to enable and prioritize Live Migration networks.
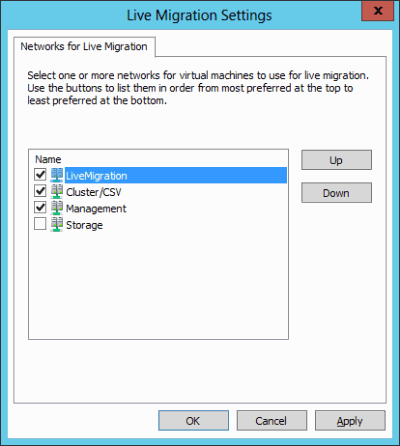
Network for Live Migration
Shared Nothing Live Migration and some migrations using PowerShell will require constrained delegation to be configured. We have an article that gives a brief explanation of the GUI method and includes a script for configuring it more quickly.
Quick Migration
Despite advances in Live Migration technology, Quick Migration has not gone away. Quick Migration has the following characteristics:
- Noticeable downtime for the virtual machine
- Requires the source and target hosts to be in the same failover cluster
- Requires the source and target hosts to be able to access the same storage, although not necessarily simultaneously
- Can be used by virtual machines on Cluster Disks, Cluster Shared Volumes, and SMB 3 shares
- The virtual machine can be in any state
- Only virtual machine ownership changes hands; files do not move
- Often succeeds where other migration techniques fail, especially when pass-through disks and questionable security policies are involved
- The virtual machine does not know that anything changed (unless something is monitoring the Hyper-V Data Exchange KVP registry section). If the Hyper-V Time Synchronization service is disabled or non-functional, the virtual machine will lose time until its next synchronization.
- Used by a failover cluster to move low priority virtual machines during a Drain operation
- Used by a failover cluster to move virtual machines in response to a host crash. If the host suffered some sort of physical failure that did not allow it to save its virtual machines first, they will behave as though they had lost power.
The primary reason that you will continue to use Quick Migration is that a virtual machine that is not in some active state cannot be Live Migrated. More simply, Quick Migration is how you move virtual machines that are turned off.
Anatomy of a Quick Migration
The following diagrams show the process of a Quick Migration.
The beginning operations of a Quick Migration vary based on whether or not the virtual machine is on. If it is, then it is placed into a Saved State. I/O and CPU operations are suspended and they, along with all the contents of memory, are saved to disk. The saved location must be on a shared location, such as a CSV, or on a Cluster Disk. Once this is completed, the only thing that remains on the source host is a symbolic link that points to the actual location of virtual machine’s XML file:
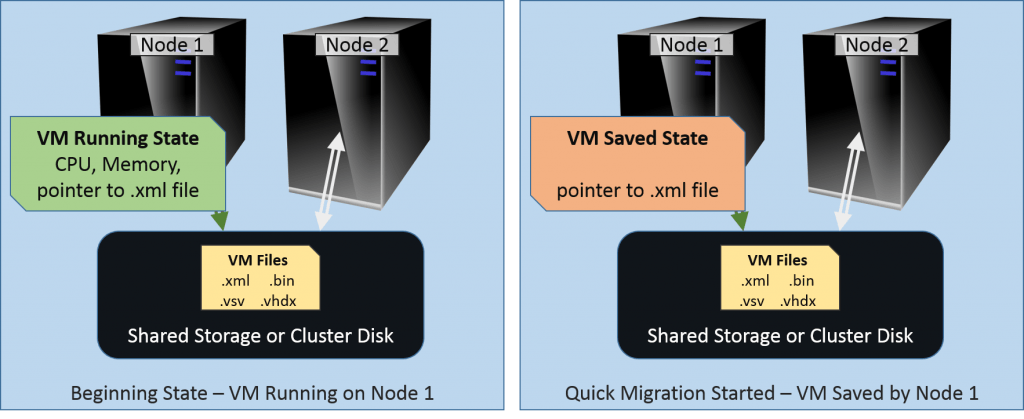
Quick Migration Phase 1
Next, the cluster makes a copy of that symbolic link on the target node and, if the virtual machine’s files are on a Cluster Disk, transfers ownership of that disk to the target node. The symbolic link is removed from the source host so that it only exists on the target. Finally, the virtual machine is resumed from its Saved State, if it was running when the process started:
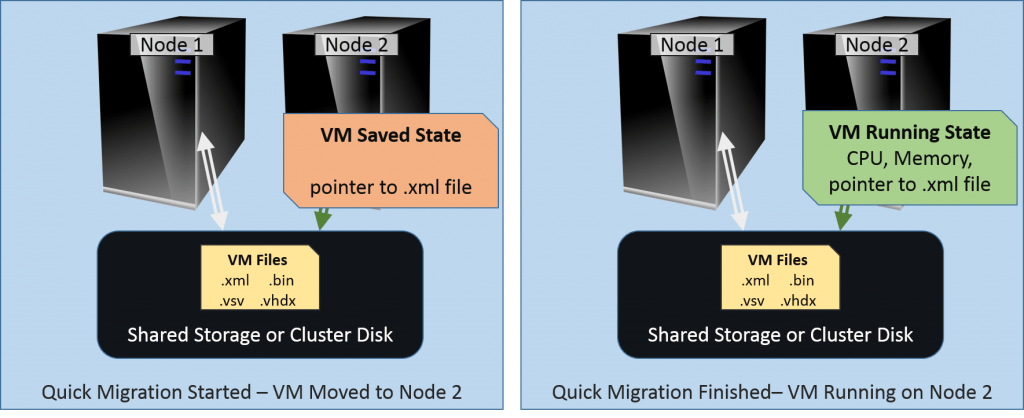
Quick Migrations Phase 2
If the virtual machine was running when the migration occurred, the amount of time required for the operation to complete will be determined by how much time is necessary for all the contents of memory to be written to disk on the source and then copied back to memory on the destination. Therefore, the total time necessary is a function of the size of the virtual machine’s memory and the speed of the disk subsystem. The networking speed between the two nodes is almost completely irrelevant, because only information about the symbolic link is transferred.
If the virtual machine wasn’t running to begin with, then the symbolic link is just moved. This process is effectively instantaneous. These symbolic links exist in C:ProgramDataMicrosoftWindowsHyper-VVirtual Machines on every system that runs Hyper-V. Although it’s rare anymore, the system drive might not be C:. You can always find the root folder by using the ProgramData global environment variable. In the command-line environment and Windows, that variable is %PROGRAMDATA%. In PowerShell, it is $env:ProgramData.
The cluster keeps track of a virtual machine’s whereabouts by creating a resource that it permanently assigns to the virtual machine. The nodes communicate with each other about protected items by referring to them according to their resource. They can be viewed at HKEY_LOCAL_MACHINEClusterResources on any cluster node. Do not modify the contents of this registry key!
Live Migration
There are a few varieties of Live Migration. In official terms, when you see only the two words “Live Migration” together, that indicates a particular operation with the following characteristics:
- Only a brief outage occurs. Applications within the virtual machine will not notice any downtime. Clients connecting over the network might, especially if they use UDP or other lossy protocols. Live Migration should always recover the guest on the target host within the TCP timeout window.
- Requires the source and target hosts to be in the same failover cluster
- Requires the source and target hosts to be able to access the same storage, although not necessarily simultaneously
- Can be used by virtual machines on Cluster Disks, Cluster Shared Volumes, and SMB 3 shares
- The virtual machine must be running
- Only virtual machine ownership and its active state changes hands; files do not move
- More likely to fail than a Quick Migration, especially when pass-through disks and questionable security policies are involved
- Designed so that failures do not affect the running virtual machine except in extremely rare situations. If a failure occurs, the virtual machine should continue running on the source host without interruption.
- Used by a failover cluster to move all except low priority virtual machines during a Drain operation (automatic during a controlled host shutdown)
- The virtual machine does not know that anything changed (unless something is monitoring the Hyper-V Data Exchange KVP registry section). While time in the virtual machine is affected, the differences are much less impacting than with Quick Migration.
There are numerous similarities between Quick Migration and Live Migration, with the most important being that the underlying files do not move. The biggest difference is, of course, that the active state of the virtual machine is moved without taking it offline.
Anatomy of a Live Migration
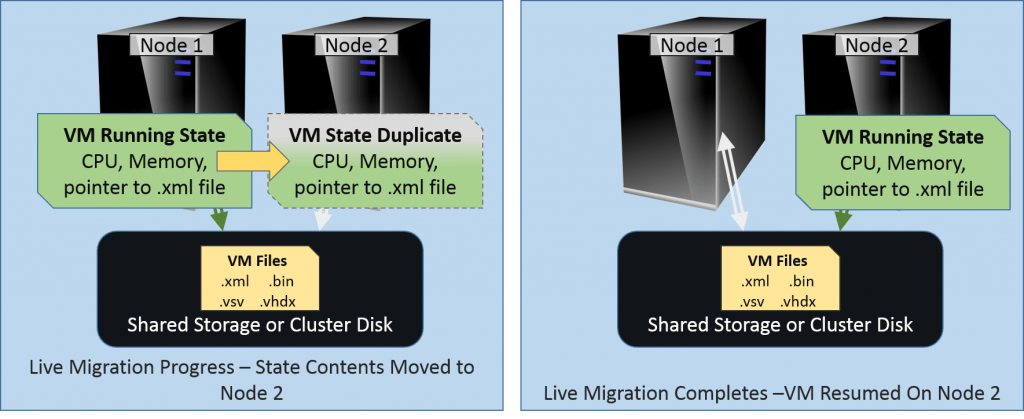
The following diagrams show the process of a Live Migration.
To start, a shallow copy of the virtual machine is created on the target node. At this time, the cluster does some basic checking, such as validating that the target host can receive the source virtual machine – sufficient memory, disk connectivity, etc. It essentially creates a shell of the virtual machine:
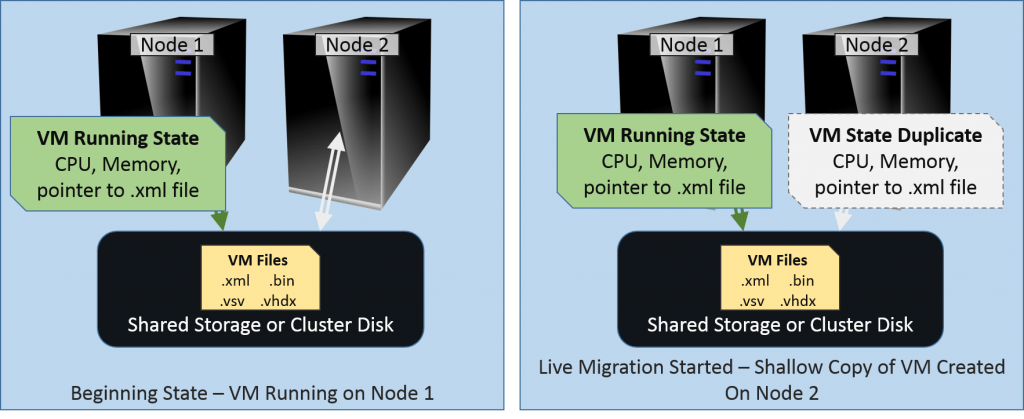
Live Migration Phase 1
Once the shell is created, the cluster begins copying the contents of the virtual machine’s memory across the network to the target host. At the very end of that process, CPU and I/O are suspended and their states, along with any memory contents that were in flux when the bulk of memory was being transferred, are copied over to the target. If necessary, ownership of the storage (applicable to Cluster Disks and pass-through disks) is transferred to the target. Finally, operations are resumed on the target:
Live Migration Phase 2
While not precisely downtime-free, the interruption is almost immeasurably brief. Usually the longest delay is in the networking layer while the virtual machine’s MAC address is registered on the new physical switch port and its new location is propagated throughout the network.
The final notes in the Quick Migration section regarding the cluster resource are also applicable here.
It is not uncommon for Live Migration to be slower than Quick Migration for the same virtual machine. Where the speed of Quick Migration is mostly dependent upon the disk subsystem, Live Migration relies upon the network speed between the two hosts. It’s not unusual for the network to be slower and have more contention.
Settings that Affect Live Migration Speed
There are a few ways that you can impact Live Migration speeds.
Maximum Concurrent Live Migrations
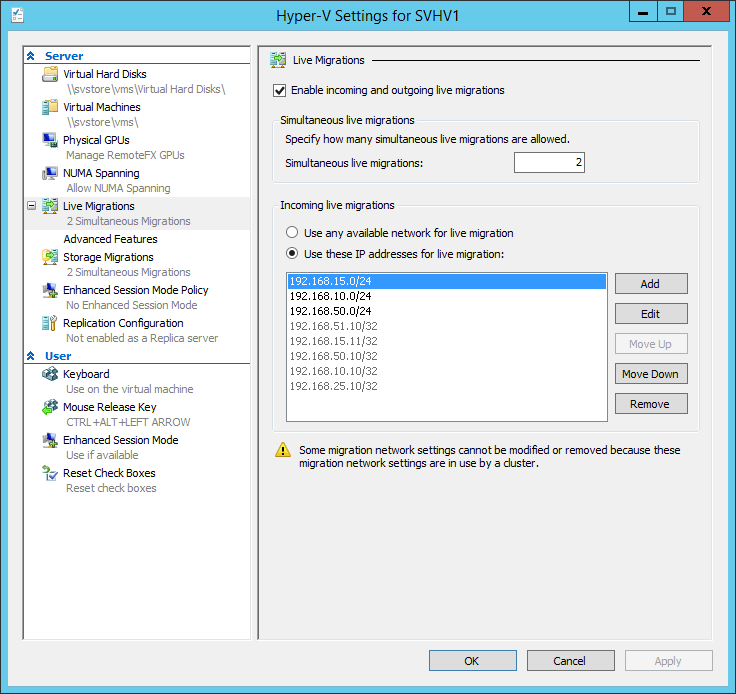
The first is found in the host’s Hyper-V settings with a simple limit on how many Live Migrations can be active at a time:
Basic Live Migration Settings
At the top of the screen, you can select the number of simultaneous Live Migrations. Using Failover Cluster Manager or PowerShell, you can direct the cluster to move several virtual machines at once. This setting controls how many will travel at the same time. How this setting affects Live Migration speed depends upon your networking configuration performance options.
If you only have a single adapter enabled for Live Migration, then this setting has a very straightforward effect. If the number is higher, individual migrations will take longer. If the number is lower, any given migration will be faster but queued machines will wait longer for their turn. Overtly, this does not truly affect the total time for all machines to migrate. However, you should remember from the previous discussion that the virtual machine must be paused for the final set of changes to be transferred. If you have a great many virtual machines moving at once, that delay might need to be longer as there won’t be as much bandwidth available for that final bit. Differences will likely be minimal.
Other effects this setting can have will be discussed along with the following Performance options setting.
Before moving on, note that the networks list in the preceding screenshot is not applicable to this type of Live Migration. We’ll revisit it in the Shared Nothing Live Migration section.
Live Migration Transmission Methods
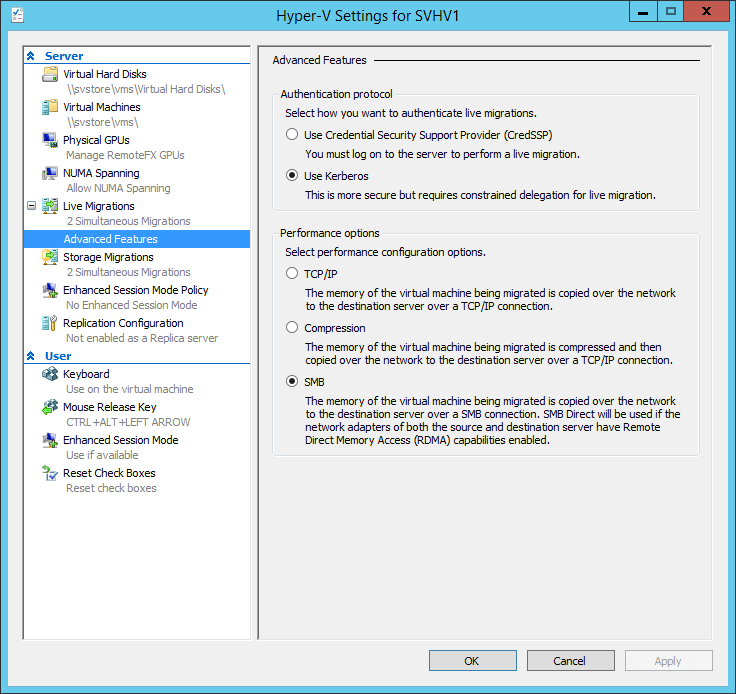
The second group of speed-related settings are found on the host’s advanced Live Migration settings tab, visible in this screenshot:
Live Migration Advanced Settings
We’re specifically concerned with the Performance options section. There are three options that you can choose:
- TCP/IP: This is the traditional Live Migration method that started with 2008 R2. It uses a single TCP/IP stream for each Live Migration.
- Compression: This option is new beginning in 2012. As the text on the screen says, data to be transmitted is first compressed. This can reduce the amount of time that the network is in use, and sometimes dramatically since memory contents usually compress very well. The drawback is that the source and destination CPUs have to handle the compression and decompression cycles. Unless you have old or overburdened CPUs, the Compression method is usually superior to the TCP/IP method.
- SMB: The SMB method is also new with 2012. By using SMB, your Live Migrations are given the opportunity to make use of the new advanced features of the third generation of the SMB protocol, including SMB Direct and SMB Multichannel.
These choices can be deceptively simple or blindly confusing, depending on your experience with all of these technologies. In addition to the stated text, their efficacy is dependent upon your networking configuration and the number of simultaneous Live Migrations. There are a few ways to quickly cut through the fog:
- When conditions are ideal, the SMB method is the fastest. Many conditions must be met. First, your adapters must support RDMA. Most gigabit adapters do not have this feature. Furthermore, RDMA doesn’t work when the adapter is hosting a Hyper-V virtual switch (this will change in the 2016 version). Without RDMA, SMB Multichannel does function, but the cumulative speed is not better than the TCP/IP method. While RDMA can work on a team when no Hyper-V switch is present, SMB won’t create multiple channels unless multiple unique IPs are designated, so only one adapter will be used. Therefore, only use SMB when all of the following are true:
- The adapters to use for SMB support RDMA
- The adapters to use for SMB are not part of a Hyper-V switch
- The adapters to use for SMB are unteamed
- The Compression method should be preferred to the TCP/IP method unless you are certain that insufficient CPU is available for the compression/decompression cycle. The network transfer portion functions identically.
- The TCP/IP and Compression methods will create a unique TCP/IP stream for every concurrent Live Migration. Therefore, you have two methods to distribute Live Migration traffic across multiple adapters:
- Dynamic and address hash load-balancing algorithms on a network team. The source port used in each concurrent Live Migration is unique, which will allow both of these algorithms to balance the transmission across unique adapters. Dynamic can rebalance migrations in-flight, resulting in the greatest possible throughput. This is, of course, dependent upon the configuration and conditions of the target. Consider setting your maximum concurrent Live Migrations to match the number of adapters in your team.
- Unique physical or virtual adapters. If multiple adapters are assigned to Live Migration, the cluster will distribute unique Live Migrations across them. If the adapters are virtual and on a team of physical adapters, any of the load-balancing algorithms will attempt to distribute the load. Consider setting your maximum concurrent Live Migrations to match the number of physical adapters used.
Network QoS for Live Migration
The third method involves setting network Quality of Service. This is a potentially complicated topic and is not known for paying dividends to those who overthink it. My standing recommendation is that you not manipulate QoS until you have witnessed a condition that proves its usefulness.
Microsoft has an article that covers multiple possible QoS configurations and includes the PowerShell commands necessary. It’s worth a read, but you must remember that these are just examples.
If you’re using the SMB mode for Live Migration, there are some special cmdlets that you’ll want to be aware of. Jose Barreto has documented them well on his blog.
Storage [Live] Migration
Starting with the 2012 version, Hyper-V now has a mechanism to relocate the storage for a virtual machine, even while it is turned on. It is utilizes some of the same underlying technology that allows differencing virtual hard disks to function and to merge them back into their parents while they are in use. This feature has the following characteristics:
- Does not require the virtual machine to be clustered
- Target storage can be anywhere that the owning host has access to – local or remote
- Despite the name, Storage Live Migration is not a Live Migration. Storage Live Migration does not require the virtual machine to change hosts. Whereas Quick and Live Migrations are handled by the cluster, Storage Live Migrations are handled by the Virtual Machine Management Service (VMMS).
- Storage Live Migration is designed to remove the source files upon completion, but will often leave orphaned folders behind.
- VHD/X files are moved first, then the remaining files.
- If the source files are on a Cluster Disk, that disk will be unassigned from the virtual machine and placed in the cluster’s Available Storage category.
The Anatomy of a Storage Live Migration
Conceptually, Storage Live Migration is a much simpler process than either Quick Migration or Live Migration. If the virtual machine is off, the files are simply copied to the new location and the virtual machine’s configuration files are modified to point to it. If the virtual machine is on, the transfer operates much like a differencing disk: writes occur on the destination and reads occur from wherever the data is newest. Of course, that’s only applicable to the virtual disk files. All others are just moved normally.
Storage Live Migration and Hyper-V Replica
I have fielded several questions about moving the replica of a virtual machine. If you’ve configured Hyper-V Replica, you know that your only storage option when setting it up is a singular default storage location per remote host. You can’t get around that. However, what seems to slip past people is that it is, just as its name says, a default location — it is not a permanent location. Once the replica is created, it is a distinct virtual machine. You are free to use Storage Live Migration to relocate any Replica anywhere that its host can reach. It will continue to function normally.
Shared Nothing Live Migration
Shared Nothing Live Migration is the last of the migration modes. I placed it here because it’s a sort of “all of the above” mode, with a single major exception: you cannot perform a Shared Nothing Live Migration (which I will hereafter simply call SNLM) on a clustered virtual machine. This does not mean that you cannot use SNLM to move a virtual machine to or from a cluster. The purpose of SNLM is to move virtual machines between hosts that are not members of the same cluster. This usually involves a Storage Live Migration as well as a standard Live Migration, all in one operation.
Many of the points from Live Migration and Storage Live Migration apply to Storage Live Migration as well. To reduce reading fatigue, I’m only going to point out the most important points:
- Source and target systems only need to be Hyper-V hosts in the same or trusting domains.
- The virtual machine cannot be clustered.
- You can use SNLM to move a guest from a host running 2012 to a host running 2012 R2. You cannot move the other way.
- If the VM’s files are on a mutually accessible SMB 3 location, you do not need to relocate them.
- The settings as shown under the Maximum Concurrent Live Migrations section near the top of this article


Not a DOJO Member yet?
Join thousands of other IT pros and receive a weekly roundup email with the latest content & updates!


15 thoughts on "A step-by-step guide to understand Hyper-V Live Migration"
Thank you for the clear information
Keep up the good work!
It is really useful information. Thanks for it.