Save to My DOJO
Table of contents
When you install Hyper-V or a copy of Windows Server for the express purpose of running the Hyper-V role, its default configuration for the page file (also called a swap file) is generally wasteful, although not harmful. Page files for individual virtual machines are tuned in the same fashion as normal physical machines, but there are a couple of things to think about that are unique to VMs.
Parent Partition Page File Tuning
Hyper-V itself doesn’t really use the page file much. It will only ever page a couple of hundred megabytes of its own. Hyper-V never pages memory assigned to virtual machines. The virtual machines themselves will page, but they’ll do so within their own VHDs and will not involve themselves with any hypervisor paging. Despite this, Hyper-V allocates page file space at installation time the same way that a Windows Server 2008 R2 installation would, which is usually at a 1:1 ratio with RAM. Since Hyper-V won’t be using that and you probably have a lot more physical RAM in your hypervisor host than you would in a typical server computer, the page file is probably a lot larger than it needs to be. If you’re using a full installation of Windows Server with Hyper-V installed as a role and that server is performing other tasks, then you’ll need to tune the page file around those other roles and applications, not Hyper-V.
Even though Hyper-V doesn’t exploit the page file, it is generally not a good idea to disable it entirely. The parent partition can make some use of it even though Hyper-V won’t. For a single-purpose server, the usage will be very minimal, so there really aren’t any hard rules or best practices in terms of sizing. Microsoft recommends that you not place any virtual machines on the same drives with the page file (or any other system file), but sizing is left up to you.
Using WMIC to Adjust Page File Settings in Hyper-V or Windows Server (including Core)
Note: If you’re using a GUI installation of Windows, all of these commands are run from a command-line and you must open it using “Run as Administrator.” WMIC is the command-line interface for the Windows Management Interface (WMI). The entire WMIC vocabulary and syntax is complex and powerful. This article will only present a tiny subset of its full capabilities and will only provide an explanation of the output of a given command. For more information on WMIC, please see the TechNet documentation. These commands are not case-sensitive, but special casing has been used where it might add clarity.
Only make changes to the page file during scheduled maintenance windows. Some are instant, others will require a reboot after completion, but it is always best to reboot once you have all settings at the desired configuration.
If your Hyper-V deployment has been in place for a while with default settings, the system can give you some guidance on sizing. Run “WMIC PAGEFILE GET /VALUE“. Of special interest here is “AllocatedBaseSize”, “CurrentUsage” and “PeakUsage”. These numbers are all presented in megabytes. If PeakUsage is very low in contrast to the “AllocatedBaseSize” and the system has experienced normal or heavy loads since its last reboot, then your page file is almost undoubtedly larger than it needs to be. If PeakUsage is high, then it isn’t as easy to say; you don’t know from this alone if that was a one-time occurrence or if it is normative. If “CurrentUsage” is high in relation to “AllocatedBaseSize”, then the setting may be accurate or even too low. For most systems running only Hyper-V, the usage numbers will probably only be a few hundred. Remember that this is only a quick metric; the best way to find out for certain is to run Performance Monitor against the system for at least 24 hours while it is operating under normal loads.
From this point onward, the mechanism for making changes has been best described and documented on Sander Berkouwer’s blog. As those instructions were written with Server Core in mind, they don’t provide the necessary context for a Hyper-V discussion so the relevant commands will be placed inline throughout the next few paragraphs. If you use Mr. Berkouwer’s references, start at the “Windows Server 2008 (post-Beta 3)” heading.
If you intend to change the page file setting, the first thing to do is find out if your system’s page file has been manually set or if Windows is controlling it. Run:
WMIC COMPUTERSYSTEM GET AutomaticManagedPagefile /VALUE
If the response is “AutomaticManagedPagefile=TRUE”, then Windows is managing the settings for you. In order to make any changes, you’ll need to change it to manual management. To do this, run:
WMIC COMPUTERSYSTEM WHERE NAME=”%COMPUTERNAME%” SET AutomaticManagedPagefile=False
After running this command, the existing page file is converted to manual control and is fixed at the size it was at conversion time.
The next step is to set the page file to an appropriate size. To reiterate, there is no standardized size for Hyper-V. There is no harm in leaving it at its default overblown size unless the containing drive needs more space. It might be possible to reduce it as far as 512MB, although this could cause problems if any management applications are installed on the system. If you’re not sure, 2GB is a reasonable starting place. To use that, run:
WMIC PAGEFILESET WHERE NAME=”C:\PAGEFILE.SYS” SET INITIALSIZE=2048,MAXIMUMSIZE=2048
If the command is unsuccessful and you have just set the mode to manual, reboot and try again. If you have installed additional drives or created partitions and you’d like to move the swap file from the C: drive or create additional swap files elsewhere, follow Mr. Berkouwer’s blog. In this case, because Hyper-V needs so little swap space, this is probably not beneficial. Once you’re satisfied with your settings, reboot the server.
Changing Page File Settings in the Windows GUI
You’ll still need to use the WMIC commands from the previous section to check on usage (or run a full Performance Monitor scan), but changing the page file settings can be done in the Windows GUI. To do so:
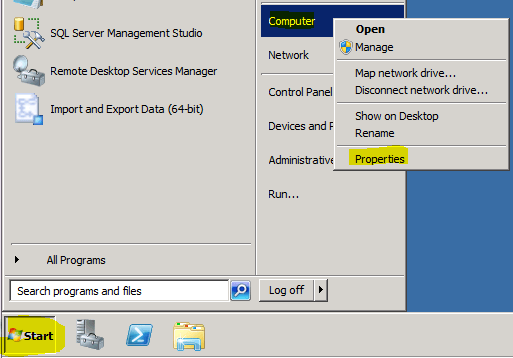
Click the Start Orb. Right-click on “Computer” and go to “Properties”.
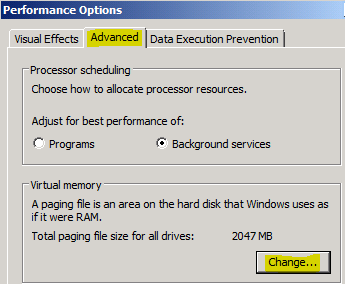
Click “Advanced System Settings” on the left. In the dialog box, change to the “Advanced” tab and click the “Settings…” button under “Performance”.
Switch to the “Advanced” tab in this dialog as well and click the “Change…” button.
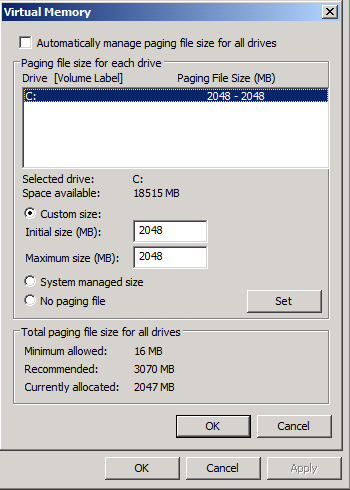
If the “Automatically manage paging file size for all drives” box is checked, Windows is handling paging for you. Clear this box to manually adjust the settings. Compare the “Recommended” and “Currently Allocated” numbers at the bottom to gain an idea of how Windows believes you should set the page file. This is not as enlightening as running a Performance Monitor, but it is a decent “at-a-glance” idea. In the center of the dialog, change to “Custom Size” and enter the values you wish. As before, if you’re not sure and you’re only running Hyper-V, 2048 is a decent number. Having different initial and maximum numbers can lead to fragmentation of the swap file but for a Hyper-V deployment this probably has no real impact. Once you’re comfortable with your settings, press the “Set” button and OK all the way out. You will typically be informed that you need to reboot after making these changes, and you should definitely do so.
Virtual Machine Page File Tuning
Tuning a page file for a virtual machine is not significantly different from tuning for a physical server. There is one restriction: you cannot place a virtual machine’s swap file on a VHD that is attached to the virtual SCSI chain. This is because the SCSI driver is synthetic, so it doesn’t load until after the virtual machine’s operating system has attempted to initialize its page file. You must place swap files for virtual machines on VHDs attached to the IDE chain. The IDE drives are emulated, so they are visible to the virtualized operating system prior to loading any drivers and the swap file can be properly initialized.
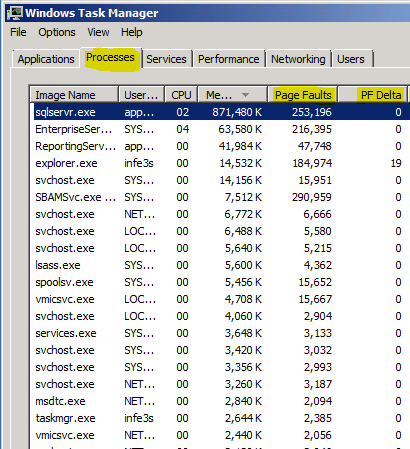
The performance impact of using a virtual IDE drive instead of a virtual SCSI drive for the page file is trivial. The underlying hardware is identical in either case. The quality of the emulated IDE layer has been tuned to the point that only the most demanding workloads could uncover any differences, and page files should not be subjected to demanding workloads. It is true that the page file is used as an extension of system RAM so its contents need to be available fairly quickly, but a properly tuned system is only going to be paging RAM that is rarely used. Windows should not be using the page file so much that any differences are even measurable. The best way to see if your virtual machine (or any Windows machine) is paging too much is to run a performance counter log on page faults per second. A “page fault” occurs when Windows tries to retrieve an item from RAM and doesn’t find it, which means it has been paged. You can see this in real-time in Task Manager. On the Processes tab, go to View->Select Columns and check the box for “Page Faults” and “Page Fault Delta”. The Page Faults column shows how many times the process has faulted since it was started. The PF Delta column indicates how many page faults are occurring between updates, so it lends extra meaningfulness to the Page Faults column. If the PF Delta column is consistently high, then there’s a chance the VM is paging too much. This should be corroborated by a full performance trace, though. The best way to reduce paging is to increase the RAM allotment of the virtual machine.


Not a DOJO Member yet?
Join thousands of other IT pros and receive a weekly roundup email with the latest content & updates!


11 thoughts on "Hyper-V Page File Settings"
One of the more cogent presentations of pagefile tuning I’ve ever stumbled across, succinct and to the point. Made all the more interesting based on the useful guidance on pagefile sizing for Hyper-V servers. Despite having read several books on Hyper-V server, I’ve never stumbled across such definitive guidance. Thank you.
[…] If you are looking for a really thorough blog on pagefile settings in R2, please visit this blog. […]