Save to My DOJO
Table of contents
When Windows Server 2012 R2 hit the datacenter, and with it a new version of Microsoft Hyper-V, it offered the option to create a new kind of virtual machine. These “Gen 2”, or generation 2, virtual machines These VMs can now support UEFI boot, among other features. However, they also require a specific disk configuration. If you’ve been reading this blog for a while, you should have seen my other articles on creating and managing VHD and VHDX files using Windows PowerShell. So now it seems, we need to see what it takes to create one of these new Gen 2 devices which by the way are only compatible with 64-bit flavors of Windows 8.1 and Windows Server 2012 R2.
To follow along, you will need to be running the most current version of Hyper-V, either on a server or a Windows 8.1 client. In addition to PowerShell 4.0 you will also need the Storage module. As you will see, you will need to create and format some partitions and the Storage cmdlets are very convenient. Let’s begin by defining a variable that holds the path to the new disk file, which has to be a VHDX file
Creating the VHDX file is pretty easy.
$path = "D:VHDGen2Demo.vhdx"
$disk = New-VHD -Path $path -Dynamic -SizeBytes 25GB
The New-VHD cmdlet doesn’t know how to create a Gen 2 disk, so we’ll have to handle that ourselves. First, you need to mount the disk image.
Mount-DiskImage -ImagePath $path
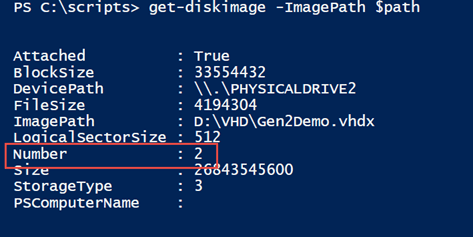
You will be referring to this disk several times which you will be able to do with its number.

Let’s save that value to a variable.
$disknumber = (Get-DiskImage -ImagePath $path).Number
The first step in the process is to initialize the disk with a GPT partition, which is what makes it a Gen 2 disk.
Initialize-Disk -Number $disknumber -PartitionStyle GPT
Next, create the recovery partition and while you are at it, go ahead and format it as well.
New-Partition -DiskNumber $disknumber -GptType '{de94bba4-06d1-4d40-a16a-bfd50179d6ac}' -Size 300MB | Format-Volume -FileSystem NTFS -NewFileSystemLabel "Windows RE Tools" -confirm:$false
This is a one line Powershell command. I’m using the –confirm:$false parameter in Format-Volume to suppress being prompted to continue. It is recommended to mark this partition as protected so that it can’t be removed. However, there are no cmdlets that will do that so you’ll have to turn to the DISKPART command line utility.
Fortunately, this is easy to use in PowerShell because DISKPART has a rudimentary automation interface. But, you will need to know the partition number for the Recovery partition.

We’ll save that result to a variable as well.
$partitionNumber = (get-disk $disknumber | Get-Partition | where {$_.type -eq 'recovery'}).PartitionNumber
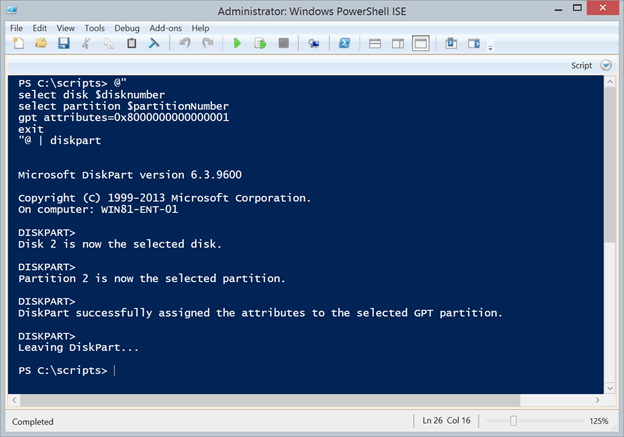
With this, you can pipe directions to DISKPART with a here string.
@"
select disk $disknumber
select partition $partitionNumber
gpt attributes=0x8000000000000001
exit
"@ | diskpart

Next, you need to create the System partition. You might think it would be as easy as the Recovery partition and I certainly was as too. Unfortunately, there appears to be a bug with formatting a System partition on this type of disk.
Format-Volume : No matching MSFT_Volume objects found by CIM query for enumerating instances of the ROOT/Microsoft/Windows/Storage/MSFT_Volume class on the CIM server, that are associated with the following instance: MSFT_Partition (DiskId = "\?scsi#disk&ven_msft&prod_virtual_dis..., Offset = 449839104). Verify query parameters and retry.

At C:ScriptsNew-Gen2VHD.ps1:106 char:5

+ Format-Volume -FileSystem FAT32 -NewFileSystemLabel "System"
+ ~~~~~~~~~~~~~~~~~~~~~~~~~~~~~~~~~~~~~~~~~~~~~~~~~~~~~~~~~~~~
+ CategoryInfo : ObjectNotFound: (MSFT_Volume:String) [Format-Volume], CimJobException
+ FullyQualifiedErrorId : CmdletizationQuery_NotFound,Format-Volume
You can still create the partition with PowerShell, but you’ll need to use DISKPART to format it. Or you could use DISKPART for the entire step.
$sysPart = New-Partition -DiskNumber $disknumber -GptType '{c12a7328-f81f-11d2-ba4b-00a0c93ec93bc}' -Size 100MB
I saved the output to a variable so that I could grab the partition number which I can then use with a DISKPART command.
$systemNumber = $sysPart.partitionNumber

"@
select disk $disknumber
select partition $systemNumber
format quick fs=fat32 label=System
exit
@" | diskpart
Next, you need to create a small, unformatted reserved partion or MSR. 128MB is the recommended size.
New-Partition -disknumber $disknumber -GptType '{e3c9e316-0b5c-4db8-817d-f92df00215ae}' -Size 128MB
All that remains is to create a partition for the operating system, using all of the remaining space.
New-Partition -DiskNumber $disknumber -UseMaximumSize
While you could get by with this configuration, Microsoft recommends you create a partition for the recovery image after the operating system partition. If you look through the Microsoft DISKPART example, they all use a 15GB partition, so I will do the same. This means though, that my operating system partition can only use any space left after allowing for the other partitions. So if I start with a 25GB drive, subtracting the Recovery Tools (300MB), System (100MB), MSR (128MB) and the 15GB recovery image, I’m left with a smaller partition. So instead of the previous command I can run this.
$winsize = (25gb-300mb-100mb-128mb-15gb)
New-Partition -DiskNumber $disknumber -size $winsize
Finally, I can create the recovery image partition.
New-Partition -DiskNumber $disknumber -GptType '{de94bba4-06d1-4d40-a16a-bfd50179d6ac}' -UseMaximumSize | Format-Volume -FileSystem NTFS -NewFileSystemLabel "Windows Recovery" -confirm:$false
Yeah, I’m using maximum size but it should be pretty close the 15GB that should be left.
At this point you have some options, which I’ll cover in another article. But for now, this is complete. This partition is unformatted under the assumption that you will format it during the install process. The final step is to dismount the disk.
Dismount-DiskImage -ImagePath $path
Now it is ready to use in a new Gen 2 Hyper-V virtual machine.
$param=@{
Name = "Demo Gen2 VM"
MemoryStartupBytes = 512MB
VHDPath = $path
Generation = 2
SwitchName ="Work Network"
BootDevice = "CD"
}

New-VM @param
It is important to configure the VM to boot for CD or something other than the VHD, since there is no operating system. When you start the virtual machine you should be able to install the OS from a DVD or ISO file.
But since creating generation 2 disks is likely to be a repeatable process, how about a tool? Here is a function I wrote to create a Gen 2 disk.
#requires -version 4.0
#requires -modules Hyper-V,Storage
#requires -RunAsAdministrator

Function New-Gen2Disk {
<#
.SYNOPSIS
Create a Generation 2 VHDX
.DESCRIPTION
This command will create a generation 2 VHDX file. Many of the parameters are
from the New-VHD cmdlet. The disk name must end in .vhdx.

The disk will be created with these partitions in this order:

300MB Recovery Tools
100MB System
128MB MSR
Windows
15GB Recovery Image

The size of the windows partition will be whatever is left over give or take a few KB.

.EXAMPLE
PS C:> New-Gen2Disk d:disksdisk001.vhdx -dynamic -size 50GB
#>

[cmdletbinding(SupportsShouldProcess)]
Param(
[Parameter(Position=0,Mandatory,HelpMessage="Enter the path for the new VHDX file")]
[ValidateNotNullorEmpty()]
[ValidatePattern(".vhdx$")]
[ValidateScript({
  #get parent
  if (Split-Path $_ | Test-Path) {
    $True
  }
  else {
    Throw "Failed to find parent folder for $_."
  }

})]
[string]$Path,
[ValidateRange(25GB,64TB)]
[uint64]$Size=25GB,
[switch]$Dynamic,
[UInt32]$BlockSizeBytes=2MB,
[ValidateSet(512,4096)]
[Uint32]$LogicalSectorSizeBytes=512,
[ValidateSet(512,4096)]
[Uint32]$PhysicalSectorSizeBytes=512

)

#initialize some variables
$RESize = 300MB
$SysSize = 100MB
$MSRSize = 128MB
$RecoverySize = 15GB

Write-Verbose "Creating $path"

#verify the file doesn't already exist
if (Test-Path -Path $path) {
    Throw "Disk image at $path already exists."
    #bail out
    Return
}

#create the VHDX file
Write-Verbose "Creating the VHDX file for $path"
$vhdParams=@{
 ErrorAction= "Stop"
 Path = $Path
 SizeBytes = $Size
 Dynamic = $Dynamic
 BlockSizeBytes = $BlockSizeBytes
 LogicalSectorSizeBytes = $LogicalSectorSizeBytes
 PhysicalSectorSizeBytes = $PhysicalSectorSizeBytes
}

Try {
  Write-verbose ($vhdParams | out-string)
  $disk = New-VHD @vhdParams

}
Catch {
  Throw "Failed to create $path. $($_.Exception.Message)"
  #bail out
  Return
}

if ($disk) {
    #mount the disk image
    Write-Verbose "Mounting disk image"

    Mount-DiskImage -ImagePath $path
    #get the disk number
    $disknumber = (Get-DiskImage -ImagePath $path | Get-Disk).Number

    $WinPartSize = (Get-Disk -Number $disknumber).Size - ($RESize+$SysSize+$MSRSize+$RecoverySize)

    #initialize as GPT
    Write-Verbose "Initializing disk $DiskNumber as GPT"
    Initialize-Disk -Number $disknumber -PartitionStyle GPT

    #clear the disk
    Write-Verbose "Clearing disk partitions to start all over"
    get-disk -Number $disknumber | Get-Partition | Remove-Partition -Confirm:$false

    #create the RE Tools partition
    Write-Verbose "Creating a $RESize byte Recovery tools partition on disknumber $disknumber"
    New-Partition -DiskNumber $disknumber -GptType '{de94bba4-06d1-4d40-a16a-bfd50179d6ac}' -Size $RESize |
    Format-Volume -FileSystem NTFS -NewFileSystemLabel "Windows RE Tools" -confirm:$false | Out-null

   $partitionNumber = (get-disk $disknumber | Get-Partition | where {$_.type -eq 'recovery'}).PartitionNumber

    Write-Verbose "Retrieved partition number $partitionnumber"

    #run diskpart to set GPT attribute to prevent partition removal
    #the here string must be left justified
@"
select disk $disknumber
select partition $partitionNumber
gpt attributes=0x8000000000000001
exit
"@ | diskpart | Out-Null

    #create the system partition
    Write-Verbose "Creating a $SysSize byte System partition on disknumber $disknumber"
    <#
     There is a known bug where Format-Volume cannot format an EFI partition
     so formatting will be done with Diskpart
    #>

    $sysPartition = New-Partition -DiskNumber $disknumber -GptType '{c12a7328-f81f-11d2-ba4b-00a0c93ec93bc}' -Size $SysSize

    $systemNumber = $sysPartition.PartitionNumber

    Write-Verbose "Retrieved system partition number $systemNumber"
"@
select disk $disknumber
select partition $systemNumber
format quick fs=fat32 label=System
exit
@" | diskpart | Out-Null

    #create MSR
    write-Verbose "Creating a $MSRSize MSR partition"
    New-Partition -disknumber $disknumber -GptType '{e3c9e316-0b5c-4db8-817d-f92df00215ae}' -Size $MSRSize | Out-Null

    #create OS partition
    Write-Verbose "Creating a $WinPartSize byte OS partition on disknumber $disknumber"
    New-Partition -DiskNumber $disknumber -Size $WinPartSize | Out-Null

    #create recovery
    Write-Verbose "Creating a $RecoverySize byte Recovery partition"
    $RecoveryPartition = New-Partition -DiskNumber $disknumber -GptType '{de94bba4-06d1-4d40-a16a-bfd50179d6ac}' -UseMaximumSize | Out-Null
    $RecoveryPartitionNumber = $RecoveryPartition.PartitionNumber

    $RecoveryPartition | Format-Volume -FileSystem NTFS -NewFileSystemLabel "Windows Recovery" -confirm:$false

    #run diskpart to set GPT attribute to prevent partition removal
    #the here string must be left justified
@"
select disk $disknumber
select partition $RecoveryPartitionNumber
gpt attributes=0x8000000000000001
exit
"@ | diskpart | Out-Null

    #dismount
    Write-Verbose "Dismounting disk image"

    Dismount-DiskImage -ImagePath $path

    #write the new disk object to the pipeline
    Get-Item -Path $path

} #if $disk

} #end function
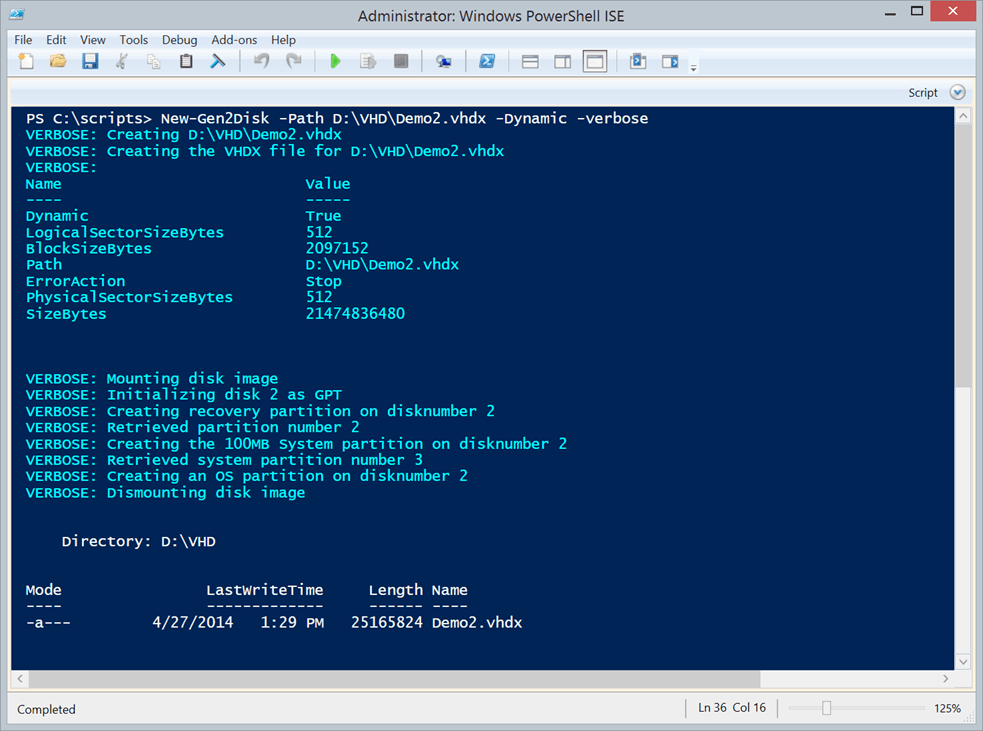
Here’s the function in action.

If you are thinking building new virtual machines as generation 2, then I think this tool will come in quite handy. In my next article we’ll explore some other steps you can take with the VHDX file prior to creating your VM.


Not a DOJO Member yet?
Join thousands of other IT pros and receive a weekly roundup email with the latest content & updates!


6 thoughts on "Creating a Generation 2 Disk with PowerShell"
Hi Jeffrey. Nice post, thanks a lot. I try to create a VM template based on such a VHDX. I use imagex.exe to apply my customized WIM file to the system partition. So far so good, works. But when creating the boot entries with “V:windowssystem32bcdboot V:windows /s V:” (where V is the mounted system partition of my virtual disk), i am not able to get the vhdx bootable. Do you have any tips how i can manage this?
I got an error about invalid GPT type.
according to
https://technet.microsoft.com/library/fd9eaa13-fd1a-4c95-a03e-842dbd1604be(v=wps.630).aspx
The System Partition should be {c12a7328-f81f-11d2-ba4b-00a0c93ec93b}
thanks
I know it’s very old, but just in case others are wondering: In his example, he created a efi partition, which is what the (uefi) bios will use to boot the gpt disk. Thus, it is very likely, that you should have assigned a letter to the efi partition (system), and used THAT letter instead of V: at the end.
Again, not tried this, but just makes sense, and is for anyone reading it nowadays.
Mali
By default, the New-Partition cmdlet creates a basic GPT data partition.
The GUIDs of valid types are:
• System Partition – “{c12a7328-f81f-11d2-ba4b-00a0c93ec93b}”
• Microsoft Reserved – “{e3c9e316-0b5c-4db8-817d-f92df00215ae}”
• Basic data – “{ebd0a0a2-b9e5-4433-87c0-68b6b72699c7}”
• Microsoft Recovery – “{de94bba4-06d1-4d40-a16a-bfd50179d6ac}”
From